Browser compatibility is essential to web development as browsers keep evolving with the latest features and UX. And it happens that current-day websites may not be fully functional on older browsers. Chrome, being the most comprehensive browser used today, it is evident why one would want to make their website Chrome compatible.Fortunately, Chrome provides a Chrome Compatibility Mode feature to help with that.
Overview
What is Chrome Compatibility Mode?
- A Chrome feature that lets testers simulate older versions of Chrome.
- Helps identify layout, design, and functional issues that only appear on legacy browsers.
- Acts similar to IE’s old compatibility view.
How to Enable Chrome Compatibility Mode (Windows)
- Navigate to Chrome’s destination folder.
- Right-click → Properties.
- Open Compatibility tab.
- Select OS from dropdown → “Run this program in compatibility mode for.”
- Apply + Confirm → Chrome runs in compatibility mode.
Debugging with Compatibility Mode
Steps to troubleshoot Chrome-specific issues:
- Enable compatibility mode.
- Run Compatibility Troubleshooter.
- Select problem type + Windows version.
- Test program → confirm if issue resolved.
- Save settings for future runs.
This article explains Chrome Compatibility mode, how to enable it, and how to debug Cross Browser Compatibility of a Web App for different browser versions.
What is Chrome Compatibility Mode?
Google Chrome offers a feature called the Chrome compatibility mode, which allows testers to explore older versions of the current browser with fewer limitations and greater access to more data available on the Internet.
The Chrome compatibility mode helps users tweak a website’s visual appeal, just like they could with the old Internet Explorer version.
How to enable Chrome Compatibility Mode?
Here is a step-by-step guide for enabling Chrome compatibility mode on your PC for Windows.
Step 1 – Open Google Chrome Destination Folder
To enable Chrome compatibility mode, navigate to your system’s Google Chrome destination folder.
Step 2 – Go to Properties
Right-click on it and then select Properties.
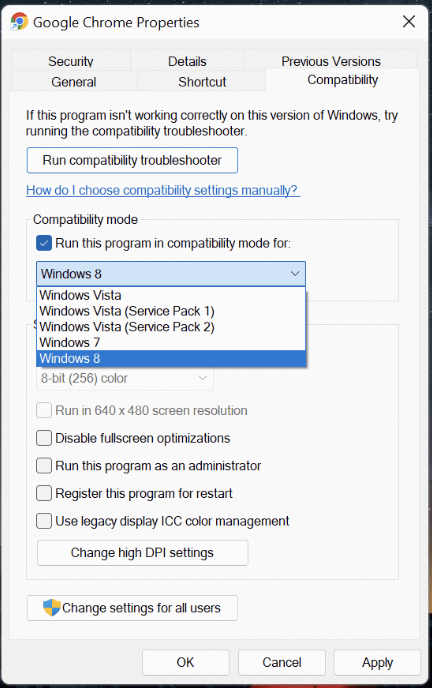
Step 3 – Open Compatibility Tab
Go to the Compatibility tab. The compatibility tab is right beside the Shortcut tab.
Chrome properties (Source)
Step 4 – Choose Your Operating System from Dropbox
Select your current operating system from the dropdown box by checking the option “Run this software in compatibility mode for:”
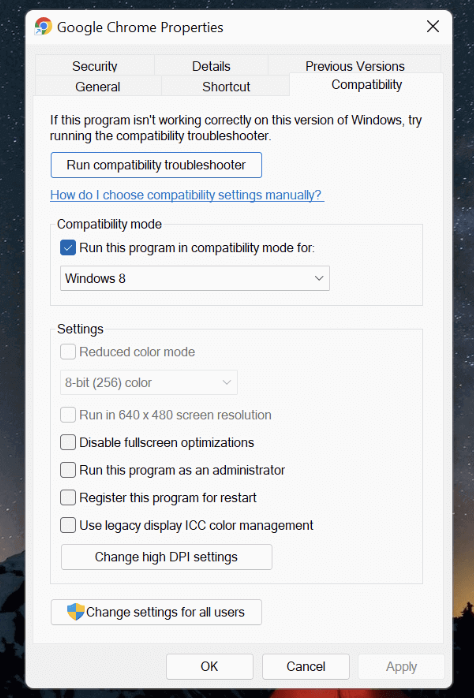
Step 5 – Validate the Changes
Now Click on Apply and OK to enable Chrome compatibility mode on your PC. You can now easily access the older version of Chrome for browsing various websites because you enabled Chrome compatibility mode.
How to Debug in Chrome Compatibility Mode?
In Chrome, debugging a compatibility issue necessitates using the “Compatibility Mode” option. testers can use this feature to access web applications and websites that Chrome does not support if they are listed in the Compatibility View list.
Read on and carefully follow the steps mentioned below:
Step 1 – Enable Chrome Compatibility Mode
You need to enable the Chrome Compatibility mode by carefully following the steps mentioned above.
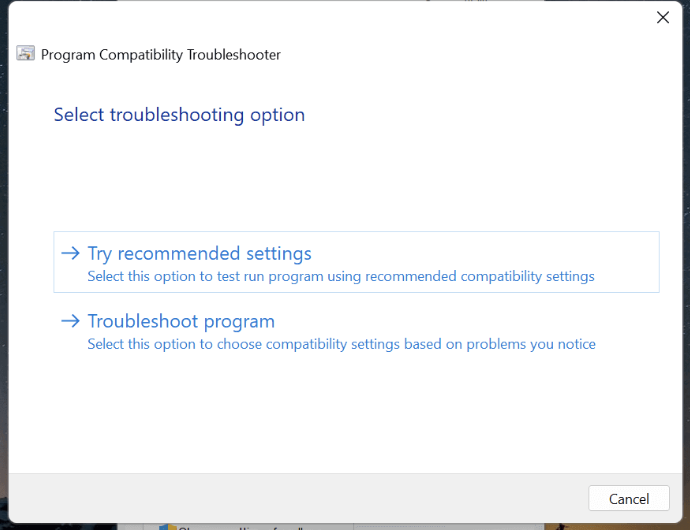
Step 2 – Activate Compatibility Troubleshooter
Click on Run compatibility troubleshooter.
Step 3 – Select the Program for Troubleshooting
Choose the Troubleshoot program option.
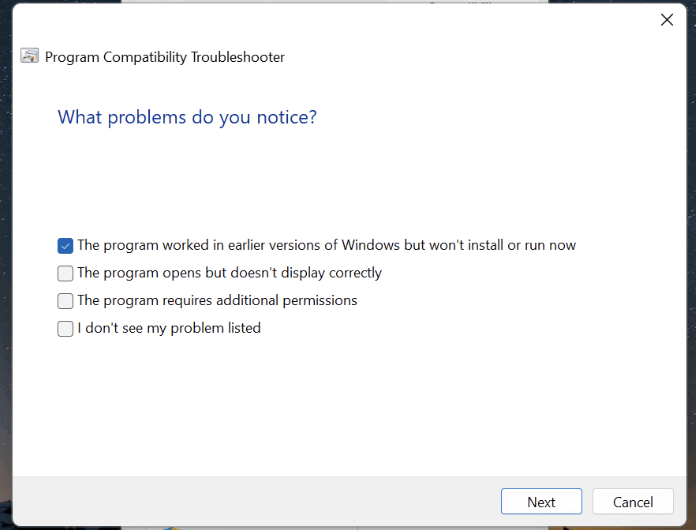
Step 4 – Mention the problem type.
Out of the available options, choose the most appropriate option that defines your problem.
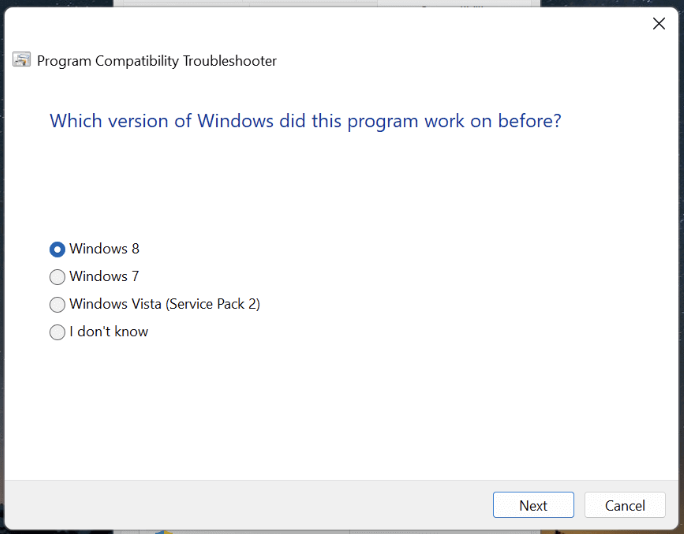
Step 5 – Mention the Windows version
Out of the available options, choose the version of windows that was being used to run the program earlier.
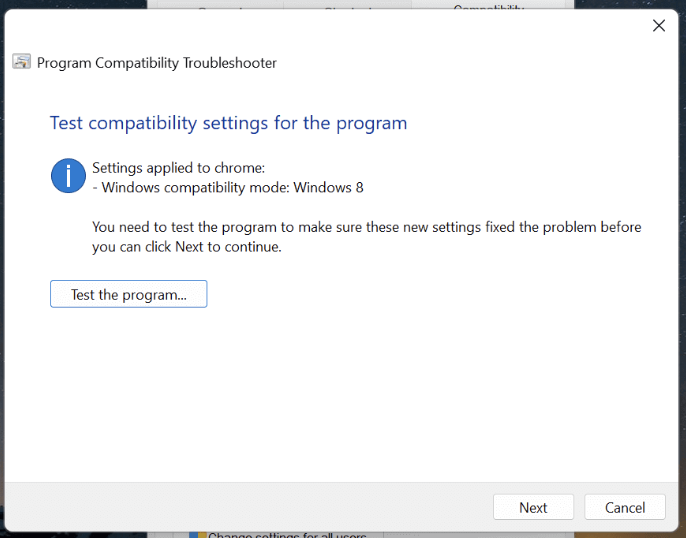
Step 6 – Test the Chrome Compatibility Settings
You must now test the program’s compatibility settings. Select the option “Test the program.”
Step 7 – Crosscheck One Last time
Before clicking Next, navigate to the desired page that needs to be tested
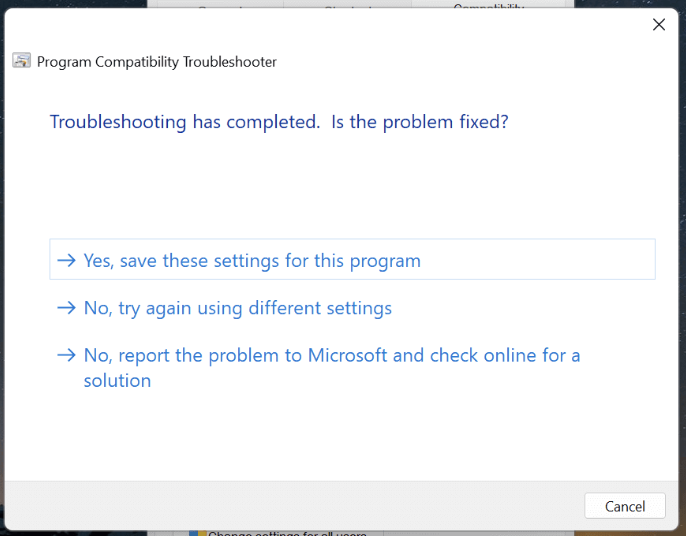
Step 8 – Confirm If the Problem is Solved
After you debug, if the problem has been resolved, save the settings for this program by clicking Yes.
How to test Cross Browser Compatibility for different Browser versions?
While Chrome Compatibility mode helps to ensure that the Chrome Application works on different Windows OS versions, here’s how you can test and debug cross browser compatibility of your web app using the following methods:
Installing Older Browser Versions
Installing older browser versions makes it easy to test websites on every version. But this can have some issues because every browser version may not install for every OS. Moreover, the website may visually differ on some browsers than others, and so it may not give you the most accurate results.
Read More: How to downgrade to older versions of Chrome?
Emulators/Simulators
Emulators and Simulators are handy for cross-browser testing because they mimic the browser’s environment so that we can test our websites. Though this is a good option, they don’t provide accurate results compared to real browsers since it just emulates the actual hardware.
- Specific issues like performance issues, battery performance, and notifications cannot be accurately tested on emulators compared to real devices.
- It is advisable to use emulators for specific functional tests.
- To have comprehensive testing with accurate results, it is suggested to go with real device testing.
Real Devices On the Cloud
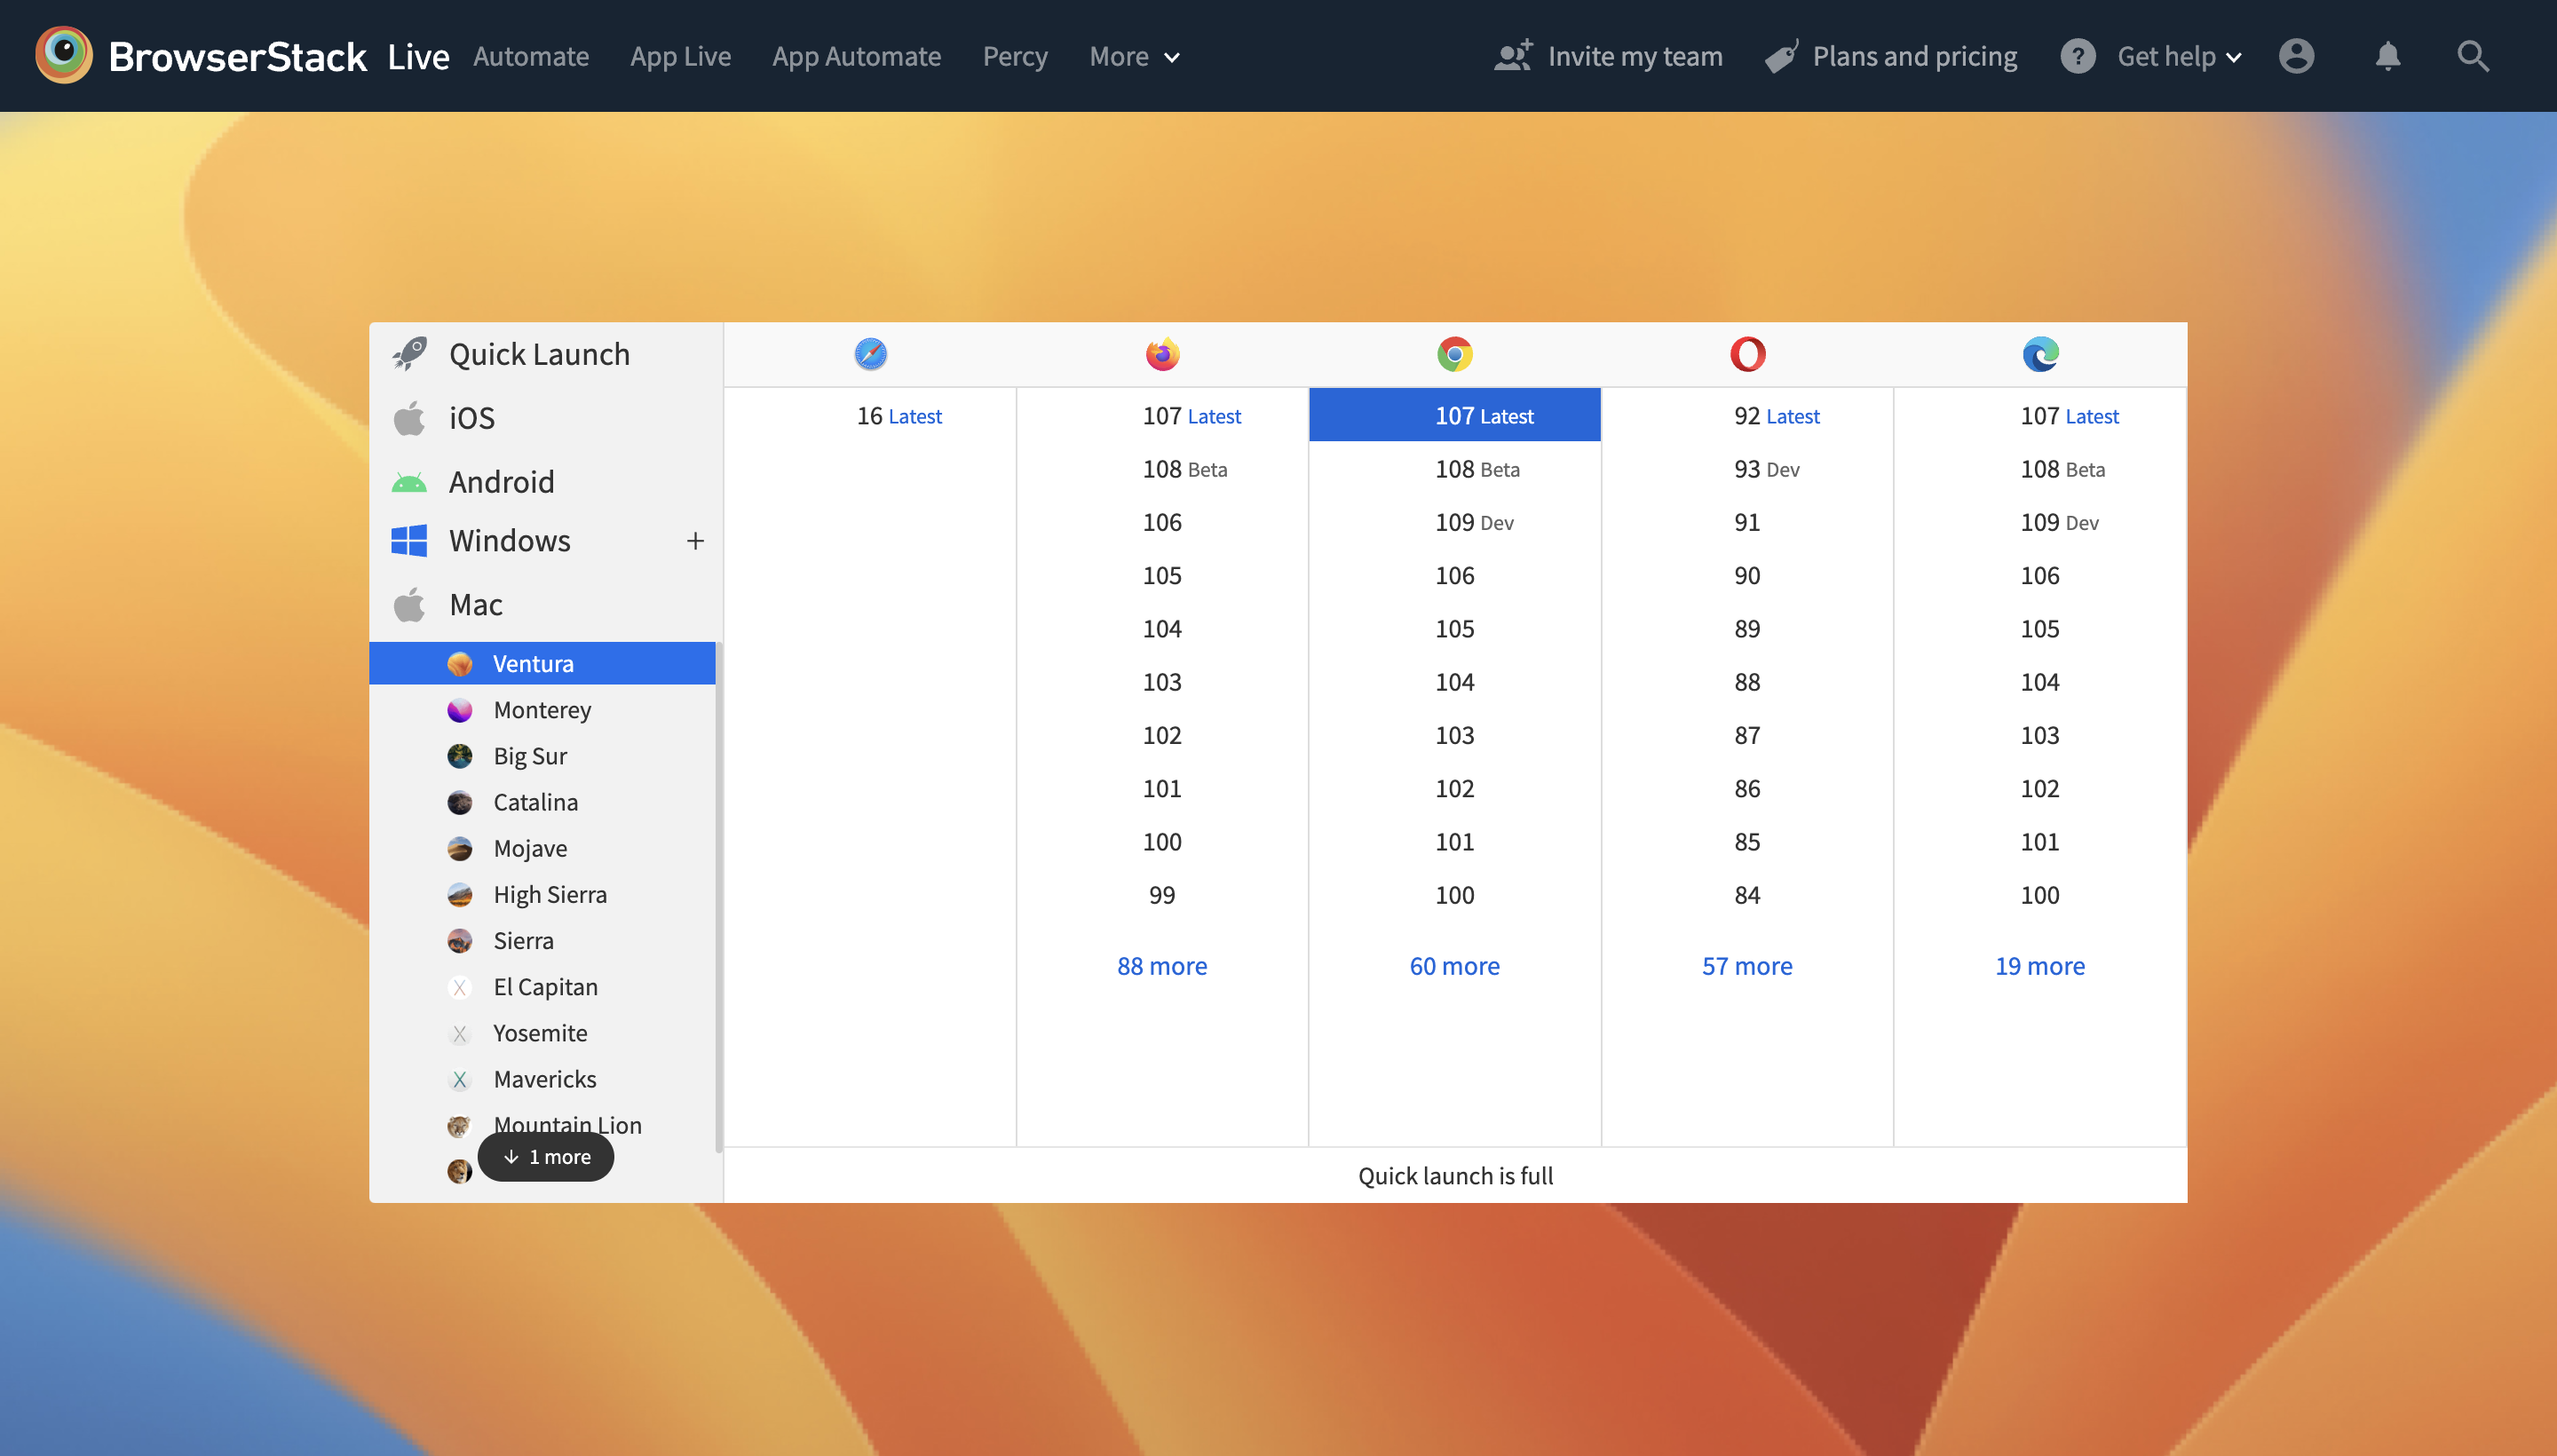
Testing on real devices is the most recommended way to test cross browser compatibility. Browserstack provides 3000+ real devices and browsers like Chrome, Firefox, Opera, Safari, and Microsoft Edge on different OS.
- Based on the tester’s requirement, they can choose any combination of browser-os-devices and test their website’s functionality and performance just like they would on a real device.
- It is also the best choice for testing chrome compatibility because Browserstack offers legacy and latest versions of Chrome on its platform.
Closing Notes
The Chrome browser is a go-to browser option for many because of its features and performance; all modern websites should strive to be compatible with it. There are different ways to check this, as seen above. Depending on the requirements, it is up to the tester which method suits their needs.
- By using cloud platforms, testers can use a single platform for all their testing needs. With Browserstack, testers can test their websites on mobiles and desktops with any Chrome version and catch any issues early on.
- Testing is a continuous cycle, and it is advisable to test from the early stages of the testing cycle. By leveraging cloud platforms, they can reduce the time and effort required to catch critical compatibility issues on their website.


