Cypress commands are asynchronous and queued for later execution, which can cause confusion.
Since commands run sequentially, tests may appear to malfunction if one command is waiting for another to complete. Understanding and managing this behavior is essential for smooth and accurate test execution.
This article explains how to handle Cypress’s asynchronous nature and avoid common issues.
What is Cypress Asynchronous Behavior?
Cypress Asynchronous Behavior refers to how commands are executed sequentially but handled asynchronously without waiting for the previous command to finish. Though the code is written sequentially, each command in Cypress is queued and runs independently, allowing tests to proceed without waiting for earlier commands to complete.
Asynchronous behavior executes steps concurrently without waiting for the previous one to finish, improving efficiency but requiring careful handling to avoid errors from incomplete commands.
Also Read: Synchronous vs Asynchronous in JavaScript
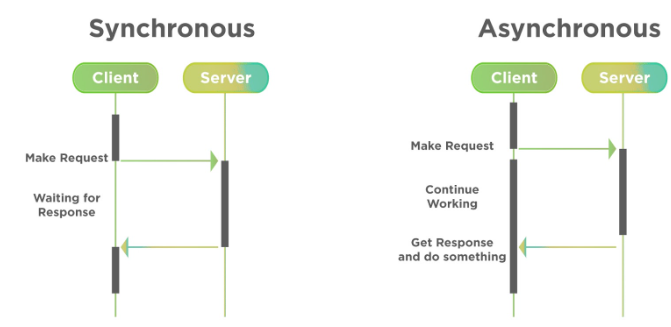
The difference between synchronous and asynchronous execution in Cypress is similar to how client-server calls are handled, where one doesn’t depend on the completion of the other.
The difference between both is illustrated below.
Every Cypress command has an asynchronous nature. Cypress has a wrapper that reads the sequential code we write, enqueues it, and executes it later. So, Cypress fulfills all our tasks related to promises and async nature.
Example:
The example of asynchronous behavior in Cypress is provided below to help you comprehend the idea.
describe('Cypress', function () {
it('Example 1', function (){
// launching Url URL
cy.visit("https://example.cypress.io/")
// identifying element
cy.get('h1').should('have.text', 'Kitchen Sink')
cy.get('h1').then(function(e){
const t = e.text()
// get in Console
console.log(t)
})
// Console message
console.log("Cypress Tutorial")
})
})
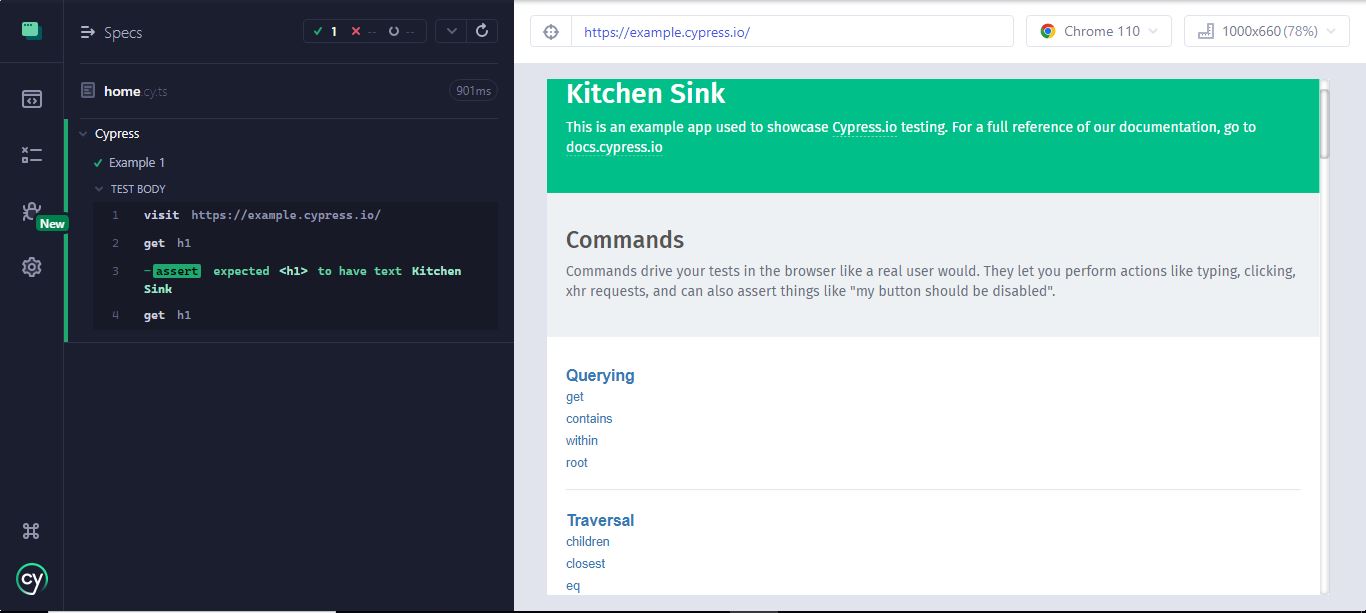
The result is provided below:
Promises to handle Cypress Asynchronous Behavior
Before beginning to execute any commands, Cypress puts them all in a queue. Programming language promises are quite similar to general language promises made to humans. A promise is a condition that represents a person’s behavior or activity.
Depending on the circumstance and nature, a person can either keep or break the Promise. When the Promise takes place, it is in an irrational state that might either resolve to be fulfilled or become refused.
On the same note, Promise is a state of the command in the case of Cypress async tests, and it will have the following states:
- Resolved: If the test phase is successful.
- Pending: If the test phase run result is being awaited.
- Rejected: If the test phase is unsuccessful.
A Cypress command executes only when the previous step has been executed successfully, or a resolved promise response has been obtained. Then, Promise is added to Cypress using the method.
Example of a Promise in Cypress:
describe('Cypress Test', function () {
it('Promise', function (){
return cy.visit('https://example.cypress.io/')
.then(() => {
return cy.get('h1');
})
})
})
The code in the example above is clear and simple to read and comprehend. All promise-related work is handled in Cypress automation, which keeps it from the user’s view. Thus, we won’t need to be concerned about handling or returning the promises.
Advanced Techniques for Handling Asynchronous Behavior
To avoid Cypress flaky tests, it is essential to have a solid testing strategy for dealing with asynchronous activities. We’ll go through a few best practices for handling this in your Cypress async tests down below.
cy.wait
Before executing the next command, wait a predetermined number of milliseconds or until an aliased resource has resolved.
Syntax:
cy.wait(time)
cy.wait(alias)
cy.wait(aliases)
cy.wait(time, options)
cy.wait(alias, options)
cy.wait(aliases, options)
Arguments:
- time (Number): The number of milliseconds to wait.
- alias (String): An aliased route that has been defined using the .as() command and is identified by the @ sign and the alias’s name.
- aliases (Array): An array of aliased routes that have been defined with the .as() command and are identified by the @ sign and the alias name.
- options (Object): Use an options object to override cy.wait() default operation
| Option | Default | Description |
|---|---|---|
| log | true | Makes the command visible in the Command log. |
| timeout | requestTimeout, responseTimeout | Duration of the wait for cy.wait() to resolve before timing out |
| requestTimeout | requestTimeout | Changes the request’s global requestTimeout. |
| responseTimeout | responseTimeout | Changes the request’s global requestTimeout. |
async/await
Cypress manages asynchronous behavior through its command queue, but when working with external asynchronous code like API calls or custom JavaScript functions—async/await helps control the flow.
Syntax:
javascript


async function functionName() {

  const result = await asyncOperation();

  // Code that runs after the async operation completes

}
Example:
javascript

async function fetchData() {
const response = await fetch('https://api.example.com/data');
return response.json();
}

it('handles external async logic', async () => {
const data = await fetchData();
expect(data).to.have.property('id');

cy.visit('/dashboard');
cy.get('.item').should('contain', data.name);
});
Here, await fetchData() pauses execution until the API response is received before Cypress commands continue.
When to Use cy.wait() vs. async/await
- Use cy.wait() for Cypress-native asynchronous behavior, such as waiting for API responses, DOM updates, or user interactions.
- Use async/await when handling external promises or custom asynchronous functions outside of Cypress’s control.
How cy.wait() differs from await:
- Scope of Use: cy.wait() is specific to Cypress commands (e.g., waiting for network requests or DOM changes), while await handles generic JavaScript promises outside Cypress.
- Command Queue Integration: cy.wait() is part of Cypress’s built-in command chain and automatically handles retries. In contrast, await works outside the Cypress chain and doesn’t have retry logic.
- Control Flow: cy.wait() doesn’t pause JavaScript execution; it waits within Cypress’s command flow. await pauses the entire function’s execution until the promise resolves.
cy.tick
After replacing a native time function with cy.clock(), move time. To override native time functions first, cy.clock() must be called before cy.tick().
Syntax:
cy.tick(milliseconds, options)
Arguments:
- milliseconds (Number): The number of milliseconds needed to move the clock. All timers that fall within the impacted period will be called.
- options (Object): To modify cy.tick() default behavior, provide an options object.
| Option | Default | Description |
|---|---|---|
| log | true | Makes the command visible in the Command log. |
.then()
A command may occasionally yield a subject rather than return it. In that situation, we use .then() to communicate with the subject directly.
Promises and .then() act identically. However, unlike a Promise, .then() is a Cypress command. As a result, we cannot use async/await in the test script.
The callback function’s output becomes the new subject and feeds the command that follows (except for undefined).
cy.get("button").then(($btn) => {
const cls = $btn.attr("class")
// ...
})
.wrap()
In the above example, $btn is a jQuery object. This implies that for Cypress to interact with it and take some action, we must first use cy.wrap().
cy.get("button").then(($btn) => {
const cls = $btn.attr("class")
cy.wrap($btn).click().should("not.have.class", cls)
})
In this example, the <button> HTML element comes first. Our subject, in this example, is the HTML element designated as <button>, which is yielded from cy.get() to .then (). To execute any operations or assertions on the subject, we must first .wrap() it. The subject can then be accessed as the variable$btn.
Cypress must .click() the button before making our assertion, which in this instance is .should(‘not.have.class’, cls). We must first wrap our $btn with cy.wrap() in order to give Cypress the right context to click on it.
Debugging Cypress Asynchronous Behavior
The ability to swiftly identify the root causes of errors and bugs whenever you come across them, is one of a software tester’s most crucial skills. This goes beyond simply writing code quickly. Hence Debugging is crucial in automated programming because of this.
We’ll discuss a few of the most effective techniques for debugging our Cypress async tests and go into great detail on each.
1. Using a Debugger
It can often be very challenging to identify exactly what went wrong and which portion of the code failed to perform as intended while running tests, especially large and complex ones. In cases like this, the debugger is highly beneficial.
Although utilizing the debugger in Cypress is very similar to doing so in other areas of your program (such as the front end), it doesn’t operate similarly.
- In Cypress, the .then() function is the only place where the debugger can be used. If not, the debugger will stop the test from running before it ever begins.
- The debugger will suspend test execution after the .then() method ensures that the Cypress command runs and completes.
it('should pause only when the cy.get() executed', () => {
cy.visit('https://example.cypress.io/')
cy.get('h1')
.should('exist')
.then($h1 => {
debugger
})
})
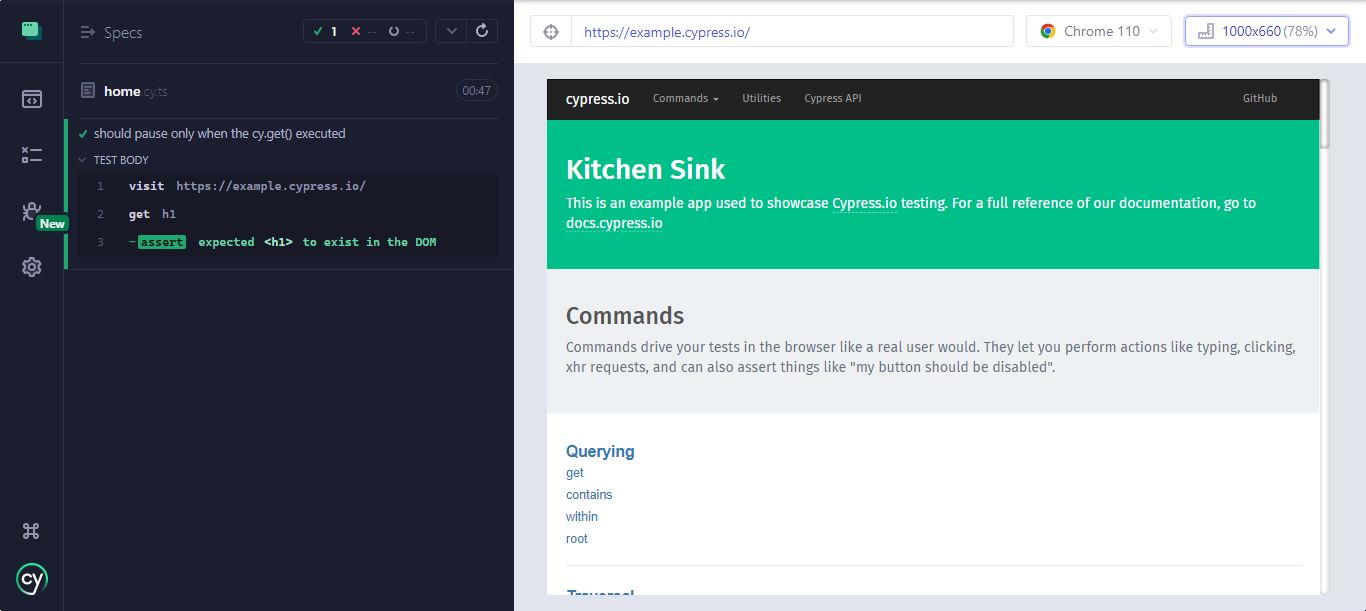
In this section of Cypress debugging, the debugger will only pause the test if the h1 element exists in the DOM since we are saying that the debugger should only pause the test only if the h1 element exists in the DOM.
The result is provided below:
As you can see, the debugger now only pauses the test once it has located the element and verified that it is present in the DOM; otherwise, it will raise an error.
2. Using the .debug()
You can chain the Cypress debugging shortcut, .debug(), to any other Cypress command across your tests. When it is called, the .debug() function will reveal certain information in the browser’s console.
- Command Name: The name of the most recent command run before the .debug() function was called.
- Command Args: The list of arguments passed to the last method before calling .debug().
- Current Subject: A new variable with the name subject will be generated inside the browser. You can use the console to interact with it. The subject variable, the Cypress command’s return value, can be interacted with using the browser console.
We’ll get the first H1 element on the page for this example.
it('should pause the test by using the .debug() command', () => {
cy.visit('https://example.cypress.io/')

cy.get('h1')
.should('exist')
.debug() // debugger
})
The result is provided below:
- We can interact with the current subject that is returned by cy.get() in the console by using the exposed variable subject in our developer tools.
- During the test, We can easily check any or many areas of our application by using the .debug() function. To view the system’s current state, we can connect it to any Cypress set of commands.
3. Using the Developer Tools
Another method for debugging our code and understanding what occurs when running tests is using the console logs provided by Developer Tool.
- The cy.log() command and the standard JavaScript console.log() function are the two commands, we can use to log outputs into the console of our browser.
- To console.log(), we should do any Cypress command’s returned value inside the .then() method.
- The proper method for logging the return value of any Cypress command is to do so inside of .then() function. In this manner, after we log it, we will receive the actual element.
This is the proper course of action.
it('should return the actual h1 element', () => {
cy.visit('https://example.cypress.io/')

cy.get('h1').then($h1 => {
// this will log the actual value of the "h1" element
console.log($h1)
})
})
The result is provided below:
Must-Read: Cypress Best Practices for Test Automation
Using BrowserStack for Cypress Test Automation
Here’s why BrowserStack is ideal for Cypress test automation:
- Cross-Browser Testing: Cypress supports mainly Chrome-based browsers, but BrowserStack extends compatibility to Safari, Edge, IE, and more.
- Cloud Infrastructure: No need to set up or maintain local browsers or devices, BrowserStack provides a cloud-based solution.
- Parallel Testing: Run multiple tests simultaneously to speed up execution and shorten release cycles.
- Real-Device Cloud: Test on 3,500+ real device-browser-OS combinations, ensuring accurate results under real user conditions.
- Integrations: Easily integrates with CI/CD tools like Jenkins, CircleCI, and Bamboo.
- Scalability: Run hundreds of tests across various environments with real-device and parallel testing on cloud infrastructure.
Useful Resources for Cypress
Understanding Cypress
- Cross Browser Testing with Cypress : Tutorial
- Run Cypress tests in parallel without Dashboard: Tutorial
- Handling Test Failures in Cypress A Comprehensive Guide
- Cypress Test Runner: Tutorial
- Handling Touch and Mouse events using Cypress
- Cypress Automation Tutorial
- CSS Selectors in Cypress
- Performance Testing with Cypress: A detailed Guide
- Cypress Best Practices for Test Automation
- Test React Native Apps with Cypress
- Cypress E2E Angular Testing: Advanced Tutorial
- Cypress Locators : How to find HTML elements
- Maximizing Web Security with Cypress: A Step-by-Step Guide
- Conditional Testing in Cypress: Tutorial
- Cypress Web Testing Framework: Getting Started
- Cypress Disable Test: How to use Skip and Only in Cypress
- What’s new in Cypress 10? How it will change your current testing requirements
Use Cases
- How to Record Cypress Tests? (Detailed Guide)
- How to run your first Visual Test with Cypress
- How to Fill and Submit Forms in Cypress
- How to Automate Localization Testing using Cypress
- How to run Cypress Tests in Chrome and Edge
- How to use Cypress App Actions?
- How to Run Cypress Tests for your Create-React-App Application
- How to Run Cypress Tests in Parallel
- How to handle Click Events in Cypress
- How to Test React using Cypress
- How to Perform Visual Testing for Components in Cypress
- How to run UI tests in Cypress
- How to test redirect with Cypress
- How to Perform Screenshot Testing in Cypress
- How to write Test Case in Cypress: (with testing example)
Tool Comparisons
- Cypress vs WebdriverIO: Key Differences
- Cypress vs Selenium: Key Differences
- Playwright vs Cypress: A Comparison
- Cypress vs Selenium vs Playwright vs Puppeteer: Core Differences
Conclusion
This article has examined asynchronously loading browser components as well as the linkage between Cypress and asynchronous loading. When testing Cypress, we discussed various approaches to dealing with asynchronous code. We examined Cypress’ internal handling of promises, which allowed us to create clearer and more comprehensible tests. Also, we looked at methods for debugging Cypress programs.
It is easier to integrate the Cypress test suite with Browserstack, which will give teams a clearer understanding of the test outcomes. Understand that Cypress testing must be executed on real browsers for accurate results. Start testing on 30+ versions of the latest browsers across Windows and macOS with BrowserStack.


