Cypress data driven testing allows testers to separate test data from test scripts, ensuring flexibility, scalability, and maintainability. By using fixtures like JSON, CSV, or Excel files, QAs can easily run tests with varied inputs across browsers.
Overview
1. What is Cypress Data-Driven Testing and Why It Matters
- Separates test data from scripts for easier maintenance and scalability.
- Uses external files like .json, .csv, or .excel for dynamic input.
- Ensures wider test coverage by running the same script with multiple datasets.
2. How to Set Up a Data-Driven Testing Framework in Cypress
- Install Cypress via npm install cypress –save-dev.
- Use Cypress folder structure: e2e (scripts), fixtures (test data), support (commands).
- Store input data in fixture files and call them via import or cy.fixture().
3. How to Create and Execute Data-Driven Tests in Cypress
- Write tests referencing fixture data for inputs (e.g., sign-up forms).
- Option 1: Import JSON directly into the test file.
- Option 2: Load data dynamically using cy.fixture() inside before() hooks.
- Execute via Cypress Test Runner (npx cypress open –e2e) or CLI (npx cypress run –e2e).
This article covers what Cypress data-driven testing is, how to set up fixtures and folder structure, different ways to create data-driven tests, and how to execute them locally and for real device validation.
What is Data-Driven Testing?
In simple terms, data-driven testing separates the test data from the test script. Any data which is required for your tests are stored separately using .csv, .json, or .excel files.
Best Practices of Data-Driven Testing
Here are some of the best practices for Data-driven Testing:
- Always separate the test data: In Data-driven testing, you must separate the test data from the test script.
- Use the similar file extensions for different set of data: The data can be stored in .csv, .json and .excel files. Prefer using the same file extensions throughout your framework. For example, when there are multiple data sets, create multiple .json files or .csv files but don’t mix them. This increases the readability and makes the maintenance of the test script easier.
- Use real data: You choose a data-driven testing approach as the data is as much as important as functionality; putting the dummy data makes test results false positive, and it might not yield the correct results.
- Include data for positive and negative scenarios: Your data-driven test should always cover both negative data sets and positive data sets.
Pre-Requisites of Data-Driven Framework in Cypress
Step 1 Install Cypress by entering the below command
npm install cypress --save-dev
Step 2 Open Cypress by entering the below command
npx cypress open
Step 3 Choose Test type
When you enter the above command, the cypress window opens, choose the E2E Testing. Then Click on Continue
Step 4 Choose a browser
Select any browser of your choice Chrome, Electron, Edge, or Firefox to perform the Cypress test
Step 5 Click on Create an empty spec
Next, the create new spec window opens, choose to create an empty spec, and name the file as demo-data-driven-test.cy.js
Step 6 Click on Create Spec
Following the above steps, Cypress creates all the required folder structure and basic configuration files.
Note: This Getting Started with Cypress tutorial covers the in-depth of creating the basic Cypress framework.
Cypres Files and Folder Structure for Data-Driven Testing
Given below are the different folders and files in the Cypress that are used in the data-driven testing:
- cypress/e2e folder: This folder contains all your test scripts
- cypress/fixture: This folder contains your data-driven test files, such as .json, .csv, etc. in Cypress; these are called fixture files
- cypress/support: This folder contains all the support files, which are required for setting up commands or common files which are required for test automation framework.
- cypress/support/e2e.js: All the global configuration commands will be placed here.
- cypress/support/command.js: This file helps you create a custom command in Cypress. Custom commands created using this file will be available globally inside your framework.
- cypress.config.js: This file contains the execution options or configuration which is required to execute your scripts.
- package.json: This file tracks all the installed node packages and allows you to create custom run commands shortcuts.
How to create Data-Driven Tests in Cypress
As you can see in the folder and file structure, you have the fixture files in Cypress. These fixture files are mainly used for data-driven testing. You can define the custom data sets inside fixture files. By default, when you create the Cypress Test Automation framework, the file example.json gets created.
Let’s take a simple use case that performs the following actions
- Navigate to BrowserStack Sign-up page
- Enter all the required details using data-driven test files
- Click on the Sign-up button
Step 1: Create a test data
If you navigate to the Sign-up page, the required data is Full Name, Email id, and Password. Create a data set for the same.
Navigate to cypress/fixtures/example.json file and add the data using the command below
{
"fullname": "David D William",
"email": "david-d-william@somedomain.com",
"password": "Davidfortest@123"
}
Step 2: Create a test script for Sign up
Once you have data ready, create a test script. Navigate to cypress/e2e folder, in the pre-requisite section, you have created the file demo-data-driven-test.cy.js, edit the test, and add the below code.
//demo-data-driven-test.cy.js

import signUpData from '../fixtures/example.json'

describe('Data driven testing Demo', () => {

  it('Should create user', () => {

    cy.visit('https://www.browserstack.com/users/sign_up')

    cy.get('#user_full_name').type(signUpData.fullname)

    cy.get('#user_email_login').type(signUpData.email)

    cy.get('#user_password').type(signUpData.password)

    cy.get('#tnc_checkbox').click()

    cy.get('#user_submit').click()

  })

})
The above method is the simplest way to load the Cypress fixture file and use the data.
In the above example, the signUpData is imported from the example.json file.
The signUpData now holds all the key-value pairs, which are inside the example.json file in this case it is fullname, email, and password details. Once you import the data, you can use it like signUpData.fullname, signUpData.email, etc.
Alternative Method to load the Fixture
//demo-data-driven-test.cy.js
describe('Data driven testing Demo', () => {
let signUpData
before(() => {
cy.fixture('example').then((data) => {
signUpData = data;
})
})

it('Should create user', () => {
cy.visit('https://www.browserstack.com/users/sign_up')
cy.get('#user_full_name').type(signUpData.fullname)
cy.get('#user_email_login').type(signUpData.email)
cy.get('#user_password').type(signUpData.password)
cy.get('#tnc_checkbox').click()
cy.get('#user_submit').click()
})
});
In the above code, the import statement is not used; instead, the Cypress command that is cy.fixture(), is used. The cy.fixture() command takes a file name as an argument and loads the file content to a specified variable.
cy.fixture('example').then((data) => {
signUpData = data;
The above line of code is responsible for loading the .json data. The example.json is the JSON file name that is inside the fixtures folder and then assigns the data to the variable signUpData. Once the JSON data is loaded, you can use it across your test scripts, signUpData.email, signUpData.password etc.
Step 3: Execute Cypress Data-Driven Test
You can execute your cypress data-driven test using the Cypress Test Runner Window or CLI option.
- Executing Cypress Data-driven test using Cypress Test Runner window
Use the below command to open Cypress Test Runner
npx cypress open --e2e
- Choose the desired browser
Once you execute the above command, the Cypress window prompts you to choose the browser, you can choose any such as Edge, Chrome, Firefox, or Electron.
- Run the test case
Once you choose the browser, then you need to click on the test script file in this case the test file is demo-data-driven-test.cy.js
The test starts executing, and the results will be displayed.
Running Cypress Data-Driven Tests using Command Line
Cypress provides an option to run tests using the command line. Using the below command, you can simply run the tests using the command line.
npx cypress run --e2e
Step 4: View the results
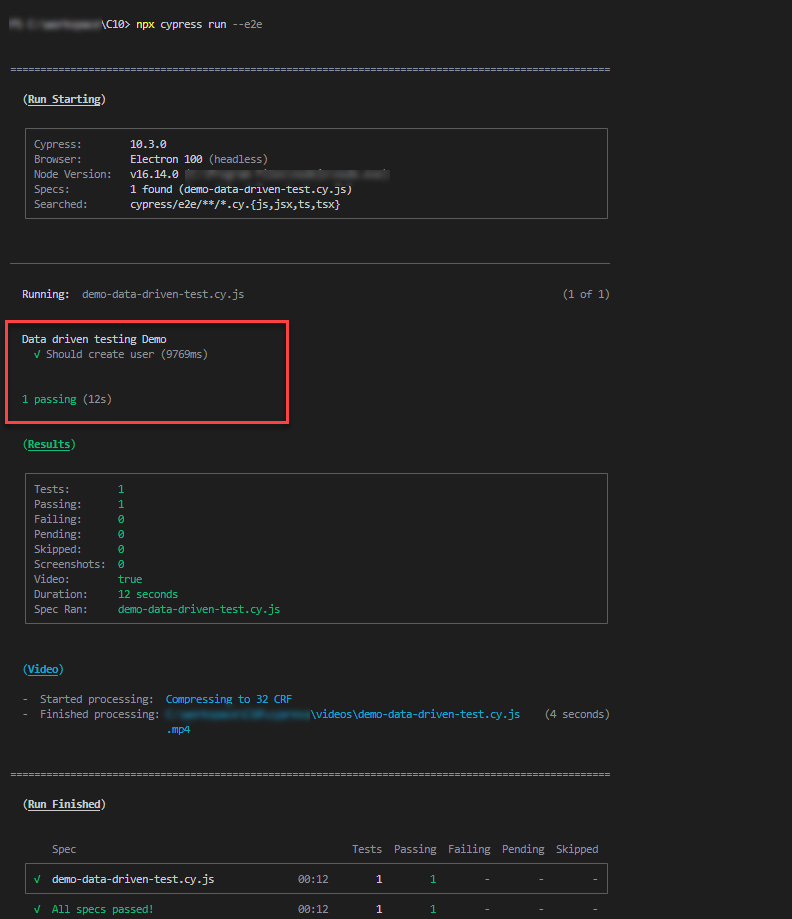
Once the execution is complete, you will get the command line output whether the test is passed or failed. The test result looks like this,
How to execute Cypress Data-driven tests on BrowserStack
BrowserStack offers access to 3000+ real device-browser combinations to test. No matter how many test cases you write, until and unless those are executed on multiple browsers and platform combinations, testing is not complete. By testing on a real device cloud, you get to run your tests under real user conditions, which improves overall test accuracy by highlighting the bottlenecks in the user experience.
Note: For integrating with BrowserStack, visit the official documentation.
Step 1: Install the BrowserStack CLI
npm install -g browserstack-cypress-cli
Step 2: Create and Configure browserstack.json file
browserstack-cypress init
After execution of the above command, browserstack.json file gets created in your project root folder.
Step 3: Add the auth token
Login to BrowserStack and Navigate to the Settings Page to get the username, access_key. Copy and paste the username and access_key to the auth section of your browserstack.json file
Optionally you can change the browser and operating system configurations
Step 4: Execute your tests
Execute your tests using the below command
browserstack-cypress run
Step 5: View your test results
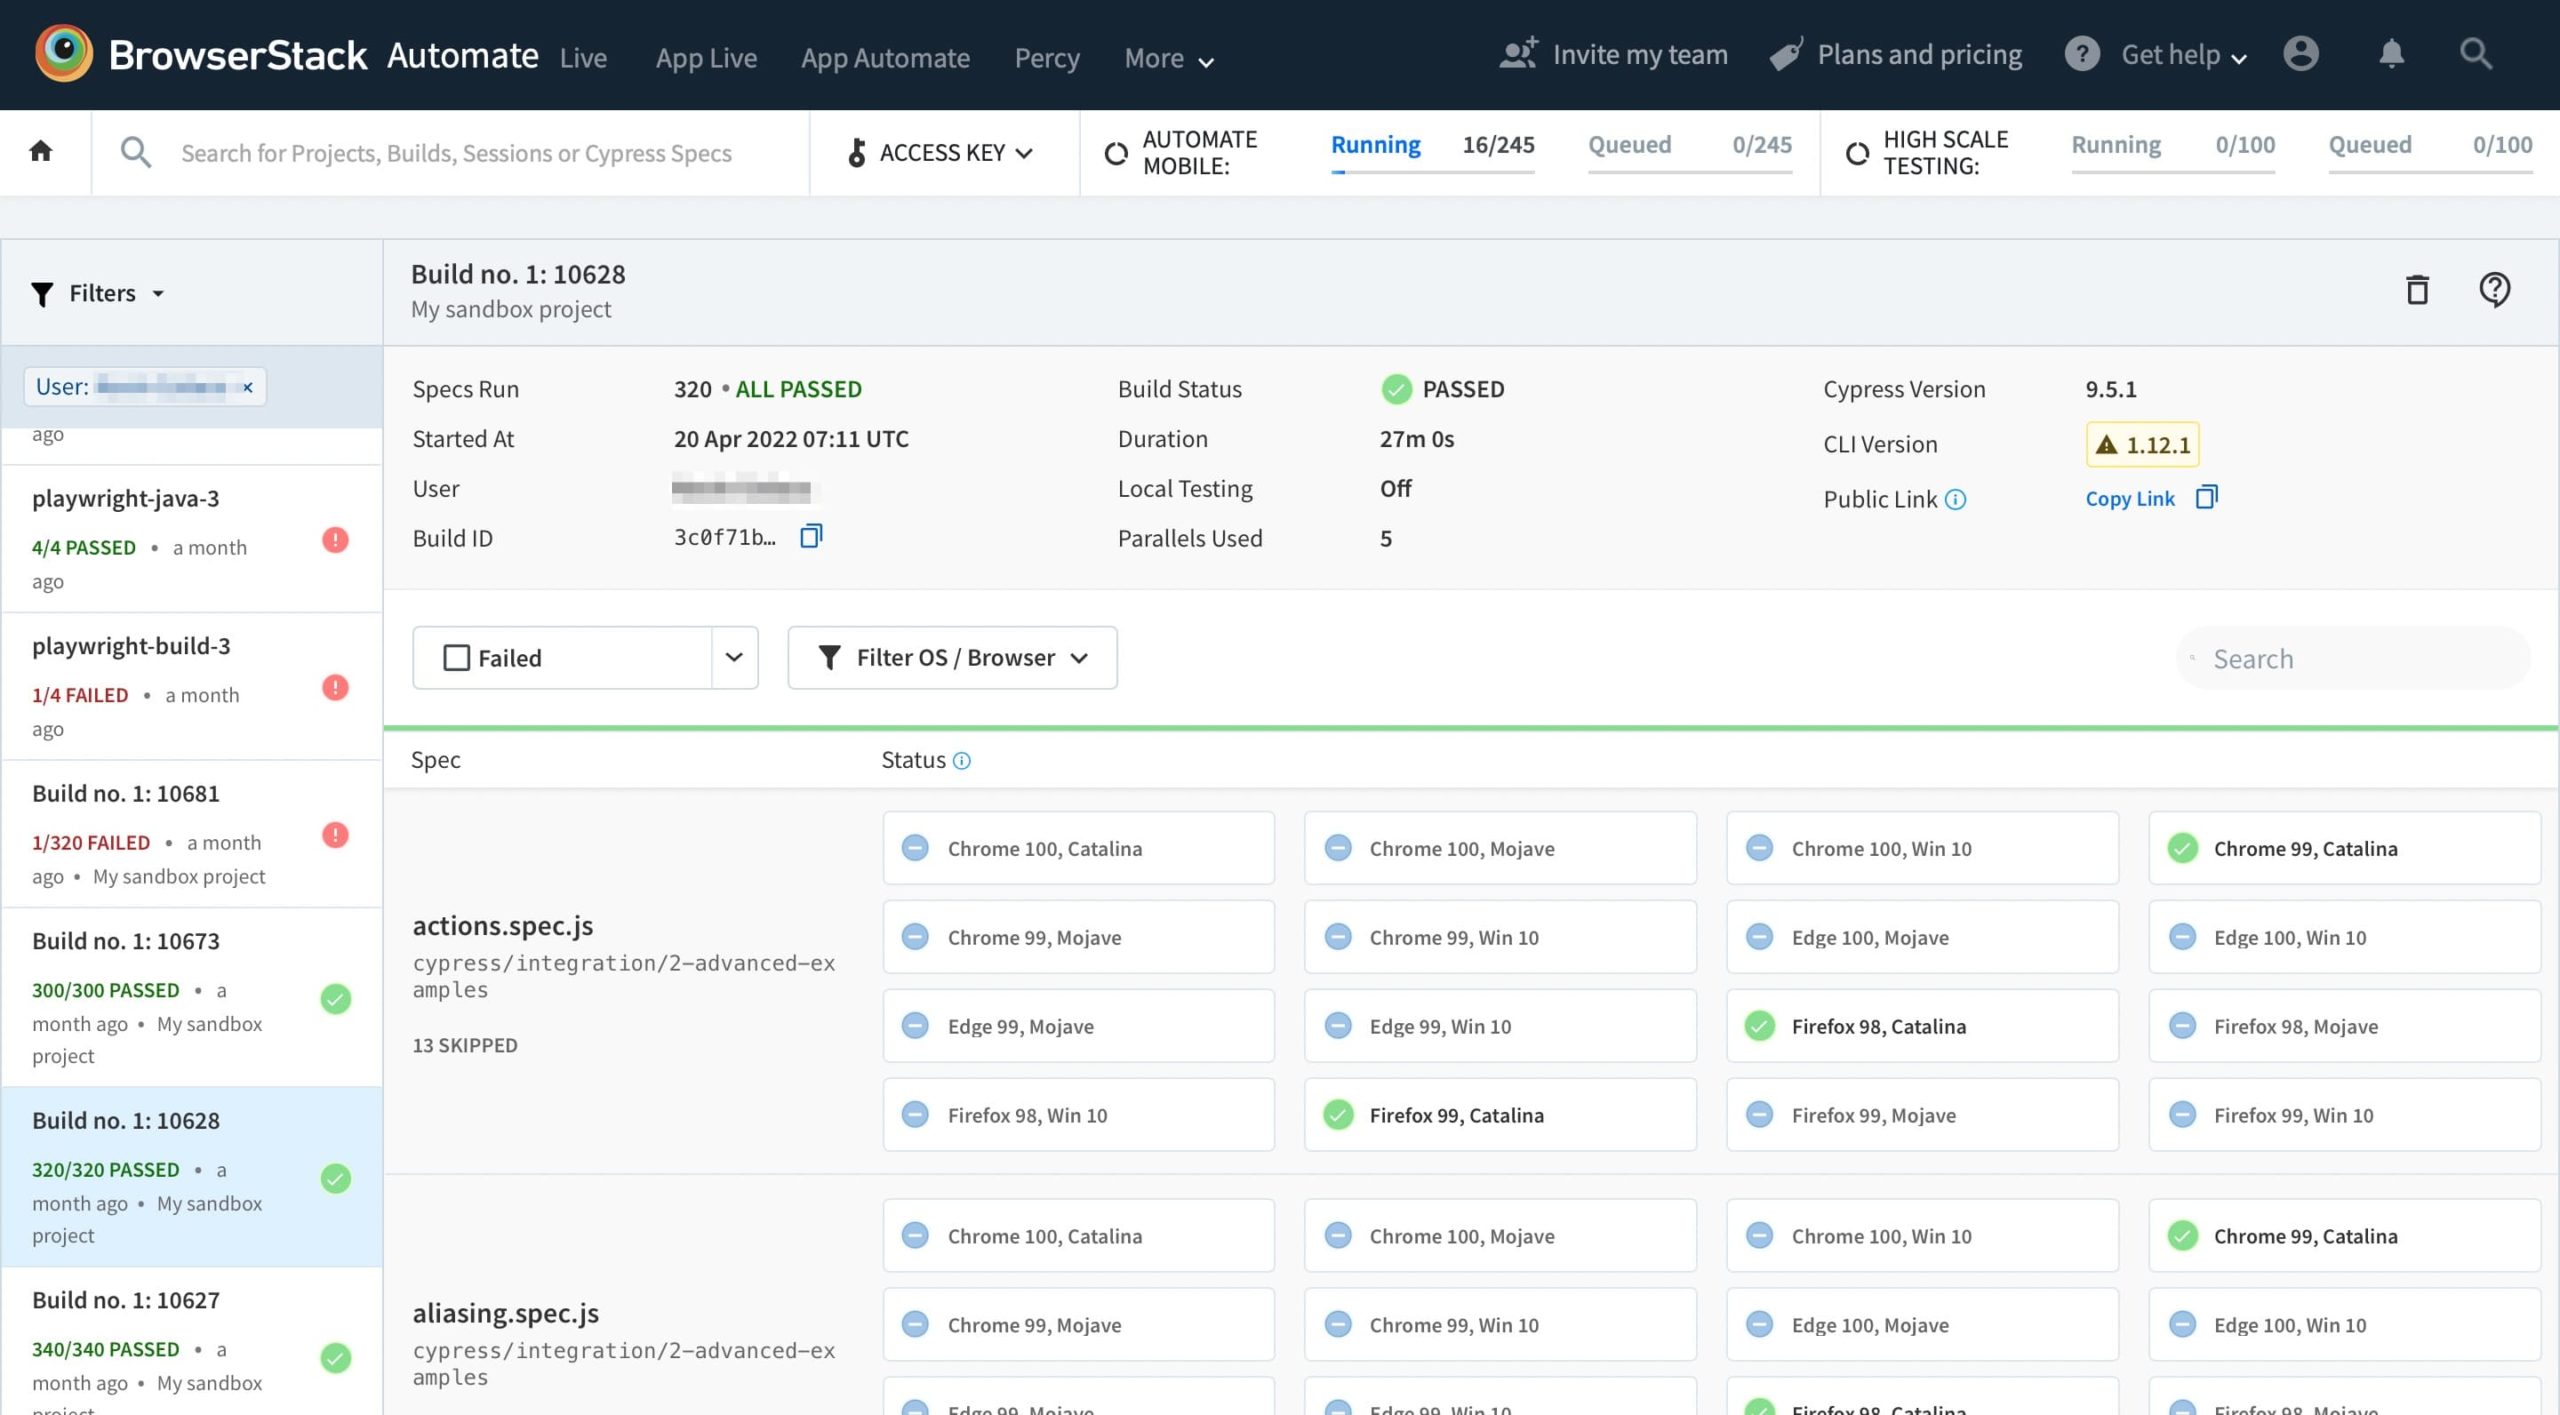
After you run your test, visit the Automate dashboard to view your test results as follows,
Conclusion
The data-driven testing framework approach is recommended when your application is data-oriented, and the data changes more often. If your application requires a lot of input data and it is dynamic, then data-driven testing is the best approach as data is separated from the test script; you only need to change the data files whenever you want to update the data. Cypress makes data-driven testing easier by giving dedicated fixture support.


