Automation is central to building high-quality iOS apps, and Xcode UI testing provides a built-in way to validate functionality directly within Apple’s IDE. Using XCTest, developers can write and run unit tests and UI tests, debug view hierarchies, capture screenshots, and extend execution to cloud-based real device testing.
Overview
How to Set Up Xcode Automation
- Enable Unit & UI tests when creating a new project.
- Use the Test Navigator to organize targets and manage XCTest plans.
- Extend local setup with cloud testing on BrowserStack for wider device access.
What XCTest Offers for UI Testing
- Initialize test classes with setup/teardown functions.
- Locate elements using XCUIElementQuery and interact with buttons, fields, and navigation flows.
- Validate outcomes using assertions (boolean, equality, nil checks, expected failures).
- Capture screenshots with XCUIScreen for reporting.
Why Debugging & Cloud Integration Matter
- Debug UI with Xcode’s Hierarchy Debugger for detailed view hierarchy inspection.
- Run automated tests on BrowserStack App Automate across 3000+ iOS devices.
- Leverage CI/CD integration, parallel execution, and team collaboration features.
This article explains how Xcode automation with XCTest works, its key UI testing capabilities, and how to extend it with BrowserStack for scalable iOS testing.
Overall Workflow and Prerequisites
In this Xcode UI testing tutorial, we will discuss testing syntax and methodology specific to iOS XCTest, so you need to have Xcode installed on your computer. Also, the setup could be extended to include automation testing with BrowserStack device cloud features.
One great benefit of working with BrowserStack is that it provides access to a full range of devices on which you can run tests, which is much more cost-effective than buying real iPhones for iOS testing.
Here is an outline of implementing iOS UI testing and then extending it to integrate with real-device cloud and automation testing:
- You would need an application to test; this could be a project that you are already working on or you could create a new project.
- Break down the project into components and modules and work on test strategy for each element.
- Write test cases for testing various layers and functionality of the application user interface using XCTest and Hierarchy Debugger.
- Run the test on your local developer set-up with Xcode, and analyze results and reports from the tests.
Integrate with BrowserStack App Live and App Automate features and run your tests collaboratively on the cloud.
Once you have the project code in the development computer, you can use built-in features in the Xcode IDE to start writing test code.
Getting Started with Writing Tests in Xcode
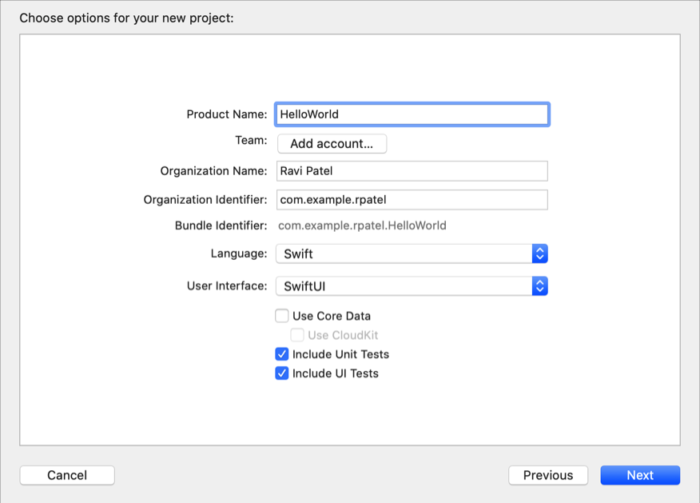
When creating a new project in Xcode, you must select the include unit and UI tests checkboxes to enable them in your project navigator workflow.
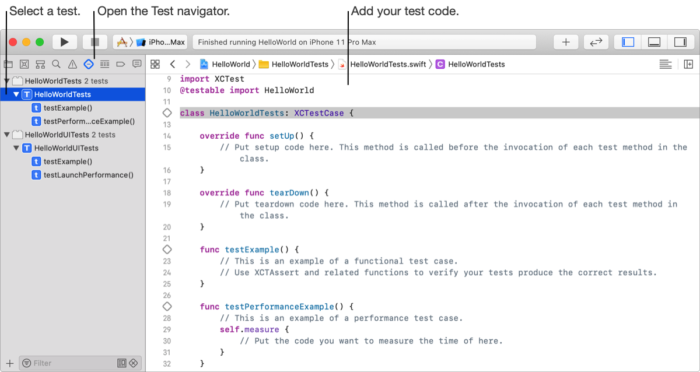
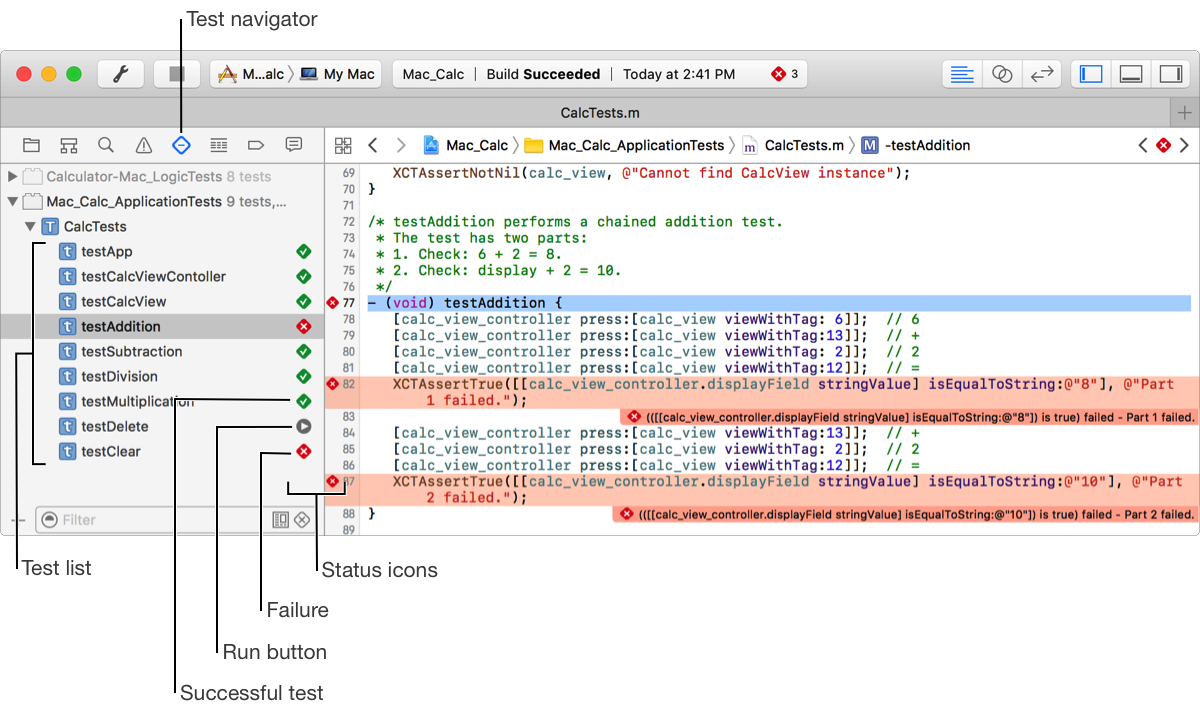
This will pre-configure the test navigator window to show unit tests and UI tests based on your project nomenclature. Just like unit tests, you have set up and tear down functions to manage the UI test environment set up and clear up once the run is complete. When you create a project with the unit tests and UI tests selection enabled, it creates wrapper classes inside which further test code can be added.
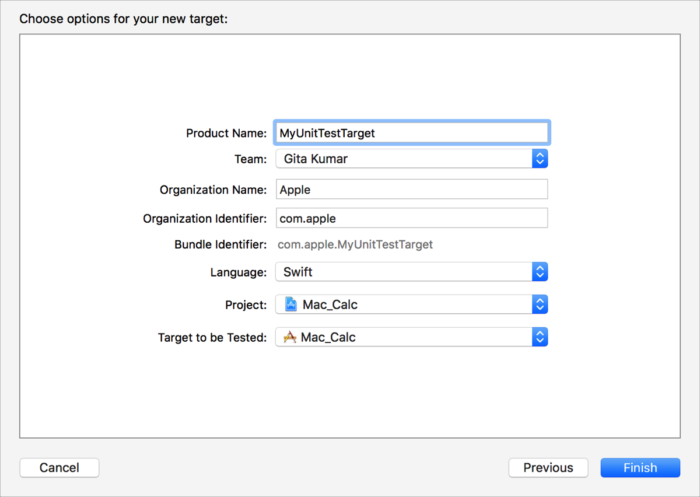
Here you can add more in depth code or extend the test plans to cover different scenarios as per your requirements. If you are adding more functionality and components in the future you can create new UI test targets by clicking on the ‘+’ icon in the bottom left corner of the Test navigator.
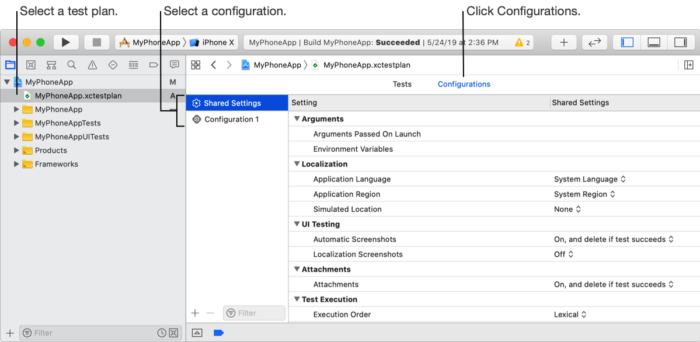
To edit a test plan (a file with a .xctestplan file extension), select the test plan and click on Configuration.
Test plan configurations help adjust and tweak various parameters related to a test plan like language, region, location etc. Writing unit test and UI tests under XCTest requires knowledge of syntax and best testing methodologies which you can follow on their official documentation; let’s go through some simple examples to help you get started.
Writing UI tests with XCTest
XCTest provides APIs to access and control, simulated devices and various UI components of the application. The process of iOS UI testing can be broken down into the following steps:
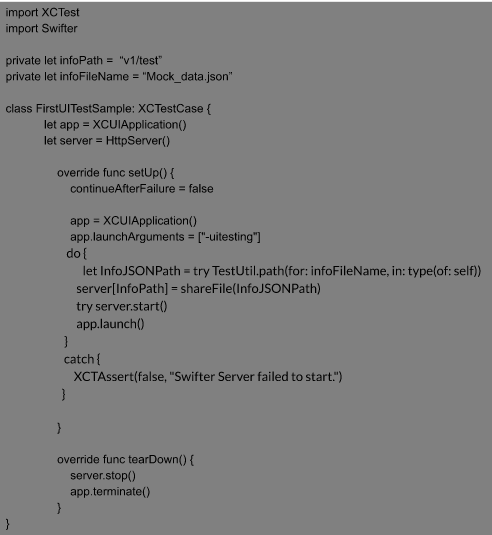
Initialise test classes
When writing test suites it is a common practice to create utility classes, set up and tear down functions for each class. This helps control the XCUIApplication and other APIs, that can be used to initiate and control test sessions. It provides several useful functions to launch, terminate and manage the application session and mock data and dependencies for your test runs.
Write Individual test functions
Once you’ve set up the correct pre/post-processing environment for your test classes, you can write individual test functions. Within these functions you can test various aspects of the application and implement individual UI tests.
Select and work with app components
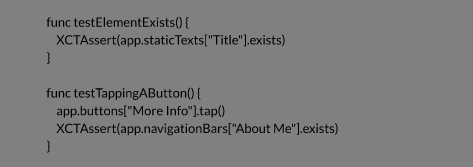
The XCUIElementQuery object can be used to query and find different types of application components with the help of queries. After executing search for a component you can use the assert function to mark success or failure.
- Here is an example of finding “Home” button and asserting result:
- Enter value in input fields
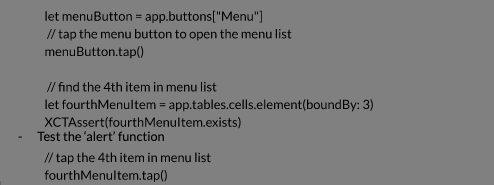
- Find and click on the 4th element in “Menu” list
Just like these there are many options and huge variety of operations that you can perform using these APIs and object functions; for a full reference, you can visit the official documentation here. For a sample app with test examples check out our Github repository dedicated to XCTests.
Take device and application screenshots
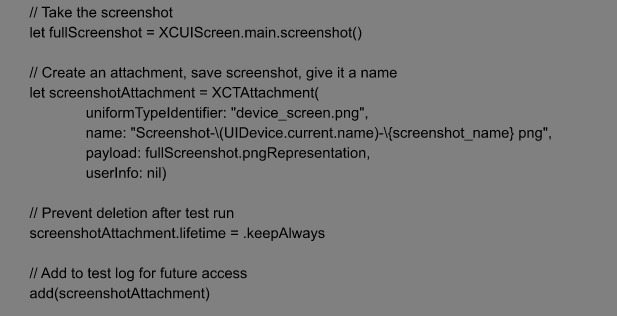
XCUIScreen and XCUIScreenshot Classes provide the functions to take screenshots from a physical device or a simulated session. Call the screenshot() method on an XCUIScreen instance to capture a screenshot of its current UI state. This method is added to XCUIScreen by the XCUIScreenshotProviding protocol.
- Taking a screenshot of current screen on the device
- Taking screenshots of all screens on the current device
These screenshots can be seen in test results with appropriate messages by creating attachments.
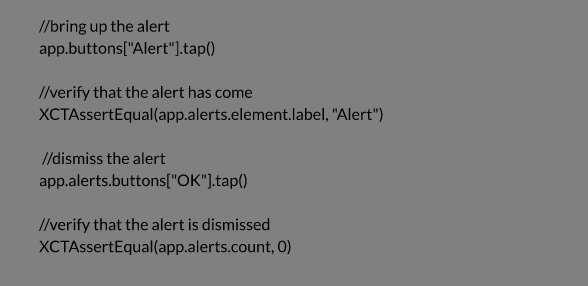
Asserting expected behavior
It is essential to introduce the right assertions and checks at the required positions to establish success or failure for a test case. This will help you determine whether a given run was a success or a failure. Depending on the use case and the priorities, the way of implementation could be different; here are some examples of different types of assertions that you can apply:
- Boolean assertions: Test if a condition returns true or false.
- Nil or not-nil: Check if a condition returns of value or not.
- Equality and Inequality: Check whether two conditions returned the same value.
- Comparable Value: compare and check two values to determine if one is greater.
- Error: check if a given function returns an error or not.
- Unconditional failure: This lets you declare failure at any point in the test case without depending on a variable or condition.
- Expected failure: You can explicitly define expected points of failure without having to stop the execution of the test case using this feature.
- Skip tests: This lets you define a conditions-based logic for skipping tests.
Managing assertions at the right point in test cases is important, as this is how Xcode decides whether a test is successful. You can read in-depth on the syntax and functions for each of these assertions in depth here.
Run tests and analyze results
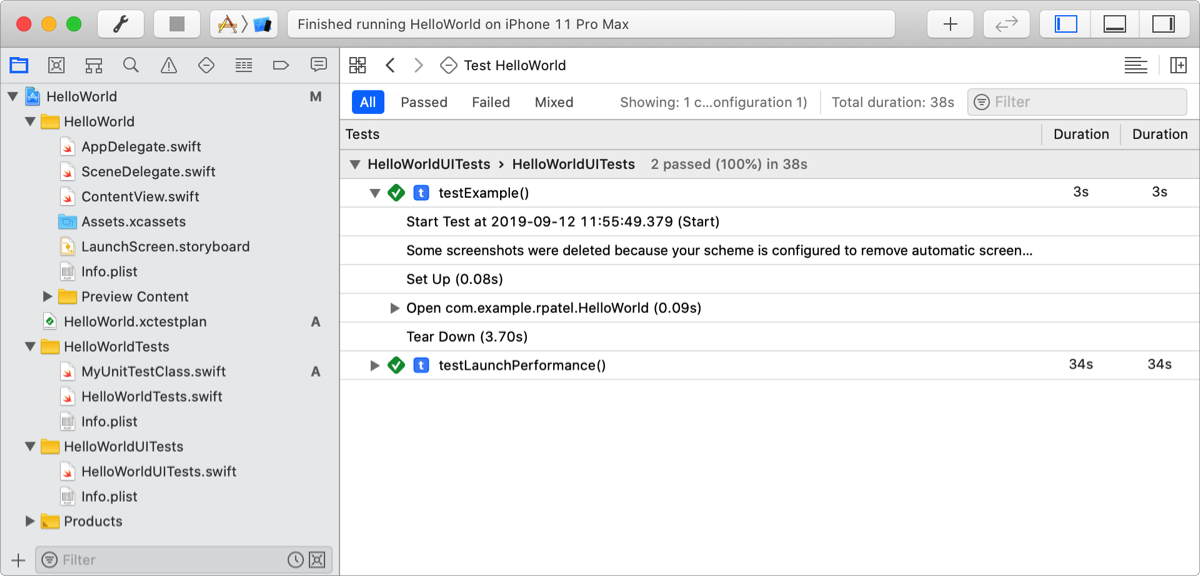
You can run a single test, a batch of tests or a full test suite, depending on your requirements. You can use the navigation features and buttons to start the test or the command line interface. Once a test run is complete, the results will be visually displayed inside the source code editor in the left gutter with icons depicting the outcome. If you want to generate a shareable results file you can follow the following steps:
1.Run your XCUI test suite using the xcodebuild command.
2. From the reports navigator control-click a test or test action and select the option to show in Finder. This will take you to the .xcresult file.
3. Open the .xcresult file in Xcode by double-clicking on it, this should take you to the report in a standalone report navigator.
4. Click on the tests listed in the navigator to view further details.
5. Click on a test to see its report.
You can use the xcrun xcresulttool to retrieve and evaluate the test results through command line, and parse them for further analysis and sharing with the team.
Testing UI with hierarchy debugger
Another great way of testing user interface is with the help of a hierarchy debugger and accessibility inspector built into Xcode. You can use the view debugger to inspect the view hierarchy of your paused app.
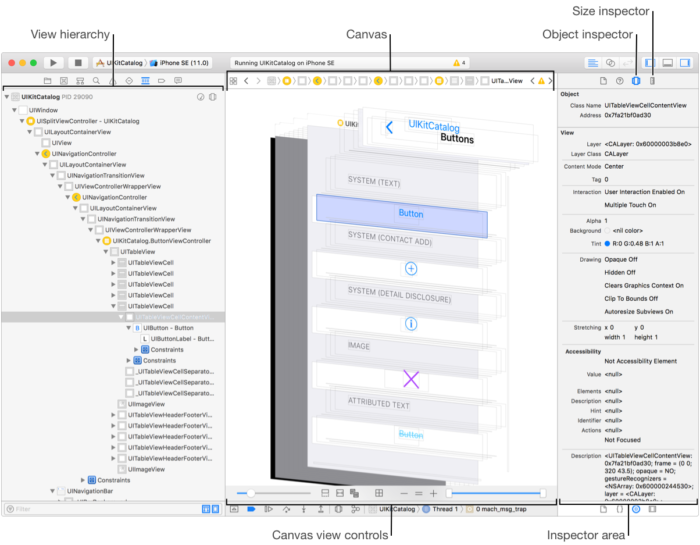
The debugger includes a hierarchical list of interface objects, a canvas with an exploded 3D rendering of the hierarchy, and inspectors for the attributes of an object and the size of a view. Here are the steps to get started:
- To open the view debugger, click the Debug View Hierarchy button at the top of the debug area.
- The view hierarchy in the navigator area shows a hierarchical list of the view controllers, views, and constraints in your paused app. Selecting an object in the list highlights the corresponding object on the canvas.
- The canvas shows a 3D exploded view of the selected object, with its constraints and parent objects. The canvas also includes controls for zooming and rotating the view.
- The inspectors in the lower pane include information about the selected object’s attributes, such as its frame and layer properties, as well as any constraints affecting it.
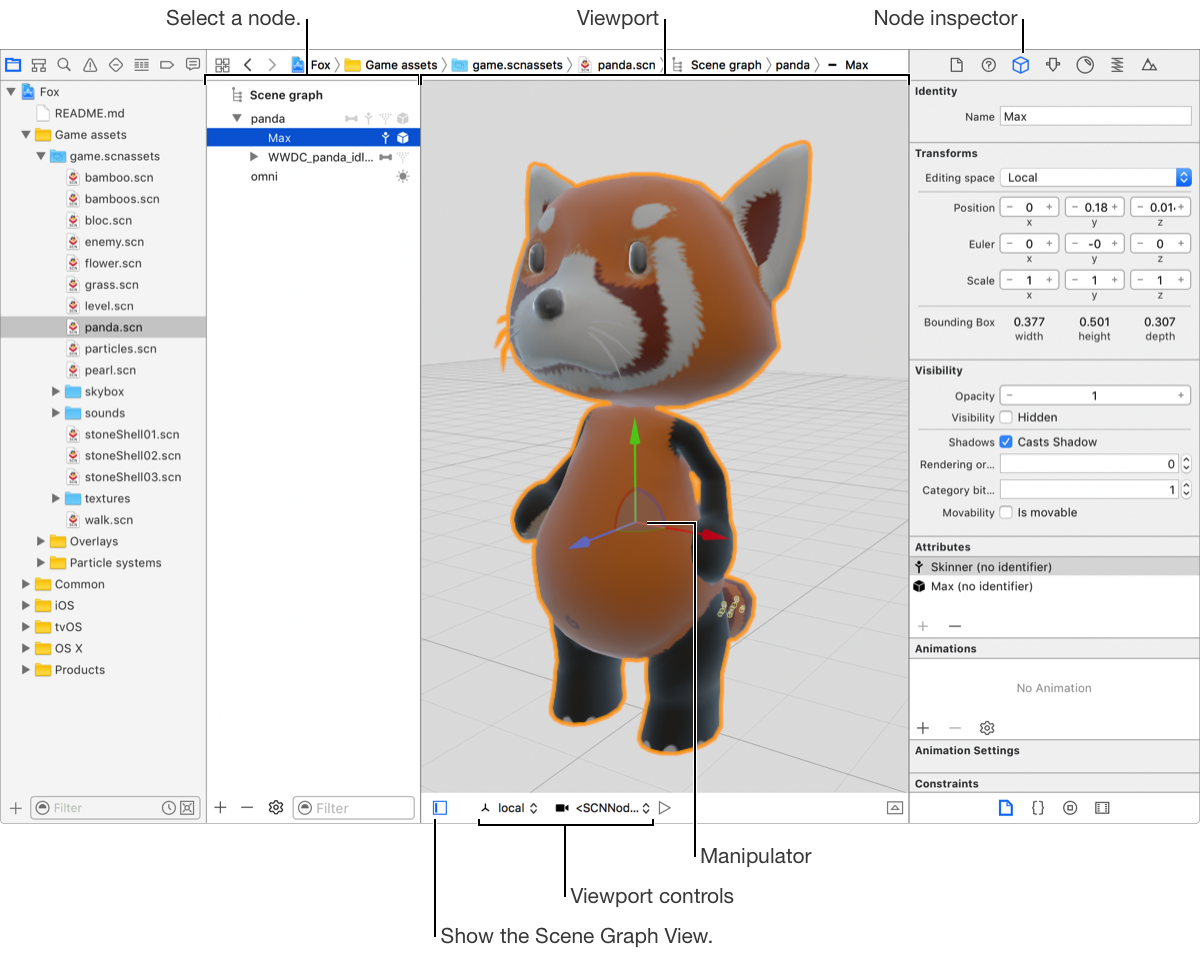
Using SceneKit scene editor, you can quickly build, edit, and preview games and interactive 3D apps. The visual interface reduces code, streamlines design, and helps you fine-tune the rendering of your apps.
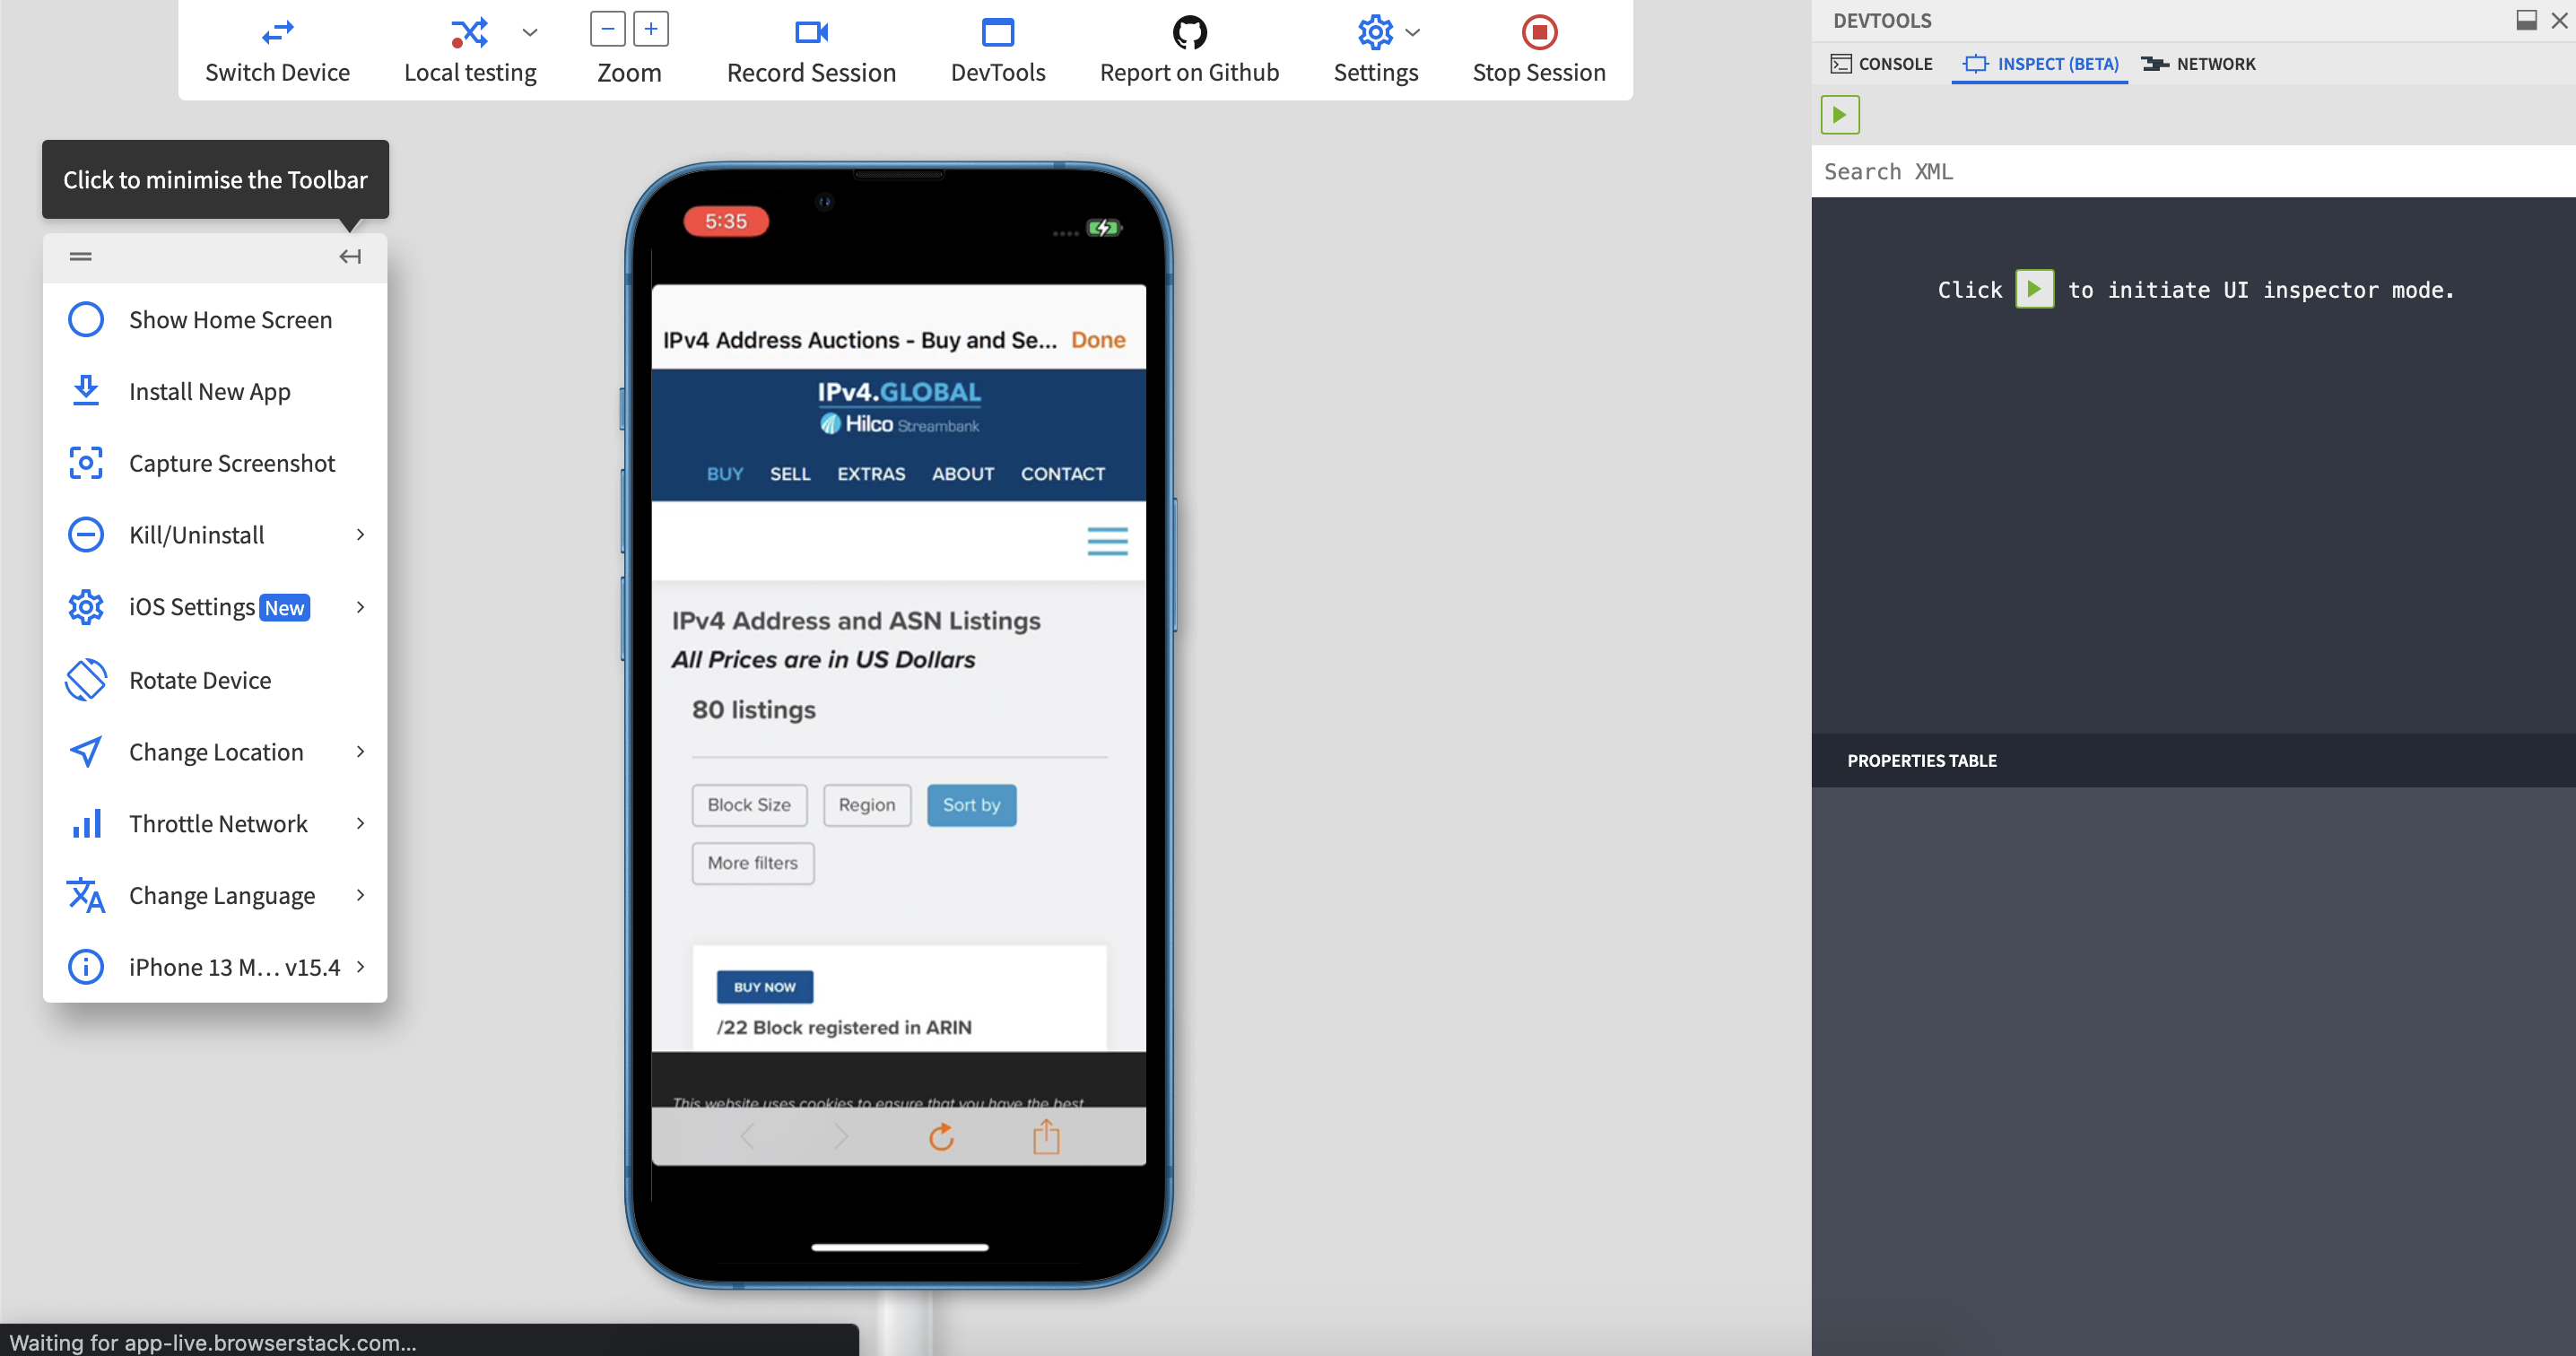
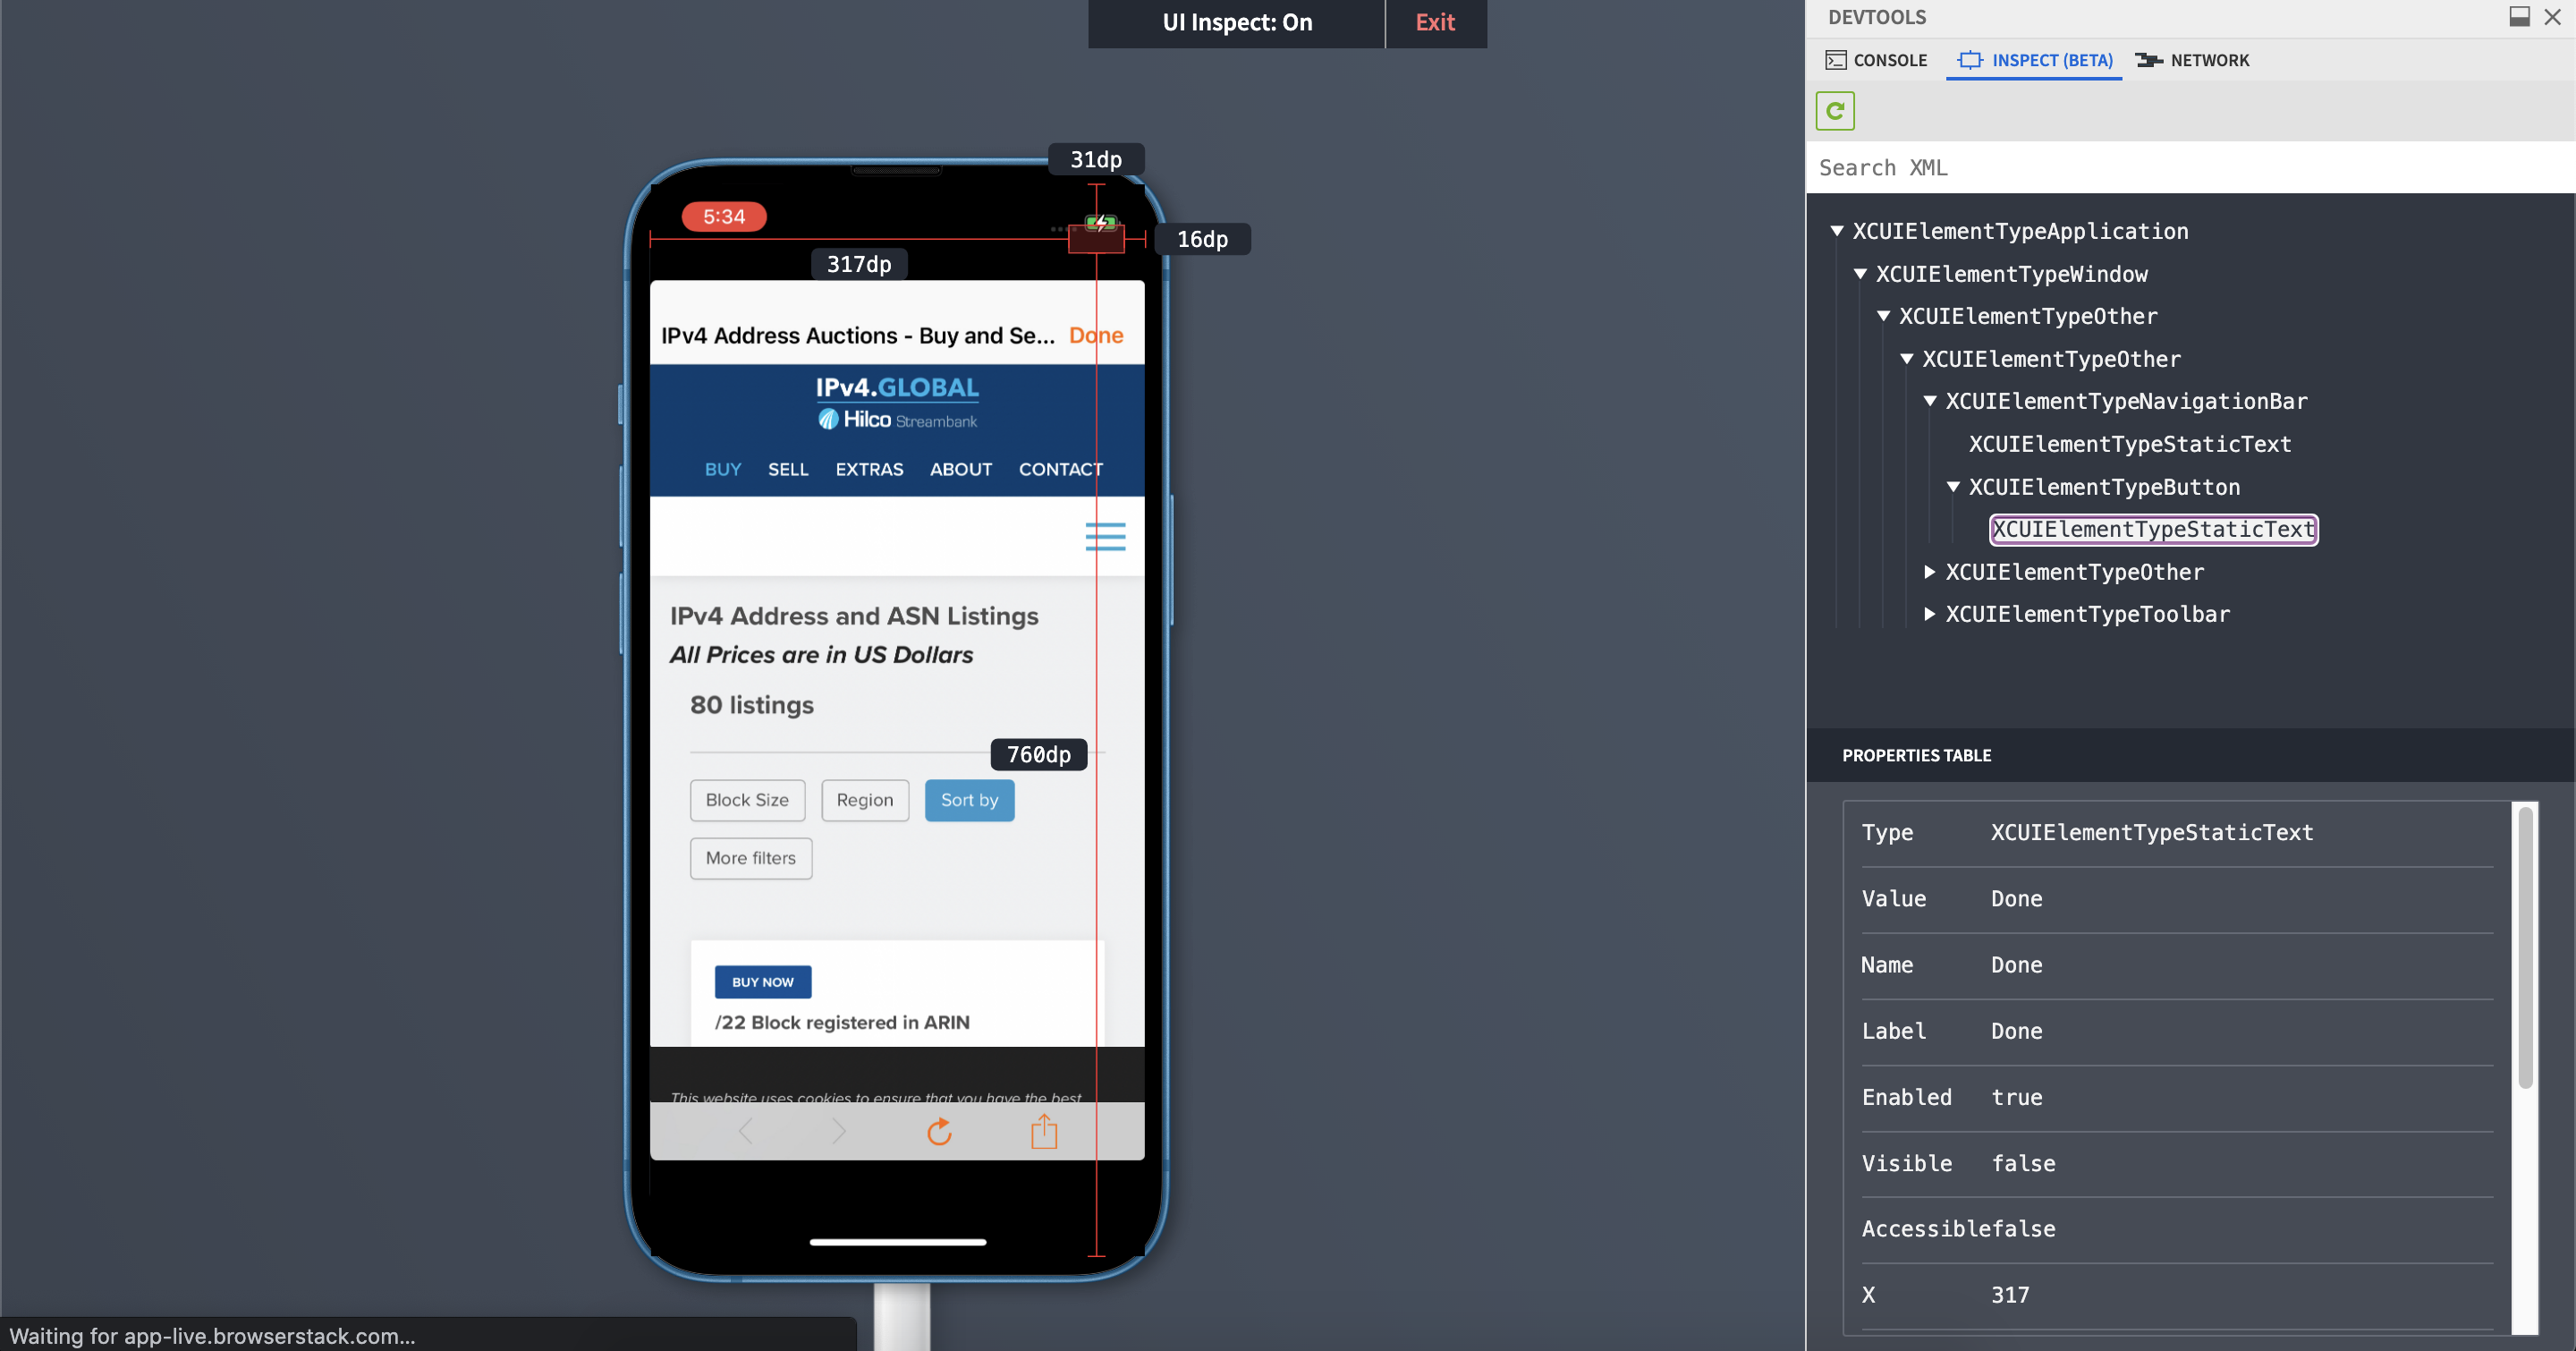
If you have to test the rendered view hierarchy on real devices, you can use the BrowserStack App live dashboard to explore and debug. When you sign in to your App Live dashboard, you can upload your app or launch a device session directly. Once inside the session, you can select the UI debugger from the top menu.
- You can test UI rendering on a host of real devices, instead of relying on simulated environments.
- You can record screenshots or video and share them across the team.
- Multiple ways of uploading App; you can also use binaries like .ipa file or download directly from App store and TestFlight.
Integration with Automated Cloud Testing
For running your UI tests in an automated set up, consider integrating with the BrowserStack App automate feature. It provides simple and easy steps to help you extend UI testing in Xcode for iOS. Here are some of the benefits of running cloud-based automation testing:
- You can access many Apple devices to run automation scripts on. Although simulated test environments can be used for testing on any kind of device through Xcode, it is always better to use real instruments for the best outcomes.
- It opens up the possibility for collaboration on the test scripts and the results of test runs. With the help of platform features you can record and analyze test runs in-depth and share them across your team.
- It is a scale-friendly way of testing as BrowserStack offers parallel testing for accelerated CI/CD pipelines and on-demand resource allocation for your growing needs.
- It offers enterprise-level data compliance for sensitive use cases and access management features like single sign-on to ensure easy control over user access.
- With various third-party integrations, you can extend this setup beyond just testing and create powerful collaborative workflows.
