Running tests on GitLab CI typically involves pushing changes to the repository and waiting for pipeline execution, which can slow down debugging and development. To streamline this process, GitLab Runner allows developers and QA teams to execute CI jobs locally, making it easier to validate .gitlab-ci.yml configurations, run tests, and catch errors before they reach the main pipeline.
This article covers how to run tests locally using GitLab CI, including prerequisites, setting up a project on GitLab, defining the CI pipeline, and executing tests with GitLab Runner. It also walks through how to run Selenium tests locally on GitLab CI using BrowserStack for cross-browser validation.
Pre-requisites to run test on GitLab locally
Before running tests locally on GitLab CI, ensure the following prerequisites are in place to successfully set up and execute jobs.
- Create GitLab Account and Log In to GitLab
- Automation Project (Java-based automation project used in this article)
- GitLab Runner
- Understanding of maven lifecycle
- GitLab CI pipeline file (gitlab-ci.yml)
Also Read: How to implement a CI/CD Pipeline?
Project Creation on GitLab to run Test Locally
Follow the below steps to create a project in GitLab.
- Log in to GitLab using your credentials.
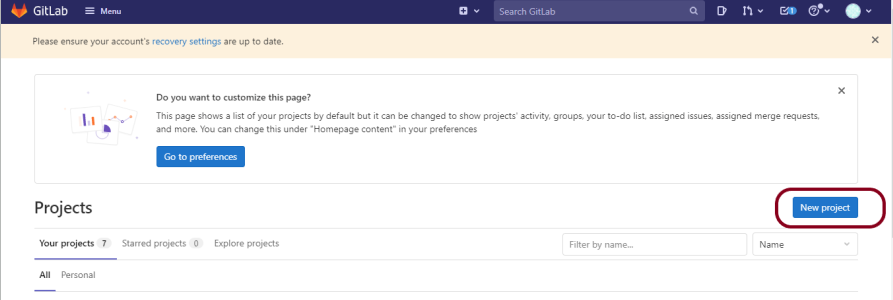
Click New Project on the landing dashboard
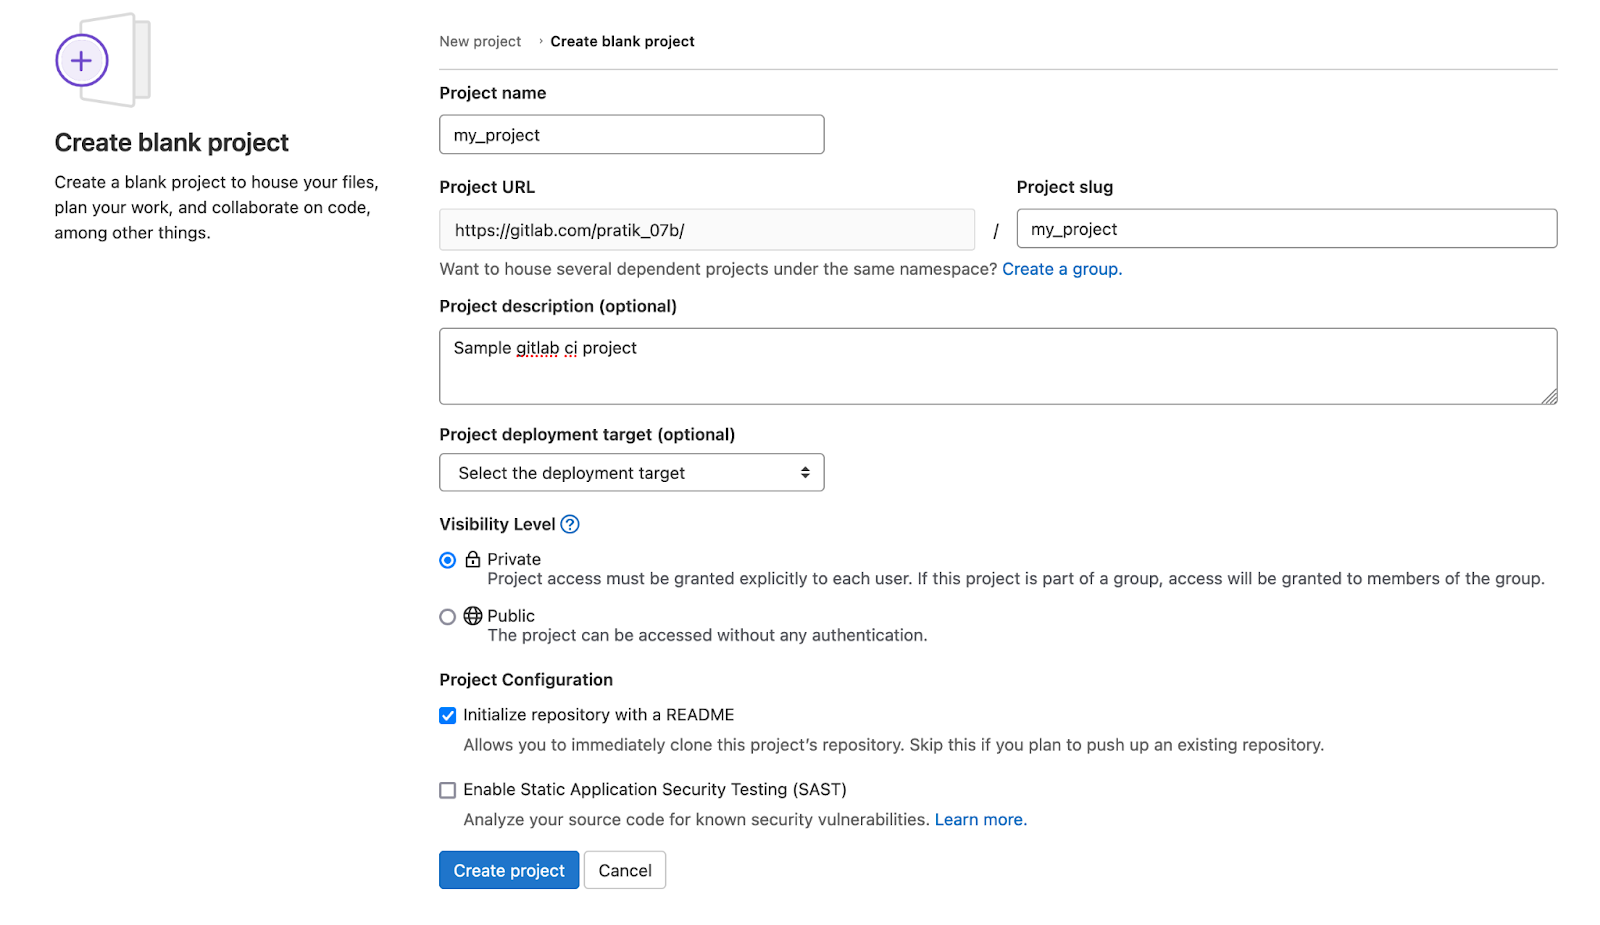
- Validate New project screen gets displayed. Select Create a blank project. You will be navigated to a new screen, which needs the following inputs
- Project Name – Add the project name (For example my_gitlab_ci_project)
- Project Description (Optional) – Add appropriate description for reference
- Visibility Level – Select the Visibility Level for the project.
- Opt the Initialize repository with a README option, this creates a README file so that the Git repository is initialised and has a default branch that can be cloned.
- Click Create project.
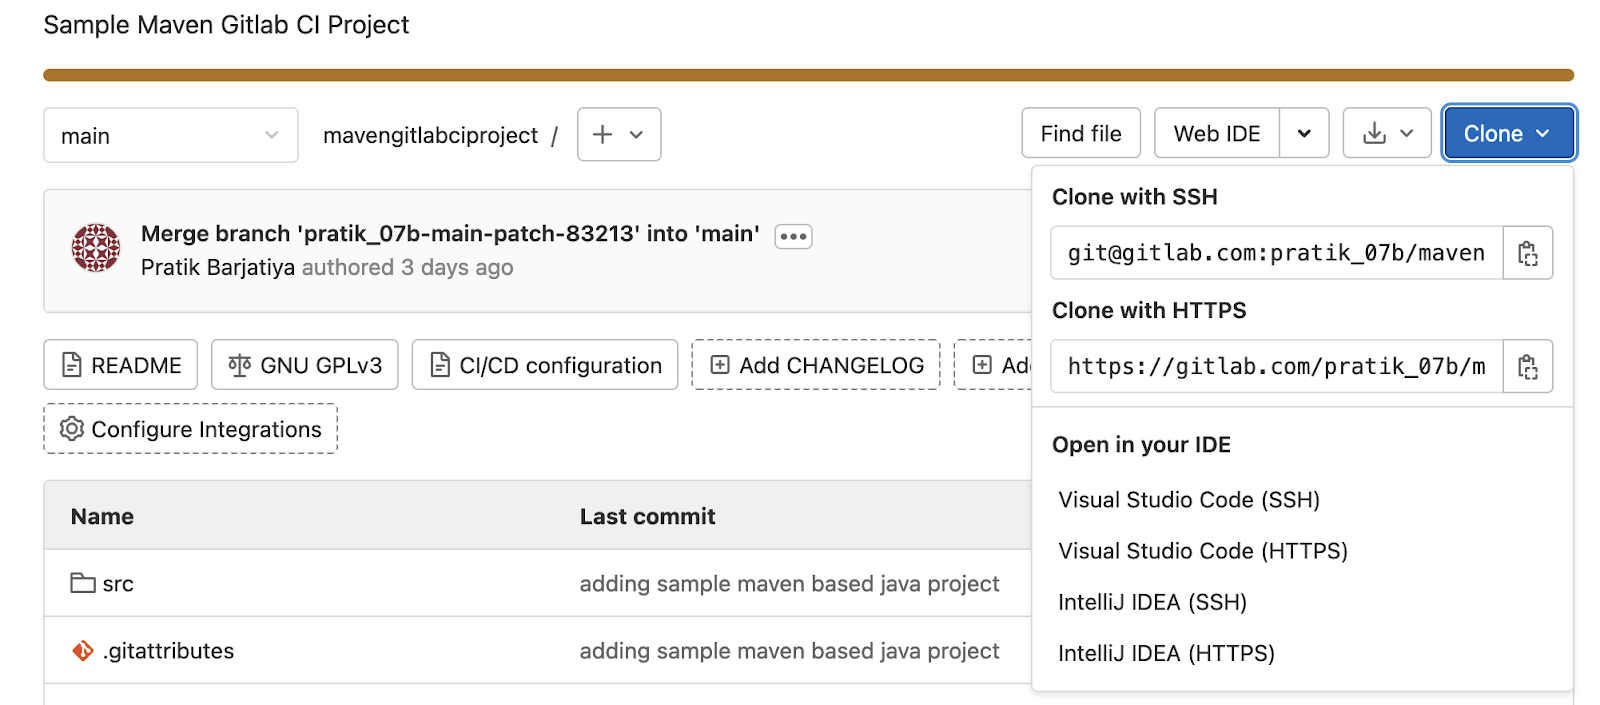
- Now clone the project on local.
- Add the automation files and push the changes.
# Clone the project

git clone <project_clone_with_https_link>

# Navigate to the repository

cd <project_name>

# Add the automation project files

cp -R <automation_local_project> <project_name>

# Push the changes to gitlab, ensure you are in git repo

git add .  # add all files

git commit -m “adding local automation project”  # commit to git local stage environment

# Run this command post local testing

git push origin master # push local stage changes to gitlab server
- Check all the files are available in the GitLab repository.
How to execute Local Tests using GitLab Runner
To execute local tests using GitLab Runner, follow the steps outlined below:
- Ensure a runner is available in GitLab to run the jobs. If there is no runner, install GitLab Runner and register a runner for the project.
- Follow the steps below to install GitLab Runner locally and register the runner using the URL and token. The local testing and project description will be displayed in the Settings > CI / CD > Runners tab.
# Download the binary for the system

# macOS amd64

sudo curl --output /usr/local/bin/gitlab-runner "https://gitlab-runner-downloads.s3.amazonaws.com/latest/binaries/gitlab-runner-darwin-amd64"

# macOS Apple Silicon/arm64

sudo curl --output /usr/local/bin/gitlab-runner "https://gitlab-runner-downloads.s3.amazonaws.com/latest/binaries/gitlab-runner-darwin-arm64"

# provide root permission and execute

sudo chmod +x /usr/local/bin/gitlab-runner

# Register a gitlab runner

gitlab-runner register
- You must also select the executor type (GitLab provides a few executor types for runners. For example – shell, docker)
- To view the available runners go to Settings > CI/CD and expand Runners. As long as you have at least one runner that is active, with a green circle close to it, you have a runner accessible to handle your jobs.
- Define a .gitlab-ci.yml file at the root of the repository. gitlab-ci.yml file defines our CI/CD jobs.
Did you know: Does BrowserStack support GitLab for CI/CD?
Defining gitlab-ci.yml
You can outline the scripts that you require to execute in this gitlab-ci.yml file.
- Define the include and cache dependencies.
- Reap commands that you need to execute in sequence and the ones in parallel
- Define the path where you want to deploy the application
- Decide if you wish to execute the scripts automatically or spark them manually.
- The contents are gathered into jobs and run as a feature of a bigger pipeline. You can bunch numerous independent jobs into stages that execute in a characterized order.
When your gitlab-ci.yml configuration file is added to the repository, GitLab can ascertain it and execute your scripts with the GitLab Runner app. This app functions precisely like your terminal and predominantly helps you reproduce production-like scripts.
A sample gitlab-ci.yml looks like
# Adding variables to set maven local environment

variables:

MAVEN_OPTS: -Dmaven.repo.local=.m2/repository

# Docker image to use latest maven distribution

image: maven:latest

# setting up maven lifecycle stages

stages:

  - build

  - test

  - package

  - deploy

# setting up cache paths

cache:

  paths:

    - .m2/repository

    - target

build_job:

  stage: build

  tags:

    - docker

  script:

    - echo “Maven compile started”

    - “mvn compile”

test_job:

  stage: test

  tags:

    - docker

  script:

    - echo "Maven test started"

    - “mvn test”

package_job:

  stage: package

  tags:

    - docker

  script:

    - echo “Maven packaging started”

    - “mvn package”

deploy_job:

  stage: deploy

  tags:

    - docker

  script:

    - echo “Maven deploy started”
In the above gitlab-ci.yml, the build job will run the scripts under build_job then test_job will execute the test scripts under test_job, and so on with the package and deploy stages.
Explore the shell executor.
gitlab-runner exec shell test_jobGitlab-runner exec is the command that helps test locally. The exec command should be executed directly from the root directory because .gitlab-ci.yml will be kept in the root directory. While executing this, you need to specify the executor type (shell in this case) and the name of the job( test_job).
The above command will clone your project from GitLab, install the dependencies, and execute the tests.
Execute Selenium Tests in Gitlab CI locally using Browserstack
For the most recent documentation, visit here.
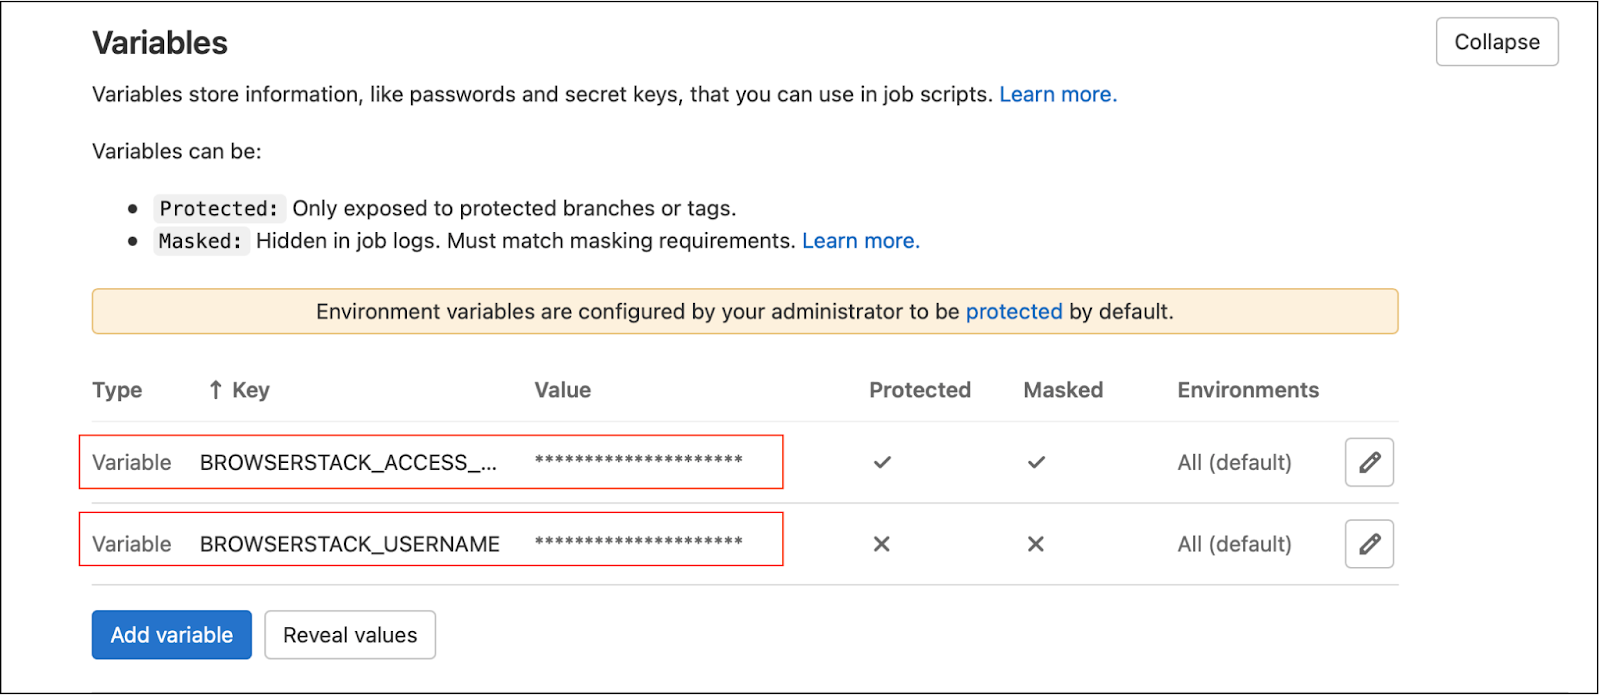
- Add BrowserStack Access Key as a variable in Variables under Settings -> CI/CD
- Set the variable name as BROWSERSTACK_ACCESS_KEY as Key. Please note that the variable name set in Key is used in the test scripts that you want to integrate with BrowserStack.
- Enter the value, which is you Access Key. The Access Key is present in the BrowserStack Automate dashboard.
- Repeat above step to add BROWSERSTACK_USERNAME as a variable.
Now you need to update our test scripts with the local environment BROWSERSTACK_LOCAL and environment identifier BROWSERSTACK_LOCAL_IDENTIFIER
String username = System.getenv("BROWSERSTACK_USERNAME");

String accessKey = System.getenv("BROWSERSTACK_ACCESS_KEY");

String browserstackLocal = System.getenv("BROWSERSTACK_LOCAL");

String browserstackLocalIdentifier = System.getenv("BROWSERSTACK_LOCAL_IDENTIFIER");

String buildName = System.getenv("BROWSERSTACK_BUILD_NAME");

DesiredCapabilities capabilities = new DesiredCapabilities();

capabilities.setCapability("os", "Windows");

capabilities.setCapability("browser", "chrome");

capabilities.setCapability("build", buildName);

capabilities.setCapability("browserstack.local", browserstackLocal);

capabilities.setCapability("browserstack.localIdentifier", browserstackLocalIdentifier);

driver = new RemoteWebDriver(new URL("https://" + username + ":" + accessKey + "@hub.browserstack.com/wd/hub"), capabilities);
You also need to configure the gitlab-ci.yml file to use the BrowserStack Local binary and route the tests through the local server
You can add pre-test steps to add the BrowserStack binary in your gitlab-ci.yml as shown below.
before_script:

   # Download the browserstack binary file

   - wget "https://www.browserstack.com/browserstack-local/BrowserStackLocal-linux-x64.zip"

   #use the following command For OS X systems

#- wget "https://www.browserstack.com/browserstack-local/BrowserStackLocal-darwin-x64.zip"

   # Unzip the BrowserStack Local binary file

#For Windows systems use the following command

#- wget "https://www.browserstack.com/browserstack-local/BrowserStackLocal-win32.zip"

#- powershell.exe D:\BrowserStackLocal.exe

   - unzip BrowserStackLocal-linux-x64.zip

   # Run the file with your access key

   - ./BrowserStackLocal --key $BROWSERSTACK_ACCESS_KEY --daemon start


test:

     script:

         - <our_test_command>

         - ./BrowserStackLocal --key $BROWSERSTACK_ACCESS_KEY --daemon stop
Conclusion
Running tests locally with GitLab CI using GitLab Runner offers significant advantages in terms of speed and efficiency during the development and debugging process.
By setting up a runner, selecting the appropriate executor, and defining a .gitlab-ci.yml file, developers can quickly validate their CI configurations and test scripts without waiting for remote pipeline execution.
Additionally, integrating platforms like BrowserStack for Selenium testing further enhances the testing process by enabling cross-browser validation locally. By adopting this testing approach, teams can streamline workflows, reduce errors, and ensure more reliable deployments.


