What is a Fragment in Espresso?
Fragment represents the behavior of the user interface of an activity. Multiple fragments can be used together in a single activity and once a fragment is created it can be reused multiple times. A fragment has its own life cycle and It has its own input and corresponding output.
AndroidComposeTestRule was designed for the use case where compose content is hosted by an Activity. This test rule allows access to the activity and thus its Navigation Controller. It is needed to successfully navigate to the various fragments of the application.
How to Set up for Espresso Fragment Test
Step 1 Add the following dependencies
androidTestImplementation('androidx.test.espresso:espresso-intents:3.4.0')
androidTestImplementation("androidx.compose.ui:ui-test-junit4:1.0.0")
Here,
Espresso Intents: Validate the click listeners that start new activities.
Compose: Verify the correct behavior of your Compose code
Step 2 Add the testInstrumentationRunner using the code written below
defaultConfig {
testInstrumentationRunner "androidx.test.runner.AndroidJUnitRunner"
}
Due to a configuration issue, I also needed to add the following packaging options to get the tests to build:
packagingOptions {
resources.excludes += "META-INF/AL2.0"
resources.excludes += "META-INF/LGPL2.1"
}
Writing tests for Fragment Testing using Espresso
The test will start by navigating to our fragment using AndroidComposeTestRule. Before each test, we use the test rule to gain access to the activity’s navController and then navigate to the particular fragment.
@get:Rule
val composeTestRule = createAndroidComposeRule<GardenActivity>()

@Before
fun jumpToPlantDetailFragment() {
composeTestRule.activityRule.scenario.onActivity {
val bundle = Bundle().apply { putString("plantId", "mangifera-indica") }
findNavController(it, R.id.nav_host).navigate(R.id.plant_detail_fragment, bundle)
}
}
Our first Test. We want to confirm that the static screen elements are displayed.
@Test
fun screen_launches() {
composeTestRule.onNodeWithText("Mango").assertIsDisplayed()
}
The composeTestRule has a function onNodeWithText that allows you to find a composable with a particular text. If the composable is found you can make various assertions. For this simple case, we only want to ensure that the element with text is displayed.
Our Second Test. We want to confirm that on sharing particular text on the share intent is displayed.
@Test
fun testShareTextIntent() {
Intents.init()

composeTestRule.onNodeWithText("Mango").assertIsDisplayed()
composeTestRule.onNodeWithContentDescription("Share").assertIsDisplayed().performClick()

intended(
chooser(
allOf(
hasAction(Intent.ACTION_SEND),
hasType("text/plain"),
hasExtra(
Intent.EXTRA_TEXT,
"Check out the Mango plant in the Android Sunflower app"
)
)
)
)
Intents.release()

// dismiss the Share Dialog
InstrumentationRegistry.getInstrumentation()
.uiAutomation
.performGlobalAction(AccessibilityService.GLOBAL_ACTION_BACK)
}
We click on the share button of the fragment when it is displayed and check on sharing the particular text on the Intent is displayed.
Run Fragment Test in Espresso
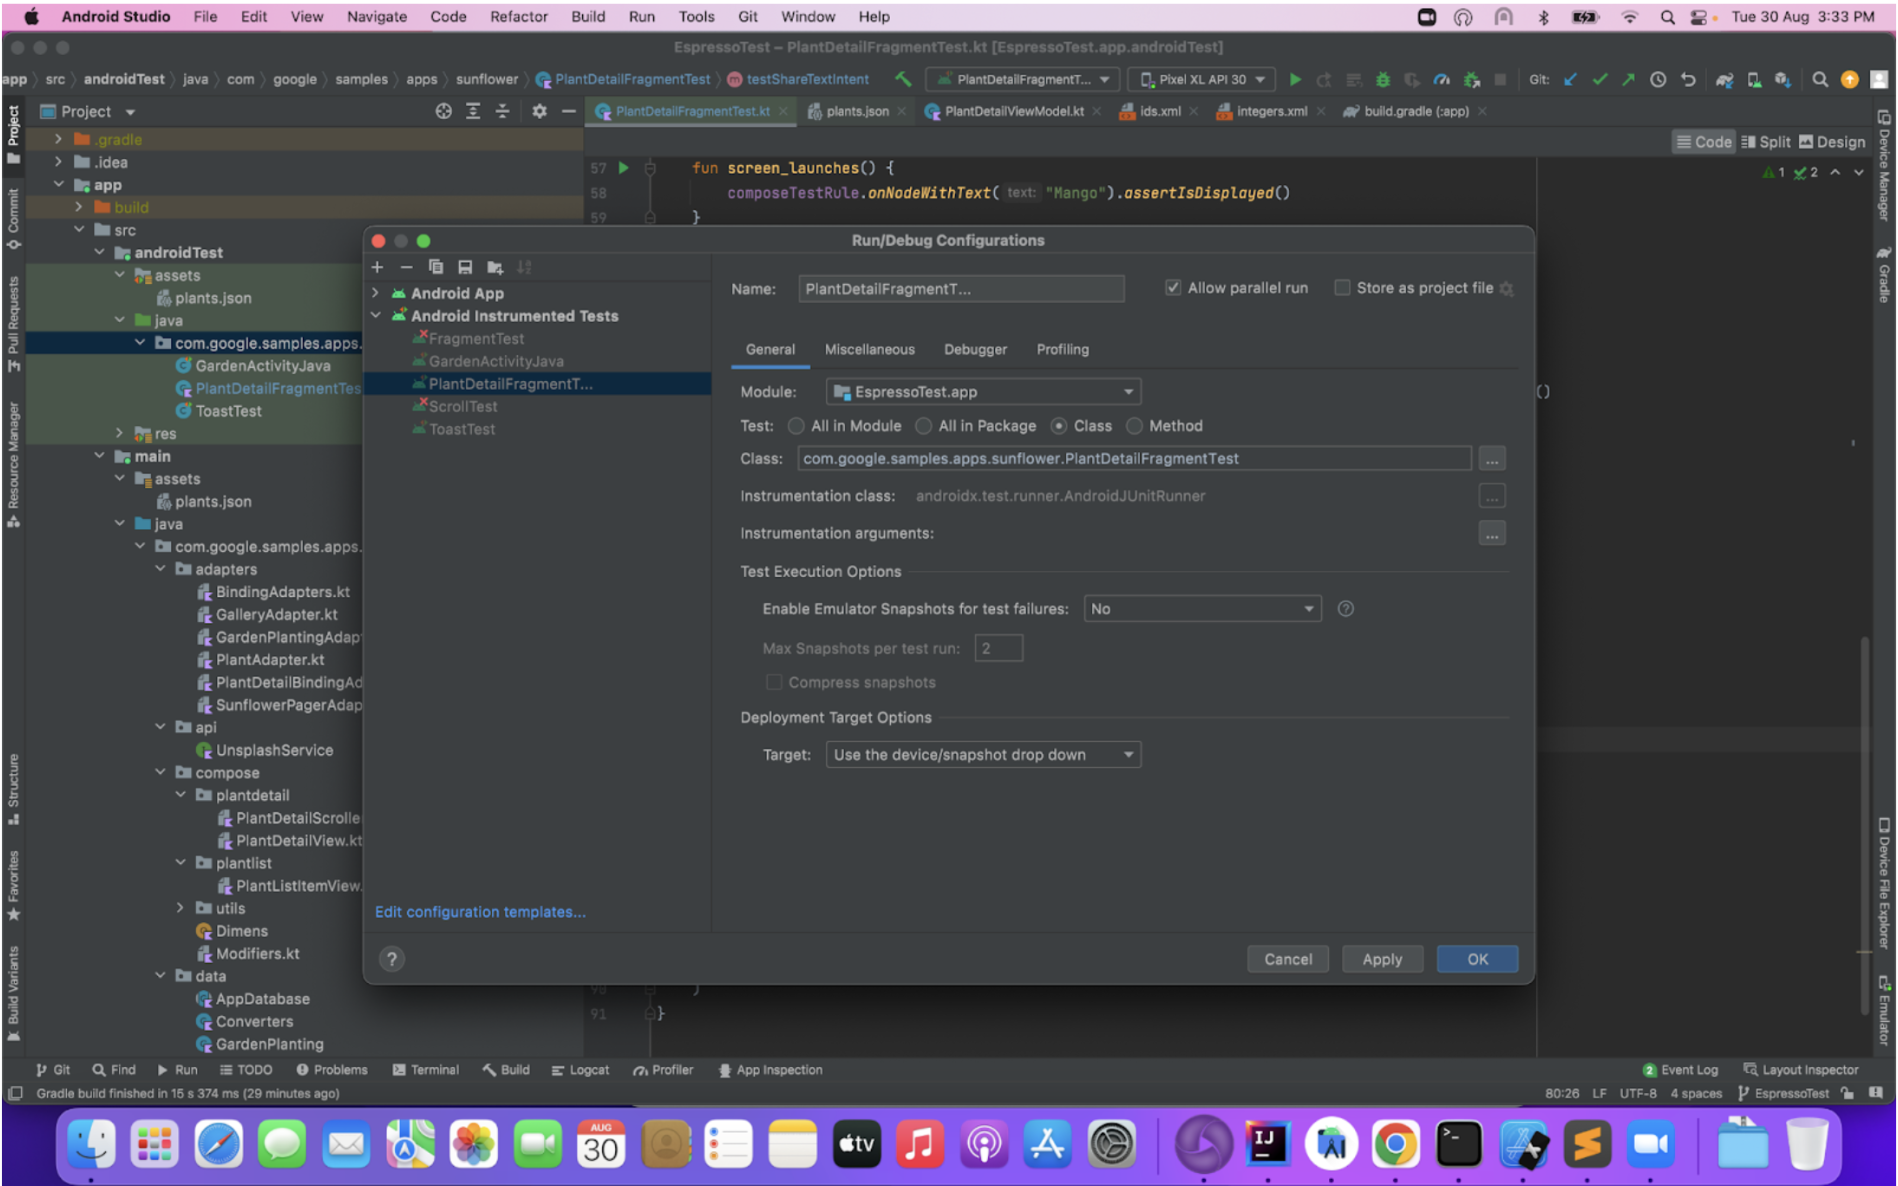
Create a test configuration In Android Studio:
- Open Run menu >> Edit Configurations
- Add a new Android Tests configuration
- Choose a module
- Add a specific instrumentation runner using the below command:
android.support.test.runner.AndroidJUnitRunner
- Add your class name
Once the configuration is set up connect your device or select the emulator and directly run the configuration.
Executing Fragment Test in Espresso with BrowserStack
For more accurate results, it is recommended to test on real devices using BrowserStack App Automate, taking real user conditions into account.
With BrowserStack’s real device cloud you can run Espresso Toast Message on real devices by following the steps below:
Step 1 To Run your test cases on BrowserStack you need two apk files.
First one is the main app .apk file and another is your androidTest .apk file.
To generate both the apk run below command
- To create a .apk file for the app run the following command in the terminal:
./gradlew assembleDebug
- To create a .apk file for the test classes in the terminal run the following command:
./gradlew assembleAndroidTest
Find both .apk files under your project folder: <project-folder>\build\outputs\apk. In the apk folder you will find two files:
- app-debug.apk
- app-debug-androidTest.apk
These are the files that you will upload to the cloud when you create your Execution Plan.
Step 2 Get your access key from the BrowserStack using the below command
curl -u "<username>:<access-key>" -X POST "https://api-cloud.browserstack.com/app-automate/upload" -F "file=@/path/to/app/file/Application-debug.apk"
Output
Please note the App URL (bs://<hashed appid>) returned in the response of this call:
{"app_url":"bs://<hashed appid>"}Step 3 Upload the app by running below command on your terminal
curl -u "<username>:<access-key>" -X POST "https://api-cloud.browserstack.com/app-automate/espresso/v2/test-suite" -F "file=@/path/to/test/file/Application-debug-test.apk"
Output
Please note the Test Suite URL (bs://<hashed testID>) returned in the response of this call:
{"test_url":"bs://<hashed testID>"}The Test ID returned in the response will be used to execute your test.
Conclusion
To get more accurate results, it is recommended to replace apk emulators with real Android Devices for testing, so as to take real user conditions into account. Which is why tools like BrowserStack App Automate are very useful to test on real Android devices.
It allows you test over a wide range of Android devices from the latest one like Google Pixel 9, Samsung Galaxy S24, and Galaxy Z Fold 6 made available for testing from Day 0 to the legacy devices. It also has Redmi, Oppo, Vivo and Motorola devices to test on.
BrowserStack App Automate makes debugging easier by allowing QAs to check the video, text, and console logs, which can be shared with the team over Slack, GitHub, Trello or Jira.


