Designing a good user interface is a key to the success of any application. Consider any web application which is dominating the software world, they have a rich and user-friendly interface. Whether it is the dashboard, graphs, complicated statistical data, or simple application, user design is considered to be one of the important parts of any software product.
Overview
Why Test UI Components?
- Ensures consistency in design and behavior.
- Catches bugs early in development.
- Improves reliability across browsers and devices.
Methods for Testing UI Components
- Unit testing for isolated component logic.
- Snapshot testing for visual consistency.
- End-to-end testing to validate components in workflows.
Tools and Frameworks
- Use popular testing libraries like Jest, React Testing Library, and Cypress.
- Visual testing tools to catch pixel-level differences are available.
Best Practices
- Keep tests independent and focused.
- Mandate component testing.
- Automate visual regression checks.
This article will assist in learning why UI component testing matters, the methods available, and best practices to ensure reliable user experiences.
What is the User Interface?
The User Interface or UI is the point of human and computer interaction in a device or application. In simple terms, when you navigate to a specific URL, what you see is the User Interface. With User Interface, one can perform a set of actions such as searching text, filtering the data, clicking on buttons, taking a picture, view the data, etc.
Also Read: A Detailed Guide on UI testing.
What is UI Component?
When you build the wall for your house, you need to arrange the blocks and make a wall. Similar way, the UI components are blocks of the User Interface. The components are often called sections or elements. The UI components are integrated to build the User Interface for any application.
Nowadays, the UI components are typically rendered from libraries; the UI libraries provide a ready-made set of UI components and no need to design from scratch. Some examples of UI libraries are angular material, Webix, Material UI, and VMware Clarity. Standard UI components have minimal features such as accessibility, responsiveness, ease of use, rich look, etc.
What is UI Component Testing?
UI Component Testing is the technique of testing a subset of UI elements. As discussed earlier, the UI component together builds the complete user interface. Modern rapid software development expects that testing and development should be done in a short cycle. When you build the UI component, and if you have to wait for the UI components to integrate and test, testing will be delayed. The modern application frameworks and tools allow the UI components to be tested in isolation. The UI Component testing helps to identify the bug at an early stage of development and deliver a quality product.
Why is UI Component Testing Important?
End-to-end testing takes care of functionality and workflow testing, but that doesn’t give a guarantee on the User Interface or visual aspect of the product, so User Interface testing is important. The modern application architecture follows a component-driven User Interface design, where the User Interface is built as an individual component first, then integrated to make a complete UI. The UI component testing has a lot of benefits:
- Early testing: Bugs exposed at the later stage of development are costlier to fix, the UI Component testing helps uncover the UI bugs at an early stage of development.
- Validates the visual aspect of the product: The UI Component testing ensures that the visual aspect of the product such as font, styles, and boundaries are correct and as expected.
- Protects from accidental changes: The component testing helps to protect from any accidental changes such as regressions etc.
- Faster development: Component-level testing helps in faster development, one need have to wait until components are integrated fully. The modern tool allows testing the UI component in an isolation.
- Ensures cross-browser compatibility: The most common scenario while testing the UI is the way the browser renders the web element. Sometimes UI might look different on different browsers if the cross browser logic is not applied efficiently. The individual component can be tested using a visual testing tool such as Percy, which helps to verify the cross-browser compatibility of UI components.
The best and easier way to test the UI component is using the Visual Testing technique, The Visual Testing tool verifies the UI components visually and provides the result. It works by comparing the two screenshots, one is the base screenshot and another is the actual one. If the actual screenshot has a difference in comparison with the base screenshot then something is wrong and so the test is marked as failed, if there is none then you are good.
The component-level Visual Testing can be done using multiple tools such as Cypress with Percy, Storybook with Percy, etc.
This article uses React framework, Cypress test automation tool, and Percy to perform UI component testing.
The Cypress tool helps to render the UI components and perform a set of actions on the UI component. On the other hand, the Percy tool takes a screenshot at the expected point and compares it against the base screenshot.
How to Test UI Components using Percy and Cypress?
Prerequisites:
Install NodeJS
- Download the NodeJS version
- Click on downloaded installer
- Follow the on-screen instructions
Setup React Development Framework
- Ensure that you have the development framework setup ready. This article explains the testing part of the UI component.
Step 1: Install Cypress
Install Cypress node packages to your project
npm install cypress -D
The above command installs the Cypress automation framework packages and their dependencies.
Step 2: Setup Cypress
The Cypress is a framework-ready application, the Cypress open command sets up all the required folder structures for your project.
npx cypress open
After execution of the above command, the Cypress window opens up. Based on your system configuration, the open command can take some time.
Step 3: Set up component testing
The Cypress supports both end-to-end and component testing. In our case, you need to set up component testing.
- Open Cypress window using the above command.
- Choose the component testing option.
- Use the on-screen instruction and generate default cypress folders/files
Step 4: Install Percy for Cypress
npm install --save-dev @percy/cli @percy/cypress
The above command installs two different packages, namely @percy/cli and @percy/cypress. Percy is required for visual validation of screenshots.
Step 5: Configure the cypress/support folder for Percy
Navigate to cypress/support/component.js file and add the import statement.
import '@percy/cypress';
Step 6: Add a new react component
For the purpose of this example, we will be creating a basic react component here, In your case, you might already have components you can use the same.
//DemoComponent.jsx
import { useState } from 'react'
import {Button, Alert} from 'react-bootstrap';
import './App.css'
import 'bootstrap/dist/css/bootstrap.min.css';
export default function DemoComponent() {
//style={{background: "red"}}
return (
<div data-testid="demo-page">

<div data-testid="demoButton">
<Button variant="primary" size="lg" >
Demo Component Button
</Button>
<p></p>
</div>
<div data-testid="infoalert">
<Alert key="info" variant="info">
This is a test Alert!
</Alert>
</div>
</div>
)
}
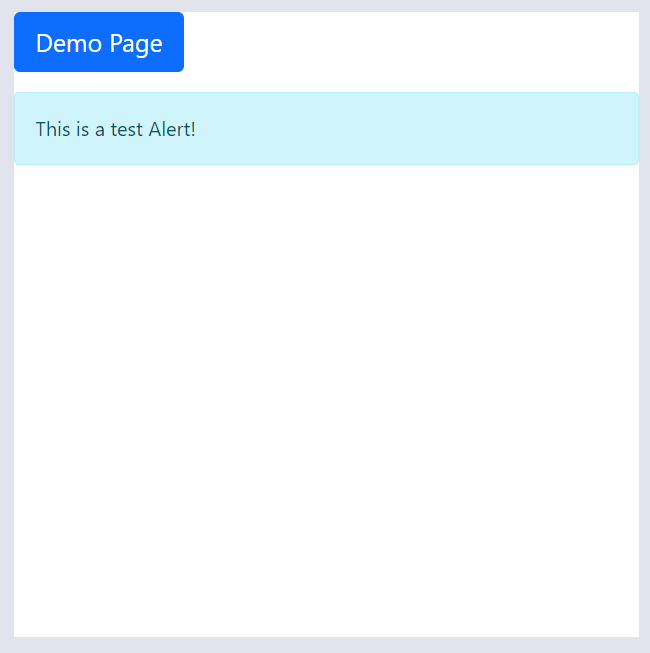
The above example when rendered, looks as shown in the below image.
Step 7: Write component tests using Percy Cypress
Using all the above steps, you have configured Cypress, installed Percy, and created a demo component which means, the setup is complete. Now you need to write the component tests.
Navigate to cypress/component folder and create a component-test.cy.jsx file.
Create a simple test as mentioned below.
import { mount } from 'cypress/react'
import DemoComponent from '../../src/DemoComponent'
const demoButton = '[data-testid=demoButton]'
describe('Demo Component Testing Percy', () => {
it('Visual Testing Cypress Percy', () => {
mount(<DemoComponent />)
cy.percySnapshot('percy-component-test')
})
})
In the above component test,
- import DemoComponent from ‘../../src/DemoComponent‘: This is the import statement, we are importing the Demo Component file.
- mount(<DemoComponent />): The mount function renders the component during the execution of your Cypress scripts inside the cypress sandboxed iFrame.
- cy.percySnapshot(‘percy-component-test’): The Percy command to take a screenshot.
Step 8: Get the PERCY_TOKEN
The PERCY_TOKEN uniquely identifies your project on Percy’s infrastructure. Before executing your tests you need to get the PERCY_TOKEN.
Steps to get the PERCY_TOKEN
- Login to Percy
(Note If you don’t have a Percy account, you can create one. Alternatively, if you have a Browserstack account you can use the same credential to Percy Login.)
- Create a new Project (If you have Percy Project already created, you can choose to use the same.)
- Navigate to Project Settings in Percy
- Copy the PERCY_TOKEN
Step 9: Set up the PERCY_TOKEN environment variable
As mentioned above, the PERCY_TOKEN uniquely identifies your project on Percy’s infrastructure when you execute your tests the Percy CLI looks for the PERCY_TOKEN environment variable, so you need to set the PERCY_TOKEN environment variable.
The Setting up token command differs for each command line tool; based on the command line tool you are using, you can choose the below one and execute the same.
- Set up a PERCY_TOKEN environment variable in Powershell
$Env:PERCY_TOKEN="<your-project-token>"
- Set up a PERCY_TOKEN environment variable in the windows command line
set PERCY_TOKEN="<your-project-token>"
- Set up a PERCY_TOKEN environment variable in Linux/Mac-based Terminal
export PERCY_TOKEN=<your-project-token>
Step 10: Execute Percy Cypress component tests
The Percy execution command differs from typical Cypress execution command. Using the below command, you can execute your Percy Cypress component tests.
npx percy exec -- cypress run –component
Step 11: View the Result
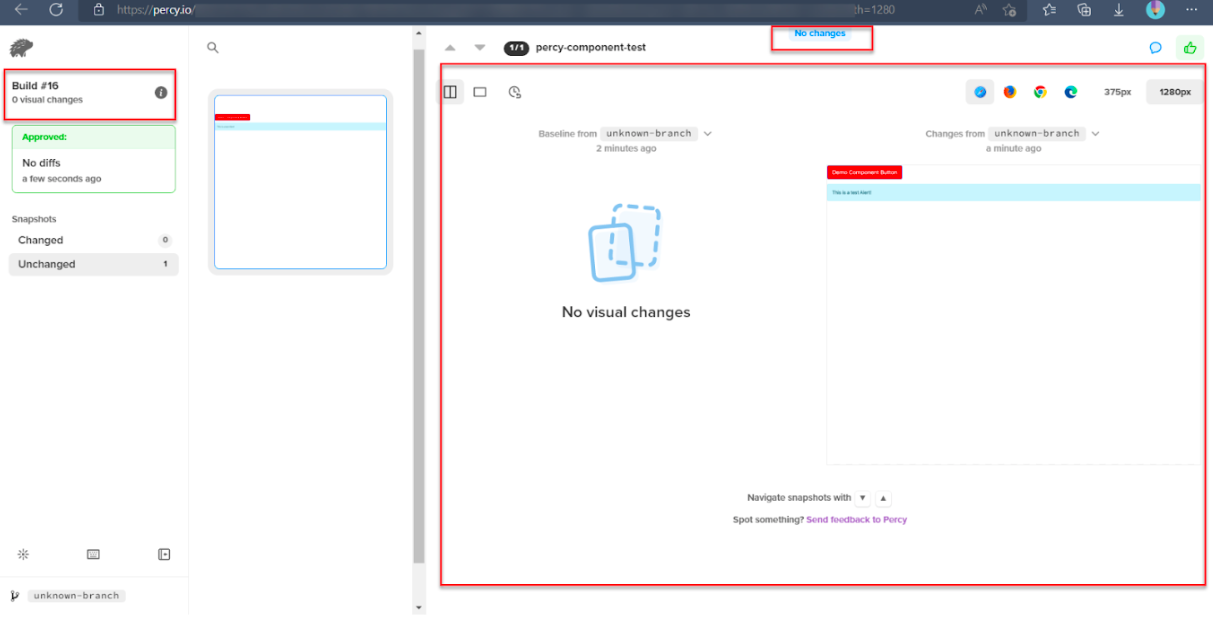
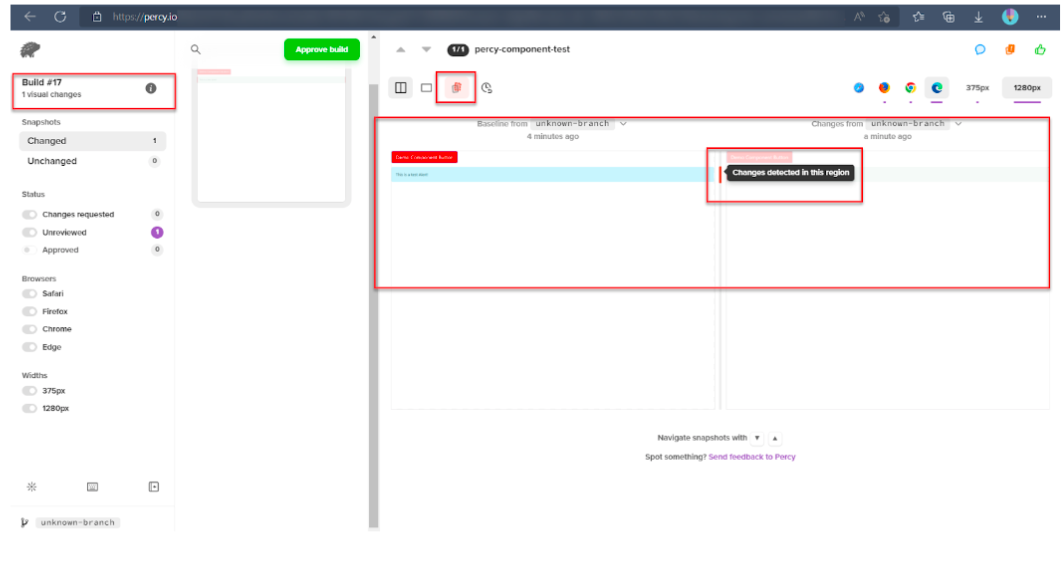
Once the test execution is complete, the command line output shows the result with Percy’s build URL. Using Percy’s build URL you can navigate to Percy’s build dashboard and view the differences.
If there is no difference, found, then the result will be shown as “No Changes”
Percy clearly shows the differences if there are any.
How to Perform Visual validation of Single HTML element using Cypress Percy
Percy added a new feature that helps to take a screenshot of a single HTML element. Percy provides an option parameter called a scope that can be used to take a screenshot of the particular element.
You might have a testing scenario where you want to visually validate a single DOM element for example: a button, textbox, particular div tag, etc. The latest version of Percy allows this.
Consider the above code, we have the button with the below HTML tag
HTML Code
<div data-testid="demoButton">

<Button variant="primary" size="lg" >

  Demo Component Button

</Button>

</div>
In the above code, we have Demo Component Button, which has data-testid, If you want to take a screenshot of this button you can modify the test as shown below.
//visual-component-test.cy.jsx

import { mount } from 'cypress/react'
import DemoComponent from '../../src/DemoComponent'
describe('Demo Component Testing Percy', () => {
it('Visual Testing Cypress Percy', () => {
mount(<DemoComponent />)
// cy.percySnapshot('percy-component-test');
cy.percySnapshot('percy-single-element-visual-test', { scope: 'div[data-testid="demoButton"]' });
})
})
In the above code, we have added
cy.percySnapshot('percy-single-element-visual-test', { scope: 'div[data-testid="demoButton"]' });The scope option is a newly introduced feature, which helps to take a single HTML element screenshot. The scope is like a key, and you need to pass the CSS selector as a value. Since in our case the CSS selector is div[data-testid=”demoButton”].
Component Testing Best Practices
- Test Every Component: Ensure that the existing and new component has component-level tests.
- Mandate component testing: Add component testing as a mandatory checklist, this helps to reduce the bugs.
- Schedule component tests: Just like any other tests, component testing can be scheduled in the pipeline or use SaaS tools such as Percy, which helps to identify any uncovered bugs.
- Add visual testing for UI components: Visual Testing makes the process more efficient and easy. Adding visual tests to components makes UI more bug-free and helps to deliver quality code.
The modern software development architecture recommends a component-based development model. The component model helps to build the UI part by part, and it is easy to scale up or add any additional features in the future. Similarly, the UI components are easy to split into, and multiple developers can work together parallelly, which accelerates the development process. Though strict code review is done every step, catching the visual aspect of the component is not easy. The visual regression tests for the component help to catch any visual bugs such as font, styles, etc., and improve the product quality.
