User Interface of the web application helps users form the first impression of your web application. It is one of the major success factors that can lead to better user engagement and retention. The modern web application architecture follows a component-based user interface to ensure that each of the components is well-designed and thoroughly tested.
The component-based architecture not only helps develop the application faster but also helps to ship the product in a shorter software development life cycle. It has many advantages such as faster development, ease of testing, and most importantly multiple developers can work on different parts (components) of the user interface simultaneously.
What is a Component in User Interface?
UI Component is a section or elements of the user interface. These are integrated to build the User Interface for any application. User interface is divided into smaller chunks which are called components, and they are developed either parallelly or sequentially, which helps to deliver a set of features in an iterative approach.
Typically, the user interface is built from libraries. Without UI libraries, one has to build the component from scratch, which is time-consuming. There are several expectations from the components such as accessibility, responsiveness, ease to use, rich aesthetics, etc. Achieving these characteristics from scratch needs effort and cost. So most organizations choose pre-built UI frameworks such as Angular material, Webix, Material UI, VMware Clarity, etc. for building UI components.
What is Component Testing of User Interface?
Testing the single or subset of UI sections/components is called UI component testing. The modern software development methodology such as the Agile model expects code to be released in a shorter span. Hence, QAs can’t wait until the complete user interface has been built; hence, as soon as the component is developed the component needs to be tested and delivered. Then the component can be integrated to make the complete user interface. This ideology helps in the faster delivery of high-quality applications.
Why is UI Component Testing Important?
There are several types of testing such as an end to end testing, API testing, and integration testing but none of the above tests assures the quality of visual aspects of the application such as styles, fonts, positions, etc. To validate the UI element individually, you need UI component testing that helps to test the UI element component by component rather than UI as a whole.
It is mainly useful in cases when adding new UI components, and hence they need to be tested individually.
Advantages of UI component testing
- Test Early: Any bugs which are exposed at a later stage of development are costly. UI component testing helps discover the bugs at an early stage, which can save time and cost.
- Quality User Interface: UI Component testing validates that all the visual aspects of the product such as font, styles, and boundaries are correct and as expected. The glitch-free user interface also ensures a smoother user experience (UX).
- No more accidental changes: Frequent execution of UI test suites help to protect from accidental changes, which are common when multiple developers are working on the same set of tasks.
- Faster Delivery: Component-level testing helps in faster development thus resulting in faster delivery of the product. A modern tool like a Storybook allows testing the UI component in isolation.
- Cross-browser UI compatibility: The most common scenario while testing the UI is the way different browsers render the web element. Sometimes UI might be rendered differently from browser to browser if the developers have not handled cross-browser logic efficiently. The individual component can be tested using a visual testing tool such as Percy, which helps to verify the cross-browser compatibility of UI components.
What is Visual Regression Testing in UI Components?
Visual regression testing is a testing technique, where two screenshots are compared, and the results are driven based on the comparison of screenshots. There will be two images: baseline and actual. The baseline image is like the expected image, and the actual image is an image after changing or fixing any UI issues.
What is a Storybook?
Storybook provides an environment where one can develop, test, and debug the UI components in isolation. It supports all modern UI frameworks such as React, Angular, Vue, etc. Storybook is a Javascript-based open source framework and is most widely used. Storybook Testing is used to check UI components.
Percy is a Visual Testing tool, which allows performing Visual testing for UI components both manually and automated. Percy can be integrated with the Storybook to get the most out of UI testing.
How to perform Visual Regression Testing for components in Storybook?
Percy is the most widely used and most popular visual testing tool; some of the best features of Percy are:
- Support for multiple test automation frameworks,
- Dedicated dashboard for each build,
- Easy-to-execute tests, easy-to-schedule builds,
- Support for both manual and automation of visual testing.
Percy can be easily integrated with Storybook. This article uses React, Storybook, and Percy tools.
Also Read: How to perform Storybook Visual Testing?
As a prerequisite, you need to integrate the integrate Storybook with React App to start with Visual Testing using Percy.
Using the To-Do app cloned from this Github code base in this guide as an example. However, you can use your application to configure Percy Visual Testing for React.
Step 1: Install Percy packages
Two Percy packages you need to install are:
- @percy/cli It helps to run Percy storybook on the command line,
- @percy/storybook It helps to integrate or use Percy commands in your storybook files.
Use the below command to install these packages
npm install --save-dev @percy/cli @percy/storybook
Step 2: Copy the PERCY_TOKEN
PERCY_TOKEN uniquely identifies your project on Percy’s infrastructure. Before executing Percy-Storybook components, you need to copy the PERCY_TOKEN.
Steps to get the PERCY_TOKEN
(Note: If you don’t have a Percy account, you can create one. Alternatively, if you have a BrowserStack account you can use the same credential to Percy Login.)
- Create a new Project (If you have Percy Project already created, you can choose to use the same.)
- Navigate to Project Settings in Percy
- Copy the PERCY_TOKEN
Step 3: Set up the PERCY_TOKEN environment variable
As mentioned above, the PERCY_TOKEN uniquely identifies your project on Percy’s infrastructure, when you execute your tests the Percy CLI looks for the PERCY_TOKEN environment variable so you need to set the PERCY_TOKEN environment variable.
The Setting up token command differs from the command line tool. Use the below commands to set up a PERCY_TOKEN environment variable in:
- Powershell
$Env:PERCY_TOKEN="<your-project-token>"
- Windows Command Line
set PERCY_TOKEN="<your-project-token>"
- Linux/Mac-based Terminal
export PERCY_TOKEN=<your-project-token>
Step 4: Execute Percy Storybook Tests
Percy captures the screenshot of all your components once you execute the test. There are multiple ways to execute your Storybook and Percy Visual Tests.
npx percy storybook:start
The above command starts the Storybook and loads the Storybook components and captures them. The captured screenshot will be uploaded to Percy’s infrastructure.
Alternatively, you can configure the test command shortcut in package.json and use it by running the following command
npm run test
Once the execution is complete, the command line output will show Percy’s build URL. You can navigate to the build and validate the test results.
Alternatively, manually log in to Percy, go to Projects, and click on the latest build.
Note: As mentioned previously in this article, the visual test works by comparing two screenshots, so the first time when you execute the test the baseline screenshot will be captured which will then be compared against the actual screenshot taken in subsequent runs. So you need to run the test at least two times to get valid test results.
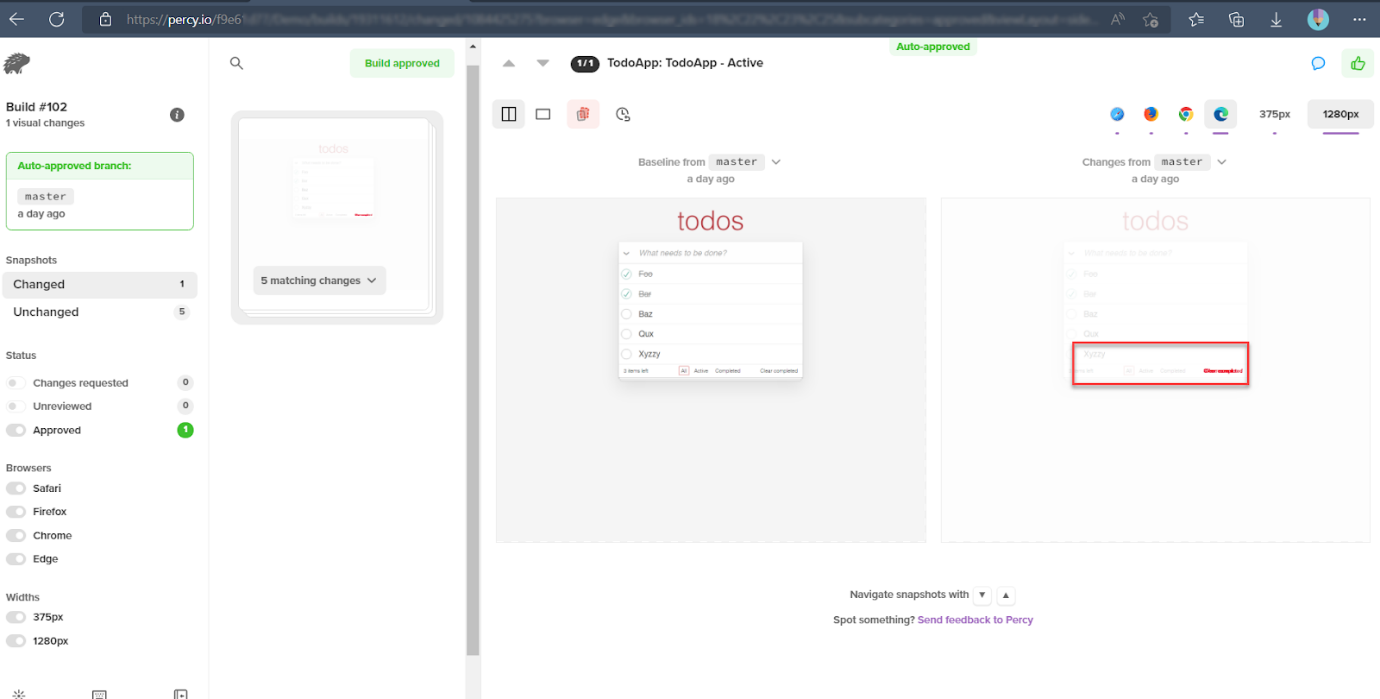
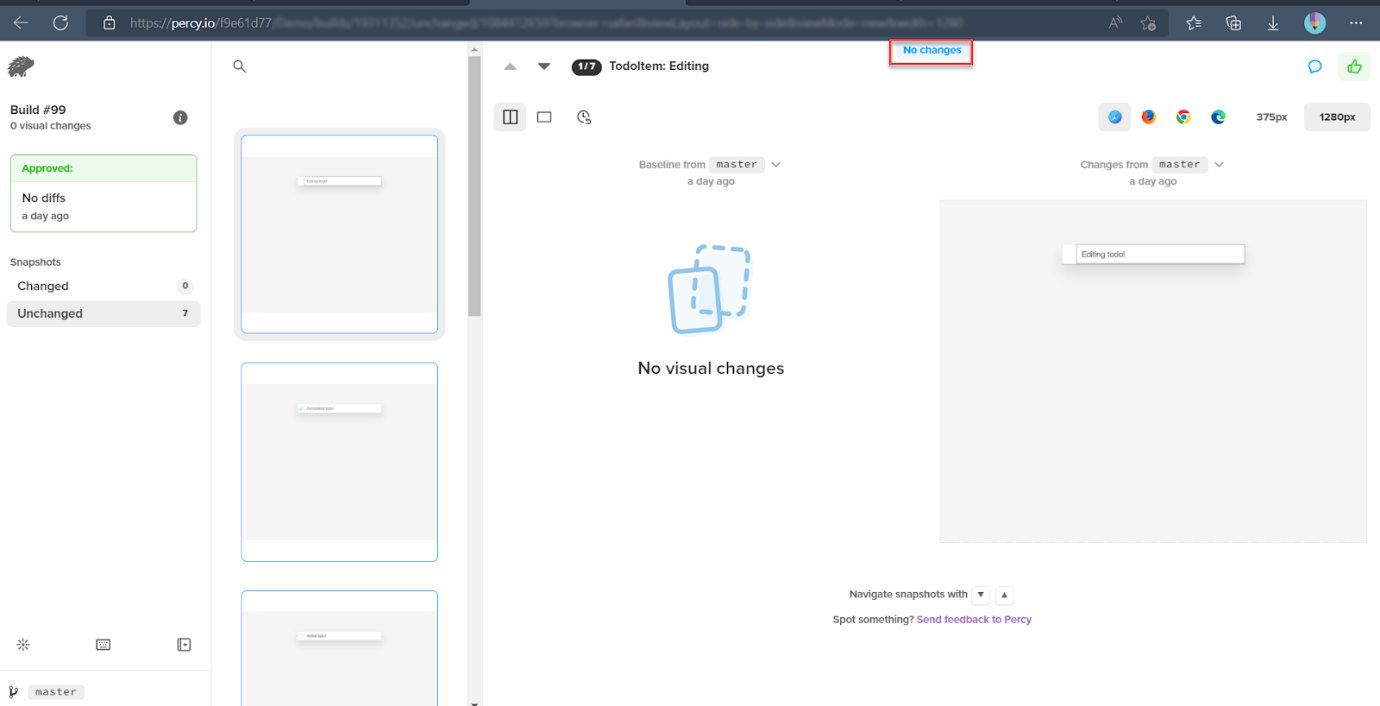
Percy’s build dashboard shows the side-by-side differences if there are any.
If there are no differences, Percy indicates that with the message “No Changes”
How to test the states of Component in Storybook
Assume that the To-Do app has multiple tasks; tasks can have states like active, completed, etc. you can test these states in the storybook book with Percy integration.
Below is the story file TodoApp.stories.js, for the to-do task component
//TodoApp.stories.js

import React, { useState, useRef } from 'react';

import TodoApp from './TodoApp';

export default {

  title: 'TodoApp',

  component: TodoApp,

};

export const App = args => <TodoApp {...args}/>;


// match component name for single story hoisting

App.storyName = 'TodoApp';

App.args = {

  showTodos: 'all',

  todos: [

    { title: 'Foo', completed: true },

    { title: 'Bar', completed: true },

    { title: 'Baz' },

    { title: 'Qux' },

    { title: 'Xyzzy' }

  ]

};
The above file can be modified to integrate with Percy to take a screenshot of states. The Percy provides an option additionalSnapshots, which helps to take a screenshot of various states of the component such as active, completed, etc.
The above story file can be modified to take screenshots of states, as seen below.
//TodoApp.stories.js

import React, { useState, useRef } from 'react';

import TodoApp from './TodoApp';

export default {

  title: 'TodoApp',

  component: TodoApp,

};

export const App = args => <TodoApp {...args}/>;

// match component name for single story hoisting

App.storyName = 'TodoApp';

App.args = {

  showTodos: 'all',

  todos: [

    { title: 'Foo', completed: true },

    { title: 'Bar', completed: true },

    { title: 'Baz' },

    { title: 'Qux' },

    { title: 'Xyzzy' }

  ]

};

App.parameters = {

  // take additional snapshots of various states

  percy: {

    additionalSnapshots: [{

      suffix: ' - Active',

      args: { showTodos: 'active' }

    },{

      suffix: ' - Completed',

      args: { showTodos: 'completed' }

    }, {

      suffix: ' - None',

      args: { todos: [] }

    }]

  }

};
In the above code, the section App.parameters have some of Percy’s parameters like additionalSnapshots.
The suffix is used to name the image files in Percy’s infrastructure, which helps to differentiate the image files.
UI Component Testing Best Practices
Here are some of the best practices to follow during UI Component Testing:
- Mandate Component Testing: There are different methods to test components, however, component testing should be part of a mandatory checklist while developing any UI component.
- Visual Testing of Components: Visual Testing is an effortless way to test any UI component. Visual Test helps reduce the bugs in the later stage of development. It ensures that the UI components appear consistently.
- Component States Testing: Typically the components such as check-box, drop-downs, etc. can have one or more states. Always ensuring that the UI component tests cover all possible states is a best practice.
Conclusion
BrowserStack’s Percy is a new generation tool for Visual Testing; it provides a lot of flexibility for the user; since it is a SaaS application, you can see the Visual Results anywhere. This further adds the flexibility to review, accept and reject the builds from anywhere. Percy improves the review process and helps in faster development and testing of UI Components.


