Visual Regression Testing (visual testing/visual validation) ensures the UI remains visually consistent after code changes by verifying layouts, styles, and elements across builds. It can be done manually or through automated screenshot comparison to catch unintended UI differences.
With TestCafe, visual regression testing compares new page snapshots against baseline images to flag layout or style shifts across browsers. It integrates directly into TestCafe, making visual checks seamless within CI workflows.
Overview
Steps to perform visual regression test using Test Cafe
Option 1: Blink-Diff Plugin
npm install testcafe-blink-diff –save-dev
Capture baseline screenshot > Capture new screenshot > Compare with Blink-Diff
Option 2: Percy Integration
- Requires Percy project + token
- Provides dashboard with diffs
Visual Regression Testing Core Workflow
- Capture Baselines: Take an initial “golden” snapshot of the UI (the expected look).
- Run & Compare: On subsequent runs, capture the “actual” UI and use a tool (like Percy or Blink-Diff) to detect pixel differences.
- Review Differences: Approve or reject the visual changes to maintain your pixel-perfect UI.
This article explains how to perform visual regression tests using TestCafe.
What is TestCafe Framework?
TestCafe framework is a modern open-source automation tool built with NodeJS. Allows the user to code using JavaScript, TypeScript, and CoffeeScript. TestCafe is popular because of its zero-configuration policy, which means, you can just download and start executing your tests. TestCafe supports Visual Regression Testing.
There are multiple ways to perform Visual Testing in TestCafe, we are going to discuss two methods of Visual Validation Technique in TestCafe.
- TestCafe Visual Testing Using testcafe-blink-diff
- TestCafe Visual Testing using Percy
TestCafe Visual Validation (Visual Testing) using the blink-diff plugin
This section covers how to run local visual regression tests in TestCafe using the open-source testcafe-blink-diff plugin.
- What it is: An NPM plugin that adds visual regression capabilities to your TestCafe tests.
- How it works: Add blink-diff commands in your TestCafe scripts to capture screenshots and compare them against baselines.
- Prerequisite: A working TestCafe setup is required before installing and using this plugin.
How to perform Visual Regression Testing using TestCafe
Step 1: Install the blink-diff node package
Install the blink-diff node package using the below command
npm i testcafe-blink-diff --save-dev
Step 2: Write your TestCafe Visual Regression Test
Create a new TestCafe test file and name it visual-test.js
Let’s consider a scenario,
- Navigate to the Google Search page
- Search for BrowserStack
- Click in Search
- Validate search results page using TestCafe blink-diff
- Write the following code snippet to perform the above scenario
//visual-test.js

import { Selector } from 'testcafe';

import { takeSnapshot } from 'testcafe-blink-diff';

fixture`Visual Testing`

    .page`https://google.com`;

test('Visual Testing Google Search Results Page', async t => {

    await t

        .maximizeWindow()

        .typeText('input[name="q"]', 'Browserstack')

        .click('input[type="submit"][value="Google Search"]')

        .expect(Selector('#result-stats').exists).ok({ timeout: 5000 });

        await takeSnapshot(t);

});
In the above code
We are importing takeSnapshot, using third-party library testcafe-blink-diff
import { takeSnapshot } from 'testcafe-blink-diff';We are performing a set of actions for the scenario mentioned using the TestCafe syntax.
In the end, you can take screenshots using the command await takeSnapshot(t);
The section below describes how to execute the test script for TestCafe Visual Validation.
Execute Visual Regression Tests in TestCafe
To run visual regression tests in TestCafe, you follow a simple three-step flow: capture a baseline image, capture the latest UI state, and compare both to detect visual changes. The detailed steps are explained below.
1. Capture Base Image
To capture the base image, you need to enter the below command
npx testcafe chrome:headless tests -s tests/screenshots --take-snapshot base
In the above command,
tests: Folder name where your Testcafe tests exist
-s tests/screenshots: Folder name to create a base image, If mentioned folder name doesn’t exist Testcafe creates a new.
–take-snapshot base: This is the indication that consider the captured image as a baseline image for the future.
After execution of the above command, the base image will be captured and stored in the screenshots directory
2. Capture Actual Snapshot
To capture Actual Snapshot, the command is almost the same as the base image capture command. The only difference is, at the end instead of base specify actual like below.
npx testcafe chrome:headless tests -s tests/screenshots --take-snapshot actual
After execution of the above command, the actual image will be captured and stored in the screenshots directory
3. Compare Two images
You have the base and actual image, now you need to compare the two images, for that you need to enter the below command.
npx testcafe-blink-diff tests/screenshots --compare base:actual --open --threshold 0.03
In the above command, the threshold is the image difference tolerance, the value can be anywhere between 0 to 3.
Test Results
Once you enter the above command, the .html results will be generated, it will show the result pass/fail along with the images difference
Try Visual Regression Testing for Free
Visual Testing for Specific DOM Element
In the above method, you will be able to capture full-page snapshots and compare them. The plugin can capture a DOM Element on the webpage, and compare them.
To compare the DOM element you need to pass the TestCafe Selector to takeSnapshot() function.
For Example, If you want to capture results count (results stats) on the Google Search page, you can write simple code like the below.
await takeSnapshot(t, { label: 'google-result-stats',selector:[Selector('#result-stats')]} );The Complete Testcafe code looks like below
//visual-test.js

import { Selector } from 'testcafe';

import { takeSnapshot } from 'testcafe-blink-diff';


fixture`Visual Testing`

    .page`https://google.com`;


test('Visual Testing Google Search Results Page', async t => {

    await t

        .maximizeWindow()

        .typeText('input[name="q"]', 'Browserstack')

        .click('input[type="submit"][value="Google Search"]')

        .expect(Selector('#result-stats').exists).ok({ timeout: 5000 });

        await takeSnapshot(t, { label: 'google-result-stats',selector:[Selector('#result-stats')]} );

});
Execution steps remain the same, once you execute the test you will the results.
Visual Regression using Testcafe and Percy
Percy is the most popular Visual Testing Review Platform. Percy is now part of Browserstack. Like Browserstack, Percy also supports all major automation tools. Percy makes Visual Testing easier by providing a dedicated comparison page. You can run your visual test in Percy using TestCafe across many browsers and validate them.
Integrate Testcafe with Percy for Visual Testing
Step 1: Install requires Percy packages
To use Percy in your Testcafe framework, you need to install two packages, namely @percy/cli and @percy/testcafe . Use the below command to install the required package.
npm install --save-dev @percy/cli @percy/testcafe
Step2: Write a Tescafe Percy script to capture a snapshot
//visual-test.js

import { Selector } from 'testcafe';

import percySnapshot from '@percy/testcafe';

fixture`Visual Testing`

    .page`https://google.com`;


test('Visual Testing Google Search Results Page', async t => {

    await t

        .maximizeWindow()

        .typeText('input[name="q"]', 'Browserstack')

        .click('input[type="submit"][value="Google Search"]')

        .expect(Selector('#result-stats').exists).ok({ timeout: 5000 });

        await percySnapshot(t, 'TestCafe Percy Example');

});
Step 3: Add the environment Variable
Get the Percy project token, by logging into Percy and Navigating to Project settings
Set Percy Token Windows Command Prompt
set PERCY_TOKEN=your_project_token
Set Percy Token Windows Powershell/Visual Studio Code Terminal
$env:PERCY_TOKEN="your_project_token"
Set Percy Token Mac/Linux based Terminal
export PERCY_TOKEN=your_project_token
Note: To get the Percy Token you need to create the Percy Project.
Step 4: Execute the Percy Visual Tests in Testcafe
Using the below command execute your Percy Testcafe script
npx percy exec -- testcafe chrome:headless tests
The Percy exec command executes the TestCafe scripts. It performs very similar actions like npx testcafe tests but at the end the snapshot will be sent to Percy’s infra.
Note:
- tests in the above command is the folder name, where your Percy TestCafe script is located.
- When a Percy command is executed, a DOM snapshot is captured and sent over to the Percy infrastructure via Percy’s API. The Percy infra then renders the DOM snapshot across different browsers and their widths. Then the screenshot is actually captured for pixel-to-pixel diffing with the subsequent build.
Step 4: View the difference
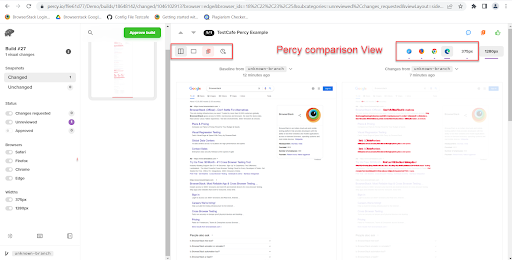
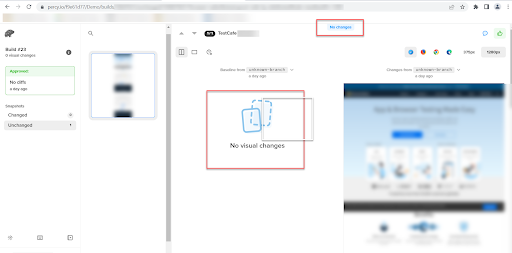
Login to Percy, Click on the respective build you will see the comparison.
If there is a difference Percy shows the difference side by side
If there is no difference Percy displays the message “No Changes”
Why use BrowserStack Percy?
Once TestCafe is integrated, the key advantages of using a cloud-based visual testing platform like Percy include:
- Visual AI Engine: AI-powered noise reduction ignores dynamic elements such as animations, ads, and timestamps, significantly minimizing false positives compared to local pixel-diff tools.
- Comprehensive Coverage: Automatically tests UI across multiple browsers, devices, and responsive viewports without requiring complex local setups.
- Centralized Review: A unified cloud dashboard enables teams to review, approve, or reject visual changes collaboratively, improving review efficiency and transparency.
- CI/CD-Ready Scalability: Built to fit seamlessly into modern pipelines, supporting fast parallel execution for frequent, large-scale deployments.
Pricing
- Free Plan: Available with up to 5,000 screenshots per month, ideal for getting started or for small projects.
- Paid Plan: Starting at $199 for advanced features, with custom pricing available for enterprise plan.
Conclusion
Unlike, other image comparison tools, Percy provides image comparison across browsers, and can be easily integrated with Test Automation frameworks like Cypress, TestCafe, WebdriverIO, and Playwright to name a few. Moreover, Percy helps in performing Root Cause Analysis and Debugging in Visual Regression Tests.
The visual Comparison technique is recommended only for User Interface validation, Visual Testing doesn’t guarantee any functional flows or application behavior. In a typical scenario, QA Validation testing cannot be signed off only by Visual Validation. However Visual Testing saves a lot of time and effort which is required for UI validation.


