Generate test cases with AI
Accelerate your test case generation by using AI to generate comprehensive test cases directly from your requirement documents, designs, or issue trackers. BrowserStack’s AI agents analyze your inputs to create detailed steps, preconditions, and expected results quickly.
- Ensure you connect Jira, Azure, Figma or Confluence accounts. The system prompts you to configure the integration if it detects a missing connection.
- The AI generator agent analyzes context from Jira attachments, including PDF and image files, when creating test cases.
- Select BDD as your output format to generate Feature/Scenario style content using standard Given / When / Then syntax.
For the most accurate AI-generated test cases, ensure the information in your prompt does not conflict with the content in your linked Jira issues or Confluence pages.
When details conflict, the AI cannot determine the correct source of truth, which may lead to incomplete or incorrect test cases.
How to generate test cases
You can generate test cases in a single flow, regardless of whether your requirements are in a PDF, a Jira ticket, or a Figma design.
Open the AI generator
Navigate to your test cases list view and click Generate with AI.
The Generate test cases with AI dialog will open.
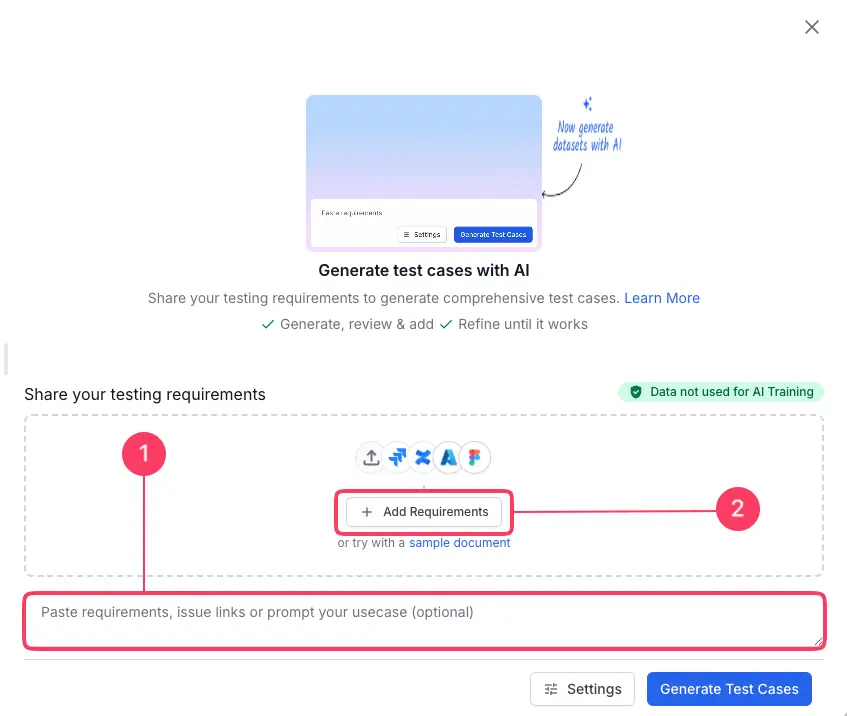
Provide your requirements
The AI needs context to generate accurate tests. You can provide this in two ways:
- Type instructions (See annotation 1): Enter a text description/prompt or paste requirements directly into the text field.
- Add external context (See annotation 2): Click the + Add Requirements menu to attach specific resources. Learn more about applicable external sources to provide context.
Use Jira issue context
- Click Add Link and select Jira from the integrations list.
- In the Jira dialog, select your Host from the dropdown menu.
- Choose the Project that contains the relevant issues.
- Select one or more Issues from the list.
- Click Link to fetch the context from the selected issues.
Use Azure work item context
- Click Add Link and select Azure from the integrations list.
- In the Azure dialog, select your Organisation from the dropdown menu.
- Choose the Project that contains the relevant issues.
- Select one or more Work Item from the list.
- Click Link to fetch the context from the selected issues.
Provide a Confluence page link
- Click Add Link and select Confluence from the integrations list.
- In the Confluence dialog, select your Host from the dropdown menu.
- Choose the Space where your requirements are documented.
- Select the specific Page you want to use.
- Click Link to fetch the content from the selected page.
Provide a Figma design link
- Click Add Link and select Figma from the integrations list.
-
In the Figma dialog, enter the Figma link.
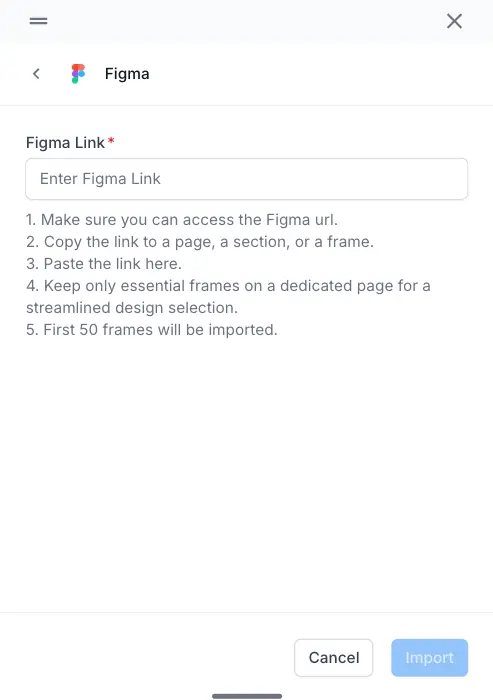
- Click Import.
-
Select individual or all the frames.

- Click Save Selection.
For integrations like Jira, Azure, Figma or Confluence, you will be prompted to Connect with OAuth or Continue with PAT if you have not authenticated yet.
Configure output settings
Before generating, click Settings to tailor the output to your specific testing needs.

| Setting | Options | Best used for |
|---|---|---|
| Template | Only Test Case | Create high-level checklists or scope documents where detailed steps are not yet needed. |
| With Steps | Standard manual testing. Generates detailed “Step-by-Step” instructions with “Expected Results.” | |
| BDD | Automation planning. Generates scenarios in Gherkin syntax (Given/When/Then) compatible with frameworks like Cucumber. | |
| Type | Functional | Validate core business logic and user flows (includes sanity and negative tests). |
| UI/UX | Verify visual elements, layout, and design fidelity against Figma frames. | |
| Security | Generate specific vulnerability checks which might be missed in standard functional tests. | |
| Performance | Testing system responsiveness, load times, and stability under stress. | |
| Compatibility | Generating vulnerability checks. | |
| Accessibility | Ensure compliance with standards like WCAG. | |
| Priority | Critical | Identify “Showstopper” defects or Smoke Test scenarios that must pass for a release. |
| High | Standard regression testing of core features. | |
| Medium | Targeted regression testing of non-critical features or recent changes. | |
| Low | Cosmetic issues or minor edge cases that do not block release | |
| Datasets | Toggle On/Off | Enables the AI to generate sample data tables for your test cases. |
Datasets are currently not supported for BDD test cases.
Generate & monitor the AI’s analysis
- Click Generate Test Cases.
- The AI will now analyze your input and provide real-time feedback on its process. You can expand each section to see more details. The process includes:
- Analyze your requirement: The AI parses the prompt, documents, and linked pages to understand the core functional and non-functional requirements.
- Scan for context: It searches for existing test cases and linked artifacts in your project to gather more context.
- Generate a summary: The AI presents its findings, including core requirements and relevant artifacts, before it begins creating the test cases.
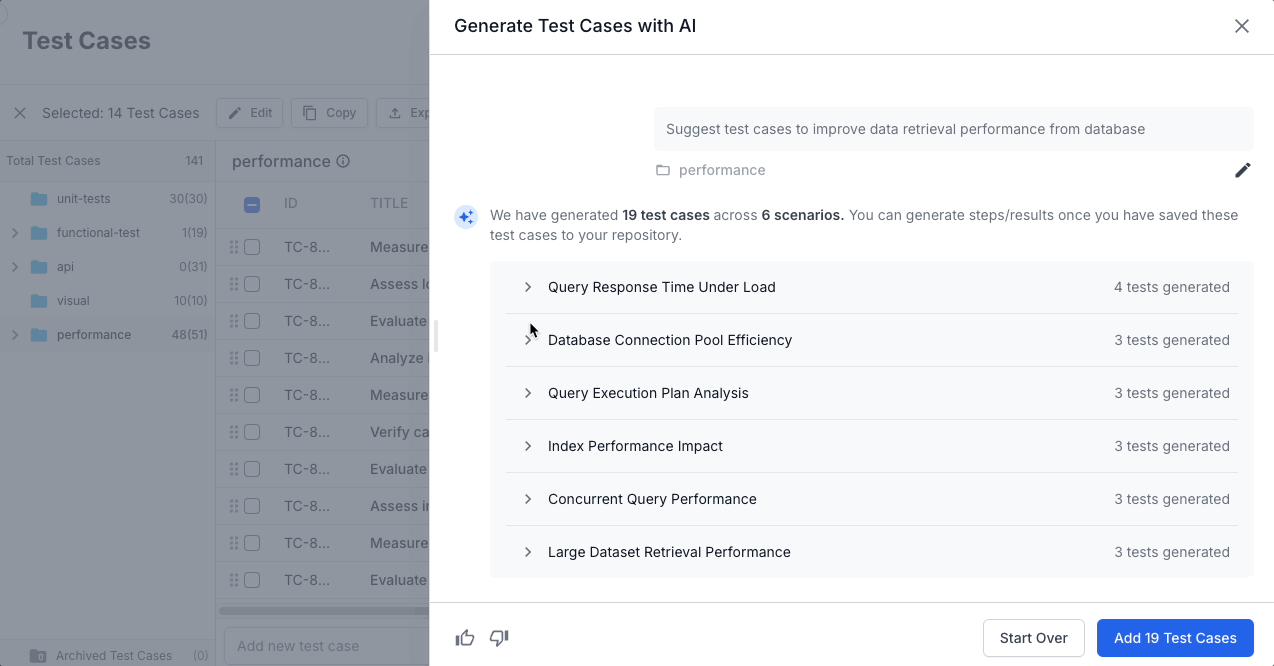
After test case generation completes, review the generated results.
- If you selected Test cases with steps or Test cases without steps, the AI groups your test cases into scenarios. On the review screen, you can perform the following actions:
- Expand a scenario: Click the arrow (>) next to the scenario to see its individual test cases.
- Review test cases: Deselect any test case you do not need by unchecking its box.
-
View test case details: Click View besides a generated test case to view test case details and make inline edits.

- Add individually: Click Add next to a specific case.
- If you selected BDD test cases, the AI groups your BDD scenarios into features. On the review screen, you can perform the following actions:
- Expand a feature: Click the arrow (>) next to the feature to see its individual test cases.
- Edit dataset: You can view or edit the dataset if it is generated within a test case. Refer to generate test datasets with AI documentation.
- Review test cases: Deselect any test case you do not need by unchecking its box.
- View test case details: Click View besides a generated test case to view test case details and make inline edits.
-
Add individually: Click Add next to a specific case.
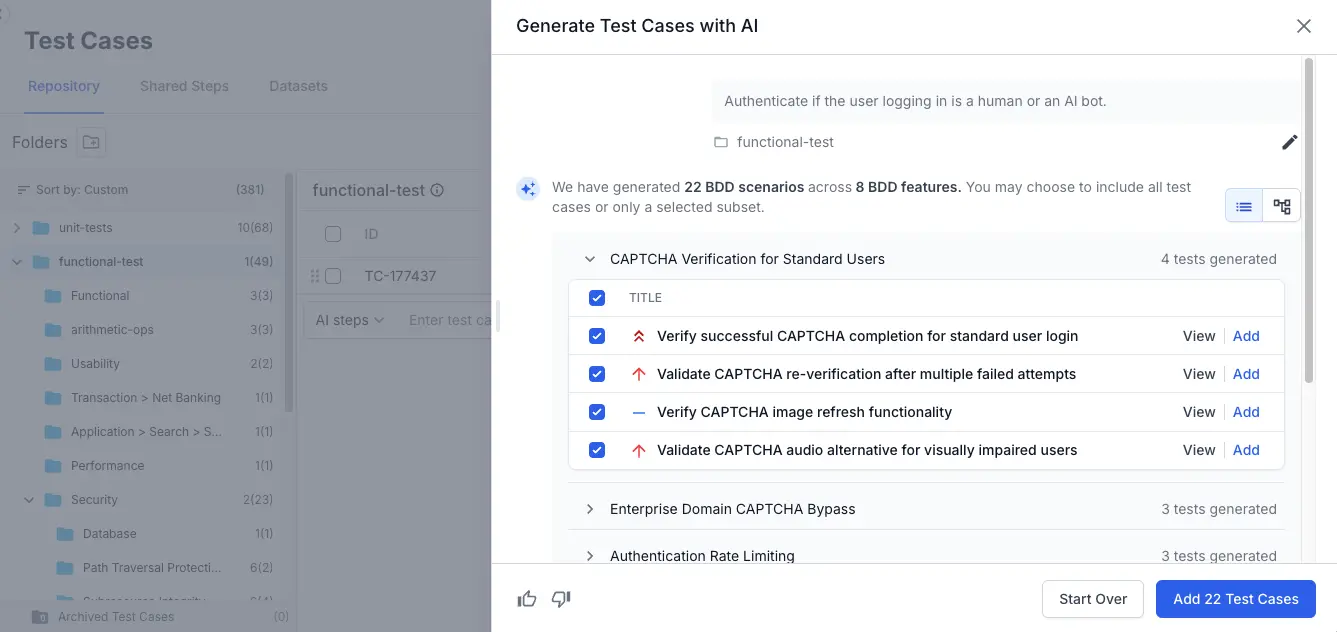
If the output is not perfect, use the text field to refine your request. Learn how to iterate your prompts and refine the results.
You have now successfully generated a comprehensive set of test cases linked directly to your requirement, ensuring your testing is aligned with your project goals.
Test case details are generated asynchronously and may take some time.
Now, you have successfully generated and added AI-powered test cases with detailed test case details to your test case repository, tailored to your specific requirements and context.
The following image shows an example of an AI-generated test case along with its details.
Persistent background generation
Once you start, the AI test case generation runs in the background. You can safely close the generation window or navigate to other parts of the application without interrupting the process. The job is tied to your current browser session and will only stop if you refresh the page or log out. To check the progress, simply reopen the Generate with AI modal.
External context sources
External context sources enable you to seamlessly integrate requirement and design data from third-party platforms into your testing workflow. By connecting these sources, you can associate Figma frames, Jira issues, or Confluence specifications with your test cases, ensuring complete traceability from design to execution. Refer to the table below to understand the supported integration types and their primary use cases.
| Source | Description |
|---|---|
| Figma | Link design frames to generate UI/UX focused tests. |
| Azure DevOps | Connect your instance to pull stories directly. |
| Jira | Select Jira issues to map acceptance criteria to test cases. |
| Confluence | Import PRDs or technical specs from your wiki. |
| Upload File | Upload PDFs, images, or doc files (e.g., architecture diagrams). |
Document limitations
BrowserStack AI performs best with PRDs that are well-structured, detailed, and unambiguous. For optimal performance, adhere to the following PRD constraints:
| File category | Supported formats | Maximum size | Other limits |
|---|---|---|---|
| Documents |
DOC, DOCX, PDF, RTF
|
25 MB |
25 pages |
| Presentations | PPTX |
10 MB |
25 slides |
| Images |
PNG, JPG, JPEG
|
5 MB |
N/A |
| Data & Text |
CSV, JSON, TXT, XLSX
|
500 KB |
N/A |
If your document exceeds the size or page limit, the upload will fail. To proceed, you must split the document into smaller parts or compress its content before uploading.
Tool-level limitations
To ensure platform stability and consistent performance across all workspaces, the system enforces specific technical boundaries. These constraints define the maximum allowable values for data volume, and concurrent processes. Review the following table to ensure your automation suites and integrations operate within these supported thresholds.
| Integration tool | First generation limit | Generation limit |
|---|---|---|
| Jira/ Azure DevOps | 1 ticket | Scenario-level constraint: Limits are enforced across the entire interaction scenario. A maximum of one ticket is permitted per full session; if a ticket is selected in an initial step, no additional tickets may be included in subsequent generations. |
| Confluence | 5 documents | Generation-level constraint: Limits are enforced per individual prompt. The attachment count applies solely to the current generation request and is independent of the number of Confluence documents attached in previous steps. |
| Figma | 10 frames | Generation-level constraint: 1 Figma link |
| Files | 5 files | Generation-level constraint: Limits are enforced per individual prompt. The attachment count applies solely to the current generation request and is independent of the number of files attached in previous steps. |
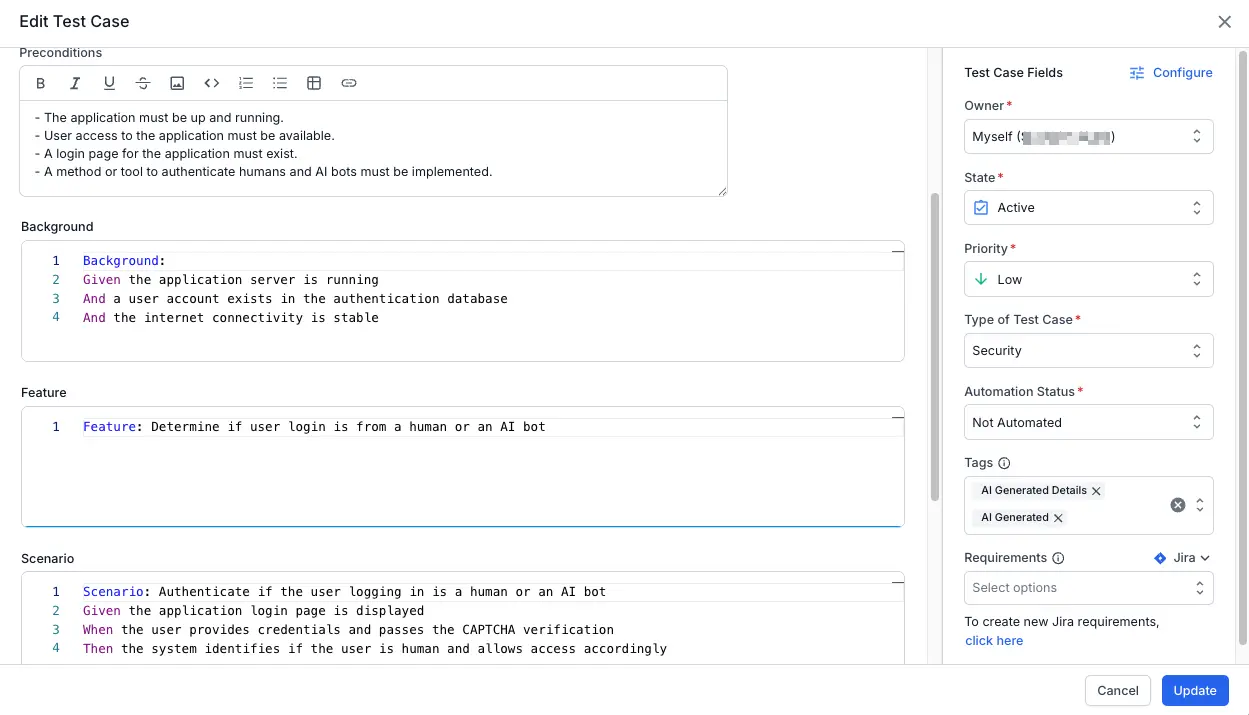
Example of an AI-generated BDD test case
The following image shows an example of an AI-generated BDD test case along with its details.
Traceability and source retention
- Each generated test case stores the original Jira issue or Confluence URL as a reference attribute.
- The link remains clickable, so you can jump back to the exact source page at any time for clarification or updates.
- If the Jira issue or Confluence page changes later, you can re-run generation with the same link to produce updated or supplemental coverage.
Best practices
- Provide the most specific page (avoid large index/parent pages with broad, unrelated content).
- Pair a concise guiding prompt with the link if the page is lengthy or covers multiple modules.
- After major edits to the Confluence page, regenerate or manually review impacted test cases to keep them aligned.
Limitations
- Private or restricted pages require that the authenticated Atlassian user has at least view permission.
- Very large pages may be truncated to a maximum processed size (system automatically prioritizes structured sections first).
- Embedded diagrams or images are not semantically parsed yet—add clarifying prompt text if critical flows are only in images.
This option streamlines context ingestion and strengthens end-to-end traceability between requirements and generated test cases.
We're sorry to hear that. Please share your feedback so we can do better
Contact our Support team for immediate help while we work on improving our docs.
We're continuously improving our docs. We'd love to know what you liked
We're sorry to hear that. Please share your feedback so we can do better
Contact our Support team for immediate help while we work on improving our docs.
We're continuously improving our docs. We'd love to know what you liked
Thank you for your valuable feedback!