Finding the right element locators is critical for reliable mobile test automation with Appium. Effective locator strategies help avoid flaky tests and ensure your scripts interact with the app as expected. Since locators determine how elements are identified in the UI, they directly affect both test stability and accuracy.
This article explains Appium locators in depth, how each works, when to use them, and how to inspect elements efficiently during test development.
What are Appium Locators?
Locators are references or identifiers used in automation testing to interact with elements in a user interface (UI). They act as the bridge between the automation script and the application’s visual elements, enabling testers to find and manipulate specific UI components like buttons, text fields, or checkboxes.
In Appium, which is a popular open-source tool for automating mobile apps (both Android and iOS), locators are used to identify elements within the mobile application’s UI so that automation scripts can interact with them. Appium uses various locator strategies to find elements across different views and platforms.
Appium supports different locator strategies like ID, Accessibility ID, Class Name, XPath, Android UI Automator, Android View Tag, and iOS UI automation.
7 Locator Strategies Supported by Appium
Appium supports multiple locator strategies to identify and interact with elements in mobile apps. Each strategy serves different use cases depending on the platform, element type, and app structure.
Here are the 7 Appium Locator Strategies:
- ID
- Class Name
- Xpath
- Accessibility ID
- Android UI Automator
- Android View Tag (Espresso Only)
- iOS UI Automation
Below is a detailed explanation of each Appium Locator Strategy.
1. ID
By far, finding elements using the ID is the most straightforward technique. Each element has a unique ID assigned to it that helps identify and interact with it. Appium has a Native element identifier for Android and iOS.
resource-id is used as an element identifier for Android and name is used for iOS.
Code
driver.findElementById("IntegerA"); // for iOS

dr.findElement(By.id("android:id/text1")).click(); //for Android
2. Accessibility ID in Appium
Accessibility ID in Appium is a highly preferred locator strategy, especially when automating Android and iOS test cases. Developers can explicitly set the Accessibility ID during development.
As Accessibility ID can be used for cross-platform automation, the code becomes reusable.
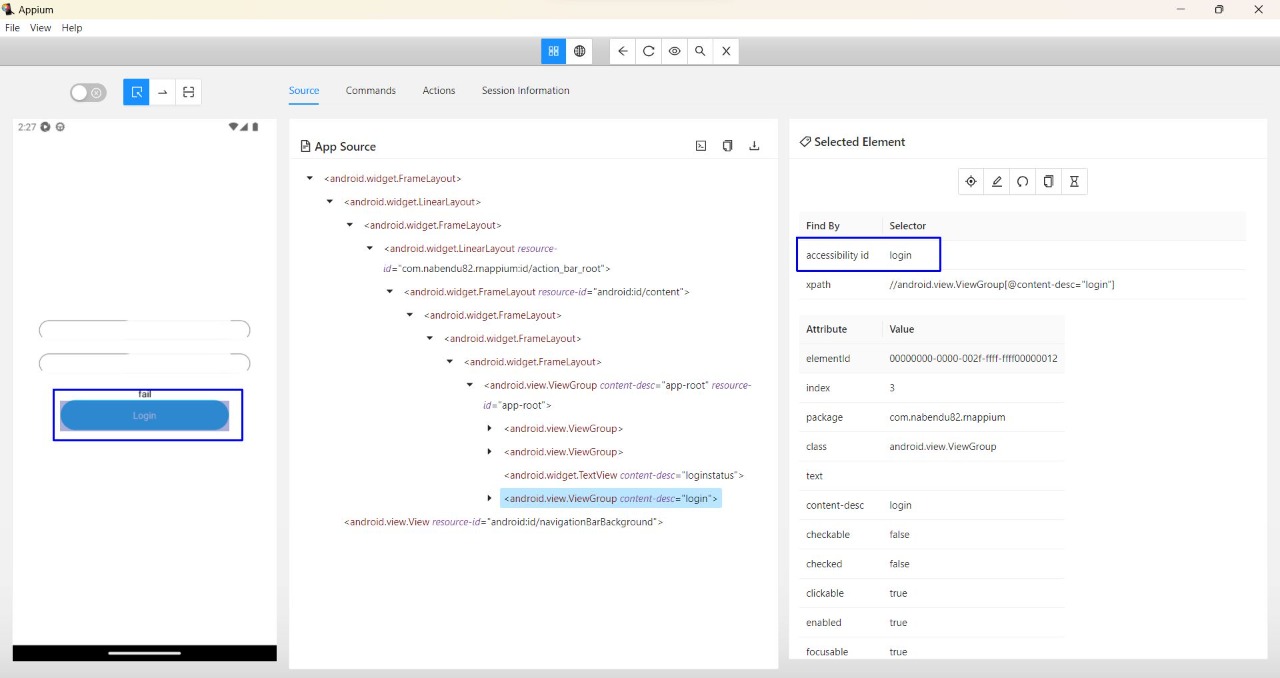
For iOS, the default Accessibility ID is set to the name of the UI element. For Android, the value of Accessibility is same as the value of the attribute “content-desc”.
Code
dr.findElementByAccessibilityId("Accessibility").click();Read More: Importance Of Code Reusability
3. Class Name
Using Class Name for searching an element is a very generic method. This is because multiple elements may have the same class name, creating a problem finding a particular component. Thus, one needs to use a combination of various attributes, for example, combining text with the class name to identify the element.
For iOS, Class Name is represented as the full name of the XCUI element and begins with XCUIElementType. For example – UIAButton, UIARadioButton
In the case of Android, the Class Name is called out as the full name of the UIAutomator2 class. For example – android.widget.TextView
Code
List<WebElement> buttons = driver.findElementsByClassName("android.widget.TextView");

for(WebElement button : buttons){
System.out.println(button.getText());

if(button.getText().equals("Animation")){
button.click();
}
}
Read More: Getting Started with XCUITest Framework
4. XPath
Xpath in Appium analyzes the XML structure of the app and then locates the element. Xpath should only be used when there is no ID, Name, or accessibility ID assigned to a specific UI element. Although XPath allows for the formulation of complex queries, using XPath is not recommended because it has stability and performance issues (as mentioned in the official documentation).
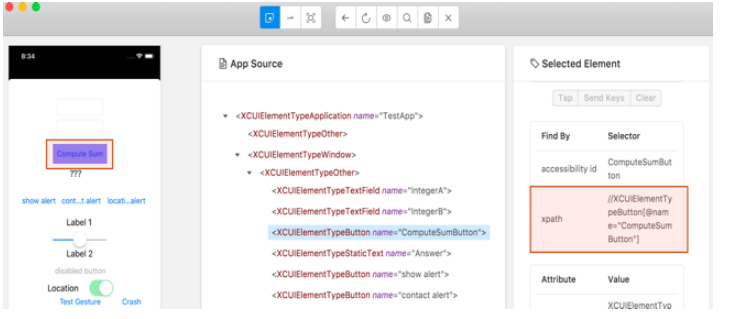
One can easily find the Xpath using the Appium Desktop Inspector while inspecting the XML structure of the application.
MobileElement computeSumButton = driver.findElementByXPath("(//XCUIElementTypeButton)[1]");5. Android UI Automator (UI Automator 2)
Naturally, as the name suggests, this locator is Android-specific. One needs to use the UI Automator API, in particular, the UISelector Class to search for specific elements. Naturally, this makes it a pre-requisite for QAs to have prior knowledge of UISelector API. In Appium, one must send the Java code as a string to the server executed in the application’s environment, which returns the particular elements.
Code
String selector = "new UiSelector().text(“Cancel”))

.className(“android.widget.Button”))";

MobileElement element = (MobileElement) driver.findElement(MobileBy.AndroidUIAutomator(selector));
6. Android View Tag (Espresso Only)
Similar to Android UI Automator, this is also an Android platform-specific locator. It allows QAs to locate elements using its view tag.
Read More: Appium vs Espresso: Key Differences
7. iOS UIAutomation
This is an iOS platform-specific locator. It enables QAs or developers to use Apple’s Instruments framework to locate elements while automating tests for iOS apps.
Code
String selector = "**/XCUIElementTypeCell[`name BEGINSWITH "P"`]/XCUIElementTypeButton[4]";

MobileElement element = (MobileElement)
Note: The iOS UIAutomation is deprecated, and now the primary support for automating iOS apps is using the XCUITest Driver.
Use this guide to migrate iOS tests from UIAutomation (iOS 9.3 and below) to XCUITest (iOS 9.3 and up)
While performing automated app testing, test scripts need to interact with extensive elements. Thus, locating the correct elements for successful testing is mandatory. Consequently, testing teams must be well-versed with all possible locator strategies in Appium that help identify web elements accurately.
Advantages of Using Locators in Appium
Here are the core advantages of using Locators in Appium:
- Cross-Platform Support: Appium allows for the same locator strategies to be used across Android and iOS platforms, which means the same test scripts can be applied to different mobile OSs with minimal modification.
- Flexibility: Appium supports a wide variety of locator strategies (ID, XPath, Class Name, etc.), giving testers flexibility to choose the most suitable one based on the app’s structure and requirements.
- Improved Test Coverage: Locator strategies like XPath and UIAutomator allow testers to handle complex and dynamic UI elements, enhancing the robustness and coverage of test cases.
- Test Maintainability: Using strategies like Accessibility ID not only improves the app’s accessibility for users but also creates stable locators that are less likely to break during app updates, reducing maintenance effort.
- Support for Real Devices and Emulators: Locators in Appium work seamlessly on both physical devices and emulators, allowing testers to validate UI components in real-world scenarios as well as simulated environments.
Which Locator is fastest in Appium?
In Appium, the fastest locator strategy is typically the ID locator (referred to as resource ID on Android and accessibility ID on iOS). This is because IDs are unique and directly reference an element, allowing Appium to locate it quickly without traversing the entire UI hierarchy.
Unlike XPath, which can be slow as it requires navigating through the document tree to find an element, ID locators offer a direct and efficient path. Using IDs is particularly beneficial for improving test performance, as they minimize the processing time required to find elements within complex mobile interfaces.
Additionally, they tend to be more stable, as IDs are often less likely to change during app updates compared to attributes like class names or text values.
When designing your Appium tests, prioritizing ID-based locators can lead to faster execution times and more reliable automation.
How do you Inspect Locators in Appium?
Inspecting locators in Appium involves using various tools and techniques to identify and validate the attributes of UI elements in a mobile app.
1. Appium Inspector: Appium includes a built-in tool known as the “Appium Inspector” that enables testers to visually inspect elements within the app. It displays the app’s interface and provides details like IDs, Accessibility IDs, XPath, and other relevant attributes for identifying elements.
2. UI Automator Viewer (for Android) / Accessibility Inspector (for iOS): Android and iOS have their own official tools for element inspection. For Android, the UI Automator Viewer provides information such as resource IDs and other attributes, while iOS users rely on Accessibility Inspector (available in Xcode) to access details like Accessibility IDs and element properties.
3. Element Inspection Libraries: Tools such as Appium Desktop, UIAutomatorViewer, and Appium Desktop Inspector offer enhanced element inspection features. These libraries provide information about the element attributes and hierarchy within the app’s UI.
4. Mobile Emulators/Simulators: Emulators and simulators allow testers to interact with the app just like on a real device. Paired with Appium, testers can observe and inspect element properties while using the app, making it easier to identify and work with UI elements.
Note: An Appium Inspector Tool allows users to locate elements using all the above locator strategies. To learn more about Appium Inspector, refer to the Tutorial on Understanding Appium Desktop.
How to Use Android-Specific Locators in Appium?
Appium supports various locator strategies to interact with mobile UI elements. In addition to commonly used locators like ID, XPath, or AccessibilityId, Appium provides Android-specific locator strategies for enhanced precision and control.
1. Using UIAutomator2: The UiSelector Strategy
The UIAutomator locator strategy uses Android’s UiSelector class to locate UI elements. This involves writing Java-like expressions that describe the UI element’s properties, such as text, resource ID, content description, or class name.
Example:
import io.appium.java_client.MobileBy;

import org.openqa.selenium.By;

private final By colorByUiSelector = MobileBy.AndroidUIAutomator(

"new UiSelector().text(\"COLOR\")"

);
Expected Output:
The above code instructs Appium to find an element whose visible text is “COLOR”.
Frequently used UiSelector methods:
- text(“value”): matches exact text
- textContains(“partial”): matches if text contains substring
- textMatches(“regex”): matches text using a regular expression
- resourceId(“id”): matches exact resource ID
- resourceIdMatches(“regex”): matches resource ID using a regular expression
- description(“desc”): matches exact content description
- descriptionContains(“desc”): matches if the content description contains the substring
- className(“android.widget.Button”): matches the element’s class
- checked(true/false): matches based on checked state
- enabled(true/false): matches based on enabled state
- selected(true/false): matches based on selected state
- index(int): matches element at a specific index in the view hierarchy (not just lists)
2. Using UiScrollable for Hidden Elements
When a target element is not immediately visible on the screen (e.g., outside the viewport), the UiScrollable class helps scroll and bring it into view. It is especially useful for dynamic lists or settings menus.
Example:
private final By pathEffectItem = MobileBy.AndroidUIAutomator(

"new UiScrollable(new UiSelector().scrollable(true))" +

".scrollIntoView(new UiSelector().text(\"PathEffects\"))"

);
Expected Output:
The above code finds a scrollable element and scrolls until it locates the text “PathEffects”.
3. Using Espresso: Data Matcher Strategy
The Data Matcher locator is specific to the Espresso driver in Appium and designed to locate elements within complex data-driven views like ListView, ScrollView, or GridView. It is especially helpful when identifying elements within long scrollable lists without manual scrolling.
Example:
The following Espresso code locates an item in a list where the “title” key has the value “App” and performs a click action:
onData(hasEntry("title", "App"))

.inAdapterView(withId("android:id/list"))

.perform(click());
To achieve a similar result using Appium, the Espresso driver provides a special locator strategy known as Data Matcher. Below is the equivalent implementation in Java using Appium:
import com.google.common.collect.ImmutableList;

import com.google.common.collect.ImmutableMap;

import io.appium.java_client.MobileBy;

import org.openqa.selenium.By;

import org.openqa.selenium.json.Json;


private final By appItemDataMatcher = MobileBy.androidDataMatcher(

new Json().toJson(

ImmutableMap.of(

"name", "hasEntry",

"args", ImmutableList.of("title", "App")

)

)

);
Expected Output:
The above code allows searching based on title, contentDescription, or other key-value pairs from an element’s adapter data.
4. Using Espresso: View Matcher Strategy
The View Matcher strategy is also Espresso-based, similar to Data Matcher, but focuses on view-level matching rather than adapter data.
Example:
import com.google.common.collect.ImmutableMap;

import io.appium.java_client.MobileBy;

import org.openqa.selenium.By;

import org.openqa.selenium.json.Json;


private final By animationItemViewMatcher = MobileBy.androidViewMatcher(

new Json().toJson(

ImmutableMap.of(

"name", "withText",

"args", "Animation",

"class", "androidx.test.espresso.matcher.ViewMatchers"

)

)

);
Expected Output:
The locator matches an element with the visible text “Animation”, using Espresso’s ViewMatchers class under the hood.
Finally, to verify whether all of the above Android-specific locators work:
- Open Appium Inspector.
- Choose UIAutomator Selector, Data Matcher, or View Matcher from the dropdown.
- Paste the expression into the Search for Element field and click Search.
- The target element will be highlighted if the locator is valid.
How to Use iOS-specific Locators in Appium?
Appium uses the XCUITest framework to automate iOS applications. XCUITest supports a set of iOS-specific locator strategies that offer greater precision and performance when interacting with native elements. The two main strategies are:
1. XCUITest Predicate String Locator
The Predicate String locator identifies UI elements using a SQL-like syntax, enabling multiple attribute-based conditions. It is beneficial when elements cannot be uniquely identified with a single property.
In the below example, Appium is instructed to find an element with the label “Colour” and the name ” Color.”
import io.appium.java_client.MobileBy;

import org.openqa.selenium.By;

private final By colorByPredicate = MobileBy.iOSNsPredicateString(

"label == \"Colour\" AND name == \"color\""

);
Expected Output:
Appium will locate the element that satisfies both conditions. If found, the test will proceed with interacting with that element, such as clicking or retrieving its attributes.
Some of the supported comparisons include:
- Equality and inequality: ==, !=, >, <, >=, <=
- Logical operators: AND, OR, NOT
- String functions: BEGINSWITH, ENDSWITH, CONTAINS, LIKE, MATCHES
- Range expressions: value BETWEEN {lower, upper}
2. XCUITest Class Chain Locator
The Class Chain locator strategy is similar in concept to XPath, but is more stable and optimized for iOS. It allows hierarchical navigation through UI elements using class names, indexes, and embedded predicate conditions.
Example:
import io.appium.java_client.MobileBy;

import org.openqa.selenium.By;

private final By colorByClassChain = MobileBy.iOSClassChain(

"**/XCUIElementTypeButton[`label == \"Colour\"`]"

);
Expected Output:
This expression searches the UI hierarchy for a ” Color ” button element.
To summarise, Appium Inspector supports both Predicate Strings and Class Chains. The tool can automatically generate these locators for selected UI elements. Users can validate locators by entering them into the “Search for element” field, which highlights the matched element if the expression is correct.
Read More: How to scroll to element in XCUITest
Demo: Using Locators in Appium
This section presents a working demonstration of using different locator strategies in Appium to automate interactions in both Android and iOS mobile applications.
The demo covers:
- Standard locators (id, xpath, accessibilityId)
- Android-specific locators (UiSelector, className)
- iOS-specific locators (predicate string, class chain)
- Cloud execution using BrowserStack’s real device cloud
1. Project Structure
The code follows a Page Object Model (POM) and includes:
- DriverManager.java: Manages driver sessions for Android and iOS
- AndroidLocators.java and IOSLocators.java: Page objects with locator definitions
- DemoTest.java: Test class that executes the locators on both platforms
- BaseTest.java: Handles teardown and reusable methods
2. Full Java Code (with Android and iOS Locators)
Here is the code for Android and iOS locators using Java.
- DriverManager.java
This class manages the initialization of the Appium drivers for Android and iOS. It provides two methods: one to get the Android driver (getAndroidDriver()) and another for the iOS driver (getIOSDriver()), both configured with the necessary capabilities for the respective platforms.
Android:
import io.appium.java_client.android.AndroidDriver;

import io.appium.java_client.ios.IOSDriver;

import io.appium.java_client.AppiumDriver;

import io.appium.java_client.MobileElement;

import org.openqa.selenium.remote.DesiredCapabilities;


import java.io.File;

import java.net.MalformedURLException;

import java.net.URL;


public class DriverManager {


public static AppiumDriver<MobileElement> getAndroidDriver() throws MalformedURLException {

        DesiredCapabilities caps = new DesiredCapabilities();

        caps.setCapability("platformName", "Android");

        caps.setCapability("deviceName", "Pixel_9");

        caps.setCapability("platformVersion", "15");

        caps.setCapability("automationName", "UiAutomator2");

        caps.setCapability("app", new File("src/test/resources/apps/AndroidApp.apk").getAbsolutePath());

        return new AndroidDriver<>(new URL("http://127.0.0.1:4723/wd/hub"), caps);

    }
Read More: How to run Appium tests on Android devices
iOS:
    public static AppiumDriver<MobileElement> getIOSDriver() throws MalformedURLException {

        DesiredCapabilities caps = new DesiredCapabilities();

        caps.setCapability("platformName", "iOS");

        caps.setCapability("deviceName", "iPhone 16 Pro");

        caps.setCapability("platformVersion", "18.0");

        caps.setCapability("automationName", "XCUITest");

        caps.setCapability("app", new File("src/test/resources/apps/iOSApp.app").getAbsolutePath());

        return new IOSDriver<>(new URL("http://127.0.0.1:4723/wd/hub"), caps);

    }

}
Read More: How to run Appium iOS Tests on Real Devices?
- AndroidLocators.java
This class contains locators for Android elements, using strategies like AccessibilityId, By.id, AndroidUIAutomator, and XPath to locate elements like buttons, text fields, and labels in the Android app.
import io.appium.java_client.MobileBy;

import org.openqa.selenium.By;


public class AndroidLocators {

    public By loginButton = MobileBy.AccessibilityId("Login");

    public By usernameField = By.id("com.example.android:id/username");

    public By passwordField = MobileBy.AndroidUIAutomator(

            "new UiSelector().resourceId(\"com.example.android:id/password\")"

    );

    public By submitButton = By.xpath("//android.widget.Button[@text='Submit']");

    public By homeLabel = By.id("com.example.android:id/homeLabel");

}- IOSLocators.java
Similar to AndroidLocators.java, this class contains locators for iOS elements. It uses strategies like AccessibilityId, iOSNsPredicateString, and iOSClassChain to find elements in the iOS app, such as buttons and text fields.
import io.appium.java_client.MobileBy;

import org.openqa.selenium.By;


public class IOSLocators {

    public By loginButton = MobileBy.AccessibilityId("Login");

    public By usernameField = MobileBy.iOSNsPredicateString("label == 'Username' AND type == 'XCUIElementTypeTextField'");

    public By passwordField = MobileBy.iOSClassChain("**/XCUIElementTypeSecureTextField[`label == 'Password'`]");

    public By submitButton = MobileBy.iOSClassChain("**/XCUIElementTypeButton[`label == 'Submit'`]");

    public By homeLabel = MobileBy.AccessibilityId("home_screen_label");

}- BaseTest.java
This class provides common functionality for all tests, including initializing the driver, performing teardown (tearDown()), and a helper method (getElement()) to locate elements with time tracking to measure performance.
import io.appium.java_client.AppiumDriver;

import io.appium.java_client.MobileElement;

import org.openqa.selenium.By;

import org.testng.annotations.AfterClass;


import static java.lang.System.currentTimeMillis;

import static java.text.MessageFormat.format;


public class BaseTest {

    protected AppiumDriver<MobileElement> driver;


    @AfterClass(alwaysRun = true)

    public void tearDown() {

        if (driver != null) {

            driver.quit();

        }

    }


    protected MobileElement getElement(By by, String locatorType) {

        long start = currentTimeMillis();

        try {

            return driver.findElement(by);

        } finally {

            System.out.println(format("Time taken by {0}: {1}ms", locatorType, currentTimeMillis() - start));

        }

    }

}- DemoTest.java
This class contains the test methods for Android and iOS. It initializes the appropriate page objects (AndroidLocators and iOSLocators) and runs tests to interact with the app elements using the defined locators. The tests verify that the login functionality works by interacting with fields and buttons on both platforms.
import io.appium.java_client.AppiumDriver;

import io.appium.java_client.MobileElement;

import org.testng.annotations.BeforeClass;

import org.testng.annotations.Test;


import static org.testng.Assert.assertTrue;


public class DemoTest extends BaseTest {

    private AndroidLocators androidPage;

    private IOSLocators iosPage;


    @BeforeClass

    public void setUp() throws Exception {

        this.androidPage = new AndroidLocators();

        this.iosPage = new IOSLocators();

    }


    @Test(priority = 1)

    public void testAndroidLocators() throws Exception {

        this.driver = DriverManager.getAndroidDriver();


        getElement(androidPage.loginButton, "Accessibility ID").click();

        getElement(androidPage.usernameField, "ID").sendKeys("androidUser");

        getElement(androidPage.passwordField, "UIAutomator").sendKeys("androidPass");

        getElement(androidPage.submitButton, "XPath").click();


        MobileElement homeLabel = getElement(androidPage.homeLabel, "ID");

        assertTrue(homeLabel.isDisplayed(), "Android: Home screen label should be displayed after login.");

    }


    @Test(priority = 2)

    public void testIOSLocators() throws Exception {

        this.driver = DriverManager.getIOSDriver();


        getElement(iosPage.loginButton, "Accessibility ID").click();

        getElement(iosPage.usernameField, "Predicate String").sendKeys("iosUser");

        getElement(iosPage.passwordField, "Class Chain").sendKeys("iosPass");

        getElement(iosPage.submitButton, "Class Chain").click();


        MobileElement homeLabel = getElement(iosPage.homeLabel, "Accessibility ID");

        assertTrue(homeLabel.isDisplayed(), "iOS: Home screen label should be displayed after login.");

    }

}
3. Output (Sample Console Log)
When the tests are executed using a local Appium server and emulator/simulator, the console output will show logs like the following:
Best Practices when using Locators in Appium
By following these best practices, you can improve the efficiency, stability, and maintainability of your Appium test scripts.
- Use Unique Locators: Always prefer unique locators like ID or Accessibility ID over less reliable ones like XPath. This ensures that tests are stable and less prone to breakage as the app evolves.
- Avoid Absolute XPath: Avoid using absolute XPath, which is based on the full path of the element in the UI hierarchy. Instead, use relative XPath to make your locators more robust and less dependent on changes in UI structure.
- Leverage Accessibility IDs: When possible, use Accessibility IDs for locating elements. They are consistent across platforms, easy to maintain, and improve accessibility for users with disabilities.
- Minimize Use of XPath: XPath can be slow and unreliable, especially on mobile platforms. Use it only when no other locator strategy works effectively. Prioritize faster strategies like ID or Class Name.
- Use Descriptive Locators: Choose locators that accurately describe the function of the element. This improves code readability and makes it easier for other testers to understand and maintain the test scripts.
- Ensure Locator Stability: Locators should remain consistent across different versions of the app. Avoid dynamic attributes that are likely to change, such as text or index-based locators.
- Optimize Locator Strategy for Performance: Locating elements using ID or Class Name is generally faster than XPath. Optimize for performance by choosing the most efficient locator for each element.
- Use Multiple Locator Strategies for Complex UIs: For complex and dynamic UIs, use a combination of locators (like XPath with conditions) to handle scenarios where elements might change based on context.
- Test Locators in Different Environments: Ensure that locators work across various devices, screen sizes, and platforms (iOS/Android) to avoid platform-specific failures.
- Maintain Locator Reusability: Use consistent naming conventions and store commonly used locators in a centralized location (like a separate class or object repository) to enhance reusability and maintainability.
How to Identify Which Element Has Accessibility ID
Identifying accessibility IDs can be difficult when developers don’t include them in the app. If only the APK file is available, accessibility IDs must be manually searched using tools like Appium Inspector or UIAutomator Viewer.
Steps to find accessibility IDs:
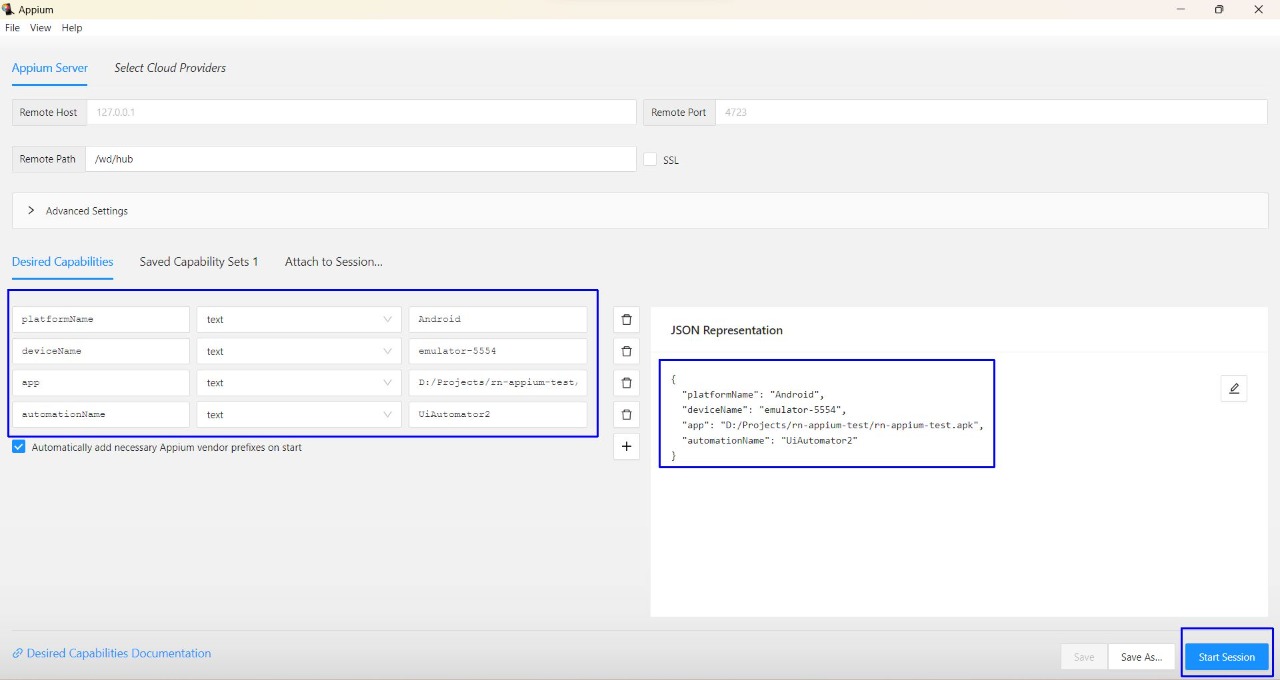
1. Launch Appium Inspector: Start the inspector tool and configure the desired capabilities to connect to the application. For React Native apps, appropriate capability settings are essential.
2. Provide the APK file: The APK file is mandatory, as it allows the tool to load and inspect the application interface.
3. Click on UI elements: By selecting an element on the screen, the tool displays various locator strategies, including the accessibility ID, if available.
Testing Accessibility ID Locators on Real Devices with BrowserStack
Testing Accessibility ID locators on real devices using BrowserStack ensures that mobile app elements are correctly identified for automation and accessibility. It gives you access to real Android and iOS devices in the cloud, so you don’t have to limit yourself to emulators or simulators.
Here’s how to test Accessibility ID Locators on real devices with BrowserStack.
- Prepare the App for Testing: Ensure the mobile app (APK for Android or IPA for iOS) is built with Accessibility ID locators properly defined for key UI elements like buttons, text fields, and menus.
- Upload the App to BrowserStack: Upload the app file using the BrowserStack App Live or App Automate platform. This can be done through the dashboard or via an API.
- Select a Real Device: Choose a real mobile device from the list provided by BrowserStack. A wide range of devices across different brands, screen sizes, and OS versions is available.
- Set Up Appium or Test Framework: Configure Appium (another supported automation framework) to connect with BrowserStack. Include the desired capabilities, such as the device name, platform version, and app URL from the upload.
- Write and Run Test Scripts: Create test scripts that use the Accessibility ID locator strategy to find and interact with UI elements. Run the scripts through the BrowserStack cloud infrastructure.
- Inspect Element Recognition: Use the BrowserStack App Automate dashboard to monitor if the Accessibility IDs correctly identify the intended elements. This helps confirm the stability of locators.
- Review Logs, Screenshots, and Videos: After the test run, review the detailed logs, screenshots, and video recordings provided by BrowserStack. These assets help verify element interactions and debug any issues.
- Repeat on Multiple Devices: Run the same test on different devices and OS versions to ensure consistent behavior and compatibility across environments.
Conclusion
Choosing the right locator strategy is one of the most essential steps in building stable and reliable Appium tests. Accessibility ID remains one of the most recommended strategies, especially for cross-platform testing, due to its speed, clarity, and consistency across Android and iOS. When used correctly, it improves test performance and supports accessibility standards.
BrowserStack makes it easier to identify accessibility ID locators by providing instant access to over 3,500 real Android and iOS devices. Testing on real devices ensures accessibility IDs are correctly identified and used across various devices and OS versions and provides a more accurate and consistent testing experience.
Frequently Asked Questions (FAQs)
1. How do you inspect locators in Appium?
Appium makes it easy to inspect elements directly from a running app. This helps testers identify the proper locators quickly without any complex setup. Here’s how it works:
- Launch the mobile application and start the Appium server.
- Open a browser and go to http://127.0.0.1:4723 (the default Appium server URL).
- Click on the “Inspect” button under Advanced Settings.
- A new window will open, showing a visual view of the app’s screen and UI hierarchy.
- Click on any element to view its attributes, such as id, class, content-desc, and more, on the side panel.
2. How do you write XPath in Appium?
XPath is used to navigate the UI structure and locate elements based on their properties. In Appium:
- Open the element inspector (using the steps above).
- Click the Spy icon to view native or web properties of all visible UI elements.
- Right-click on a selected property (like text, resource-id, or class) and choose Copy XPath.
- Use the copied XPath in the script.
For example:
driver.findElement(By.xpath("//android.widget.TextView[@text='Login']"));3. What are some tips for selecting effective locators in Appium?
Some helpful tips for selecting the right Appium locator are:
- Use Accessibility ID whenever possible, as it is fast, stable, and works for both Android and iOS.
- Use ID or resource-id for Android apps and name or label for iOS when Accessibility ID is unavailable.
- Prefer Class Name for generic UI types like buttons or input fields.
- Use XPath only as a last resort, especially when no other unique identifiers are available.
- Explore Android-specific options like UI Automator or View Tag (for Espresso tests).
- For iOS, use iOS UIAutomation strategies provided by Appium.
- Always inspect elements first and pick locators less likely to change across app versions.


