Delivering high-quality mobile apps requires seamless user experiences, fast performance, and cross-platform compatibility.
Overview
Appium, a leading open-source framework for automating native and hybrid mobile apps, is key to enabling scalable and efficient mobile testing.
What is Appium Grid?
Appium Grid enables parallel mobile testing by connecting multiple Appium servers to a central Selenium Grid Hub, allowing tests to run simultaneously across different devices and platforms.
How to Set Up Appium Grid
- Launch the Selenium Grid Hub as the central controller for routing test commands.
- Create JSON config files for each Node device and connect them to the Hub.
- Launch Appium server instances for each Node using the corresponding JSON configurations.
- Define Desired Capabilities for each device to match tests with suitable Nodes.
- Execute your test cases to run them in parallel across configured devices via the Grid.
This article explains how to set up an Appium Grid to streamline automated testing across multiple devices and platforms.
What is Appium?
Appium is an open-source automation testing framework for apps supported by platforms like iOS, Android, macOS, and Windows. Similar to Selenium, it enables the tester to write test scripts in different programming languages such as JavaScript, Java, Ruby, Python, PHP, and C#, which can be used for both Android and iOS platforms.
What is Appium Grid?
Appium Grid is a distributed testing architecture that enables parallel execution of automated tests across multiple devices and platforms.
It acts as a bridge between Appium Servers and Selenium Grid, allowing testers to efficiently perform cross-platform and cross browser testing.
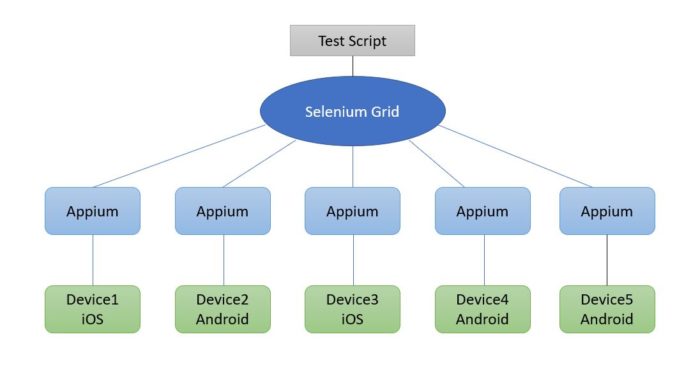
Appium Grid connects a central Hub to multiple Nodes (devices with Appium Servers), enabling simultaneous test execution on multiple devices, reducing execution time, improving test coverage, and streamlining large-scale mobile testing across Android and iOS.
How Appium Grid Works
The structure of Appium Grid consists of a Hub and Nodes. The hub manages the devices and coordinates the tests, while the Nodes execute the tests on specific devices.
Here is how Appium Grid Works
Appium Grid Architecture
- Hub: The central server that manages requests and routes them to the appropriate Nodes.
- Nodes: Remote devices (physical or emulators) connected to the Hub, executing tests based on received commands.
- Test Execution: Commands are sent from the WebDriver client to the Hub, which routes them to the Node for execution.
- Parallel Testing: Tests are run concurrently on multiple devices, speeding up the overall testing process.
- Cross-Platform Testing: Appium Grid supports multiple device-browser combinations, ensuring a wide range of tests.
- Selenium Grid Integration: Appium leverages Selenium Grid for seamless parallel execution of tests, reducing time and streamlining test comparisons.
Prerequisites of Appium Grid
Listed below are the prerequisites for setting up the Appium Grid and starting with the cross browser testing on multiple browser-device combinations (both Android and iOS) simultaneously:
- Procure a Mac computer with macOS 10.11 or 10.12, and an iOS device with iOS 9.3 or higher.
- Install Java and set up the environment variables.
- Install Android Studio and set up Android environment variables.
- Install Eclipse IDE for Java.
- Install Appium Desktop and download the Appium Jars for Eclipse.
- Install Homebrew (for managing missing packages). The first command below downloads the script to the local machine, while the second command runs the installation.
/bin/bash -c "$(curl -fsSL https://raw.githubusercontent.com/Homebrew/install/HEAD/install.sh)"

brew install wget
e
- Install Carthage (for managing dependencies).
brew install carthage
- Install Node & NPM.
brew install node
- Install Maven.
brew install maven
- Install Appium.
npm install -g appium
- Install XCode 11 (XCode 7 or higher is required).
npm install -g ios-deploy
- Install XCUITest Driver.
- Install TestNG.
- Install Selenium Standalone Server Jar Package.
How to set up Appium Grid?
Below are the key steps to start setting up Appium grid:
Step 1: Starting Hub by Launching Selenium Grid
The Hub is the central point in the Appium Grid, where Selenium Grid is used to route the JSON test commands to the nodes. It receives test requests from the client and routes it to the required Nodes.
Once the Selenium Grid is installed as mentioned in the prerequisites, set up the Hub (launching Selenium Grid) – open the command prompt, and navigate to the directory, where the Selenium Server Standalone jar file has been downloaded.
Start the Hub by passing the -role hub flag to the Selenium Standalone Server by entering the following command:
java -jar selenium-server-standalone-<version>.jar -role hub
This would start the hub automatically using port 4444 by default.
One can change the default port by adding an optional parameter -port when running the command.
One doesn’t have to specify the host name as it can be determined automatically. However, if the tester is using a VPN network, specifying the host becomes necessary.
To view the status of the hub, open a browser window and navigate to http://localhost:4444/grid/console
Step 2: Configure Appium Node JSON file and connect it to the Selenium Grid Hub
To set up Nodes for the Appium Grid, configure the JSON files for each of the node devices, such as done below for Device 1 (iOS 12, iPhone 8 Plus):
{
"capabilities":
[
{
"deviceName": "iPhone 8 Plus",
"browserName": "Safari",
"version":"12",
"maxInstances": 2,
"automationName": "XCUITest",
"platform":"iOS"
}
],
"configuration":
{
"cleanUpCycle":3000,
"timeout":30000,
"proxy": "org.openqa.grid.selenium.proxy.DefaultRemoteProxy",
"url":"http://192.168.31.106:4628/wd/hub",
"host": "192.168.31.106",
"port": 4628,
"maxSession": 2,
"register": true,
"registerCycle": 5000,
"hubPort": 4444,
"hubHost": "192.168.31.106"
}
}
This JSON file will help connect the Hub and Nodes and act as a bridge in routing the relevant test to the required device at the Node.
Similarly, configure the JSON Files for other nodes (devices) to build the Appium Grid.
Then run the driver node by using the following command. Make sure that the port parameter mentioned here is the same as that on the Node Config JSON file.
appium -p 4728 --nodeconfig /absolute/path/nodeconfigdevice1.json
Note that the default port for Appium Client and server is 4723, while that of the Appium server and testing device is 4724. However, one can specify the port number to avoid confusion.
Step 3: Initialize the Mobile Drivers for Node Devices using Appium
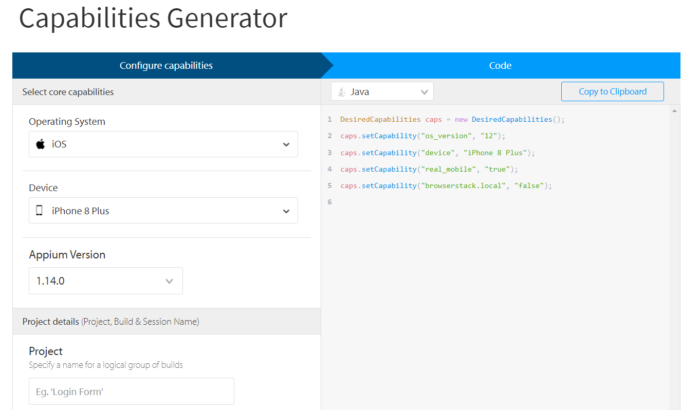
Set the Desired Capabilities for Device 1 (iOS 12)using the following code This would be the first node for the Appium Grid:
DesiredCapabilities caps = new DesiredCapabilities();
caps.setCapability("os_version", "12");
caps.setCapability("device", "iPhone 8 Plus");
caps.setCapability("real_mobile", "true");
caps.setCapability("browserstack.local", "false");
Setting up Desired Capabilities using BrowserStack Capabilities Generator
BrowserStack allows its users to set Desired Capabilities through Capabilities Generator as shown above.
Similarly, one can set the Desired Capabilities for other devices too (including Android devices) that would be used as Nodes in the Appium Grid.
The initialization of Node devices will help in allocating relevant tests to the targeted Node Device upon matching the Capabilities.
By performing the three steps above, testers can set up the Appium Grid, which would help them perform parallel testing on multiple devices by connecting the Appium Servers of the individual devices with a central Hub (Selenium Grid). The multiple device-browser combinations at the nodes will help in performing Cross Device Testing for the test scenarios.
Testing on Real Mobile Devices with BrowserStack
Once the Appium Grid is set up, testers need access to real mobile devices to run their test suites effectively. BrowserStack provides a real device cloud with thousands of Android and iOS devices, enabling automated testing through Appium in real user conditions.
Key Benefits of Using BrowserStack with Appium Grid:
- Real Device Access: Run automated tests on a wide range of real iOS and Android devices.
- Built-in Debugging Tools: Identify and fix issues quickly with logs, video recordings, and screenshots.
- Cross-Platform Testing: Ensure app compatibility across different devices, OS versions, and screen sizes.
- Parallel Testing: Run tests simultaneously on multiple devices to speed up execution and feedback cycles.
- Faster Release Cycles: Accelerate app delivery with scalable and efficient test infrastructure.
Conclusion
Setting up an Appium Grid enables efficient parallel testing across multiple devices and platforms, reducing test execution time and improving coverage.
By integrating it with real device clouds like BrowserStack, teams can scale mobile automation and deliver high-quality apps faster and more reliably.
Useful Resources for Appium
Tutorials
- How to perform Parallel Test Execution in Appium?
- Appium Visual Testing: The Essential Guide
- How to run Appium iOS Tests on Real Devices?
- How to perform Debugging in Appium
- How to Run Your First Appium Test Script
- How to report bugs in Appium UI Testing?
- How to run Appium Tests on macOS?
- XPath in Appium: Tutorial
- How to Analyze Appium Logs
- How to perform Drag and Drop using Appium
- How to test mobile app in Landscape or Portrait mode using Appium
- How to Run Same Script in Multiple Devices using Appium
- How to change Time Zones for Mobile App Testing using Appium
- How to Perform Localization of Mobile Apps using Appium
- What is Appium Inspector? (Benefits & How to Use it?)
- How to run Appium tests on Android devices
- How to scroll down to an element in Appium
- How to Download and Install Appium
- How to set up your Appium Grid
- How to test Biometric authentication using Appium?
- How to use touch actions in Appium?
- How to Automate a Real E2E User Flow involving App and Browser with Appium
- How to Inspect Element using UIAutomatorViewer in Appium
- How to Test Flutter Apps Using Appium Automation
- Understanding Appium Desktop: Tutorial
- Appium Tutorial for Mobile Application Testing
- React Native and Appium Tutorial
- Understanding FindElements in Appium
Best Practices, Tips, and Tricks
- Appium Best Practices Every Developer Must Know
- Effective Locator Strategies in Appium
- Top Appium Commands every Developer must know
- Desired Capabilities in Appium
- Overcoming Top Challenges faced in Appium Automation
Getting Started with
- Getting Started with Appium and NUnit framework
- WebdriverIO Tutorial: Getting started with Test Automation using Selenium and Appium
- Appium with Python: Getting Started with App Automation Testing
- Appium with Java: Getting Started to Run Automated Tests
- Test Windows Desktop App using Appium-Compatible WinAppDriver
Differences and Comparisons


