When building applications with Create-React-App, ensuring your UI behaves as expected is key to delivering a smooth user experience. Cypress offers a straightforward and reliable way to automate testing directly in the browser, making it easier to catch issues before they reach production.
Overview
Create-React-App is a popular tool that simplifies setting up React applications with a ready-to-use development environment.
Running Cypress tests on a Create-React-App project helps automate end-to-end testing, ensuring your app works smoothly while speeding up bug detection and improving code reliability.
Benefits of Running Cypress Tests for Create-React-App
- Fast and easy setup tailored for React projects
- Real-time test execution with automatic reloads
- Clear, detailed error messages and debugging tools
- Reliable end-to-end testing in a real browser environment
- Improves app stability by catching UI bugs early
- Integrates seamlessly with existing React workflows
- Speeds up development with automated regression checks
This article explores the process of running Cypress tests on your Create-React-App project, helping you build more robust and maintainable React applications with confidence.
Why use Create-React-App to build your application
There are several reasons why you might choose to use Create React App over other alternatives for building your application:
- Simplicity: Create React App provides a simple and straightforward way to set up a development environment for building React applications. It includes all the necessary tools and configurations out-of-the-box, which can save you time and effort.
- Community Support: Create React App has a large and active community of developers who contribute to its development, provide support, and create plugins and extensions that can be used with the tool. This can make it easier to find help and resources when you need them.
- Opinionated Setup: Create React App provides a pre-configured and opinionated setup for building React applications. This can help you avoid common mistakes and ensure that your application follows best practices.
- Familiarity: Create React App is widely used and has become a standard tool for building React applications. If you’re already familiar with the tool, it may be more efficient for you to use the Create React App than to learn a new tool.
Read More: How to Test React using Cypress
Why use Cypress for Testing Create-React-App Applications?
Running Cypress tests on a Create-React-App provides several key benefits that improve both the development workflow and the overall quality of the application:
- End-to-End Testing Made Simple: Cypress offers an intuitive interface to create and execute end-to-end tests that mimic real user interactions, ensuring the app functions correctly from start to finish.
- Fast Feedback Loop: With automatic reloads and real-time test execution, developers get immediate test results, accelerating debugging and shortening development cycles.
- Reliable and Stable Tests: Running directly inside the browser, Cypress provides more consistent and dependable test results compared to tools relying on external browser automation.
- Comprehensive Debugging Tools: Detailed error messages, screenshots, and video recordings during test runs make diagnosing and fixing issues faster and easier.
- Improves Code Quality: Automated tests detect regressions and UI bugs early, helping teams deliver more stable and reliable React applications with confidence.
To further enhance testing efficiency, BrowserStack offers a robust cloud-based platform that enables running Cypress tests across a wide range of real browsers and devices. This ensures comprehensive test coverage and faster delivery cycles by validating app behavior in environments that closely match real user conditions.
Set up the Create React App
To explore component testing with Create React App, start by creating an application that includes a component test. The sample app allows searching through a list of pre-populated names
Understand the App
Before installing and using Cypress for component testing, ensure all necessary dependencies are downloaded and installed to run the application successfully.
1. Download the Github repository with the application.
2. Open the downloaded repository in VScode.
3. Click Terminal > New Terminal.
4. Install the required dependencies:
npm install
5. Start the development server:
npm run dev
6. Verify the server is up and running at localhost:5173.
Understand the Component
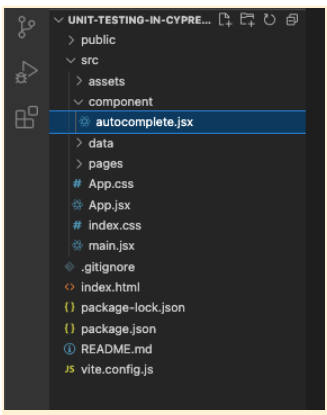
The following image shows the folder structure of the app:
The autocomplete.jsx file includes the state variables declarations:
- suggestions – array of suggestions used to populate the autocomplete menu.
- suggestionIndex – index of the active suggestion used for keyboard navigation.
- suggestionsActive – used to toggle the visibility of the autocomplete suggestions.
- value – autocomplete suggestion that the user has selected.
It includes the onChange event that will be triggered when a user starts typing and searching for a name. It also includes the onClick event that will be triggered when a user clicks a name from the list that populates. The keyDown event listens for keyboard navigation that a user performs. The Suggestions component holds the logic to return suggestions based on the user entry.
Read More: How to run specific test in Cypress
Install Cypress in the App
To write a component test for the component described earlier, we need to install Cypress.
1. Open the downloaded repository in VScode.
2. Click Terminal > New Terminal.
3. Run the following command to install Cypress:
npm install cypress --save-dev
4. Run the following command to open Cypress dashboard:
npx cypress open
Write the component test for Create-React-App using Cypress
The component test to be written for the app will cover the following:
- Verifies that the UI is up and running.
- Verifies that the filtering drop-down is functional.
- Verifies that scrolling through to a name works correctly.
To add the test to the app:
- In VSCode, open the src/component directory.
- Create a new file, autocomplete.cy.jsx.
- Copy the following code in the file. In the autocomplete.cy.jsx file, the component is mounted using the cy.mount command and Save the file.
import Autocomplete from './autocomplete';
import countries from '../data/countries';


describe('Test the autocomplete functionality', () => {
beforeEach(() => {
cy.mount(<Autocomplete countries={countries} />);
})


it('check everything is working in ui', () => {
cy.get('[data-cy="heading"]').contains('Search your country:');
cy.get('input[type="text"]').should('have.value', '');
cy.get('[data-cy="suggestion-list"]').should('not.exist');
})


it('check filter is working', () => {
cy.get('input[type="text"]').type('no');
cy.get('[data-cy="suggestion-list"]').should('be.visible').as('suggestList');
cy.get('@suggestList').should('have.length', 1);
})


it('check selections are working', () => {
cy.get('input[type="text"]').as('inputText');
cy.get('@inputText').type('no').type(Cypress._.repeat('{downArrow}{downArrow}', 1));
cy.get('[data-cy="suggestion-list"] li:nth-child(3)').should('have.class', 'active');
cy.get('@inputText').type(Cypress._.repeat('{upArrow}', 1));
cy.get('[data-cy="suggestion-list"] li:nth-child(2)').should('have.class', 'active');
cy.get('[data-cy="suggestion-list"] li:nth-child(2)').click();
cy.get('input[type="text"]').should('have.length', 1);
cy.get('[data-cy="suggestion-list"]').should('not.exist');
})


})
Run Cypress Tests on Real Devices
Run Component test for Create-React-App using Cypress
After you have added the component test to your component, you can run the test using the Cypress dashboard.
1. In VSCode, click Terminal > New Terminal.
2. Run the following code:
npx cypress open
3. Click Component Testing > Chrome, and then click Start Component Testing in Chrome.
4. In the Cypress dashboard, click Specs and double-click the autocomplete.cy.jsx file.
The test is complete and the result appears as follows:
E2E test for Create-React-App using Cypress
For running the Cypress E2E test, using the bstackdemo web app. The test will sign in using an account, log out the current user, and then verify to be on the Sign in page.
Prerequisite
Before you can create the E2E spec for testing, you must install the cypress-xpath dependency.
- In VSCode, click Terminal > New Terminal.
- Open the root project directory.
- Run the following command to open Cypress:
npm install cypress-xpath
Write the E2E test for Create-React-App using Cypress
Create an empty spec using the E2E testing option that Cypress provides.
1. In VSCode, click Terminal > New Terminal.
2. Run the following command to open Cypress:
npm cypress open
3. Click E2E Testing > Chrome, and then click Start E2E Testing in Chrome.
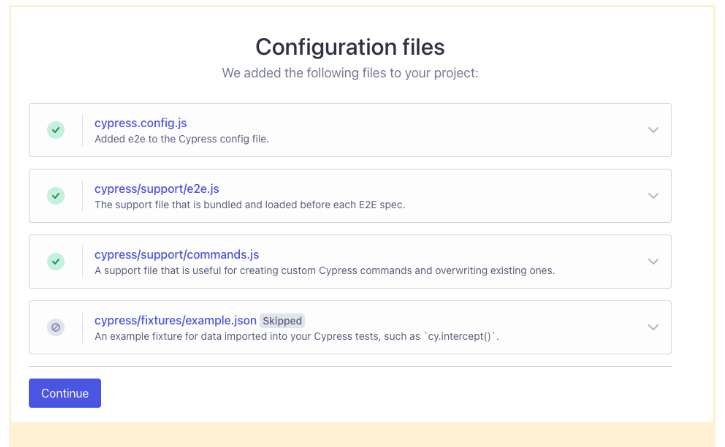
4. Click Continue to create an empty spec.
5. Set the name of the test as e2e.cy.js and click Create spec.
6. In VSCode, open the cypress/e2e folder.
7. Open the e2e.cy.js file.
8. Copy the following code:
require('cypress-xpath'),


describe('empty spec', () => {


it('Bstack demo signin', () => {
cy.visit('https://bstackdemo.com/signin')
cy.get("#username").click();
cy.xpath("//div[text()='demouser']").click();
cy.get("#password").click();
cy.xpath("//div[text()='testingisfun99']").click();
cy.get("#login-btn").click();


cy.get("#logout").should('have.text','Logout')


cy.get("#logout").click();


cy.get("#signin").should('have.text','Sign In')
})
})
Run Cypress Tests on Real Devices
Run your Cypress E2E test for Create-React App
1. In VSCode, open the directory, bstackdemo-e2e.
2. Click Terminal > New Terminal.
3. Run the following command to open Cypress:
npm cypress open
4. Click E2E Testing > Chrome, and then click Start E2E Testing in Chrome.
5. In the Cypress dashboard, click Specs and double-click the e2e.cy.js file.
Read More: Cypress End to End Testing: Tutorial
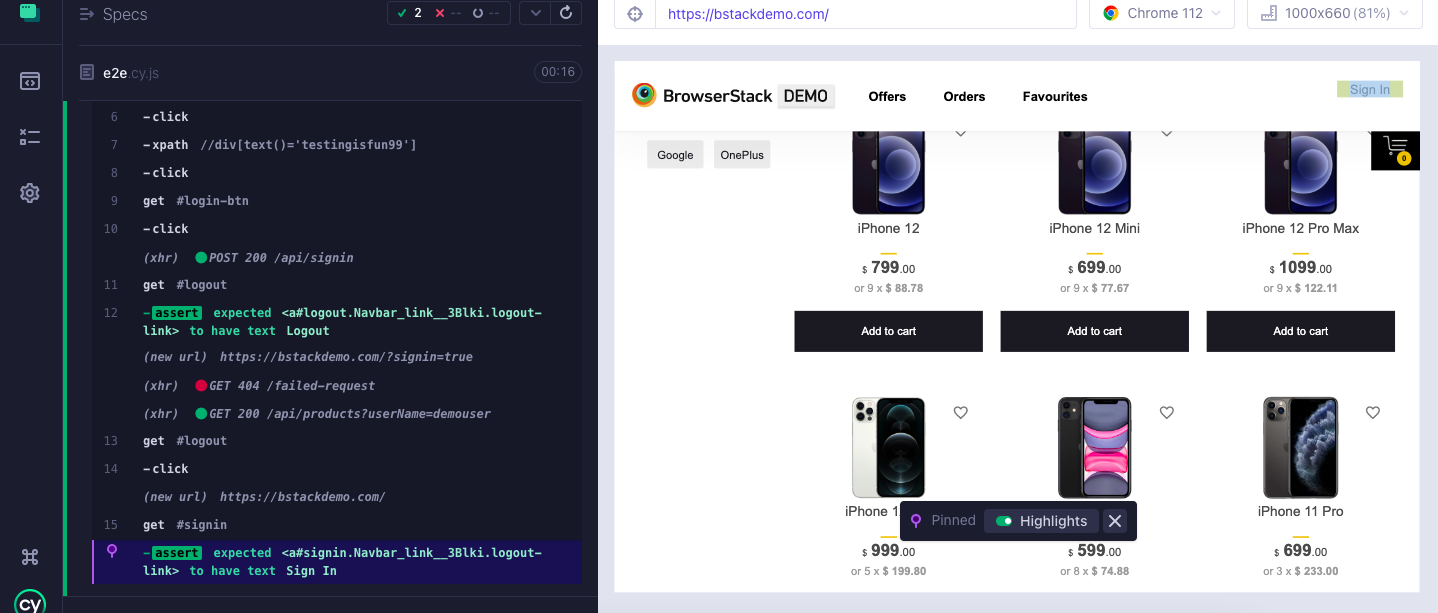
The test is complete and shows the result as follows:
Best Practices for running Cypress Tests on Create-React-App
Some of the best practices that you can note before creating Cypress test cases are:
- Aim to keep each spec file independent of each other. Reduce interdependencies.
- Use assertions correctly such that Cypress commands progress only when explicit conditions are met.
- Consider each scenario as an independent test case in isolation, sign into applications using programs, and manage your application’s state.
- Use the configuration file (*.cy.js) to set your baseURL.
For enhanced testing efficiency, BrowserStack Automate provides seamless integration with Cypress, enabling tests to run across 3500+ real browsers and devices in the cloud. With parallel test execution and local testing capabilities, BrowserStack helps speed up test runs and securely test applications hosted behind firewalls.
Conclusion
Effective testing is crucial to building reliable applications, and Cypress offers a powerful solution tailored for Create-React-App projects.
By setting up and running both component and end-to-end tests with Cypress, developers can catch issues early, ensure smooth user experiences, and accelerate development cycles.
Adhering to best practices further enhances test stability and maintainability, making Cypress an essential tool for modern React development.
