When testing your application, the only way to achieve faster time to production is by automating tests. Writing Cypress tests and executing them is one of the easiest and fastest ways to boost testing if your application is written in Javascript.
Overview
What is Cypress?
Cypress is a JavaScript-based front-end testing framework catering to web applications. It lets developers and testers write tests like unit tests, integration tests, and end-to-end tests for different development stages.
Benefits of Writing Test Cases on Cypress
- Leverage End-to-End Test Automation
- Utilize Automatic Waiting
- Utilize Time-travel debugging
- Make use of Real-Time Reloads
- Interactive Debugging
- Reduce flaky tests
- Ease to Use
This tutorial explains how to write Cypress test cases and takes you through a Cypress testing example.
How to write Cypress Test Case
When writing a Cypress test case, consider the type of testing that you want to implement. The Cypress UI offers you an easy interface to start running E2E Cypress test scripts or component tests. It also includes a wizard that takes you through creating the tests.
Consider an example, such as a shopping web application, such as www.bstackdemo.com. When testing this web app, there might be multiple scenarios that you would want to test.
Cypress E2E Test Case
An E2E Cypress test script comprises a test that checks for a complete logical flow in the application. So, for our web app, bstackdemo.com, this would mean a complete life cycle of placing an order for the phone or testing the login flow for the application.
In this guide, you will learn to create an E2E test that tests for login using the correct credentials and a failed test using the incorrect credentials.
Cypress Component Testing
In a typical SDLC, all modules of the web application are never developed together. In an Agile environment, each module is developed over a series of sprints. Though in an ideal world, it is preferred that E2E tests are performed to ensure integration between different modules and resulting issues are identified together; you must accept practicalities and optimize your testing process to handle iterative development.
In such cases, you can use Cypress component testing. For our example web application, that could mean testing just the login page and checkout page in isolation.
Here is a Cypress testing example to better understand how to write a test case for each of these scenarios.
Cypress Testing Example
Before you start implementing this example, ensure that the following prerequisites are met.
Prerequisites
- Understanding of Cypress fundamentals
- Install NodeJS
- Install Visual Studio Code (required for this tutorial)
Run a Cypress E2E test
Running a Cypress E2E test involves installing Cypress in your working directory, creating necessary supplementary files, creating your spec file, and then running your test.
Run Cypress Tests on Real Devices
Step 1: Install Cypress in working directory
- Create an E2E directory named bstackdemo-E2E.
- In VSCode, open the directory, bstackdemo-E2E.
- Click Terminal > New Terminal.
- Install Cypress using the below command
npm install Cypress
- Verify that Cypress and related dependencies are installed.
npx Cypress --version
Step 2: Create E2E testing configuration files and a spec file.
After you have installed Cypress, use the Cypress wizard to first create the related configurations, and then the spec file that tests your E2E scenario.
- Open the Cypress launchpad.
npx Cypress open
- Select the E2E Testing option to start creating the spec file. As there are no spec(*.cy.js) files created yet, the E2E Testing option shows the **Not Configured** status.
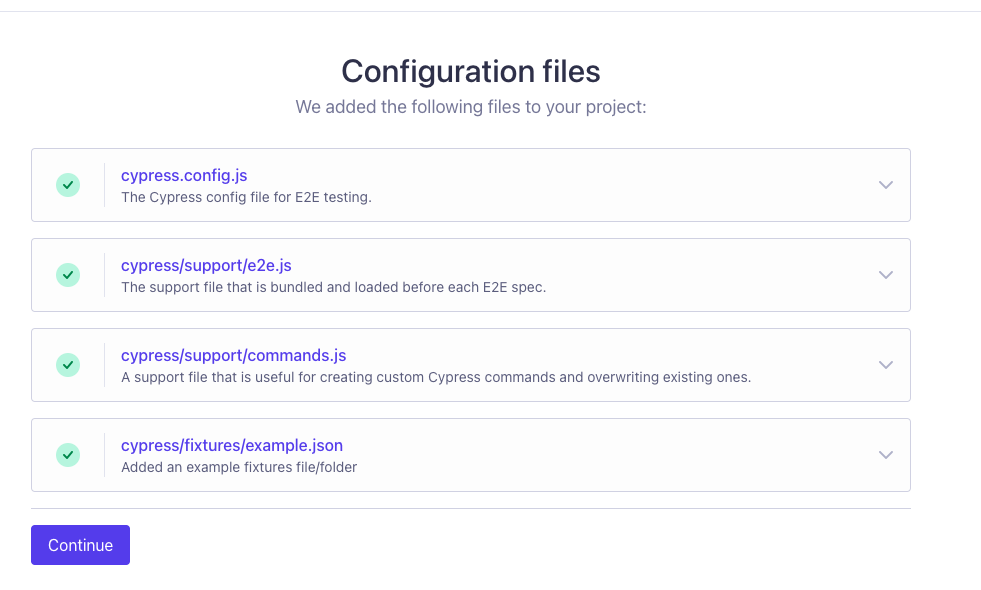
- Click Continue to create required configuration files in the directory.
- Select Chrome as the testing browser, and then click Start E2E Testing in Chrome. The Cypress dashboard opens.
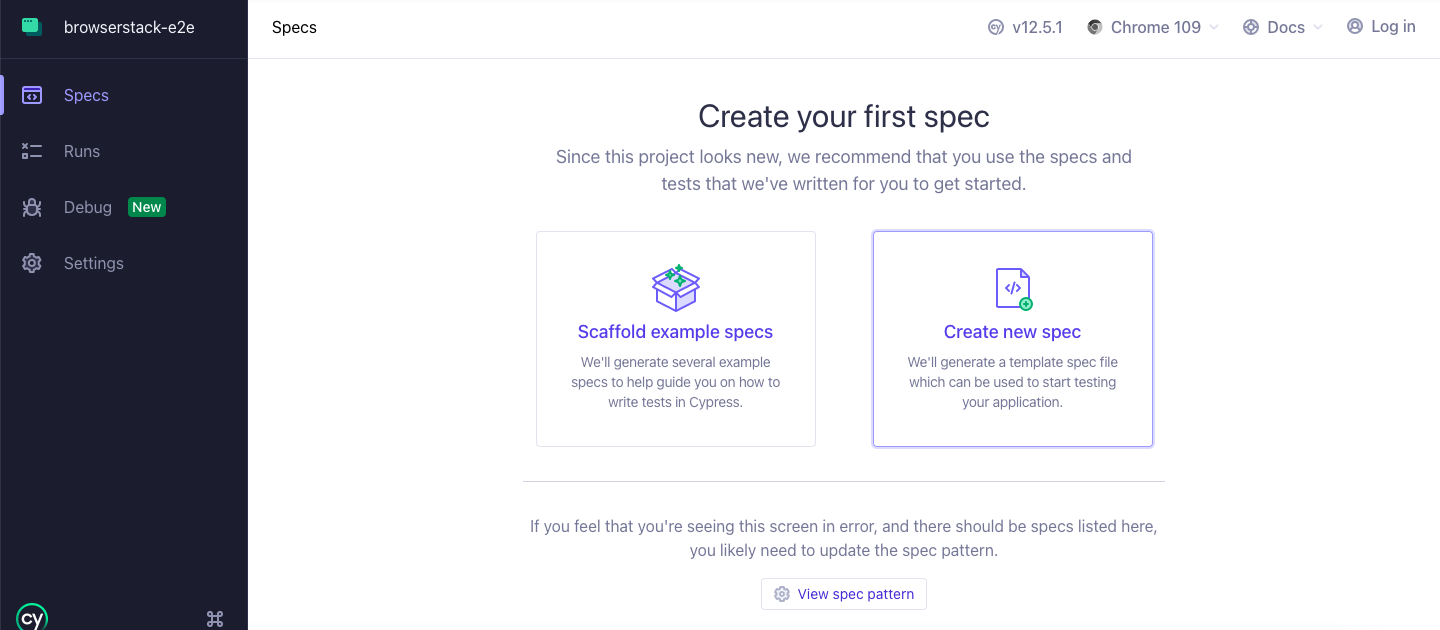
- Click Create new spec to generate a dummy spec file. Enter a name, login.cy.js and click Create spec.
- A confirmation screen with starter code included in the spec file is displayed. Close this window and open VSCode.
Step 3: Edit the E2E test and run the test
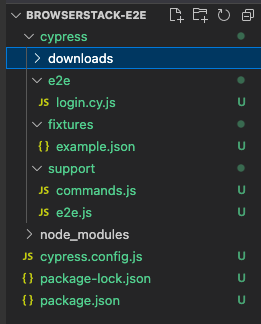
When you create a directory, it includes all the required configurations and the spec files that you want to test. The following image shows the files created and what they mean.
- E2E: Contains Cypress end-to-end spec files. Each file can be thought of as a test case in your test suite.
- fixtures: For data driven tests, include your data .json files here.
- support: Helper functions, utilities, any reusable code, and custom commands can be placed here.
- support/e2e.js: Store global configurations in this folder.
- support/commands.js: Include custom commands to override existing commands.
- Cypress.config.js: Includes runtime configurations such as browser manipulation, videos, images, etc. The following image shows the cypress.config.js file that is generated for this project:
const { defineConfig } = require("cypress");
module.exports = defineConfig({
projectId: 'tbw9to',
e2e: {
setupNodeEvents(on, config) {
// implement node event listeners here
},
},
});
Note: If you are using BrowserStack to test your project, see the BrowserStack Cypress integration documentation.
- package.json: Includes installed dependencies and option to create custom command shortcuts.
Complete the following steps to run the E2E test:
1. In VSCode, click the E2E folder in the navigation tree, and then open the login.cy.js file.
2. Copy the following code to the file and save it. This code includes two scenarios; first to check for successful login, and second to check for an unsuccessful login.
require('Cypress-xpath'),


it('BstackDemo successful login', () =>{
cy.visit('https://www.bstackdemo.com/signin/')
cy.get("#username").click();
cy.xpath("//div[text()='demouser']").click();
cy.get("#password").click();
cy.xpath("//div[text()='testingisfun99']").click();
cy.get("#login-btn").click();
cy.get("#logout").should('have.text','Logout')
cy.get("#logout").click();
cy.get("#signin").should('have.text','Sign In')
})


it('BstackDemo failed login', () =>{
cy.visit('https://www.bstackdemo.com/signin/')
cy.get("#username").click();
cy.xpath("//div[text()='demouser']").click();
cy.get("#password").type('ddd{enter}');
cy.xpath('//*[@id="login-btn"]').click()
cy.get("#login-btn").click();
cy.xpath('//*[@id="__next"]/div[2]/div').should('have.text','demouserdddLog InInvalid Password')
cy.log('invalid password')
})
3. Install the Cypress-xpath package in the directory.
npm i cypress-xpath
4. Run the test using either of the following options:
- Using the Cypress dashboard:
a. Click the Specs option from the navigation pane.
b. Click the login.cy.js spec file to run the test.
- Using the terminal in VSCode. In the terminal, run the following command:
npx cypress run --spec cypress/e2e/login.cy.js
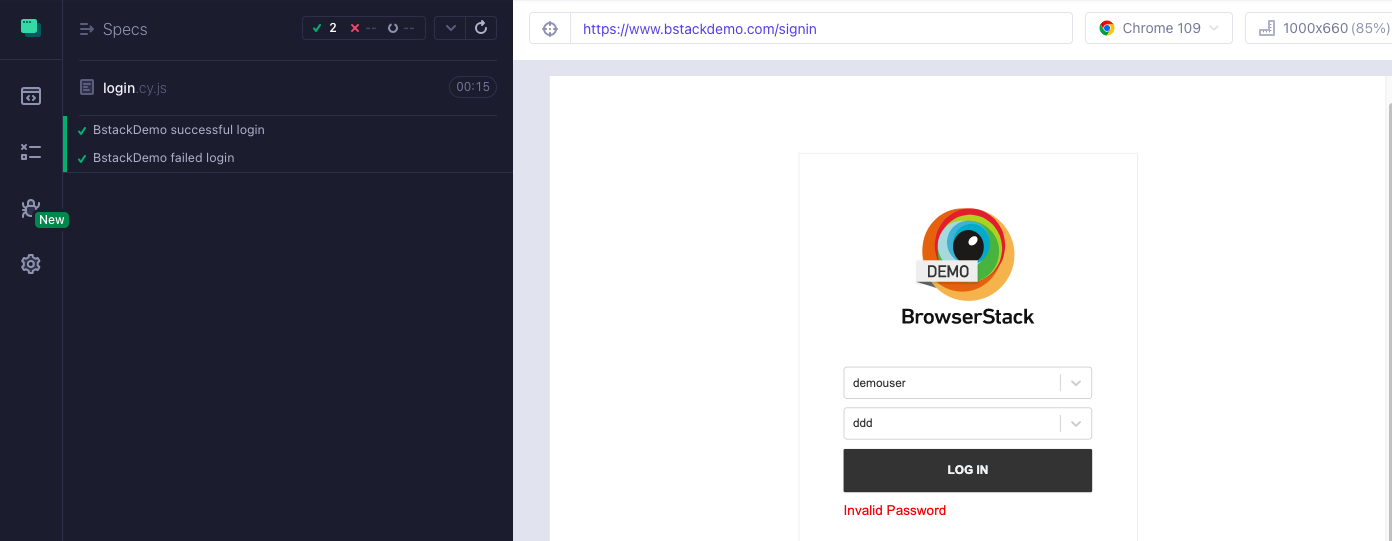
To verify if your test ran successfully, in the Cypress dashboard, click Runs. The following image shows the successful execution of your E2E tests.
Run a Cypress Component Test
Component testing is an effective approach to test a module in your UI instead of an E2E scenario.
Note: Ensure that all the prerequisites are same as mentioned in the previous section and should be met before you start component testing.
Step 1: Create a sample directory, bstackdemo-comp-testing.
Step 2: Create a react native app in the directory
As part of component testing, all the components of the app need to be available on the local machine. For this, create a react native app in your local directory.
- In VSCode, open the bstackdemo-comp-testing directory.
- Create a sample react app:
npm create vite@latest sample-app -- --template react
- Initialize the sample app to install dependencies:
cd sample-app &&
npm install
Step 3: Install Cypress in working directory
- In VSCode, open the bstackdemo-comp-testing directory.
- Click Terminal > New Terminal.
- Install Cypress using
npm install cypress -D
- Verify that Cypress and related dependencies are installed.
npx Cypress --version
Step 4: Create component testing configuration files and a spec file
After you have installed Cypress, use the Cypress wizard to first create the related configurations and the spec file that tests your component testing scenario.
- Open the Cypress launchpad.
npx Cypress open
- Select the Component Testing option to start creating the spec file. As there are no spec(*.cy.js) files created yet, the component testing option shows the **Not Configured** status.
- Confirm the Front-end framework and the Bundler, and then click Next step.
- Review the installed dev dependencies and click Continue.
- Review the configuration files added and click Continue.
- Select Chrome as the testing browser, and then click Start Component Testing in Chrome. The Cypress dashboard opens.
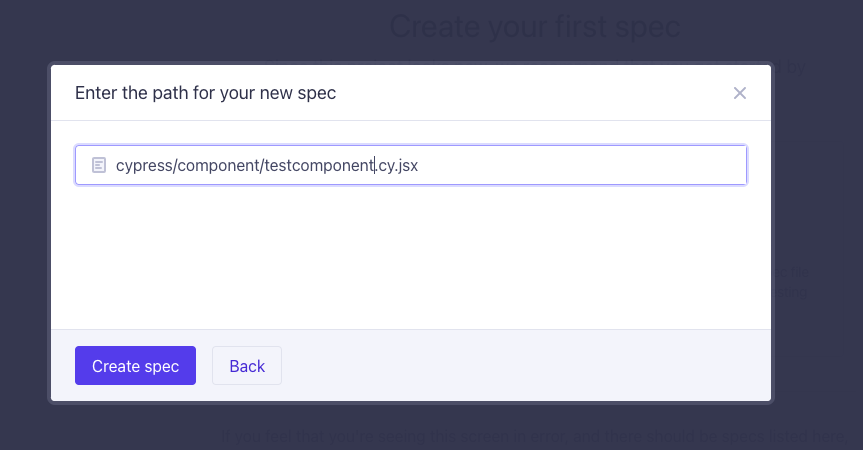
- Click Create new spec to generate a dummy spec file. Enter a name, testcomponent.cy.jsx and click Create spec.
- A confirmation screen with starter code included in the spec file is displayed. Close this window and open VSCode.
Step 5: Create the react app
The sample app includes a simple hello world message. It also includes the logic to accept the name of a person and include that in the hello world message.
- In VSCode, click the sample-app > src directory, and then open the App.jsx file.
- Copy the following code that displays Hello world when the test is run. The code also accepts the name of a person as input and appends to the message:
import { useState } from 'react'
export default function Test({ name = 'Hello World!, People' }) {
const [nameMessage] = useState(name)


return (
<div>
<div id='message'>
Hello Browserstack! {nameMessage}
</div>
</div>
)
}
Step 6: Edit the Component test and run the test
1. In VSCode, click sample-app > Cypress > component directory, and then open the testcomponent.cy.jsx file.
2. Copy the following code that tests the app functionality:
import Test from '../../src/App'
describe(Test Component', () => {
it('Default Message', () => {
cy.mount(<Test/>)
cy.get('#message').should('have.text','Hello World!, People')
})
it('BrowserStack Name', () => {
cy.mount(<Test name='BrowserStack'/>)
cy.get('#message').should('have.text','Hello World! BrowserStack')
})
})
3. In VSCode, open the terminal.
4. Run the test using either of the following options:
a. Using the Cypress dashboard:
- Run
npx cypress open
- Click the Specs option from the navigation pane.
- Click the testcomponent.cy.jsx spec file to run the test.
b. Using the terminal in VSCode:
- In the terminal, run the following command:
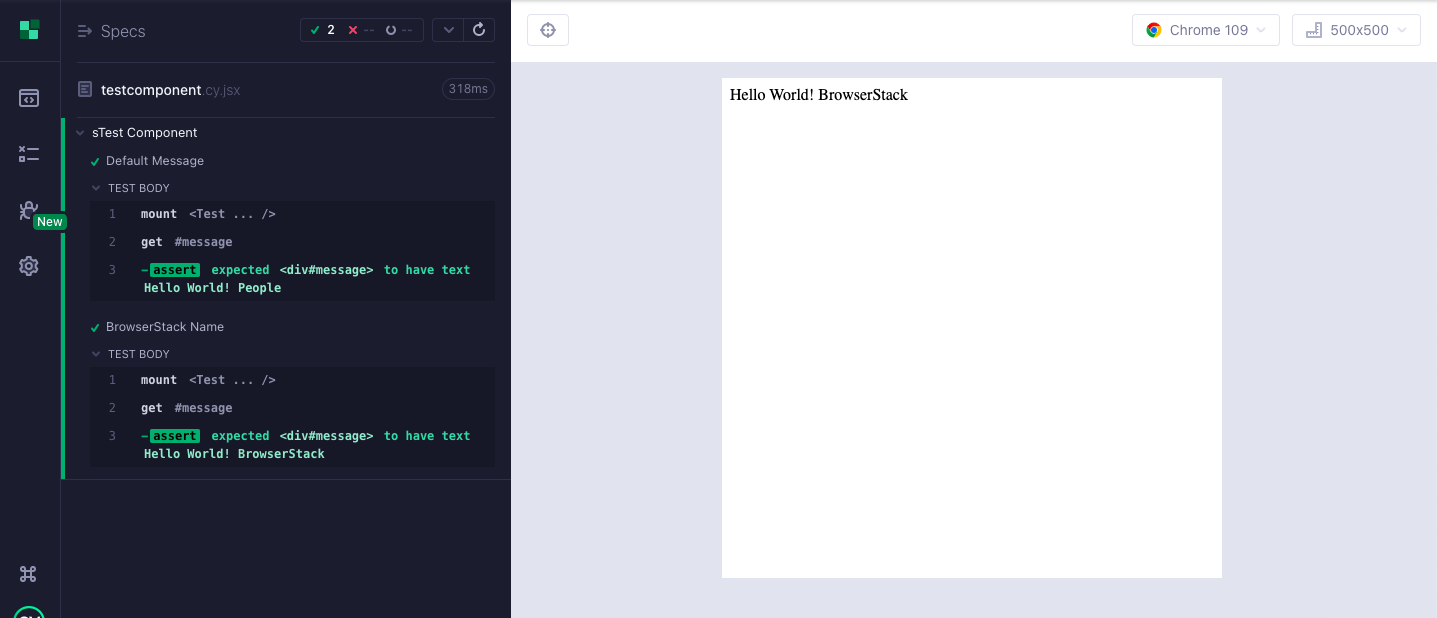
npx cypress run --componentTo verify if your test ran successfully, in the Cypress dashboard, click Runs. The following image shows the successful execution of your component tests.
Best Practices
Some of the best practices that you can note before creating Cypress test cases are:
- Treat each E2E scenario as an independent test case in isolation, log into applications using programs, and control your application’s state.
- Each spec file must be independent of each other. Reduce interdependencies.
- Use assertions correctly such that Cypress commands progress only when explicit conditions are met.
- Use the configuration file (*.cy.js) to set your baseURL.
Conclusion
In this article, you learnt about how to structure your test cases and also how to split your tests as E2E tests or component tests. Though Cypress is robust and offers ease of creating tests, it does limit the range of browsers and devices that you can test in real time situations.
For stable testing, you must simulate real world devices and for that using a real device cloud, such as BrowserStack for Cypress, is a great option. Access to multiple devices helps you predict and handle issues before your product reaches production.
Run Cypress Tests on Real Devices
Useful Resources for Cypress
Understanding Cypress
- Cross Browser Testing with Cypress : Tutorial
- Run Cypress tests in parallel without Dashboard: Tutorial
- Handling Test Failures in Cypress A Comprehensive Guide
- Cypress Test Runner: Tutorial
- Handling Touch and Mouse events using Cypress
- Cypress Automation Tutorial
- CSS Selectors in Cypress
- Performance Testing with Cypress: A detailed Guide
- Cypress Best Practices for Test Automation
- Test React Native Apps with Cypress
- Cypress E2E Angular Testing: Advanced Tutorial
- Cypress Locators : How to find HTML elements
- Maximizing Web Security with Cypress: A Step-by-Step Guide
- Conditional Testing in Cypress: Tutorial
- Cypress Web Testing Framework: Getting Started
- Cypress Disable Test: How to use Skip and Only in Cypress
- What’s new in Cypress 10? How it will change your current testing requirements
Use Cases
- How to Record Cypress Tests? (Detailed Guide)
- How to run your first Visual Test with Cypress
- How to Fill and Submit Forms in Cypress
- How to Automate Localization Testing using Cypress
- How to run Cypress Tests in Chrome and Edge
- How to use Cypress App Actions?
- How to Run Cypress Tests for your Create-React-App Application
- How to Run Cypress Tests in Parallel
- How to handle Click Events in Cypress
- How to Test React using Cypress
- How to Perform Visual Testing for Components in Cypress
- How to run UI tests in Cypress
- How to test redirect with Cypress
- How to Perform Screenshot Testing in Cypress
- How to write Test Case in Cypress: (with testing example)
Tool Comparisons


