Most testers assume running tests in parallel with TestNG is straightforward—just flip a config, increase thread count, and watch your suite finish faster.
I believed that too, until a routine regression run took far longer than expected. I tried reorganizing classes, trimming steps, and removing delays, but nothing meaningfully improved the execution time.
That’s when I understood the real value of TestNG’s parallel execution capabilities and how much time I had been losing without them.
Overview
Parallel test cases in TestNG allow multiple tests to run simultaneously instead of sequentially. This reduces overall execution time and improves efficiency, especially for large test suites or CI/CD workflows.
Steps to Configure Parallel Execution in TestNG
- Define the parallel mode in the testng.xml file (methods, classes, or tests).
- Set the thread-count attribute to specify how many tests run simultaneously.
- Ensure WebDriver instances are isolated to avoid shared state issues.
- Run the suite using TestNG to validate parallel behavior.
Example
<!DOCTYPE suite SYSTEM "https://testng.org/testng-1.0.dtd" >

<suite name="ParallelSuite" parallel="methods" thread-count="4">


    <test name="ParallelMethodExecution">

        <classes>

            <class name="com.example.tests.SampleTest"/>

        </classes>

    </test>


</suite>
Important Considerations
- Each thread must use its own WebDriver instance to prevent conflicts.
- Avoid shared static variables that may cause race conditions.
- Increase system resources if running a high thread count.
- Ensure your application under test can handle parallel user flows.
This article covers how parallel execution works in TestNG, how to configure it at different levels, and how to avoid common issues so your test suites run faster and scale more efficiently.
What is TestNG?
TestNG is a powerful testing framework for Java designed to simplify the creation, execution, and management of automated tests. Inspired by JUnit and NUnit, it offers more advanced features, including TestNg annotations, flexible configuration options, and built-in support for parallel execution.
TestNG allows testers to structure their test suites efficiently through testng.xml, enabling fine-grained control over test grouping, sequencing, and dependencies.
Its ability to integrate seamlessly with Selenium WebDriver makes it one of the most widely adopted frameworks for UI test automation.
With features such as data-driven testing, parameterization, reporting, and multi-threaded execution, TestNG provides the flexibility needed to scale test suites and improve execution speed—making it particularly valuable in continuous testing and CI/CD environments.
What is Parallel Execution in TestNG?
Parallel testing is the practice of running multiple tests simultaneously in separate threads. In the context of Selenium and TestNG, this means you can execute tests across different browsers, devices, and environments at the same time rather than running them one after another.
According to Sarah Thomas, an expert in software testing, parallel tests should always be designed as independent, thread-safe units, with each thread managing its own WebDriver instance to prevent interference and ensure consistent execution.
The primary goal of parallel execution is to significantly reduce overall test execution time while increasing environment coverage.
For example, imagine a sanity suite of 50 test cases that must run on both Chrome and Firefox. Executed sequentially, you would spend one hour running the suite on Chrome and another hour on Firefox—two hours in total.
With parallel execution, both runs can occur concurrently, completing in approximately one hour and cutting execution time by 50%.
TestNG supports parallelism at multiple levels, including methods, classes, and test suites. Using the testng.xml configuration file, you can define the parallel mode and specify the number of threads.
<suite name="Parallel Test Suite" thread-count="2" parallel="methods" >
By combining TestNG’s parallel execution capabilities with the right infrastructure, teams can achieve faster feedback and broader coverage without increasing complexity.
This is where platforms like BrowserStack Automate become especially valuable, offering instant access to real browsers and devices so parallel tests can run reliably at scale.
How to Perform Parallel Execution in TestNG
TestNG provides built-in support for parallel testing. This section explains how you can run parallel tests in TestNG.
Before setting it up, there are a few key prerequisites to ensure smooth and effective parallel execution.
Prerequisites
- Add TestNG to your project (via Maven/Gradle or JAR).
- Set up a test framework (e.g., Selenium).
- Create a testng.xml file to configure parallel execution
- Ensure thread safety, especially for WebDriver instances.
- Use proper TestNG annotations to structure tests.
Download required Maven dependencies
- Install Java 8 or higher and set JAVA_HOME in system environment variables.
- For a Maven project, add Selenium Java, TestNG and WebDriverManager dependencies. Save the pom.xml file to download all the dependencies.
- Add the TestNG library to classpath.
<dependencies>
<dependency>
<groupId>org.seleniumhq.selenium</groupId>
<artifactId>selenium-java</artifactId>
<version>4.5.0</version>
</dependency>

<dependency>
<groupId>org.testng</groupId>
<artifactId>testng</artifactId>
<version>7.6.1</version>
<scope>test</scope>
</dependency>

<dependency>
<groupId>io.github.bonigarcia</groupId>
<artifactId>webdrivermanager</artifactId>
<version>5.2.1</version>
</dependency>
</dependencies>
Executing Test Methods Sequentially in TestNG
Below program runs the test methods sequentially:
Step 1: Under src/test/java create a package and under that create a class as ParallelTest
public class ParallelTest {

WebDriver driver;

@Test(priority = 1)
public void testChrome() throws InterruptedException {
System.out.println("The thread ID for Chrome is "+ Thread.currentThread().getId());
WebDriverManager.chromedriver().setup();
driver = new ChromeDriver();
driver.get("https://www.bstackdemo.com/");
driver.manage().window().maximize();
Assert.assertEquals(driver.getTitle(), "StackDemo");
}

@Test(priority = 2)
public void testFirefox() throws InterruptedException {
System.out.println("The thread ID for Firefox is "+ Thread.currentThread().getId());
WebDriverManager.firefoxdriver().setup();
driver = new FirefoxDriver();
driver.get("https://www.bstackdemo.com/");
driver.manage().window().maximize();
Assert.assertEquals(driver.getTitle(), "StackDemo");
}

@AfterClass
public void close() {
driver.quit();
}
}
Step 2: Right click on the class and select Run As >> TestNG Test. Observe the time taken to execute both the methods in a sequential manner. It takes 18486 ms as seen below

Now let us run both the methods in parallel.
To do so you need to first create a testing.xml file and add a parallel attribute for the test suite with value as methods.
Parallel Execution at different levels in TestNG
TestNG allows you Parallel Execution at different levels such as:
- Parallel Execution of Test Methods
- Parallel Execution of Test Classes and
- Parallel Execution of Test Suites
You can understand these different levels of Parallel Execution in TestNG using examples as demonstrated in the sections below.
Executing Parallel Test Methods in TestNG
Step 1: To create a testing.xml file, right click on the ParallelTest class and select TestNG >> Convert To TestNG.
Step 2: You may select Parallel mode and ThreadCount value of your choice while creating the testing.xml file or you may update it later as per the requirement change. I have selected Parallel mode as methods and ThreadCount as 2.
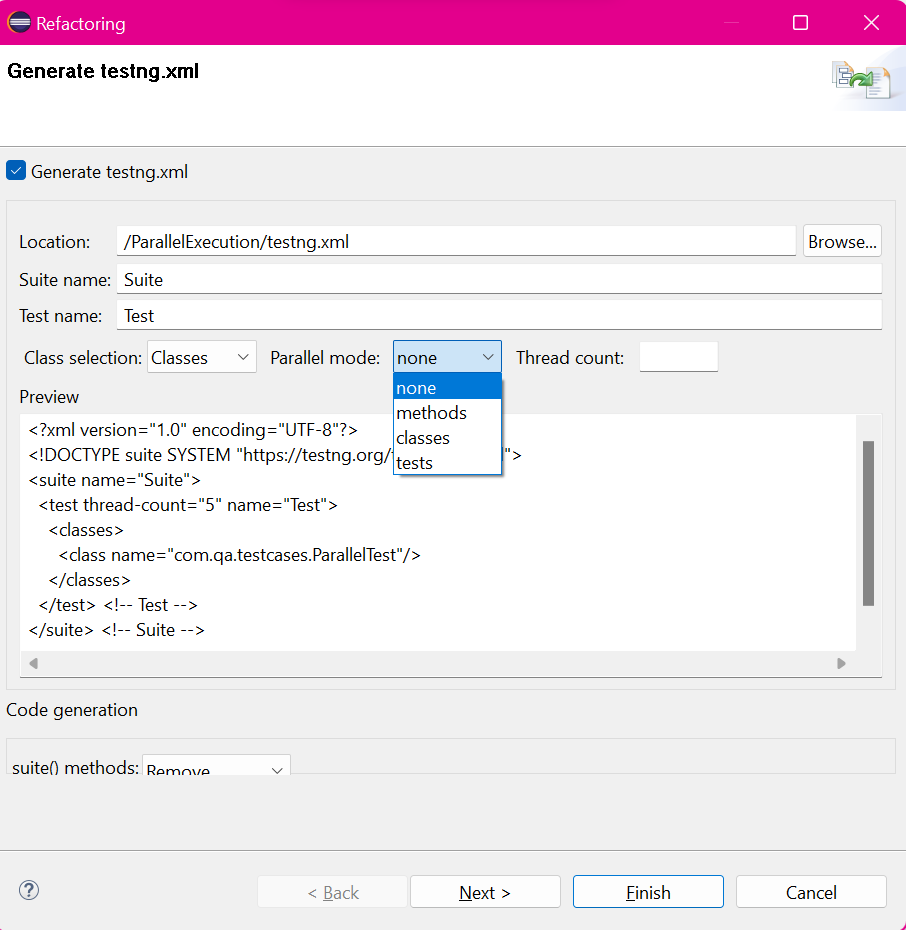
<?xml version="1.0" encoding="UTF-8"?>
<!DOCTYPE suite SYSTEM "https://testng.org/testng-1.0.dtd">
<suite name="Parallel Test Suite" parallel="methods" thread-count="2">
<test name="Parallel Test" >
<classes>
<class name="com.qa.testcases.ParallelTest"/>
</classes>
</test> <!-- Test -->
</suite> <!-- Suite -->
Step 3: Right click on the testing.xml file and select “Run As” -> “TestNG Suite”. Observe the time taken to execute both the methods in parallel mode(10204 ms, decreased the execution timeby 8282 ms).

Executing Test Classes in Parallel using TestNG
Step 1: To run classes in parallel mode, create two class files as ChromeTest and FirefoxTest with three test methods.
public class ChromeTest {
WebDriver driver;

@BeforeTest
public void setUp() {
WebDriverManager.chromedriver().setup();
driver = new ChromeDriver();
driver.get("https://www.bstackdemo.com/");
driver.manage().window().maximize();
}

@Test(priority = 1)
public void testTitle() {
System.out.println("The thread ID for testTitle Chrome is "+ Thread.currentThread().getId());
Assert.assertEquals(driver.getTitle(), "StackDemo");
}

@Test(priority = 2)
public void clickOffers() throws InterruptedException {
System.out.println("The thread ID for clickOffers Chrome is "+ Thread.currentThread().getId());
WebElement offers=driver.findElement(By.cssSelector("a#offers"));
offers.click();
Thread.sleep(2000);
WebElement loginBtn=driver.findElement(By.cssSelector("button#login-btn"));
Assert.assertTrue(loginBtn.isDisplayed());
}

@Test(priority = 3)
public void clickOrders() throws InterruptedException {
driver.navigate().to("https://www.bstackdemo.com/");
System.out.println("The thread ID for clickOrders Chrome is "+ Thread.currentThread().getId());
WebElement orders=driver.findElement(By.cssSelector("a#orders"));
orders.click();
Thread.sleep(2000);
WebElement loginBtn=driver.findElement(By.cssSelector("button#login-btn"));
Assert.assertTrue(loginBtn.isDisplayed());
}

@AfterTest
public void tearDown() {
driver.close();
}
}


public class FirefoxTest {
WebDriver driver;

@BeforeTest
public void setUp() {
WebDriverManager.firefoxdriver().setup();
driver = new FirefoxDriver();
driver.get("https://www.bstackdemo.com/");
driver.manage().window().maximize();
}

@Test(priority = 1)
public void testTitle() {
System.out.println("The thread ID for testTitle Firefox is " + Thread.currentThread().getId());
Assert.assertEquals(driver.getTitle(), "StackDemo");
}

@Test(priority = 2)
public void clickOffers() throws InterruptedException {
System.out.println("The thread ID for clickOffers Firefox is " + Thread.currentThread().getId());
WebElement offers = driver.findElement(By.cssSelector("a#offers"));
offers.click();
Thread.sleep(3000);
WebElement loginBtn = driver.findElement(By.cssSelector("button#login-btn"));
Assert.assertTrue(loginBtn.isDisplayed());
}

@Test(priority = 3)
public void clickOrders() throws InterruptedException {
driver.navigate().to("https://www.bstackdemo.com/");
System.out.println("The thread ID for clickOrders Firefox is "+ Thread.currentThread().getId());
WebElement orders=driver.findElement(By.cssSelector("a#orders"));
orders.click();
Thread.sleep(2000);
WebElement loginBtn=driver.findElement(By.cssSelector("button#login-btn"));
Assert.assertTrue(loginBtn.isDisplayed());
}
@AfterTest
public void tearDown() {
driver.quit();
}

}
Step 2: In the testing.xml file, add class names and update parallel value as classes and run it.
<?xml version="1.0" encoding="UTF-8"?>
<!DOCTYPE suite SYSTEM "https://testng.org/testng-1.0.dtd">
<suite name="Parallel Test Suite" parallel="classes" thread-count="2">
<test name="Parallel Test" >
<classes>
<class name="com.qa.testcases.ChromeTest"/>
<class name="com.qa.testcases.FirefoxTest"/>
</classes>
</test> <!-- Test -->
</suite> <!-- Suite -->

To demonstrate that two classes are running on different threads I have added a code to print the current Thread Id. Note that ChromeTest is running on Thread ID 14 and FirefoxTest is on Thread ID 15.
Obviously, as demonstrated in parallel methods, execution time while running classes in parallel is lesser when classes are run sequentially.
Executing Test Suites in Parallel using TestNG
To run all the tests available inside the suite tag in parallel mode, you need to update the “parallel” value as “tests” in testing.xml file.
Here thread-count value plays an important role because if thread count is less than tests, tests need to wait for other tests to execute.
Let us understand this by following example:
Step 1: Create one more class as EdgeTest. ChromeTest, FirefoxTest, and EdgeTest classes have 3 test methods.
public class EdgeTest {
WebDriver driver;

@BeforeTest
public void setUp() {
WebDriverManager.edgedriver().setup();
driver = new EdgeDriver();
driver.get("https://www.bstackdemo.com/");
driver.manage().window().maximize();
}

@Test(priority = 1)
public void testTitle() {
System.out.println("The thread ID for testTitle Edge is "+ Thread.currentThread().getId());
Assert.assertEquals(driver.getTitle(), "StackDemo");
}

@Test(priority = 2)
public void clickOffers() throws InterruptedException {
System.out.println("The thread ID for clickOffers Edge is "+ Thread.currentThread().getId());
WebElement offers=driver.findElement(By.cssSelector("a#offers"));
offers.click();
Thread.sleep(2000);
WebElement loginBtn=driver.findElement(By.cssSelector("button#login-btn"));
Assert.assertTrue(loginBtn.isDisplayed());
}

@Test(priority = 3)
public void clickOrders() throws InterruptedException {
driver.navigate().to("https://www.bstackdemo.com/");
System.out.println("The thread ID for clickOrders Edge is "+ Thread.currentThread().getId());
WebElement orders=driver.findElement(By.cssSelector("a#orders"));
orders.click();
Thread.sleep(2000);
WebElement loginBtn=driver.findElement(By.cssSelector("button#login-btn"));
Assert.assertTrue(loginBtn.isDisplayed());
}

@AfterTest
public void tearDown() {
driver.close();
}
}
Step 2: Update parallel value as tests and add all the 3 tests in testing.xml file. Keep thread count as 2 and run the testing.xml file.
<?xml version="1.0" encoding="UTF-8"?>
<!DOCTYPE suite SYSTEM "https://testng.org/testng-1.0.dtd">
<suite name="Parallel Test Suite" thread-count="2" parallel="tests" >
<test name="Parallel Test Chrome" >
<classes>
<class name="com.qa.testcases.ChromeTest"/>
</classes>
</test> <!-- Test -->

<test name="Parallel Test Firefox" >
<classes>
<class name="com.qa.testcases.FirefoxTest"/>
</classes>
</test> <!-- Test -->

<test name="Parallel Test Edge" >
<classes>
<class name="com.qa.testcases.EdgeTest"/>
</classes>
</test> <!-- Test -->
</suite> <!-- Suite -->
When thread count is set to 2, ChromeTest and FireTest will execute in parallel on 2 Threads. EdgeTest will wait for either one of them to execute so that it can execute on the freed thread.
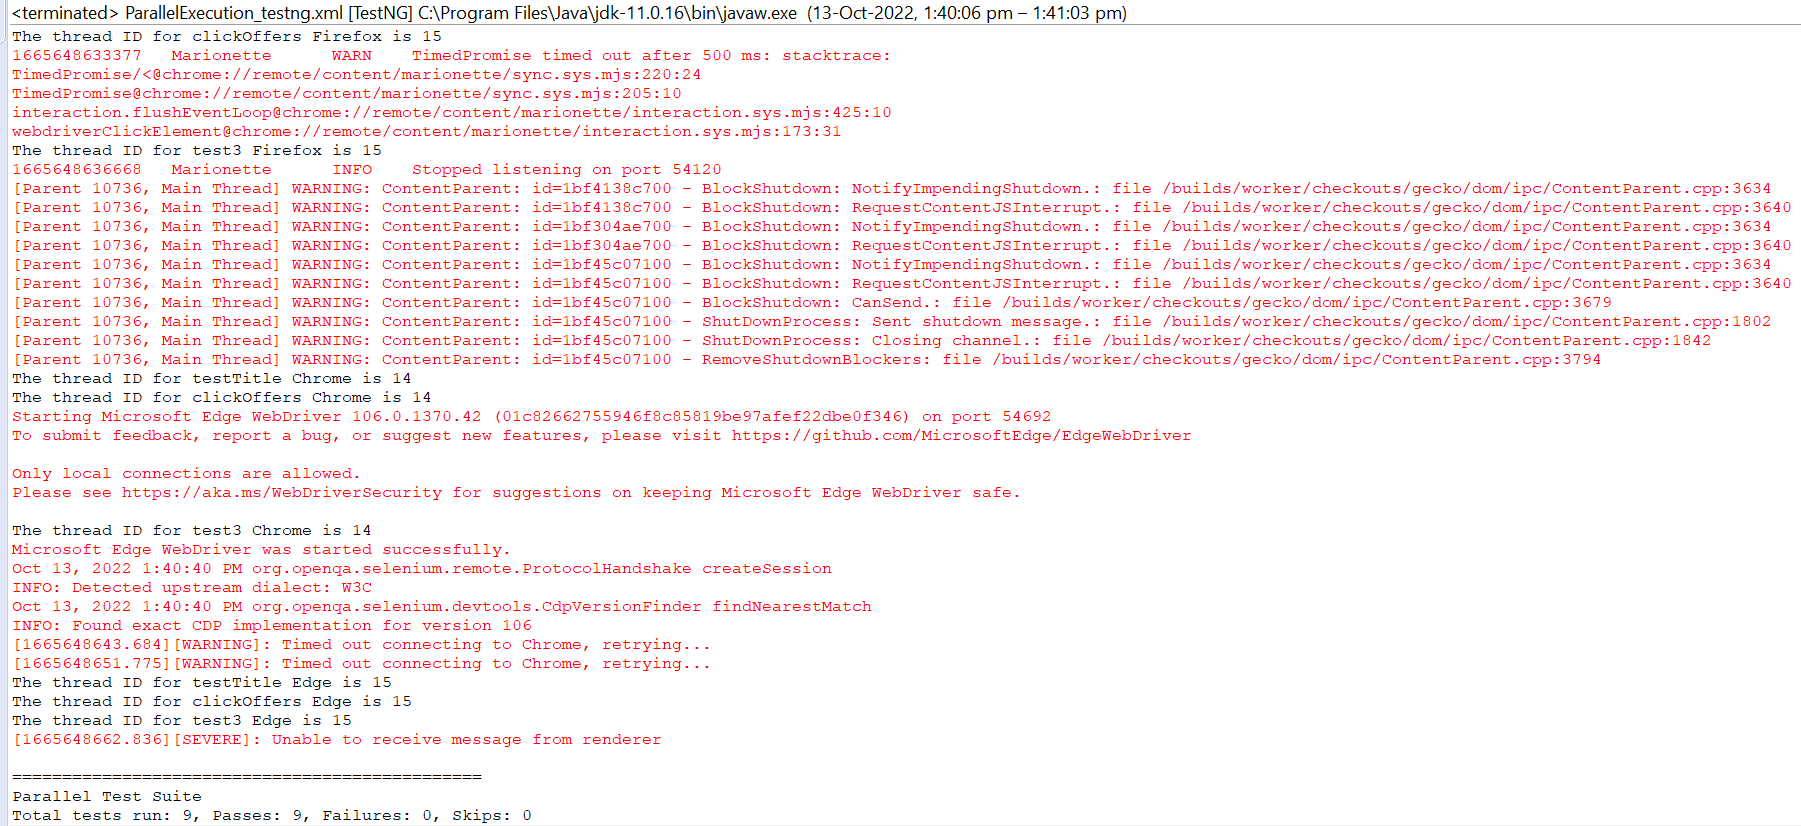
You can see from the above console logs, that “FirefoxTest” and “ChromeTest” ran in parallel on Thread 14 and 15 respectively. Later “EdgeTest” ran on Thread 15 as it was freed earlier than 14.
If thread count would have been “3”, all three tests would have run on Thread 14, 15 and 16 respectively in parallel thereby decreasing execution time.
Threads in TestNG
In TestNG, a thread refers to a separate path of execution that allows multiple test cases to run at the same time. Instead of running tests one after another (sequentially), threads help execute them in parallel, which speeds up the overall test run, especially useful for large test suites.
Each thread can run a test method, a class, or even an entire test block independently, without waiting for others to finish. This makes better use of system resources like CPU and memory, reducing total execution time.
The number of threads can be controlled using the thread-count attribute in the testng.xml file.
For example, setting thread-count=”3″ tells TestNG to run up to three tests at the same time.
Threads are the foundation of parallel execution in TestNG. When used correctly, they help scale testing efficiently across methods, classes, or even browsers. However, proper handling is important to avoid issues like shared resource conflicts or inconsistent results.
Performance comparison between Serialized and Parallelized test execution in TestNG
Below are the key differences between Serialized and Parallelized test execution in TestNG:
| Feature / Aspect | Serialized Execution | Parallel Execution |
|---|---|---|
| Execution Flow | Tests run one after another | Tests run at the same time in separate threads |
| Speed | Slower, especially with many test cases | Faster, as multiple tests run simultaneously |
| System Resource Usage | Minimal use of CPU and memory | Efficient use of CPU and memory |
| Setup Complexity | Simple and easy to configure | Requires thread configuration and careful design |
| Thread Usage | No threading involved | Uses multiple threads |
| Risk of Conflicts | Low risk (tests run in isolation) | Higher risk if shared data or drivers are not handled well |
| Ease of Debugging | Easier to track and fix issues | Harder to trace failures due to overlapping execution |
| Suitability for Large Suites | Not suitable for large test volumes | Ideal for large and data-heavy test suites |
| Infrastructure Requirements | Typically requires fewer resources | Demands more powerful infrastructure |
| Error Isolation | Since tests run one after another, it’s easier to identify and isolate the root cause of errors | Failures can be harder to isolate due to concurrent execution |
| Best Fit For | Small projects, simple workflows | Large projects, cross-browser or data-driven testing |
How to Convert a Static WebDriver to Non-Static for Parallel Test Execution in TestNG
The following steps can be used to convert Static WebDriver to Non-Static:
1. Declare WebDriver as a Non-Static Instance Variable: This ensures that each object of the test class holds its own WebDriver instance.
public WebDriver driver;
2. Initialize WebDriver in @BeforeMethod or @BeforeClass: The @BeforeMethod annotation ensures a new browser instance is created for each test method when running in parallel.
@BeforeMethod

public void setup() {

    driver = new ChromeDriver();

}
3. Use Instance Driver Inside Test Methods: This ensures that each test method operates independently, using the correct browser instance created specifically for its own execution thread.
@Test

public void openHomePage() {

    driver.get("https://example.com");

    // additional test steps

}
4. Quit WebDriver in @AfterMethod: This ensures that each browser session is closed properly after test execution.
@AfterMethod

public void tearDown() {

    if (driver != null) {

        driver.quit();

    }

}
5. Using ThreadLocal for Safer Parallel Tests: For more control in multi-threaded execution, especially in frameworks using Page Object Model, ThreadLocal<WebDriver> can be used to isolate WebDriver instances per thread:
public class DriverManager {

    private static ThreadLocal<WebDriver> driver = new ThreadLocal<>();


    public static WebDriver getDriver() {

        return driver.get();

    }


    public static void setDriver(WebDriver driverInstance) {

        driver.set(driverInstance);

    }


    public static void quitDriver() {

        if (driver.get() != null) {

            driver.get().quit();

            driver.remove();

        }

    }

}
To set up ThreadLocal WebDriver, use the following steps:
Step 1: Initialize in Setup
@BeforeMethod

public void setup() {

    WebDriver localDriver = new ChromeDriver();

    DriverManager.setDriver(localDriver);

}
Step 2: Access in Test
DriverManager.getDriver().get("https://google.com");Read More: Parallel Testing with Selenium
Parallel Test Execution Using DataProviders in TestNG
Follow these steps to run parallel tests using DataProviders in TestNG:
Step 1: Create a DataProvider with Parallel Set to True
Define the data in a method annotated with @DataProvider. Set parallel = true so that TestNG knows to run each data set in a separate thread.
@DataProvider(name = "loginData", parallel = true)

public Object[][] getData() {

    return new Object[][] {

        {"user1", "pass1"},

        {"user2", "pass2"},

        {"user3", "pass3"}

    };

}
Step 2: Link the Test Method to the DataProvider
Use the dataProvider attribute in the @Test annotation to feed the test method with the data. Each test run gets a unique username-password pair and runs in parallel.
@Test(dataProvider = "loginData")

public void testLogin(String username, String password) {

    WebDriver driver = new ChromeDriver();

    driver.get("https://google.com/login");

    // perform login steps

    driver.quit();

}
Step 3: Set Thread Count in testng.xml (Optional but Recommended)
Define how many threads can run in parallel by configuring the suite file. This allows TestNG to run multiple test methods with different data at the same time.
<suite name="ParallelDataProvider" parallel="methods" thread-count="3">

    <test name="LoginTest">

        <classes>

            <class name="com.test.LoginTest"/>

        </classes>

    </test>

</suite>
Parallel Test Execution in Multiple Browsers Using TestNG for Selenium Automation Testing
Running the same test cases across different browsers is a common requirement in cross-browser testing. TestNG makes this easy by allowing parallel execution using XML configuration and parameterization, so tests can be executed in multiple browsers at the same time, saving time and ensuring broader coverage.
Follow These Steps to Set Up Parallel Test Execution Across Browsers:
Step 1: Create a Test Method That Accepts the Browser Name
Use @Parameters to pass the browser type dynamically and launch the appropriate driver.
@Parameters("browser")

@BeforeMethod

public void setup(String browser) {

    if (browser.equalsIgnoreCase("chrome")) {

        driver = new ChromeDriver();

    } else if (browser.equalsIgnoreCase("firefox")) {

        driver = new FirefoxDriver();

    } else if (browser.equalsIgnoreCase("edge")) {

        driver = new EdgeDriver();

    }

}
Step 2: Write the Test Case
Use the driver instance in the test as usual.
@Test

public void openHomePage() {

    driver.get("https://google.com");

    // perform actions or validations

}
Step 3: Clean Up After Test Execution
Always close the browser after test completion.
@AfterMethod

public void tearDown() {

    if (driver != null) {

        driver.quit();

    }

}
Step 4: Define Browsers in testng.xml and Enable Parallel Execution
In the XML file, define each browser under a separate <test> block and enable parallel execution.
<suite name="CrossBrowserSuite" parallel="tests" thread-count="3">


    <test name="ChromeTest">

        <parameter name="browser" value="chrome"/>

        <classes>

            <class name="com.test.CrossBrowserTest"/>

        </classes>

    </test>


    <test name="FirefoxTest">

        <parameter name="browser" value="firefox"/>

        <classes>

            <class name="com.test.CrossBrowserTest"/>

        </classes>

    </test>


    <test name="EdgeTest">

        <parameter name="browser" value="edge"/>

        <classes>

            <class name="com.test.CrossBrowserTest"/>

        </classes>

    </test>


</suite>
Challenges of Parallel Test Execution in TestNG
Some of the challenges of parallel test execution in TestNG include:
- Shared WebDriver conflicts: Multiple threads accessing a single driver instance can cause unexpected failures.
- Data collisions: Tests modifying the same data files, databases or config settings may lead to inconsistent results.
- Thread safety issues: Shared objects or non-thread-safe utilities can behave unpredictably when accessed by multiple threads.
- Complex debugging: Simultaneous failures can generate overlapping logs, making it difficult to trace issues.
- High resource usage: Running too many threads can strain system memory and CPU, leading to crashes or slowdowns.
- Timing and synchronization problems: Dynamic elements may not load as expected when tests execute simultaneously.
- Test order unpredictability: Dependent tests may break if executed in a different order due to parallel scheduling.
- Improper Test Isolation: Tests that rely on shared states, static variables, or global config can interfere with each other when run in parallel, leading to flaky results.
- Setup and Teardown Conflicts: If setup (@BeforeClass, @BeforeMethod) or teardown (@AfterClass, @AfterMethod) logic isn’t thread-safe, it can lead to unexpected behavior or resource cleanup issues during parallel runs.
To handle these challenges effectively, teams need a test infrastructure that supports stable, scalable parallel execution across a wide range of real browsers and devices.
Platforms like BrowserStack Automate make this easier by providing the reliability and coverage required to run large TestNG suites in parallel with confidence.
Read More: How to Automate TestNG in Selenium
Scale Your TestNG Parallel Execution with BrowserStack Automate
Running parallel tests locally can quickly become limited by hardware capacity, browser availability, and maintenance overhead. BrowserStack Automate solves these challenges by providing a cloud-based testing platform designed to execute large TestNG suites in parallel across real devices and real browsers.
Key Benefits of Using BrowserStack Automate for Parallel Execution
- Instant Scalability: Run hundreds of parallel TestNG threads without worrying about local system limitations.
- Real Browsers and Devices: Test on the latest versions of Chrome, Firefox, Edge, Safari, and real mobile devices for accurate user coverage.
- Faster Execution Times: Parallelize test runs across a distributed cloud infrastructure to significantly reduce overall test duration.
- Built-in Debugging Artifacts: Access screenshots, video recordings, console logs, network logs, and performance data for every test session.
- Stable and Secure Infrastructure: Avoid flaky results caused by local machine constraints or inconsistent browser setups.
- Seamless CI/CD Integration: Plug Automate into Jenkins, GitHub Actions, GitLab, Bamboo, and other CI systems for continuous, parallel testing at scale.
Using BrowserStack Automate allows teams to unlock the full potential of TestNG’s parallel execution capabilities, ensuring faster feedback, better coverage, and more reliable testing at scale.
Conclusion
Sequential testing is time consuming and therefore, parallel testing is required to decrease the execution time and cover more devices, browsers, platforms under test. With enhancement and innovations in the technology field, companies are frequently launching new devices, browser/ updated browsers and platforms to give a better user experience. It becomes challenging for a tester to test against all such combinations and on the other hand it is obligatory to test that too.
BrowserStack offers 3500+ real devices and browsers to help achieve cross browser testing in parallel using Selenium through its Cloud Selenium Grid. Sign up today to have a seamless experience while running parallel tests!
Run Parallel Tests on BrowserStack
Useful Resources
TestNG and Selenium

