iOS Unit Testing is the process of testing individual components (or units) of an iOS application, typically at the level of individual classes, methods, or functions. The goal is to ensure that each part of the code works as expected in isolation.
Unit tests are written to verify that the logic of the code behaves correctly in different scenarios, which helps identify bugs early in the development process.
Importance of iOS Unit Testing
Coding is a very abstract activity if you sit down and think about it. Developing apps is an understandably complex process that involves, besides coding, the ability to audit your work and pass a few tests and jump a few hoops before your work is released for the world to enjoy.
- Most people who code find themselves embedded in the broader context of a university/company/learning group as a part of which they are coding various programs.
- This means they learn from the people and work environment they grow up in, which could be a great thing or a disaster, depending on the circumstances.
- Software programs like iPhone and iPad apps are bundled hierarchical programmatic structures of information/instructions that perform many computations as part of a running application process.
Swift as a coding platform for Apple, like any other platform, has its strengths, weaknesses, and peculiarities. The job of an efficient programmer is to understand and contain the platform features, behavior and edge cases, directing them to work for the business or product goals.
- This requires a deep knowledge of the development and delivery platform end-to-end, on top a humble suspicion towards one’s own work and constant test activity running parallel to coding.
- Hence you will find very effective developers testing their code constantly and even developing ways to automate the process.
- The industry standard way of doing that is to write additional code with the supposed application code, whose sole job is to test the application code along various desirable metrics.
That is, in essence, what Unit Testing is all about. But still, it is not that simple to generalize. Let’s try and understand with the help of some use cases.
Key Benefits of iOS Unit Testing
Performing unit testing in Xcode with XCTest framework offers several real-world, meaningful benefits for developers and organizations:
- Improved code quality: Unit tests help identify bugs and errors early in the development process, ensuring that your code is more reliable and robust.
- Faster development: When issues are caught early through unit testing, they can be fixed more quickly than if discovered later during manual testing or by end-users. This speeds up the overall development process.
- Easier code maintenance: Well-structured unit tests document your code, making it easier for other developers to understand and maintain the codebase.
- Better collaboration: Unit tests ensure that code written by multiple developers works together seamlessly, enhancing collaboration and reducing codebase conflicts.
- Reduced debugging time: Unit tests can help pinpoint the exact location of a bug or issue, significantly reducing the time spent on debugging.
- Easier code refactoring: When you have a good set of unit tests, you can refactor your code more confidently, knowing that your changes won’t introduce new issues.
- Test-driven development (TDD): Unit testing is a fundamental part of TDD, a development process where you write tests before writing the actual code. This approach can lead to cleaner, more efficient code.
- Faster onboarding: Unit tests can help new developers understand the codebase faster by providing insights into the expected behavior of each component.
- Improved regression testing: Unit tests can catch regressions early, ensuring that changes and updates to the code don’t break existing functionality.
- Cost savings: By catching and fixing issues early, unit tests can save time and money by reducing the need for extensive manual testing and the risk of shipping faulty code to end users.
What can you test with Unit Testing?
In Xcode, you can use the XCTest framework to write and execute unit tests for various components of your iOS, macOS, watchOS, or tvOS projects. With unit tests, you can test a wide range of aspects, including but not limited to:
- Functions and methods: Test individual functions and methods to ensure they return expected outputs for given inputs and handle edge cases appropriately.
- Performance: Test the performance of your code by measuring the time taken to execute specific tasks or functions. This helps you identify bottlenecks and optimize your code.
- Asynchronous code: Test asynchronous code, such as network requests and completion handlers, to ensure they complete successfully and return expected results.
- Data models: Test the behavior and consistency of your data models, including validation, serialization, and deserialization.
- Business logic: Test the core logic of your application to ensure it meets the required specifications and behaves as expected.
- Code Coverage: Measure and analyze the percentage of your Xcode code coverage covered by your unit tests to ensure a high level of test coverage.
- Mocking and stubbing: Use mock objects and stubs to isolate specific components during testing, which helps control dependencies and focus on the component under test.
- UI components: While unit tests primarily focus on non-UI code, you can also test some aspects of your UI components, such as their initial state and interaction with other objects.
Remember that unit tests are meant to test small, isolated pieces of code. For more comprehensive testing of your application’s user interface and interaction, you should use UI tests within the XCUI framework.
Getting Started with Development on App Store
To test your applications using TestFlight, build and deliver using CI/CD and finally deploy it to the Apple App Store, you will need to get the following steps fulfilled:
- Go to the Apple Developer website and click on “Account” in the top right menu bar.
- Sign in with your Apple ID or create a new one if you don’t have one.
- Click on the “Enroll” or “Join” option to start enrollment.
- It will tell you to download Apple Developer App to continue.
- Choose the appropriate membership level and click on “Start Your Enrollment.”
- Follow the on-screen instructions to complete the enrollment process and pay the annual fee.
- Once enrolled, you can download Xcode from the Mac App Store and start developing your apps for the Apple ecosystem.
- After you have installed Xcode, open it and sign in with your Apple Developer account.
- You are now ready to develop and test your applications using Xcode and TestFlight.
- You can also use CI/CD tools like Jenkins, Travis CI, or CircleCI to build and deliver your applications.
Once your app is reviewed and approved, you can release it to the App Store.
Figuring out What to Test in iOS App Unit Testing
To make this section comprehensive, instead of making lists, let’s make a very simple app in Xcode and then use it as a subject for understanding iOS Swift unit testing.
Setup Application Code
For our iOS Unit Test example, we will setup a simple app that does the following:
- Setup a controller file in Xcode
- Setup a view file in Xcode
- Define a simple form with 2 number inputs and a button
- Entering numbers and clicking button shows the sum in a popup
The final code looks like this:
BrowserStackDemo/ BrowserStackDemoApp.swift
import SwiftUI
import UIKit


@main
struct MyCalculatorApp: App {
var body: some Scene {
WindowGroup {
ContentView(controller: CalculatorController())
}
}
}


class CalculatorController: ObservableObject {
@Published var firstNumber: String = ""
@Published var secondNumber: String = ""
@Published var result: Int = 0

func calculateSum() {
if let first = Int(firstNumber), let second = Int(secondNumber) {
result = first + second
showAlert()
}
}

func showAlert() {
let alert = UIAlertController(title: "Result", message: "The sum is \(result)", preferredStyle: .alert)
alert.addAction(UIAlertAction(title: "OK", style: .default))

if let windowScene = UIApplication.shared.connectedScenes.first as? UIWindowScene,
let window = windowScene.windows.first {
window.rootViewController?.present(alert, animated: true, completion: nil)
}
}


}


struct MyContentView: View {
@ObservedObject var controller: CalculatorController

var body: some View {
VStack {
TextField("First number", text: $controller.firstNumber)
.padding()
TextField("Second number", text: $controller.secondNumber)
.padding()
Button(action: controller.calculateSum) {
Text("Calculate")
}
}
}
}
This code defines a basic calculator app with a user interface implemented using SwiftUI, which allows users to input two numbers and calculate their sum.
Here’s a summary of what each part of the code does:
- @main struct MyCalculatorApp: App: Defines the main app structure and the entry point for the app.
- class CalculatorController: Implements the app’s logic by calculating the sum of the two input numbers and presenting an alert with the result.
- func showAlert(): Presents an alert with the calculation result.
- struct MyContentView: View: Defines the app’s user interface using SwiftUI.
- TextField and Button elements: Provide text input fields for the user to input the two numbers, and a button to trigger the sum calculation.
- calculateSum(): Performs the calculation of the sum of the two input numbers using the Int() initializer to convert the input strings to integers.
BrowserStackDemo/ ContentView.swift
import SwiftUI


struct ContentView: View {
@ObservedObject var controller: CalculatorController

var body: some View {
VStack {
Text("Addition Calculator")
.font(.title)
.padding()
HStack {
TextField("Enter first number", text: $controller.firstNumber)
.padding()
.keyboardType(.numberPad)
TextField("Enter second number", text: $controller.secondNumber)
.padding()
.keyboardType(.numberPad)
}
Button("Calculate") {
controller.calculateSum()
}
.padding()
.foregroundColor(.white)
.background(Color.blue)
.cornerRadius(10)
}
}
}- This code defines a SwiftUI view that displays a basic addition calculator with two text fields for entering two numbers and a button to perform the addition.
- It takes an instance of CalculatorController as an observed object to handle the calculation and display the result.
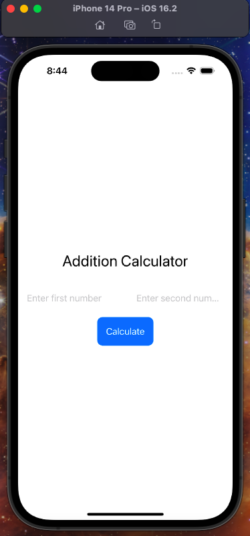
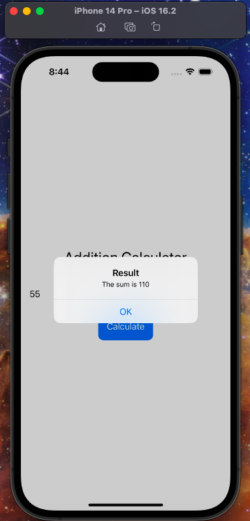
Finally, running the app in the simulator gives us this output:
Configuring Xcode for iOS App Unit Testing
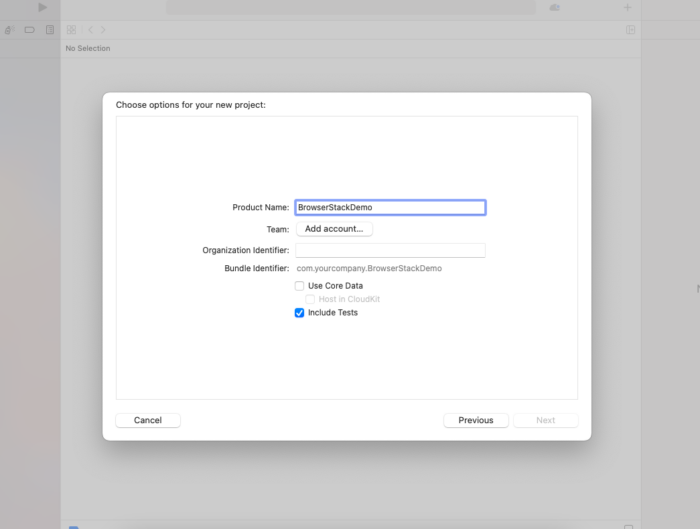
As mentioned earlier, unit tests can be initialized by simply selecting the “include tests” option while creating a new project.
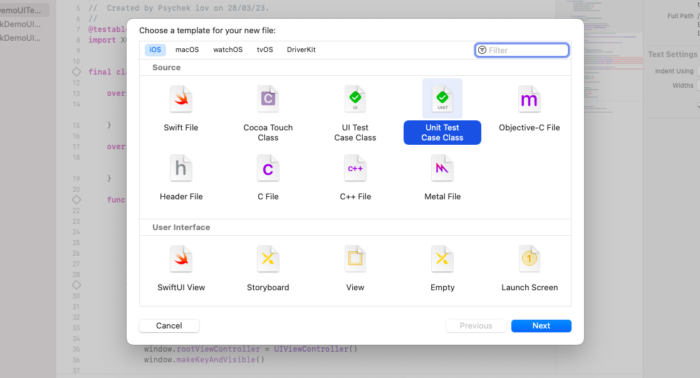
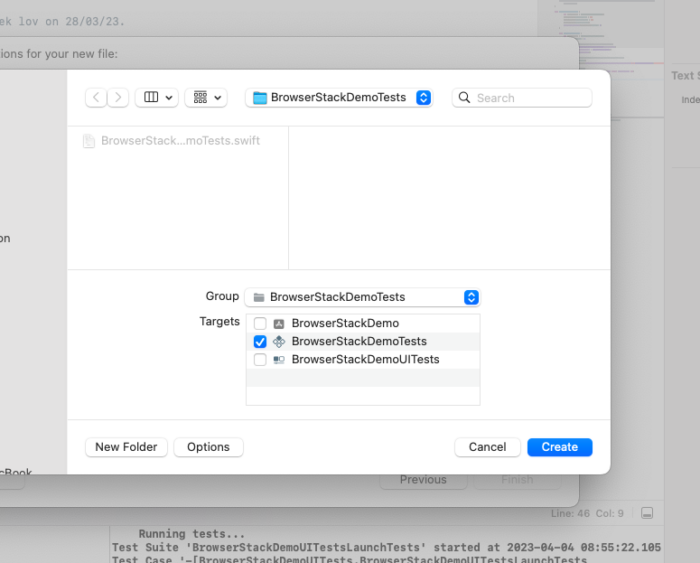
If you want to create the test classes manually later, you can:
Step 1. Click on the project navigator on the left side of Xcode.
Step 2. Right-click on the group or folder where you want to add a new test file.
Step 3. Choose “New File” from the contextual menu.
Step 4. Select the “Test Case Class” template from the “iOS” or “macOS” category.
Step 5. Click “Next” and name your test file.
Step 6. Select the appropriate targets and click “Create“.
Writing iOS Unit Tests
The default test file templates for both unit and UI tests in Xcode provide a starting point for developers to create their tests. In the case of unit tests, the template includes a sample test case with a test function and a setUp and tearDown function.
The setUp function is executed before each test function and is used to set up any required resources or objects for the test case. The tearDown function is executed after each test function and is used to clean up any resources or objects used by the test case.
1. Test Functional Logic
Our test file ‘BrowserStackDemoTests /BrowserStackDemoTests.swift’ contains the functional tests for the app, the first unit test we will write is supposed to check for the result of the sum and match it against a specific output for given inputs:
func testCalculateSum() {
let controller = CalculatorController()
controller.firstNumber = "2"
controller.secondNumber = "3"
controller.calculateSum()
XCTAssertEqual(controller.result, 5)
}
This test creates a new instance of the CalculatorController class, sets its firstNumber and secondNumber properties, calls the calculateSum() method to calculate the sum, and then checks if the result property is equal to the expected value of “5” using the XCTAssertEqual function.
While XCAssert is a useful function for writing unit tests, it’s important not to rely on it too heavily. In some cases, it may be more appropriate to use other techniques for validating test results, such as:
- Checking the state of an object after a method has been called
- Using conditional statements to check for expected behavior
- Logging or printing debug information for manual inspection
XCAssert can only be used within a single test method, and it can’t be used to test asynchronous behavior. Understanding these limitations and using the appropriate testing techniques for each situation is important.
2. Test with mock UIWindow
For the next test, we will test the alert after sum function :
func testShowAlert() {
let controller = CalculatorController()
controller.result = 5

// Create a mock UIWindow to present the alert
let window = UIWindow(frame: UIScreen.main.bounds)
window.rootViewController = UIViewController()
window.makeKeyAndVisible()

// Call showAlert() and make sure the alert is presented
controller.showAlert()
XCTAssertTrue(window.rootViewController?.presentedViewController is UIAlertController)

// Dismiss the alert
window.rootViewController?.dismiss(animated: true, completion: nil)
}
It creates an instance of the CalculatorController, sets the result property to 5, creates a mock UIWindow to present the alert, calls showAlert() function and then checks if the presented view controller is an instance of UIAlertController.
Finally, the test dismisses the alert by calling dismiss() function on the rootViewController. This test verifies that the showAlert() function presents an alert when the result property is set to a non-zero value.
3. Test Asynchronously
The below code is an example of an asynchronous test method using Swift’s new async/await syntax. The testWebLinkAsync method uses the URLSession API to download the webpage at the specified URL, and asserts that the response is an HTTP 200 OK status code.
 func testWebLinkAsync() async throws {
// Create a URL for a webpage to download.
let url = URL(string: "https://bstackdemo.com")!

// Use an asynchronous function to download the webpage.
let dataAndResponse: (data: Data, response: URLResponse) = try await URLSession.shared.data(from: url, delegate: nil)

// Assert that the actual response matches the expected response.
let httpResponse = try XCTUnwrap(dataAndResponse.response as? HTTPURLResponse, "Expected an HTTPURLResponse.")
XCTAssertEqual(httpResponse.statusCode, 200, "Expected a 200 OK response.")
}- async keyword indicates that the method is an asynchronous function that can suspend and resume its execution. throws keyword indicates that the method can throw an error.
- The first line creates a URL object for the webpage to download. The await keyword suspends the execution of the method until the download operation is complete.
- The URLSession.shared.data(from:delegate:) method initiates an asynchronous download of the webpage, returning both the downloaded data and the URL response.
- The XCTUnwrap function attempts to unwrap the response as an HTTPURLResponse object. If the unwrapping fails, it throws an error with the specified message.
- The XCTAssertEqual function asserts that the response status code is 200 OK. If the assertion fails, it throws an error with the specified message.
Note that to use async/await syntax in Xcode, you must be using a version of Swift that supports it (currently Swift 5.5 or later). Additionally, the XCTest framework has added support for asynchronous testing with the XCTWaiter API.
For our next test we will test a function synchronously using wait and timeout :
func testCalculateSumAsync() {
let controller = CalculatorController()
controller.firstNumber = "2"
controller.secondNumber = "3"

let expectation = XCTestExpectation(description: "calculateSum() completes")

DispatchQueue.main.async {
controller.calculateSum()
XCTAssertEqual(controller.result, 5)
expectation.fulfill()
}

wait(for: [expectation], timeout: 5.0)
}- We create an instance of CalculatorController, set the values of firstNumber and secondNumber. Then, we use DispatchQueue.main.async to execute the calculateSum function asynchronously.
- Next, we use XCTAssertEqual to verify that the result property of the controller is indeed 5 after the calculateSum function has completed.
- Finally, we use expectation.fulfill() to indicate to the test framework that the asynchronous test has completed successfully.
- By using DispatchQueue.main.async and expectation.fulfill(), we can properly test the behavior of code that executes asynchronously, ensuring that our tests are comprehensive and accurate.
4. Mock Dependencies
Using mock objects to simulate dependencies and isolate the code being tested
- When writing unit tests, it’s important to isolate the code being tested from any external dependencies, such as network requests or database operations. One way to achieve this is by using mock objects.
- Mock objects are objects that mimic the behavior of real objects, but are designed specifically for testing purposes. They can be used to simulate dependencies and ensure that the code being tested is functioning correctly.
For example, imagine a class that relies on a network request to retrieve data. To test this class, you could create a mock network service that returns a predefined set of data, rather than relying on a real network request.
Here’s an example of how you could use a mock object to test a class :
class MockCalculatorController: CalculatorController {
var calculateSumCalled = false

override func calculateSum() {
calculateSumCalled = true
result = 5
}
}


func testCalculateSumWithMock() {
let controller = MockCalculatorController()
controller.firstNumber = "2"
controller.secondNumber = "3"

controller.calculateSum()

XCTAssertTrue(controller.calculateSumCalled)
XCTAssertEqual(controller.result, 5)
}- In this test, we are testing the calculateSum() method with a mocked object of CalculatorController.
- We create a subclass of CalculatorController named MockCalculatorController and override the calculateSum() method.
- In this overridden method, we set the calculateSumCalled flag to true and set the result property to 5.
- We then create an instance of MockCalculatorController, set the values of firstNumber and secondNumber, and call calculateSum() method on it.
- Finally, we assert that the calculateSumCalled flag is true and the result property is equal to 5.
- This test verifies that the calculateSum() method is working as expected and that the mocked object is correctly returning the expected values.
It’s important to note that relying too heavily on mock objects can also be problematic. If the mock object doesn’t accurately mimic the behavior of the real dependency, the tests may not catch any errors that occur when using the real dependency.
Strike a balance between using mock objects to isolate code and testing the real dependencies to ensure their functionality.
5. Test User Interface
UI tests are separate from unit tests, when initialized the default UI test class has the following code:
BrowserStackDemoUITests /BrowserStackDemoUITests.swift
import XCTest


final class BrowserStackDemoUITests: XCTestCase {


override func setUpWithError() throws {
// Put setup code here. This method is called before the invocation of each test method in the class.


// In UI tests it is usually best to stop immediately when a failure occurs.
continueAfterFailure = false


// In UI tests it’s important to set the initial state - such as interface orientation - required for your tests before they run. The setUp method is a good place to do this.
}


override func tearDownWithError() throws {
// Put teardown code here. This method is called after the invocation of each test method in the class.
}


func testExample() throws {
// UI tests must launch the application that they test.
let app = XCUIApplication()
app.launch()


// Use XCTAssert and related functions to verify your tests produce the correct results.
}


func testLaunchPerformance() throws {
if #available(macOS 10.15, iOS 13.0, tvOS 13.0, watchOS 7.0, *) {
// This measures how long it takes to launch your application.
measure(metrics: [XCTApplicationLaunchMetric()]) {
XCUIApplication().launch()
}
}
}
}
Running the code will launch a simulator and test for app UI performance.
In this class, you can create additional test methods to test different parts of the application’s user interface. To interact with the user interface, you can use the XCUIElement class to find and interact with different elements on the screen, such as buttons, text fields, and tables.
XCUITest is a powerful framework for automating UI testing in iOS applications. It provides a wide range of capabilities for testing different app types, use cases, and device conditions.
Here are some examples:
- Test different app types: XCUITest can be used to test any type of iOS app, including those that use UIKit, SwiftUI, or other frameworks. It can also test applications that use third-party libraries and APIs.
- Test different use cases: XCUITest can simulate user interactions with the application, such as tapping buttons, scrolling through lists, entering text, and more. This makes testing a wide range of use cases possible, from simple to complex.
- Test different device conditions: XCUITest can simulate different device conditions, such as screen sizes, orientations, and languages. This makes it possible to test how the application behaves in different environments without the need for physical devices.
Running Unit Tests from Xcode
Step 1. Product > Test : Use the test command to run all tests in a project.
Step 2. Using the test triangles: Click on the diamond shape icon on the left side of the code editor to run all tests in the file. Click on the triangle shape icon next to a specific test method to run that test only.
Step 3. Re-run the latest test: Press “Command + U” to run the last test.
Step 4. Run a combination of tests: Click on the Test navigator, select multiple tests, and click the Run button.
Step 5. Applying filters in the test navigator: Use the search bar in the Test navigator to filter test cases and test methods based on keywords.
Step 6. Code coverage: Show test coverage for each file by enabling the sidebar in the code editor and selecting the Code Coverage option.
After enabling, you should be able to see the code coverage in your editor after running tests.
Interpreting and understanding test results
A green checkmark means the test passed, while a red X means the test failed.
Failed tests are highlighted in red and show error messages describing what went wrong.
The console logs provide further details and trace in case of errors.
Debugging failed unit tests
Debugging involves finding the root cause of a bug in your code. By stepping through the code, inspecting variables and watching them change, you can isolate where the bug is happening.
The Xcode debugger allows you to control execution of your code, monitor variables, pause execution, and view variables in code and the variable viewer. The call stack helps you navigate related code, and you can evaluate expressions in the console to see more information about variables.
Use the Xcode debugger to isolate bugs in your code by stepping through it and inspecting variables. Customize what Xcode displays by choosing Behaviors > Running. Use the debug bar to control your app’s execution.
Hover over variables in your source code to view their values, or use the variable viewer to list variables available in the current execution context. Use the console to interact with the debugger directly and evaluate expressions. Select a line in the call stack to see the source and variables.
Unit Testing Integration with CI
Continuous Integration (CI) has become indispensable to modern software development workflows. It helps developers automate the building, testing, and deployment of code changes, leading to faster delivery of high-quality software.
One crucial aspect of CI is integrating unit testing into the process to catch issues early and ensure code quality across local, test and production environments.
- Running Tests in Isolation: When integrating unit tests with CI, running tests in isolation is crucial to prevent external factors from affecting test results. This includes separating unit tests from integration tests, running tests on a separate server, and avoiding dependencies on other systems.
- Using the Same Environment as Production: Another best practice for integrating unit tests with CI is to use the same environment and data as production. This means setting up a test environment identical to the production environment, including hardware, software, and network configurations. Doing this helps to ensure that your code will work seamlessly in production, reducing the chances of unexpected issues.
- Creating a Comprehensive Test Plan: Creating a comprehensive test plan is essential for effective unit testing.
This plan should include smoke tests to ensure critical functionality is working correctly and regression tests to verify that new code changes don’t break existing functionality. The test plan should also cover edge cases and other scenarios specific to your application.
BrowserStack cloud infrastructure offers a wide range of tools for automated testing, including functional testing, visual testing, and performance testing.
It can test applications across various operating systems, browsers, and devices, making it an excellent fit for CI. Developers can ensure that their applications work seamlessly across different environments and configurations, reducing the risk of unexpected issues in production.
Best Practices for writing Effective Unit Tests
As we reach the end of this iOS unit testing tutorial, here are the top 7 best practices:
- Write testable code: Good unit tests are only possible if the code you are testing is testable. To make code testable, it should be modular, loosely coupled, and follow the Single Responsibility Principle (SRP).
- Create a separate test target: A separate test target should contain your test classes. This allows you to run your tests independently of the app target and helps to ensure that your tests do not accidentally modify your application data.
- Keep test methods small and focused: Each test method should test only one thing and focus on a specific aspect of the code. Keeping tests small and focused makes writing, reading, and maintaining them easier.
- Use arrange, act, and assert (AAA) pattern: AAA pattern is a common way to structure unit tests. In this pattern, the test is divided into three parts: arrange, act, and assert. The arranging phase sets up the test data and dependencies, the act phase calls the method being tested, and the assert phase verifies the expected results.
- Use descriptive method names: The method name should indicate what the test is testing. This makes it easier to understand what the test is doing when it fails and helps identify which tests need to be run when you are debugging.
- Test coverage: Use Xcode’s code coverage tool to ensure that your tests cover all the code paths. Aim to achieve as high code coverage as possible.
- Continuous integration: Integrate unit tests with a CI workflow to automate the testing process and ensure that tests are run consistently. This can help to catch bugs early in the development process.


