Jenkins is a well-known open-source DevOps tool used in many organizations’ CI/CD pipelines. Selenium is a popular open-source automation tool for testing websites. Because of its user-friendliness and community help desk, Selenium enjoys widespread adoption in the testing industry. There is no better example of continuous integration and deployment than the Jenkins Selenium combination.
Overview
What Is Jenkins in Selenium?
- Jenkins acts as an automation server to trigger Selenium test runs on code commits or schedules.
- It helps in automating builds, test execution, and reports.
Setup & Configuration Steps
- Install Jenkins (download war file or via package) and go to the dashboard.
- Install Selenium and import the required framework.
- Create Jenkins job in dashboard: Freestyle or Maven project.
- Configure build steps, workspace, test execution script, and browser/drivers.
- Use BrowserStack plugin or credentials to run tests in the cloud if desired.
Best Practices & Benefits
- Maintains version control for your test code.
- Schedule regular test executions and get feedback via reports.
- Make use of cloud platforms (like BrowserStack) to run on different browsers/devices.
This article will explain how to set up, configure, and use Jenkins to run Selenium tests efficiently.
What is Jenkins in Selenium?
Jenkins, created by Hudson Lab, is the most popular open-source continuous integration application. It’s cross-platform, meaning it works with Mac OS X, Linux, and Solaris. Jenkins is written in Java. Whether it’s an SVN checkout, a cron job, or the status of an application, Jenkin can keep tabs on it all. When a specific job condition is met, it will trigger the specified actions.
- Whenever you change your code, Jenkins can automatically perform your Selenium tests and then deploy your code to a new environment if the tests pass.
- Jenkins allows you to set a time and date for executing your tests.
- The Test Reports and performance logs can be saved for future reference.
- Jenkins can be used in a continuous integration setup with Maven to create and test a project.
Selenium testing can be performed in Jenkins whenever there is a software update, allowing for comprehensive testing of the updated code against all possible inputs.
Steps to install Jenkins & Selenium
Configuring Jenkins
You can install Jenkins from the Jenkins website on your computer. Jenkins may be launched from the command line or run on a web application server.
For command-line implementation, see the details below.
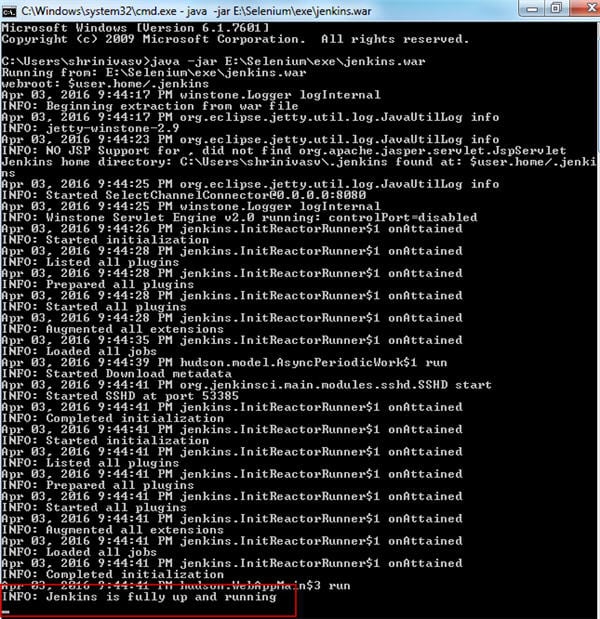
- At the command prompt, execute java -jar followed by the location of a .war file.
- If your Jenkins.war file has begun to run, you can confirm this by pressing enter and viewing the console output.
- Now you can see if Jenkins is set to go by using the default port of 8080.
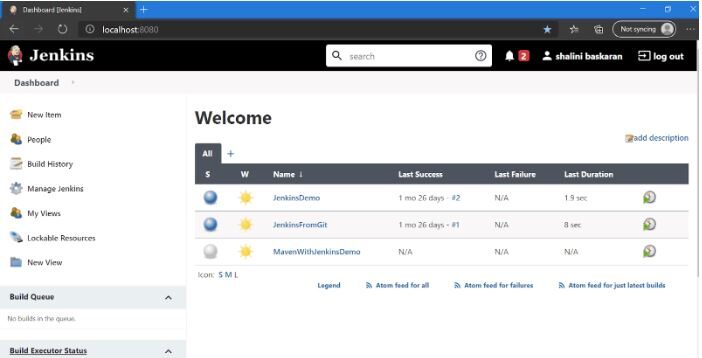
- Just type “http://localhost:8080” into your browser’s address bar. Your Jenkins user interface will load.
Installing Selenium
Several prerequisites must be set up before installing Selenium.
To begin automating with Selenium, you will need the following components:
- Java (JDK)
- Eclipse
- Selenium Client and WebDriver Language bindings
- Configuring Selenium Webdriver with Eclipse
- Creating and Running the first test
Configuring Selenium
The methods to set up Selenium Webdriver in Eclipse are as follows:
- Launch Eclipse first
- Create a workspace in Eclipse in step two.
- Create a new Java project in the BrowserStack workspace in step three.
- Create a package and a class under the Java project in step four.
- Include Selenium JARs in Eclipse’s Java Project
Integrating Jenkins with Selenium (using Jenkins Dashboard)
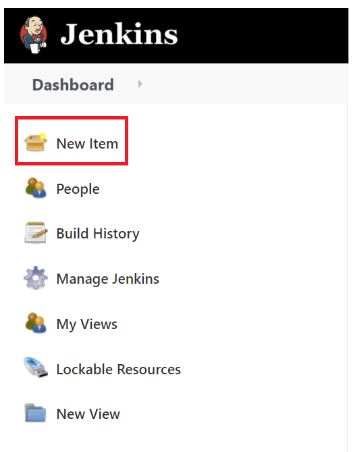
- To initiate a fresh project, go to the Jenkins dashboard and select the New Item button.
- Choose the Freestyle Project choice and enter the project’s name. Proceed with the OK button.
- Fill out the Description box under General Section to briefly overview the project.
- Select “None” under “Source Code Management.”
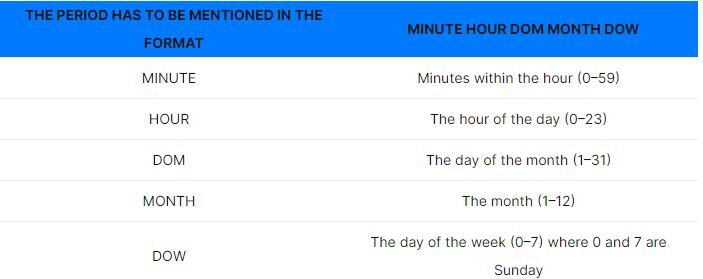
- When deciding how to schedule the jobs, we can pick the appropriate choice from the provided option. To schedule the tasks, let’s go ahead and set a time limit. Here is a list of guidelines that must be observed when mentioning the time frame.
- Make a project with Selenium WebDriver and TestNG to execute the tests.
import static org.testng.Assert.assertEquals;

import java.util.concurrent.TimeUnit;

import org.openqa.selenium.By;
import org.openqa.selenium.WebDriver;
import org.openqa.selenium.chrome.ChromeDriver;
import org.testng.annotations.AfterTest;
import org.testng.annotations.BeforeTest;
import org.testng.annotations.Test;

public class LoginPage {

WebDriver driver;

@BeforeTest
public void setUp() {
System.setProperty("webdriver.chrome.driver", "C:\\Users\\Sidharth\\Downloads\\chrom86_driver\\chromedriver.exe");
driver = new ChromeDriver();
}

public void login() {
String login_url = "https://opensource-demo.orangehrmlive.com/";
driver.get(login_url);

driver.manage().window().maximize();
driver.manage().timeouts().pageLoadTimeout(10, TimeUnit.SECONDS);
driver.findElement(By.id("txtUsername")).sendKeys("Admin");
driver.findElement(By.id("txtPassword")).sendKeys("admin123");
System.out.println(driver.getTitle());
}

@Test
public void dashboard() {

driver.findElement(By.id("menu_dashboard_index")).click();
String textPresent = driver.findElement(By.xpath("//*[@id=\"content\"]/div/div[1]/h1")).getText();

String textToBePresent = "DashBoard";
assertEquals(textPresent, textToBePresent);
}


@AfterTest
public void tearDown() {
driver.quit();
}

}- Create a file named TestNG.xml.
- Create a distinct folder for each dependency and place it in the project folder. Make a bat file with the information listed below.
java -cp bin;lib/* org.testng.TestNG TestNG.xml
- Give a precise name to the TestNG.xml file you made in your project.
- Choose the newly formed project in Jenkins’s dashboard. Click Configure. Click Advanced in the General section, then select “Use custom workplace.” Indicate the test project’s route(path).
- Select the “Execute Windows batch Command” option from the Add Build Step dropdown box in the Build section. Indicate the name of the bat file generated in Step 7.
- Click Apply and then Save to commit your changes to the Jenkins project. Click Build now to see the status of the tests being run in the Jenkins project.
Integrating Jenkins with Selenium using Maven
Maven
Maven is a significant project and build management tool based on the idea of a POM (Project Object Model). Its configuration data includes project information and details about the construction directory, source directory, dependency, test source directory, goals, and plugins, among other things.
- First, launch the Jenkins service.
- Launch a browser and go to the port and localhost where Jenkins operates.
- On the dashboard, select New Item.
- Enter the project name and choose Maven project as the project category.
- Hit “OK.” You can see in the dashboard that a job has been effectively created.
- After selecting the project, hit Configure.
- Enter the full route to your pom.xml under the Build section. Enter the command “clean test” in the Goals and Options.
- Save after selecting Apply.
- Select “Build Now.”
- Click the console output to see the entire records.
Quick Installation – Jenkins plugins for Selenium integration
With the help of the BrowserStack Jenkins plugin, setting up Jenkins to conduct tests on BrowserStack is a breeze. Jenkins is a tool for continuous integration that allows for the testing, building, and deploying of code in its many iterations.
Failures can be prevented before they reach the production stage with CI/CD tools.
Ensure the following chores are finished before you begin the integration:
- You now have the latest version of the Jenkins CI server (v1.653+) loaded.
- Possession of one’s Access Key and Username for one’s BrowserStack account.
- You have set up a pipeline, and the Jenkins server operates locally at the default port of http://localhost:8080/.
- You are the repository’s proprietor or maintainer.
- Your project’s repository will now include a Jenkinsfile.
Configuring Jenkins to run Selenium tests
To install the BrowserStack plugin, follow the steps below:
- Click Manage Jenkins in the left navigation on your Jenkins page, which is accessible by default at http://localhost:8080/.
- Click Manage Plugins on the Manage Jenkins page.
- On the page for Plugin Manager, select the Available tab.
- Find BrowserStack using the search box.
- Depending on your preference, select BrowserStack and pick Install without restart or Download now and install after restart.
- View the installation status of the plugin on the Installing Plugins/Upgrades page.
- Once installation is complete, select Return to the top page to configure the plugin.
Creating a Jenkins job for Selenium testing
At this point, all that remains is to build and set up a new Jenkins plan to execute the automated tests.
- Click Manage Jenkins > Configure System on your Jenkins page at http://localhost:8080.
- Click Add > Jenkins in the BrowserStack Credentials section.
- Type your Username and Access Key into the Jenkins Credentials Provider: Jenkins window.
- Then click Authenticate. A Success statement shows after the plugin has confirmed your BrowserStack credentials.
- In the Jenkins Credentials Provider: Jenkins window, click Add at the bottom. You’ll be taken to the configuration screen after that.
- Click Save on the configuration screen.
- Click Manage Jenkins > Manage Credentials on the Jenkins Dashboard.
- Write down the ID of the credential that is displayed in the ID column in the Credentials area. This ID will be used in your project’s Jenkinsfile.
- Add the BrowserStack (credentialsId: ‘credential_id>’) line to your project’s Jenkinsfile and enclose all test commands inside of it as shown below:
browserstack(credentialsId: '<credential_id>') {
# your test commands
}
The next instance Jenkinsfile specifies a sample shell command, the setup step, and the credential ID:
pipeline {
agent any
stages {
stage('setup') {
steps {
browserstack(credentialsId: 'dw471drf-db68-4r23b-969d-24r3r32f') {
echo "hello"
}
}
}
}
}
Running Selenium Tests with Jenkins
1. Triggering Selenium tests with Jenkins
Integrating BrowserStack with current test cases entails editing your test cases to add BrowserStack capabilities, credentials, and a remote URL. Even though your current test scripts include capabilities, BrowserStack expects specific capabilities, such as browser version, to help determine how tests are run.
This code snippet mentioned below demonstrates the BrowserStack-specific features
username = process.env.BROWSERSTACK_USERNAME
accessKey = process.env.BROWSERSTACK_ACCESS_KEY
buildName = process.env.JENKINS_LABEL

var capabilities = {
'bstack:options' : {
"os" : "Windows",
"osVersion" : "10",
"sessionName" : "BStack Build Name: " + buildName,
"userName" : username,
"accessKey" : accessKey,
"seleniumVersion" : "4.0.0",
},
"browserName" : "Chrome",
"browserVersion" : "100.0",
}

var driver = new webdriver.Builder().
usingServer("https://hub-cloud.browserstack.com/wd/hub").
withCapabilities(capabilities).
build();
Add the following commands to your Jenkinsfile to start your test:
- Go to your project’s Jenkinsfile.
- As shown below, add the instructions and wrap all test commands inside the BrowserStack statement. Add the command used to perform parallel tests.
pipeline {
agent any
stages {
stage('setup') {
steps {
browserstack(credentialsId: '<credential_ID>') {
// add commands to run test
// Following are some of the example commands -----
s 'npm install'
sh 'node single.js'
sh 'node parallel.js'
}
}
# ...
}
}
}
2. Scheduling Jenkins for Automatic Execution
Let’s look at the Jenkins task scheduling setup. You don’t need to be acquainted with Linux’s command line environment to understand it, but it resembles the cron syntax quite a bit. A scheduling entry comprises five fields that are separated by whitespace. By adding additional entries, you can schedule a task multiple times.
One of the key features of Jenkins is scheduling builds (Selenium Tests), which automatically initiate the build based on predefined criteria. Jenkins’s Build Trigger configuration offers several methods to start the build process.
3. Viewing Test Results in Jenkins
You can integrate the test findings from BrowserStack Automate into Jenkins using the BrowserStack Jenkins plugin.
The methods below can enable test reporting in Jenkins:
- Go to the project’s Jenkinsfile.
- After the BrowserStack section in the Jenkinsfile, add the next line of code:
// Enable reporting in Jenkins
browserStackReportPublisher 'automate'
- The following is an example Jenkinsfile that makes use of the browserStackReportPublisher ‘automate’ statement:
pipeline {
agent any
tools {nodejs "node"}

stages {
stage('setup') {
steps {
browserstack(credentialsId: 'e04r231dce-cb60-23db-939d-2ewdc95f03edf7b3') {
// some example test commands ...
sh 'npm install'
sh 'node parallel.js'
}
// Enable reporting in Jenkins
browserStackReportPublisher 'automate'
}
}
}
}
Now that Jenkins is integrated, you can see the outcomes of the tests that you ran on BrowserStack.
Top 3 Best Practices for Jenkins-Selenium Integration
1. Organizing tests in Jenkins
You can test web apps hosted on internal, private, and development servers using BrowserStack Local Testing. You can establish a private, secure link between your internal servers and the BrowserStack Selenium Grid using the Local testing binary. The BrowserStack Jenkins plugin carries out these tasks.
2. Version Control for Selenium tests
The process of monitoring and managing modifications to software code is known as version control, also referred to as source control. Software tools, and version control systems, assist software development teams in tracking changes to source code over time.
- You can better grasp the context and the coverage anticipated by the test case by understanding how and when a test case was modified.
- The tester who created the test may have understood why the function was tested that way, but would a new team member today comprehend it?
- A version history will enable the new team member to comprehend precisely what the test was intended to cover in its initial iteration and why and how it has changed over time.
- Additionally, it aids the testers in ensuring that the test still covers the purposes for which it was initially written despite numerous minor modifications made over time.
Github and Gitlab are two major options for this, but there are other choices. Using Git’s robust features, you can easily track changes to your code tests and label specific branches or pushes with version numbers.
3. Integrating other tools with Jenkins and Selenium
The Jenkins plugin for BrowserStack makes it simpler to set up Jenkins to perform tests on BrowserStack. This document will show you how to integrate the results of your BrowserStack Automated tests with test reporting frameworks.
Benefits of integrating Jenkins with Selenium
Using test frameworks like Nose2, PyTest, Robot, Selenium, and more, Jenkins can be used to carry out automation testing.
- Selenium can run test scripts, produce test findings, and carry out post-actions like printing test reports, among other things.
- It can even test cases against various input combinations to achieve greater test coverage.
- The test environment receives updates whenever there is an implementation modification.
- Developers are updated on the outcomes of the build and test stages, and automation testing is conducted continuously.
Closing Notes
Choose a cloud-based testing platform like BrowserStack that integrates with Jenkins.
Implement the BrowserStack Jenkins module to:
- Establish and tear down the BrowserStack Local binary to evaluate internal, development, and staging environments.
- Include test results from BrowserStack, such as video, logs, and snapshots, in your Jenkins job results.
- Start conducting tests on a cloud Selenium Grid of 3000+ real browsers and devices, and integrate the tests seamlessly into a CI/CD pipeline for maximum efficiency and accuracy.

