How do you keep up when your web app is shipping new features every other week?
Manual testing quickly becomes inefficient at that pace. You need automated tests that run fast, detect regressions early, and scale as your product grows. That’s where Selenium with Java becomes invaluable.
Selenium is one of the most trusted open-source automation tools out there and Java is still a go-to language for test automation. In fact, 29.4% of developers use Java (StackOverflow, 2025), which means you’re learning a skill that’s proven, reliable, and widely supported.
This guide walks you through everything from setting up your environment to running your first automated test with Selenium and Java.
Why Use Selenium with Java for Automation?
Selenium with Java can be used together due to the following reasons:
- Wide Adoption & Community Support: Java is one of the most widely used languages with a massive community and extensive Selenium documentation.
- Stability & Reliability: Java-based Selenium tests tend to be more stable and consistent, especially in large-scale enterprise environments.
- Strong Integration with Testing Frameworks: Seamless use with tools like TestNG, JUnit, and Maven for test management, reporting, and execution.
- Cross-Platform Support: Works well on Windows, Linux, and macOS – ideal for distributed automation teams.
- Rich Set of Libraries: Access to a large set of open-source libraries for logging, reporting (Extent Reports, Allure), assertions, and more.
- Performance: Java offers faster execution compared to dynamically typed languages like Python in some cases.
- Robust IDEs and Tooling: Excellent support from IDEs like IntelliJ IDEA and Eclipse for writing, debugging and maintaining test scripts.
- Support for Parallel and Cross-Browser Testing: Easily scalable for multi-threaded and cross-browser execution using tools like Selenium Grid, TestNG, and BrowserStack.
- Easy CI/CD Integration: Smooth integration with Jenkins, GitHub Actions and other DevOps tools for continuous testing.
Get Started with Selenium Automation Framework in Java
To learn Selenium with Java, one must combine the different components to start coding.
- Preferred for automated functional testing
- Compatible with multiple operating systems like Windows, Linux, Solaris, and macOS
- Supports multiple browsers like Chrome, Safari, IE, Edge, and Firefox
- Easy to integrate with Jenkins, Maven, and Docker to achieve a continuous testing approach.
- Tools like TestNG and JUnit further help structure the Selenium tests for easy maintainability and generating reports.
This section teaches how to set up and run a simple test through Selenium with Java bindings.
Get Expert QA Guidance Today
Schedule a call with BrowserStack QA specialists to discuss your testing challenges, automation strategies, and tool integrations. Gain actionable insights tailored to your projects and ensure faster, more reliable software delivery.
Setting up a Selenium automation framework in Java is a foundational step toward achieving scalable test coverage. However, building a maintainable structure, integrating it with CI/CD, and ensuring cross-environment stability often require expert guidance. The QA specialists at BrowserStack can help streamline your framework design and setup for long-term efficiency.
Pre-requisites for Setup and Configuration of Selenium in Java
The following components will get started with Java to run Automated Tests:
- Install Java (JDK)
- Install Eclipse
- Selenium Client and WebDriver Language bindings
- Configuring Selenium Webdriver with Eclipse
- Creating and Running the first test with Selenium and Java
Step 1 – Install Java
- A Java development kit that includes the JRE (Java Runtime Environment) is required to write and run Java programs. JRE is a child of JDK, which comes along with JDK installation.
- Even for running applications that need the dependency of Java, one needs to install JDK.
- One such application is Eclipse IDE. Download Java, install it, and set the environment path.
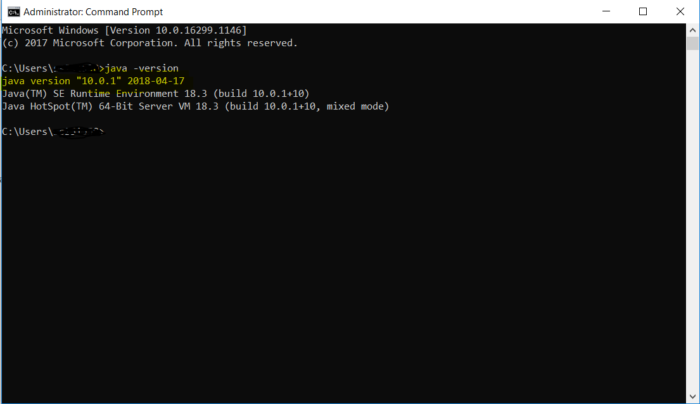
- Once the path is set, verify the installation by typing java -version on the command prompt, which provides the details of the installed java version.
Step 2 – Install Eclipse
Eclipse is a Java development platform for writing and running code.
- Download Eclipse from their office page. Based on the OS, one can go with the required option.
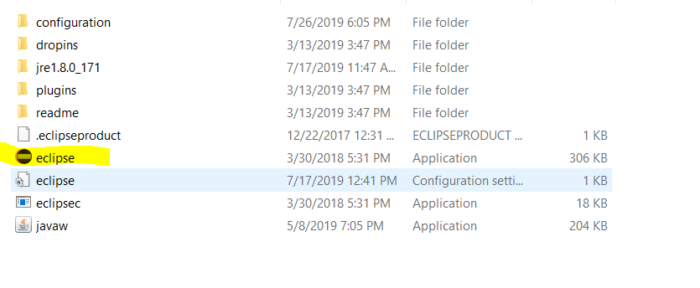
- Once downloaded, extract the downloaded file. Once completed, one can see the eclipse .exe in the eclipse folder:
Read More: How to configure Selenium in Eclipse
Step 3 – Selenium Client and WebDriver Language Bindings
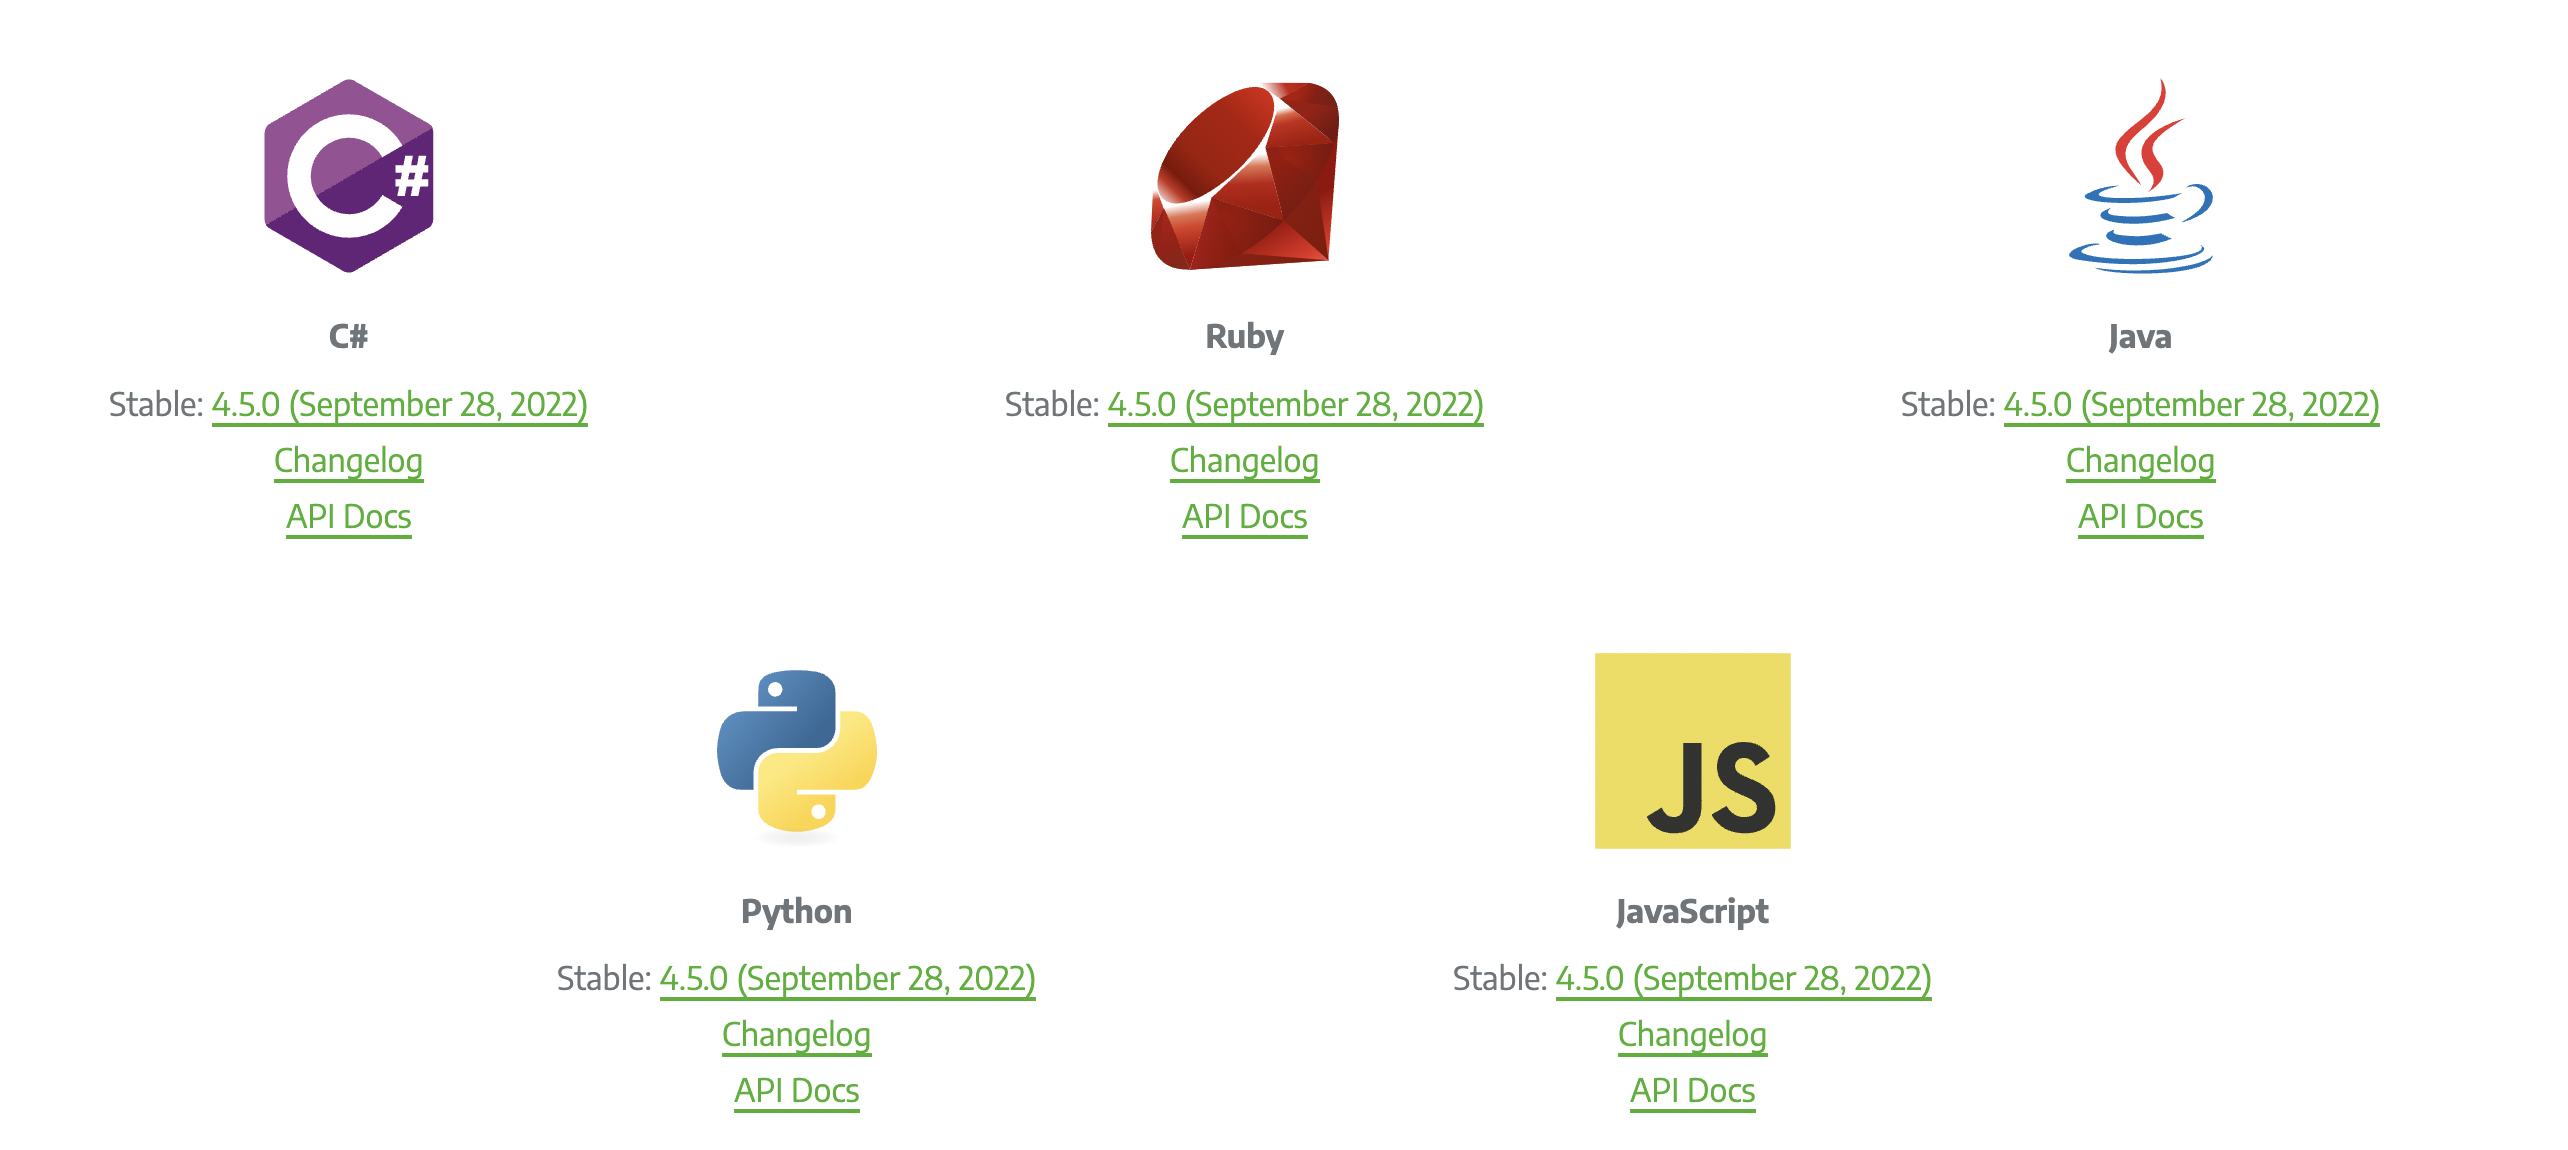
Selenium Webdriver supports multiple , and each language has its client driver. As we are using Selenium with Java, we need to have Selenium Java Client Driver. One can download the client driver from the official Selenium website and check the multiple language client drivers provided.
Step 4 – Configuring Selenium WebDriver With Eclipse
This is a vital step of starting with Selenium. To configure Eclipse with the Selenium Webdriver client,
1. Double-click on the eclipse.exe file to launch it
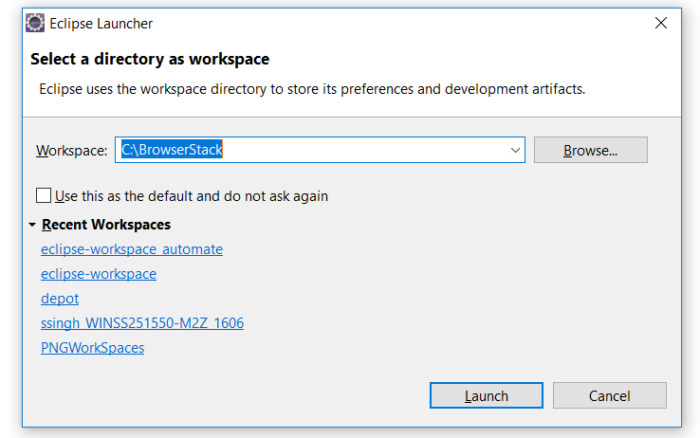
2. Create a workspace. Think of it just like any other folder, which stores all the scripts in one place. One can choose to create as many workspaces as required. Click on Launch to launch the workspace.
3. Create a new Java project by clicking on File-> New-> Java Project and name the project
4. Create a package under this project by right-clicking on the ‘src’ folder
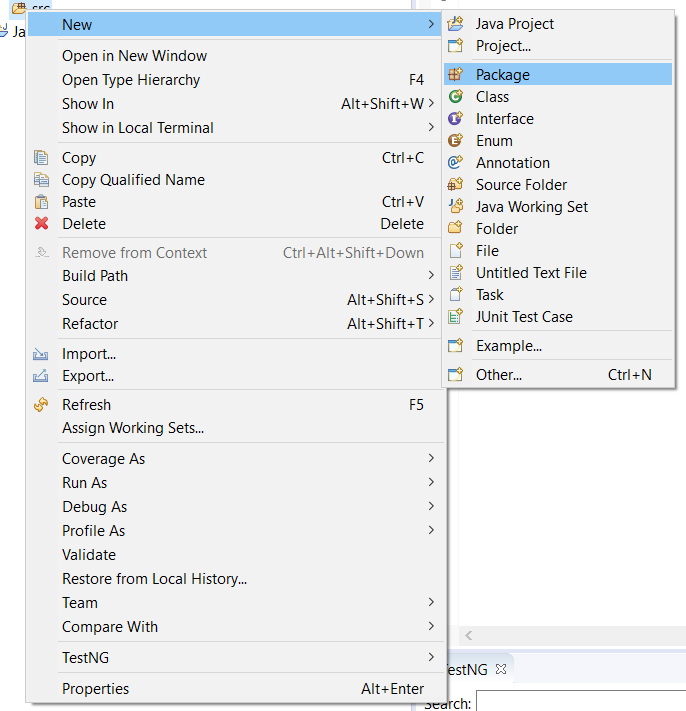
5. Once the package is created, right-click on the package and create a class.
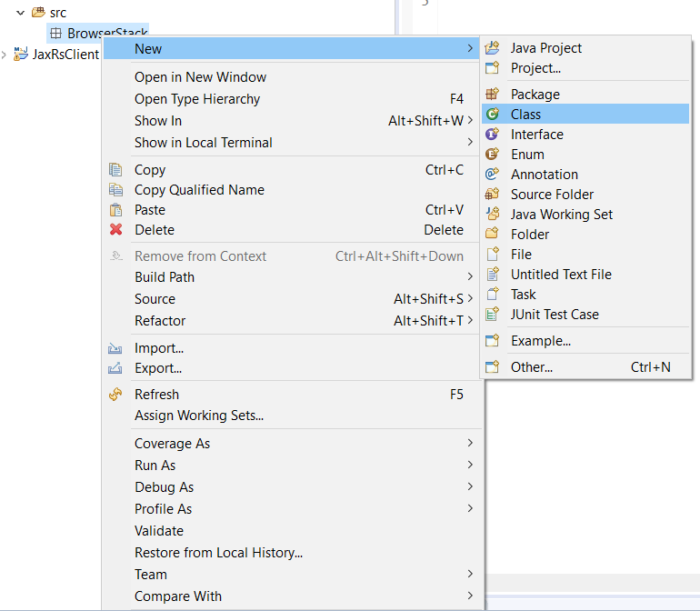
6. Once the class is created, go ahead with adding the Selenium Jars to the project.
7. To add the Selenium Jars, right-click on the project folder and go to Properties:
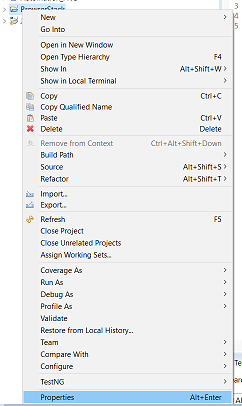
From the Properties window, navigate to ‘Java Build Path’ and click on ‘Add External JAR’s
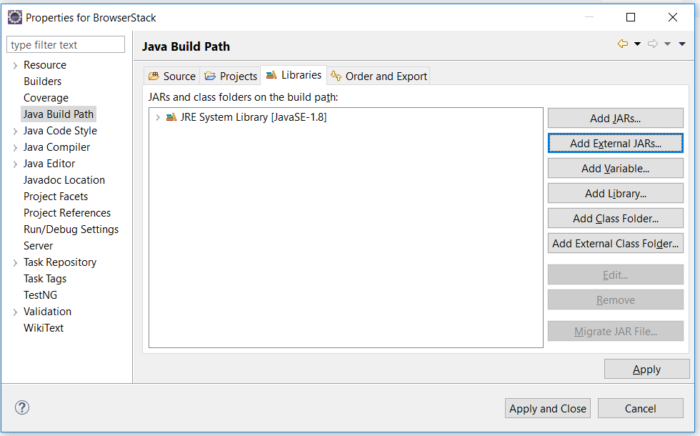
8. Add the downloaded Selenium Jars and click on ‘Apply and Close.’ Selenium with Eclipse is configured now. Now Eclipse is ready to execute the first script.
Step 5 – Creating and Running the first test using Selenium and Java
- As the first test, we will write a script to open ‘google.com’ on the Chrome browser.
- To use Chrome, it is mandatory to have the driver executable. To download the driver executable, visit the Selenium website.
- One can download the executable file for specific browsers in the third-party driver browser section.
Post downloading, below is the code snippet to run the first test using Selenium and Java:
import java.util.concurrent.TimeUnit;

import org.openqa.selenium.WebDriver;
import org.openqa.selenium.chrome.ChromeDriver;

public class FirstTestInSelenium {

public static void main(String[] args) {
// TODO Auto-generated method stub

//setting the driver executable
System.setProperty("webdriver.chrome.driver", ".\\Driver\\chromedriver.exe");

//Initiating your chromedriver
WebDriver driver=new ChromeDriver();

//Applied wait time
driver.manage().timeouts().implicitlyWait(10, TimeUnit.SECONDS);
//maximize window
driver.manage().window().maximize();

//open browser with desried URL
driver.get("https://www.google.com");

//closing the browser
driver.close();

}

}
In the code snippet above, we have used the Selenium keyword driver.get(“URL to open in browser”) to open URL in the desired browser. Other keywords like driver.close help to close the browser window as a cleanup part.
This was a quick starter to learn Selenium with Java and run Automated Tests. One should also consider the best practices while writing Selenium tests.
Running Tests Using Selenium with Java on Local
Below are the steps to follow to run tests using Selenium with Java on Local :
Step 1. Install Java JDK
Step 2. Install an IDE
Use an IDE like IntelliJ IDEA or Eclipse to write and manage the test code.
Step 3. Set Up Maven or Gradle Project
- Create a Maven or Gradle project in your IDE.
- Add Selenium dependencies in the pom.xml (Maven) or build.gradle (Gradle).
Example (Maven):
<dependencies>

  <dependency>

    <groupId>org.seleniumhq.selenium</groupId>

    <artifactId>selenium-java</artifactId>

    <version>4.32.0</version>

  </dependency>

</dependencies>
Step 4. Download WebDriver
- Download the appropriate WebDriver (e.g., ChromeDriver for Chrome) from the Selenium website.
- Add it to the system PATH or specify its location in your test script.
Step 5. Write Your First Test
Create a simple Java class to open a browser and navigate to a website.
Example:
import org.openqa.selenium.WebDriver;

import org.openqa.selenium.chrome.ChromeDriver;


public class MyFirstTest {

  public static void main(String[] args) {

    System.setProperty("webdriver.chrome.driver", "path/to/chromedriver");

    WebDriver driver = new ChromeDriver();

    driver.get("https://www.google.com");

    System.out.println("Title: " + driver.getTitle());

    driver.quit();

  }

}
Step 6. Run the Test
- Run the Java class from the IDE.
- The browser should launch, navigate to the site, and close after the test finishes.
Step 7. (Optional) Use a Test Framework
Integrate with TestNG or JUnit for better test structure, assertions, and reporting.
Running Selenium Tests with Java on Cloud
Follow the steps below:
1. Prerequisites
- Java JDK installed
- IDE (Eclipse or IntelliJ)
- Maven project setup
- BrowserStack account (free trial or paid)
2. Add Selenium Dependencies to pom.xml
In the pom.xml, include:


<dependencies>

  <dependency>

    <groupId>org.seleniumhq.selenium</groupId>

    <artifactId>selenium-java</artifactId>

    <version>4.32.0</version>

  </dependency>

  <dependency>

    <groupId>junit</groupId>

    <artifactId>junit</artifactId>

    <version>4.13.2</version>

    <scope>test</scope>

  </dependency>

</dependencies>
3. Get BrowserStack Credentials
- Login to BrowserStack, which is a cloud-based testing platform
- Navigate to the Automate Dashboard
- Copy Username and Access Key
export BROWSERSTACK_USERNAME=”your_username”
export BROWSERSTACK_ACCESS_KEY=”your_access_key”
4. Write the Test Code Using RemoteWebDriver
Create a test class in src/test/java (e.g., BStackTest.java):
import org.junit.After;

import org.junit.Before;

import org.junit.Test;

import org.openqa.selenium.WebDriver;

import org.openqa.selenium.remote.DesiredCapabilities;

import org.openqa.selenium.remote.RemoteWebDriver;


import java.net.URL;


public class BStackTest {


    private WebDriver driver;


    @Before

    public void setUp() throws Exception {

        String USERNAME = System.getenv("BROWSERSTACK_USERNAME");

        String AUTOMATE_KEY = System.getenv("BROWSERSTACK_ACCESS_KEY");

        String URL = "https://" + USERNAME + ":" + AUTOMATE_KEY + "@hub-cloud.browserstack.com/wd/hub";


        DesiredCapabilities caps = new DesiredCapabilities();

        caps.setCapability("browser", "Chrome");

        caps.setCapability("browser_version", "latest");

        caps.setCapability("os", "Windows");

        caps.setCapability("os_version", "11");

        caps.setCapability("name", "BrowserStackTest");


        driver = new RemoteWebDriver(new URL(URL), caps);

    }


    @Test

    public void testGoogleTitle() {

        driver.get("https://www.google.com");

        System.out.println("Page title is: " + driver.getTitle());

    }


    @After

    public void tearDown() {

        if (driver != null) {

            driver.quit();

        }

    }

}
5. Run the Test
- Execute the test class from the IDE or command line (mvn clean test)
- BrowserStack will:
- Spin up a cloud browser instance (Chrome on Windows 11 in this case)
- Run the test remotely
- Show real-time and recorded test results in the dashboard
6. View Results
- Go to the BrowserStack Automate dashboard
- View Video recordings, Console logs, Screenshots, and Performance metrics
Running Parallel Tests in Selenium With Java
Follow the steps below to run parallel tests in Selenium with Java:
1. Prerequisites
- Java JDK installed
- Maven project setup in IntelliJ or Eclipse
- Selenium and TestNG dependencies in pom.xml
- (Optional) BrowserStack account if running in the cloud
2. Add Required Dependencies
In the pom.xml, include:
<dependencies>

  <dependency>

    <groupId>org.seleniumhq.selenium</groupId>

    <artifactId>selenium-java</artifactId>

    <version>4.32.0</version>

  </dependency>

  <dependency>

    <groupId>org.testng</groupId>

    <artifactId>testng</artifactId>

    <version>7.11.0</version>

    <scope>test</scope>

</dependency>

</dependencies>
3. Create Two or More Test Classes
Example: TestGoogle.java
import org.openqa.selenium.WebDriver;

import org.openqa.selenium.chrome.ChromeDriver;

import org.testng.annotations.Test;


public class TestGoogle {

    @Test

    public void testGoogle() {

        WebDriver driver = new ChromeDriver();

        driver.get("https://www.google.com");

        System.out.println("Title: " + driver.getTitle());

        driver.quit();

    }

}
Example: TestBing.java
import org.openqa.selenium.WebDriver;

import org.openqa.selenium.chrome.ChromeDriver;

import org.testng.annotations.Test;


public class TestBing {

    @Test

    public void testBing() {

        WebDriver driver = new ChromeDriver();

        driver.get("https://www.bing.com");

        System.out.println("Title: " + driver.getTitle());

        driver.quit();

    }

}
4. Create a testng.xml for Parallel Execution
<!DOCTYPE suite SYSTEM "https://testng.org/testng-1.0.dtd" >

<suite name="ParallelSuite" parallel="classes" thread-count="2">

    <test name="ParallelTests">

        <classes>

            <class name="TestGoogle" />

            <class name="TestBing" />

        </classes>

    </test>

</suite>
Explanation:
- parallel = “classes”: runs tests in separate classes in parallel
- Thread-count = “2”: runs two threads concurrently
5. Run the Suite
From your IDE, right-click testng.xml -> Run
Or from Maven: mvn clean test
6. (Optional) Run in Parallel on BrowserStack
In the test classes, replace ChromeDriver with RemoteWebDriver and set different DesiredCapabilities for each.
Use the USERNAME and ACCESS_KEY from BrowserStack. Then use parallel = “tests” in testng.xml and list each test block with its own capabilities.
Advanced Use Cases of Selenium with Java
Some of the use cases include:
- Parallel Test Execution: Run tests concurrently using TestNG or Selenium Grid to speed up execution.
- Cross-Browser Testing: Test on multiple browsers to ensure compatibility.
- Cloud-Based Testing: Integrate with platforms like BrowserStack to run tests at scale.
- CI/CD Integration: Plug Selenium into Jenkins, GitHub Actions, etc., for continuous testing.
- Page Object Model (POM): Improve test maintainability with structured page classes.
- Data-Driven Testing: Use TestNG or Excel files to input test data.
- Screenshot & Logging Utilities: Capture failure states for debugging.
- Headless Browser Testing: Use headless Chrome or Firefox for faster test execution in CI pipelines.
Best Practices while writing Selenium tests with Java
Some of the essential aspects to remember while writing Selenium tests with Java are:
- Using the Right Locator
Selecting locators are the building blocks of a Selenium script, and using the right one is critical. If incorrect locators are used, they tend to make the script flaky and unreliable. Using ‘ID’ and ‘Name’ locators is easy. They also provide faster execution and are more reliable than CSS and XPath.
Read More: Quick XPath Locators Cheat Sheet
- Incorporate the Test-Driven Script
When we talk about testing, it is about testing the software on multiple permutations and a combination of data. The same should be incorporated into the Selenium tests. Multiple data points should drive all Selenium tests, and a data-driven framework helps achieve this.
- Using the right Wait
For WebElements or a page to load, it is essential to give a specific halt time to the script and avoid failure. Selenium provides certain waits like ‘Implicit’ or ‘Explicit’ to achieve this. Both these waits halt the execution of the script until it finds the element.
The moment it finds the element, it continues the execution of the script. ‘Thread.sleep’, on the other hand, stops the execution for the defined period even when it finds the element in the defined interval. This increases the execution time of the script.
- Don’t make scripts specific to a Browser or Driver
Cross browser testing plays a vital role in testing. Depending on business needs, one may expect the scripts to run on multiple browsers or a specific browser. Selenium frameworks like TestNG provide annotations like @parameters, and JUnit provides annotations like @RunWith, which helps run tests on multiple browsers and corresponding drivers.
- Validate Tests using Assertions
The key to writing a good test is validating the tests. Just like when one writes a test case and mentions the actual and expected results, one needs to assert the tests in Selenium with the help of assertions provided in frameworks like TestNG and JUnit. If the assertions are not used, the testing process is incomplete, as it does not validate the test build’s correctness.
- Take Screenshots for Reporting
As a QA tester, it is essential to provide proof of testing for failures with supportive screenshots. The same stands for Automated Selenium testing. In case a test fails, it is vital to have corresponding screenshots. This helps explain the bug to the developer, who can debug it instantly.
Similarly, from a reporting perspective, to provide insight to the stakeholders, it is valuable to share reports with them, to establish the stability of the product. For this, Selenium provides a default reporting system with frameworks like TestNG and provides further customizations to them using TestNG listeners.
Read More: Top 5 Selenium Reporting Tools
Why run Selenium Java Tests on BrowserStack Real Device Cloud?
You should run Selenium Java Tests on a real device cloud like BrowserStack Automate for below reasons:
- Realistic Testing Conditions: Real device clouds provide access to a broad spectrum of devices and environments, ensuring tests reflect actual user conditions accurately.
- Enhanced Security: Maintained with high security standards, real device clouds offer secure, isolated testing environments, minimizing data breach risks.
- Broad Browser and OS Coverage: Helps identify compatibility issues across various browsers and operating systems, enhancing user experience.
- Performance Insights: Real devices yield authentic performance data essential for optimizing application responsiveness.
- Scalability and Accessibility: Facilitates scalable and accessible testing, suitable for distributed teams.
- CI/CD Integration: Integrates smoothly with CI/CD pipelines for continuous testing and early issue detection.
- Cost-Effectiveness: Although initially more costly, it saves on long-term expenses related to fixes and support.
Conclusion
Selenium WebDriver streamlines automation testing for UI across platforms and browsers, supporting efficient regression and cross-browser testing. It integrates well with Jenkins and Maven for continuous testing.
Cloud tools like BrowserStack enhance testing by offering real device access, ensuring consistent user experiences. Its flexibility, combined with plugins, makes Selenium a preferred choice for scalable and effective testing.
Selenium Java Resources
- How to configure Selenium in Eclipse
- Maven Dependency Management with Selenium
- Locators in Selenium: A Detailed Guide
- Selenium Commands every Developer or Tester must know
- Selenium WebElement Commands
- Desired Capabilities in Selenium Webdriver
- Assert and Verify Methods in Selenium
- Select Class in Selenium : How to select a value in dropdown list?
- SendKeys in Selenium WebDriver
- Handling Login Popups in Selenium WebDriver and Java
- How to Launch Browser in Selenium
- How to handle Alerts and Popups in Selenium?
- How to Find Element by Text in Selenium: Tutorial
- How to perform UI Testing with Selenium
- Regression Testing with Selenium: Tutorial
- Cross Browser Testing in Selenium : Tutorial
- Page Object Model and Page Factory in Selenium
- How to handle Action class in Selenium
- How to run your first Selenium test script
- Parallel Testing with Selenium
- JUnit Testing Tutorial: JUnit in Java
- All about TestNG Listeners in Selenium


