Test automation ensures efficiency and consistency in software development. With shorter development cycles, Selenium is essential for automating web application testing
Overview
Benefits of Using Eclipse for Selenium
- Optimized for Java development, ideal for Selenium testing.
- Enhances automation and tool integration.
- Simplifies issue detection and resolution.
- Auto-completion and syntax highlighting boost productivity.
- Works effortlessly with Selenium libraries, frameworks, and version control.
Download and Set Up Selenium
- Download the latest Selenium WebDriver.
- Install the required Browser Driver
- Set Environment PATH by placing browser driver files in a directory included in the system PATH.
- Install and configure Selenium Java Language Bindings.
Configure Selenium in Eclipse
- Launch Eclipse and Create Workspace
- Create Java Project
- Create Package & Class and Add Selenium JARs
This guide gives an in-depth explanation on how to set up Selenium in Eclipse for Java-based automation testing.
Why Use Eclipse for Selenium?
Eclipse is a widely used Integrated Development Environment (IDE) for Selenium testing due to its powerful features and seamless support for Java. It offers a user-friendly interface, making it easier for testers to write, manage, and debug test scripts efficiently.
Key Benefits of Using Eclipse for Selenium:
- Eclipse is designed for Java development, making it an ideal choice for Selenium testing.
- Offers various plugins to enhance automation capabilities and integrate with other tools.
- Provides built-in debugging tools that help identify and resolve issues in test scripts.
- Improves productivity by assisting with code completion and readability.
- Easily integrates with Selenium libraries, test frameworks, and version control systems.
Prerequisites for configuring Selenium in Eclipse
Below are the prerequisites for downloading and configuring Selenium in Eclipse:
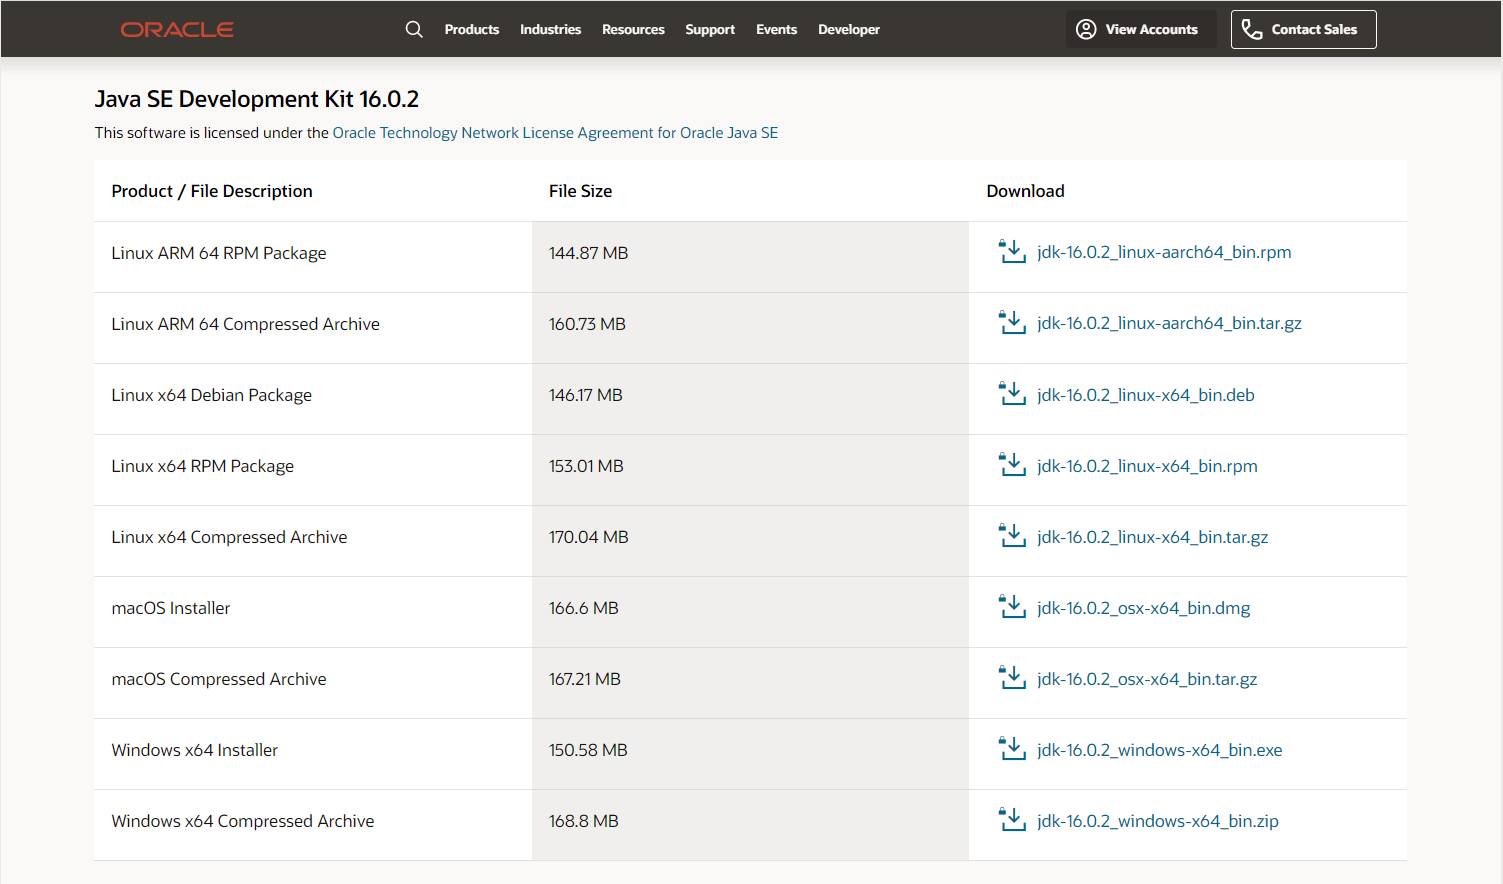
1. Download and install Java SE Development Kit (JDK) 16.0.2.
2. Run the JDK Installer and follow setup instructions.
3. Use the following for silent installation:
jdk.exe /s
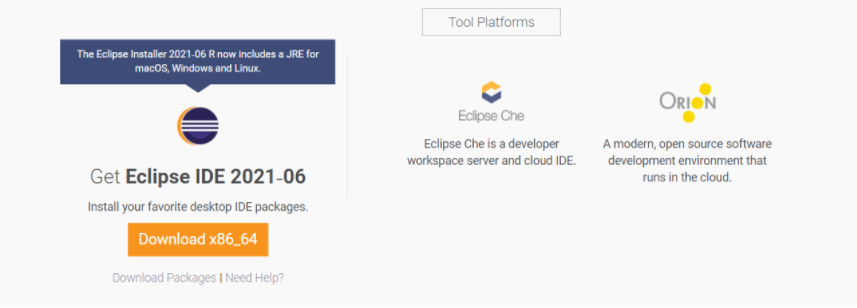
4. Download and install Eclipse IDE.
How to download Selenium in Eclipse
Below are the steps to download Selenium in Eclipse:
Step 1: Download and Install Selenium to be set up in Eclipse.
Step 2: Install Browser Driver.
For Cross Browser Testing, download the relevant Browser Driver – ChromeDriver (for Chrome), GeckoDriver (for Firefox), SafariDriver(for Safari), and InternetExplorerDriver and MSEdgeDriver (IE and Edge respectively).
Step 3: Place these Browser Driver files in a directory that is part of the environment PATH. This will allow a command-line call to the programs to execute them irrespective of the working directory.
Step 4: Install Java Language Bindings
- Version 3.141.59 (2018)
- Changelog
- API Docs
How to configure Selenium in Eclipse
Here are the steps to configure Selenium Webdriver with Eclipse:
Step 1: Launch Eclipse
To launch Eclipse double click on the eclipse.exe file in the download location.
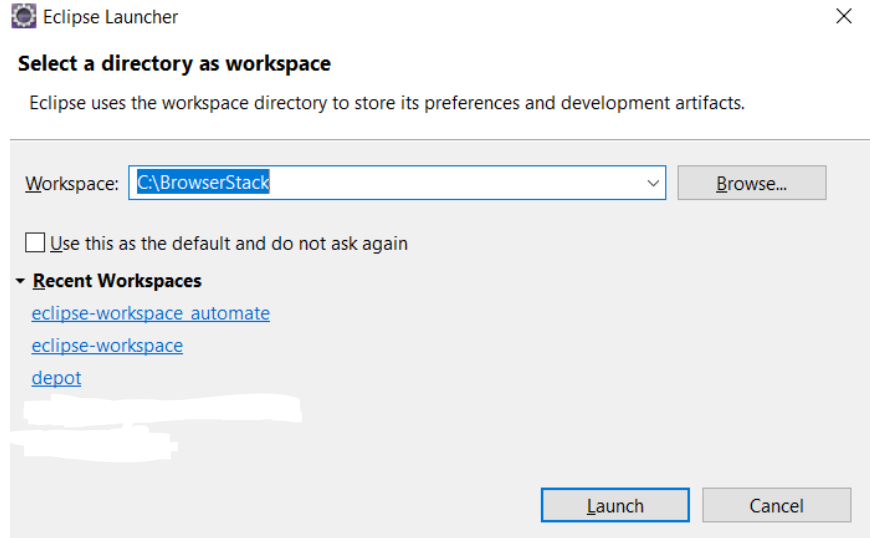
Step 2: Create Workspace in Eclipse
This workspace named “C:\BrowserStack” is like any other folder, which will store all the test scripts. Launch the BrowserStack workspace.
Creating Workspace in Eclipse
Step 3: Create New Java Project in the BrowserStack Workspace
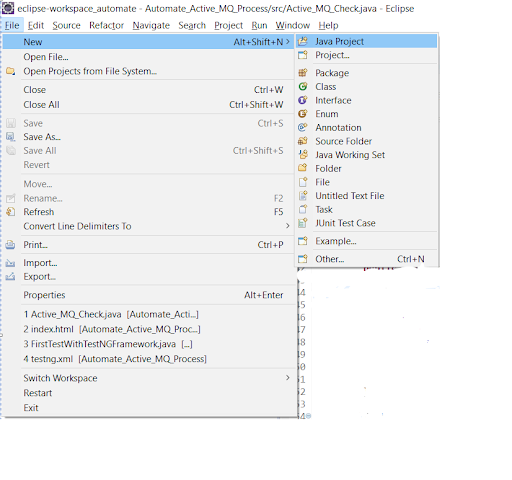
Create a new Java Project by clicking on File > New > Java Project and name it.
Creating a new Java Project
Step 4: Create Package and Class under the Java Project
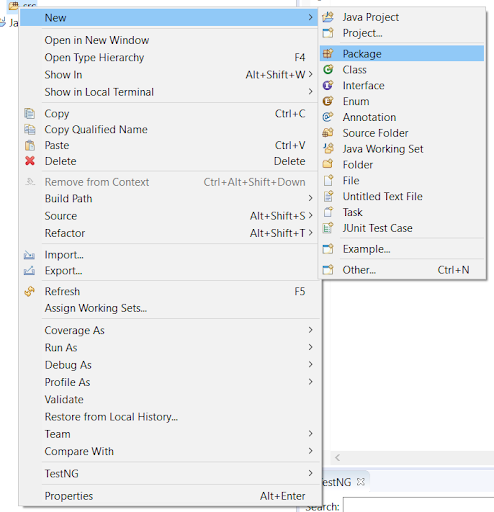
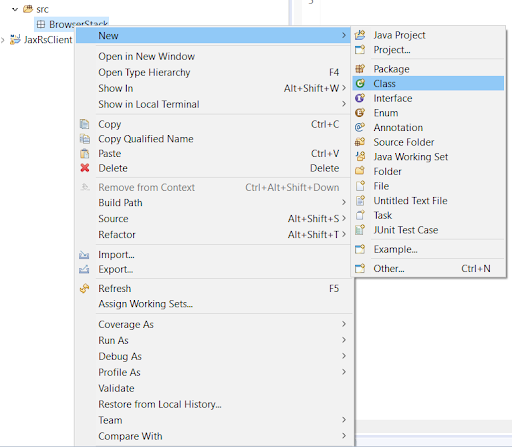
By clicking on the src folder (which is the source folder), create a new package and name it (BrowserStack). Then right-click on the package name and create a class.
Creating Package in the Java Project
Creating Class in the BrowserStack Package
Step 5: Add Selenium JARs to the Java Project in Eclipse
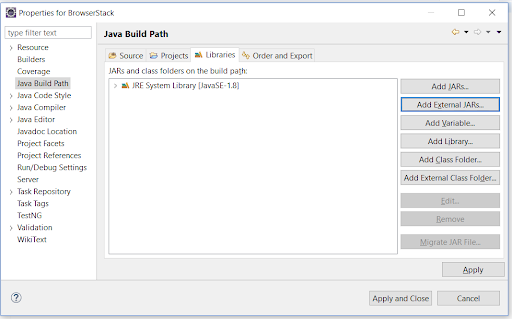
To add the Selenium Jars to the BrowserStack Java right click on the BrowserStack Project folder and select the Properties option. In the properties window, click on the Java Build Path and Add External JARs. Browse and add the downloaded Selenium JARs i.e. Client Combined JAR and all the JARs under the Libs folder, then click Apply and Close.
Adding Selenium JARs in the BrowserStack Project
This configures Selenium with Eclipse, making it ready to execute the first test script.
Follow-up Read: How to Install and Configure TestNG in Eclipse
Best Practices for Using Eclipse for Selenium
Here are the best practices for using Eclipse for Selenium:
- Set Up a Clean Project Structure
Create a well-organized folder structure in Eclipse, ideally using Maven or Gradle. Separate your code into packages like tests, pages, utils, and drivers to enhance readability and maintenance. - Use Page Object Model (POM)
Implement POM to separate page elements and interactions into dedicated classes. This promotes code reusability, easier updates, and better test management. - Manage Dependencies with Maven
Use a pom.xml file to manage Selenium and other library versions. It simplifies adding/removing dependencies and ensures consistency across environments. - Use WebDriverManager
Avoid manually downloading browser drivers by integrating WebDriverManager. It automatically handles driver binaries and simplifies cross-browser setup. - Integrate TestNG or JUnit
Use testing frameworks like TestNG or JUnit for organizing tests, creating suites, and generating reports. Annotations like @Test, @BeforeMethod, and @AfterClass make test flow easy to control. - Add Logging and Reporting
Incorporate logging frameworks (e.g., Log4j) for debugging and integrate reporting tools like ExtentReports to get detailed test execution summaries. - Handle Waits and Synchronization Smartly
Use explicit waits (like WebDriverWait) and avoid hard-coded delays. This ensures tests are more reliable and adaptable to UI changes. - Regularly Clean and Build the Project
Use Project > Clean in Eclipse to remove outdated builds and rebuild the project. This keeps the environment fresh and prevents compilation issues. - Use Version Control (Git)
Integrate Git within Eclipse or use external tools to track changes, collaborate with teammates, and manage different test versions effectively. - Keep Eclipse and Plugins Updated
Ensure you’re using the latest Eclipse version along with updated plugins for Maven, TestNG, and Selenium to benefit from new features and bug fixes.
Conclusion
Using Selenium with Java simplifies automation testing, accelerates execution, and minimizes errors for a seamless user experience.
Java’s extensive support makes it a preferred language for Selenium, optimizing regression and cross-browser testing. When integrated with CI tools like Jenkins, it enhances continuous delivery workflows.
For accurate test results, Selenium tests must run on real browsers and devices.
Leverage BrowserStack’s real device cloud to test on 3500+ real browsers and devices. Execute parallel tests on its Cloud Selenium Grid for faster, reliable results, ensuring a flawless user experience with BrowserStack Automate.
Useful Resources for Selenium
Methods, Classes, and Commands
- Selenium Commands every Developer or Tester must know
- Selenium WebElement Commands
- Desired Capabilities in Selenium Webdriver
- Assert and Verify Methods in Selenium
- Understanding System setProperty in Selenium
- Select Class in Selenium : How to select a value in dropdown list?
- SendKeys in Selenium WebDriver
- getAttribute() method in Selenium: What, Why, and How to use
- How does Selenium isDisplayed() method work?
- findElement vs findElements in Selenium
- Types of Listeners in Selenium (with Code Examples)
- How to set Proxy in Firefox using Selenium WebDriver?
Configuration
- How to set up Selenium on Visual Studio
- How to configure Selenium in Eclipse
- Maven Dependency Management with Selenium
- How to Build and Execute Selenium Projects
XPath
- How to use XPath in Selenium?
- How to find element by XPath in Selenium with Example
- Top Chrome Extensions to find Xpath in Selenium
Locators and Selectors
- Locators in Selenium: A Detailed Guide
- CSS Selector in Selenium: Locate Elements with Examples
- How to Create Object Repository in Selenium
Waits in Selenium
- Wait Commands in Selenium C and C#
- Selenium Wait Commands: Implicit, Explicit, and Fluent Wait
- Understanding Selenium Timeouts
- Understanding ExpectedConditions in Selenium
- Understanding Role of Thread.sleep() in Selenium
Frameworks in Selenium
- Data Driven Framework in Selenium
- Implementing a Keyword Driven Framework for Selenium: A Practical Guide
- Hybrid Framework in Selenium
Miscellaneous
- How to create Selenium test cases
- How to set Proxy in Selenium?
- Difference between Selenium Standalone server and Selenium server
- Exception Handling in Selenium WebDriver
- How to use JavascriptExecutor in Selenium
- How to run your first Selenium test script
- Parallel Testing with Selenium
Best Practices, Tips and Tricks
- Top 5 Challenges Faced During Automation Selenium Testing
- 5 Selenium tricks to make your life easier
- 6 Things to avoid when writing Selenium Test Scripts
- Best Practices for Selenium Test Automation
- Why you should pay attention to flaky Selenium tests
- How to start with Selenium Debugging
- How to make your Selenium test cases run faster
- How to upgrade from Selenium 3 to Selenium 4
- Why you should move your testing to a Selenium Cloud?
Design Patterns in Selenium: Page Object Model and Page Factory
- Design Patterns in Selenium
- Page Object Model and Page Factory in Selenium
- Page Object Model and Page Factory in Selenium C#
- Page Object Model in Selenium and JavaScript
- Page Object Model and Page Factory in Selenium Python
Action Class
- How to handle Action class in Selenium
- How to perform Mouse Hover Action in Selenium
- Understanding Click Command in Selenium
- How to perform Double Click in Selenium?
- How to Drag and Drop in Selenium?
- How to Scroll Down or Up using Selenium Webdriver
- How To verify Tooltip Using Selenium
TestNG and Selenium
- Database Testing using Selenium and TestNG
- How to use DataProvider in Selenium and TestNG?
- All about TestNG Listeners in Selenium
- How to run parallel test cases in TestNG
- How to use TestNG Reporter Log in Selenium: Tutorial
- Prioritizing tests in TestNG with Selenium
JUnit and Selenium
- Understanding JUnit assertions for Selenium Testing with Examples
- How to run JUnit Parameterized Test in Selenium
- How to write JUnit test cases
- JUnit Testing Tutorial: JUnit in Java
- How to create JUnit Test Suite? (with Examples)
Use Cases
- Handling Login Popups in Selenium WebDriver and Java
- How to Launch Browser in Selenium
- How to handle Alerts and Popups in Selenium?
- How to get Selenium to wait for a page to load
- How to Find Element by Text in Selenium: Tutorial
- How to Read/Write Excel Data using Apache POI Selenium
- How to handle Captcha in Selenium
- How to handle multiple windows in Selenium?
- How to handle Multiple Tabs in Selenium
- How to find broken links in Selenium
- How to handle Cookies in Selenium WebDriver
- How to handle iFrame in Selenium
- How to handle Web Tables in Selenium
- How To Validate Text in PDF Files Using Selenium Automation
- Get Current URL in Selenium using Python: Tutorial
Types of Testing with Selenium
- Different Testing Levels supported by Selenium
- How to perform UI Testing with Selenium
- Regression Testing with Selenium: Tutorial
- UI Automation using Python and Selenium: Tutorial
- How to Run Visual Tests with Selenium: Tutorial
- How to perform ETL Automation using Selenium
- Cross Browser Testing in Selenium : Tutorial


