Appium is a popular open-source framework used to automate testing for native, hybrid, and mobile web apps on both Android and iOS. It lets you write tests using languages like Java, Python, or JavaScript, and run them on real devices or emulators.
This article explains how Appium works, how to set it up, and how to run Appium Script locally and on BrowserStack.
What is Appium?
Appium is an open-source automation testing framework for applications supported by various platforms like iOS, Android, macOS, and Windows. It enables the tester to write test scripts in different programming languages such as JavaScript, Java, Ruby, Python, PHP, and C#. It also offers cross-platform testing wherein a single API can be used for both Android and iOS platforms.
Appium does not carry dependencies on mobile operating systems. It comprises a wrapper of framework that translates Selenium Webdriver commands into UIAutomation (iOS) or UIAutomator (Android) commands depending on the device type. The OS type does not factor in here.
Key Features of Appium
Appium is widely used in mobile automation because it supports real devices, multiple languages, and all app types, without requiring app changes. Below are its most important capabilities:
- Cross-Platform Automation: Appium allows you to write one test script and run it on both Android and iOS platforms. This reduces duplication and speeds up test creation for apps that share functionality across platforms.
- Multi-Language Support: Appium is based on the WebDriver protocol, which means you can write tests in any language that has a Selenium client library, such as Java, Python, JavaScript, Ruby, or C#. This flexibility helps teams work in the language they’re most comfortable with.
- No App Recompilation Needed: Unlike some mobile testing tools, Appium does not require you to recompile or modify your app. This makes it easier to test production builds and reduces the risk of introducing test-specific changes.
- Support for All App Types: Appium supports native apps (built using Android or iOS SDKs), hybrid apps (web views wrapped in a native container), and mobile web apps accessed through browsers like Chrome and Safari.
- Real Device and Emulator/Simulator Support: Whether you’re running tests locally on emulators or on real devices in the cloud, Appium gives you the flexibility to choose the environment that matches your needs.
Read More: How to run Appium Tests on macOS?
- CI/CD Integration: Appium fits well into continuous integration workflows. It can be integrated with tools like Jenkins, CircleCI, GitHub Actions, and others to enable automated testing as part of your build pipeline.
- Active Community and Ecosystem: As an open-source project with a large user base, Appium benefits from regular updates, plugin support, and community-driven enhancements, making it a robust and evolving automation solution.
Appium Architecture
Appium follows a client-server architecture built on the WebDriver protocol. It acts as a bridge between the test script and the mobile device (real or virtual), enabling platform-independent automation. Here’s a breakdown of its core components and how they interact:
1. Appium Client: The client is the test script written in a supported language (Java, Python, JavaScript, etc.) using a WebDriver-compatible library. It sends automation commands to the Appium Server.
2. Appium Server: A Node.js-based server that receives requests from the client in the form of JSON over HTTP. It processes these requests and forwards them to the relevant mobile automation engine depending on the platform.
3. Automation Engines: Appium has two engines
- UIAutomator2/Espresso (Android): Executes commands on Android devices.
- XCUITest (iOS): Executes commands on iOS devices.
Read More: Appium vs Espresso: Key Differences
4. Mobile Device (Real or Emulator/Simulator): The device where the actual app is installed and tested. The automation engine interacts with the OS and app to perform the test actions.
5. Bootstrap Components (Platform-Specific): Appium uses internal helper apps (like Appium Settings or uiautomator2-server for Android) to facilitate communication between the server and the mobile OS.
The following steps explain how Appium processes and executes a test command within its client-server architecture:
- Test Command Sent: The Appium client (your test script) sends a command, such as tapping a button, using the WebDriver protocol over HTTP.
- Server Receives and Routes: The Appium Server receives the command, parses it, and identifies the target platform (Android or iOS) based on the desired capabilities.
- Forwarded to Automation Engine: The command is routed to the appropriate automation engine. UIAutomator2 or Espresso is used for Android, while XCUITest is used for iOS.
- Action Executed on Device: The automation engine interacts with the app on the real device or emulator to perform the specified action.
- Response Returned: The result (success, failure, or output) is sent back from the device through the automation engine and server, and finally returned to the test script.
Prerequisites for Appium Automation
Appium can be installed:
- using NPM or
- downloading Appium Desktop, a graphical, desktop-based avenue to launch the Appium server.
In this case, let’s download using Appium Desktop.
1. Go to release page and download the latest version of Appium, according to your system configuration.
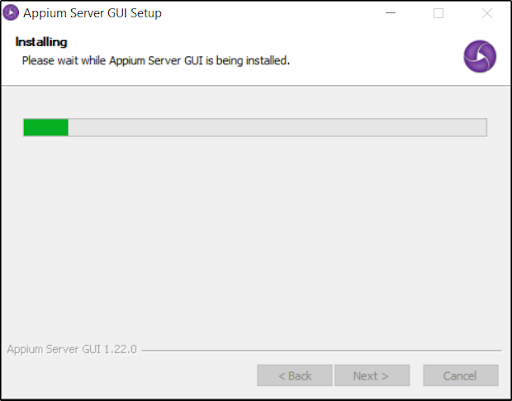
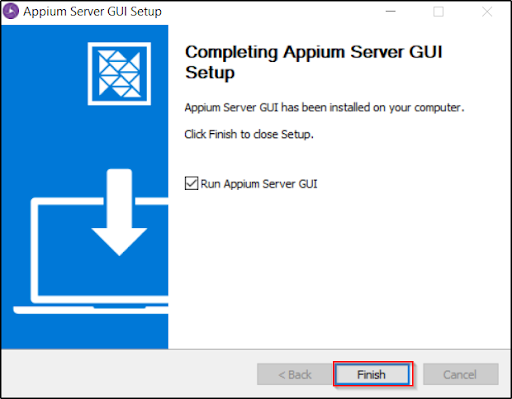
2. Follow the on-screen instructions and install Appium.
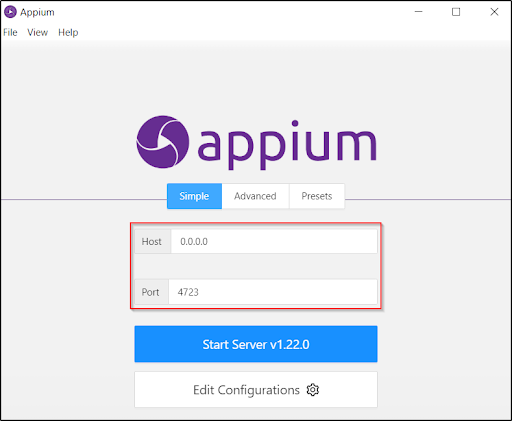
3. Once the setup is complete, run the Appium server GUI and check for the host and port configuration as shown below:
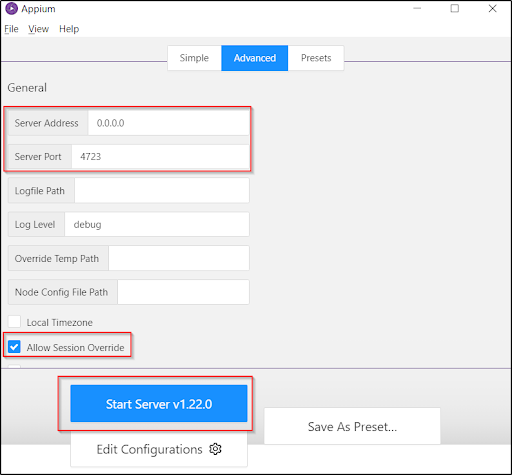
4. As a next step, go to the Advanced tab and configure the server address and port as shown in the snapshot below. Now, you can start the server by clicking on the Start Server button shown:
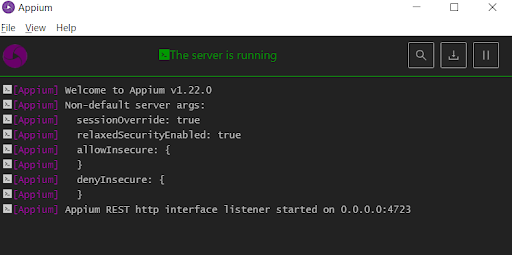
5. Once the Appium server starts, you can see the server status as shown below:
6. Now, you can connect your mobile device to the system through a USB cable. Open the command prompt and run the command: ADB devices to check the details of the device.
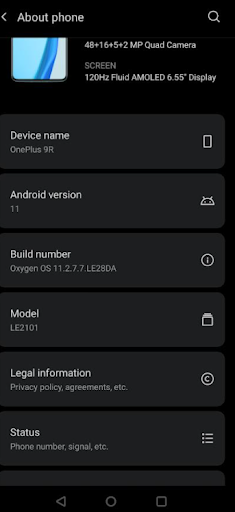
7. You will also need to provide your mobile phone’s Android version number in the Appium script.To find this, open your mobile phone and go to Setting > About Phone. In the About Phone screen, you can see the Android version as shown below:
How to Run Appium Test Script
Follow these steps to run the Appium Script.
- Create a project in Eclipse, add a package and create a class to write the test script.
- Make sure the libraries are configured with the Appium dependencies.
- The code below helps you understand how to write Appium code to launch the play store application:
import java.net.MalformedURLException;

import java.net.URL;

import org.openqa.selenium.remote.DesiredCapabilities;

import io.appium.java_client.AppiumDriver;

import io.appium.java_client.MobileElement;

import io.appium.java_client.android.AndroidDriver;

public class AppiumTestcase {

public static void main(String[] args) {

//Set the Desired Capabilities

DesiredCapabilities caps = new DesiredCapabilities();

caps.setCapability("deviceName", "My Phone");

caps.setCapability("udid", "device id"); //Give Device ID  caps.setCapability("platformName", "Android");

caps.setCapability("platformVersion", "11.0");

caps.setCapability("appPackage", "com.android.vending");

caps.setCapability("appActivity", "com.google.android.finsky.activities.MainActivity");

caps.setCapability("noReset", "true");

//Instantiate Appium Driver

try {

AppiumDriver driver = new AndroidDriver(new URL("http://0.0.0.0:4723/wd/hub"), caps);

} catch (MalformedURLException e) {

System.out.println(e.getMessage());

}

}

}
This script would launch the Play Store app on your mobile device. The best way to proceed is to run your script and then monitor the Appium Desktop screen.
You will notice that the Appium Desktop screen will start showing some logs. This is how you will know that your Appium test script is running.
Run Appium Test Script on BrowserStack
BrowserStack App Automate enables you to test native and hybrid mobile applications using the Appium automation framework on thousands of real Android and iOS devices. It’s easy to run Appium tests written in Java on real Android and iOS devices on BrowserStack.
Setup
- You will need a BrowserStack username and access key. To obtain your access credentials, sign up for a free trial or purchase a plan. After that, launch Browserstack App Automate.
- Ensure you have Appium’s Java client library installed. If you do not have one, please add the Maven dependency below to your project in IDE. In this case, the IDE being used is Eclipse.
// Maven users can add this dependency to project's POM

<dependency>

<groupId>io.appium</groupId>

<artifactId>java-client</artifactId>

<version>7.0.0</version>

</dependency>
- Ensure that you have access to an Android app (.apk or .aab file) or an iOS app (.ipa file)
/* Note the "app_url" value for the sample app. This value uniquely identifies the app on BrowserStack. */

{"app_url":"bs://c700ce60cf13ae8ed97705a55b8e022f13c5827c"}

/* In your test script, use this "app_url" value to specify the application under test using the "app" capability. During test execution, the sample app will automatically be installed and launched on the device being tested. */

caps.setCapability("app", "bs://c700ce60cf13ae8ed97705a55b8e022f13c5827c")- If you do not have an application, please use the sample android or iOS app. In this case, let’s use an Android application.
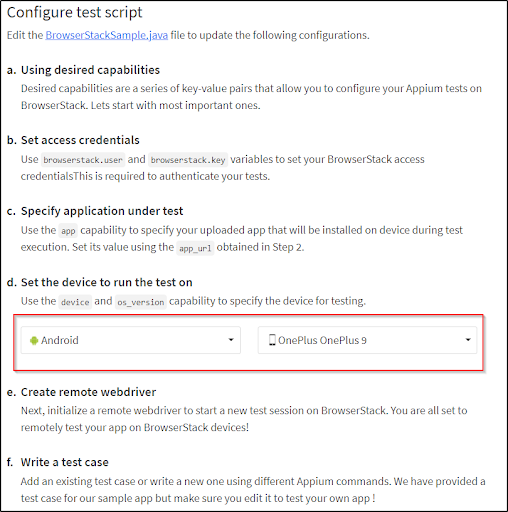
- As a next step, configure the code as shown in the screenshot below. In this case, lets select a real OnePlus 9 device with Android version 11 from the drop down as shown below.
Also, copy the code snippet from the App Automate dashboard to execute the test case.
Execution of Appium Test Script:
The following Java code demonstrates how to run an Appium test on BrowserStack using the BrowserStack sample Wikipedia Android app. The test is configured to run on a real OnePlus 9 device running Android 11. It automates the following scenario:
- Launch the app.
- Tap the Search Wikipedia input field.
- Enter the text “BrowserStack“.
- Verify that results are returned by checking that at least one TextView is present.
- Close the session using driver.quit().
This test script uses DesiredCapabilities to define test parameters and initializes an AndroidDriver instance to interact with the remote BrowserStack Appium server. The script also makes use of WebDriverWait to handle synchronization.
Note: Replace “your_username” and “your_key” with your actual BrowserStack credentials.
Once ready, run the test locally using your build tool (like Maven or Gradle). It will execute on a real device hosted on BrowserStack.
package android;

import java.net.URL;

import java.util.List;

import java.util.function.Function;

import java.net.MalformedURLException;

import io.appium.java_client.MobileBy;

import io.appium.java_client.android.AndroidDriver;

import io.appium.java_client.android.AndroidElement;

import org.openqa.selenium.support.ui.ExpectedConditions;

import org.openqa.selenium.support.ui.WebDriverWait;

import org.openqa.selenium.WebDriver;

import org.openqa.selenium.remote.DesiredCapabilities;

public class BrowserStackSample {

public static void main(String[] args) throws MalformedURLException, InterruptedException {

     DesiredCapabilities caps = new DesiredCapabilities();
       // Set your access credentials

     caps.setCapability("browserstack.user", "your_username");

     caps.setCapability("browserstack.key", "your_key");

     // Set URL of the application under test

     caps.setCapability("app", "bs://c700ce60cf13ae8ed97705a55b8e022f13c5827c");

     // Specify device and os_version for testing

        caps.setCapability("device", "OnePlus OnePlus 9");

        caps.setCapability("os_version", "11.0");

     // Set other BrowserStack capabilities

     caps.setCapability("project", "First Java Project");

     caps.setCapability("build", "browserstack-build-1");

     caps.setCapability("name", "first_test");


     // Initialize the remote Webdriver using BrowserStack remote URL

     // and desired capabilities defined above

        AndroidDriver<AndroidElement> driver = new AndroidDriver<AndroidElement>(

         new URL("http://hub.browserstack.com/wd/hub"), caps);

        // Test case for the BrowserStack sample Android app.

        // If you have uploaded your app, update the test case here.

        AndroidElement searchElement = (AndroidElement) new WebDriverWait(driver, 30).until(

            ExpectedConditions.elementToBeClickable(

             MobileBy.AccessibilityId("Search Wikipedia")));

        searchElement.click();

AndroidElement insertTextElement = (AndroidElement) new WebDriverWait(driver, 30).until(

             ExpectedConditions.elementToBeClickable(

              MobileBy.id("org.wikipedia.alpha:id/search_src_text")));

        insertTextElement.sendKeys("BrowserStack");

        Thread.sleep(5000);

        List<AndroidElement> allProductsName = driver.findElementsByClassName(

         "android.widget.TextView");

        assert(allProductsName.size() > 0);

        // Invoke driver.quit() after the test is done to indicate that the test is completed.

        driver.quit();

}

}
You are now ready to run your first Appium test on BrowserStack. On your local machine, open the terminal/command prompt and navigate to the folder containing your test script. Build and run the test script just like any other Java program using your project’s preferred build tools (E.g. Maven, Gradle).
# Using Maven

mvn test -P <android-first-test>
After executing the test case you can view the results on the BrowserStack dashboard.
That’s how it works.
Troubleshooting Errors and Common Problems in Appium Script
Even with a well-configured setup, Appium scripts can run into various issues, ranging from configuration errors to platform-specific bugs. Below are some of the most common problems and tips on how to resolve them:
- Session Not Created Exception: This often occurs due to an incorrect Appium server URL, mismatched desired capabilities, or an outdated automation engine. Double-check the deviceName, platformVersion, and automationName in your desired capabilities.
- App Not Installed: This error usually means the app path provided is incorrect, or the device lacks the necessary permissions. Make sure the app file exists, is accessible, and has the correct extension (.apk or .ipa).
- Element Not Found: Caused when the locator used in the script does not match any UI element. This may be due to dynamic elements, delays in rendering, or incorrect locator strategies. Use Appium Inspector or UIAutomator Viewer/Xcode’s Accessibility Inspector to verify locators.
- Stale Element Reference Error: This happens when the DOM or UI has refreshed after locating an element. Re-locate the element before interacting with it, especially after navigation or reload events.
- Appium Server Crashes or Freezes: Can be caused by mismatched driver versions, memory issues, or unsupported configurations. Ensure you’re using compatible versions of Appium, drivers (UIAutomator2/XCUITest), and platform SDKs.
- Inconsistent Behavior Across Devices: UI elements may behave differently on various screen sizes, OS versions, or manufacturers. Use conditional waits and avoid hardcoded delays. Also, validate functionality on a range of devices during test planning.
- Port Already in Use Error: If Appium server fails to start, another process may be using the default port (4723). Either stop the conflicting process or start Appium on a different port using the –port flag.
Conclusion
Appium is a reliable choice for automating mobile app testing across platforms. It supports native, hybrid, and web apps, works with popular programming languages, and doesn’t require modifying your app. Whether you’re testing on Android or iOS, Appium offers the flexibility to build robust, maintainable test suites.
To take your Appium tests further, run them on real devices with BrowserStack. You get instant access to a wide range of Android and iOS devices, fast debugging through video and logs, and seamless integration with your CI pipeline. This helps you catch device-specific bugs early, improve test coverage, and release confidently across real user environments.
Useful Resources for Appium
Tutorials
- How to perform Parallel Test Execution in Appium?
- Appium Visual Testing: The Essential Guide
- How to run Appium iOS Tests on Real Devices?
- How to perform Debugging in Appium
- How to Run Your First Appium Test Script
- How to report bugs in Appium UI Testing?
- How to run Appium Tests on macOS?
- XPath in Appium: Tutorial
- How to Analyze Appium Logs
- How to perform Drag and Drop using Appium
- How to test mobile app in Landscape or Portrait mode using Appium
- How to Run Same Script in Multiple Devices using Appium
- How to change Time Zones for Mobile App Testing using Appium
- How to Perform Localization of Mobile Apps using Appium
- What is Appium Inspector? (Benefits & How to Use it?)
- How to run Appium tests on Android devices
- How to scroll down to an element in Appium
- How to Download and Install Appium
- How to set up your Appium Grid
- How to test Biometric authentication using Appium?
- How to use touch actions in Appium?
- How to Automate a Real E2E User Flow involving App and Browser with Appium
- How to Inspect Element using UIAutomatorViewer in Appium
- How to Test Flutter Apps Using Appium Automation
- Understanding Appium Desktop: Tutorial
- Appium Tutorial for Mobile Application Testing
- React Native and Appium Tutorial
- Understanding FindElements in Appium
Best Practices, Tips, and Tricks
- Appium Best Practices Every Developer Must Know
- Effective Locator Strategies in Appium
- Top Appium Commands every Developer must know
- Desired Capabilities in Appium
- Overcoming Top Challenges faced in Appium Automation
Getting Started with
- Getting Started with Appium and NUnit framework
- WebdriverIO Tutorial: Getting started with Test Automation using Selenium and Appium
- Appium with Python: Getting Started with App Automation Testing
- Appium with Java: Getting Started to Run Automated Tests
- Test Windows Desktop App using Appium-Compatible WinAppDriver
Differences and Comparisons


