This blog post was originally published in Wehkamp's Engineering blog.
We run an online store and that’s pretty cool. This means moving fast and making use of the latest and greatest technologies and methods. It also has drawbacks, including (ironically, given the previous sentence) Internet Explorer 11.
So what’s the problem? Well, IE11 is wonky. It can break your site easily while other browsers are fine. But we still need to support it because quite a substantial amount of our customers use it.
At Wehkamp, we rely heavily on automated testing. But because of our preferred tooling and the way our platform is setup, we can only test in Chrome at the UI level. So, let’s solve that.
WebdriverIO & BrowserStack
In order to automate IE11, my only option was basically Selenium.
'Just' Selenium is a bit too barebones for my taste so I decided to go with WebdriverIO. It gives us a nice framework out of the box, including extensibility by means of plugins and services such as the BrowserStack integration and a visual-regression-service plugin.
We’re going to use visual regression to see what IE11 makes of our site. There’s no point in running our complete UI test-suite through IE11 again. We already cover that in Chrome, and 99% of the time we could tell by just looking at IE11 that some functionality is broken.
We’re using BrowserStack because our AWS platform runs everything in docker containers. Docker and IE11 is no dice, so BrowserStack is going to be our provider of IE11 in the cloud. Added benefit is that it comes with all kinds of other browsers (including mobile and tablet).
Initial setup
This blog will focus on BrowserStack and the visual regression part of things. I assume that prerequisites like installing NodeJS, NPM, WebdriverIO, etc. are all already done.
If you installed webdriverIO correctly, there already is a wdio.conf.js file in the install directory. This is where we’re going to make some changes.
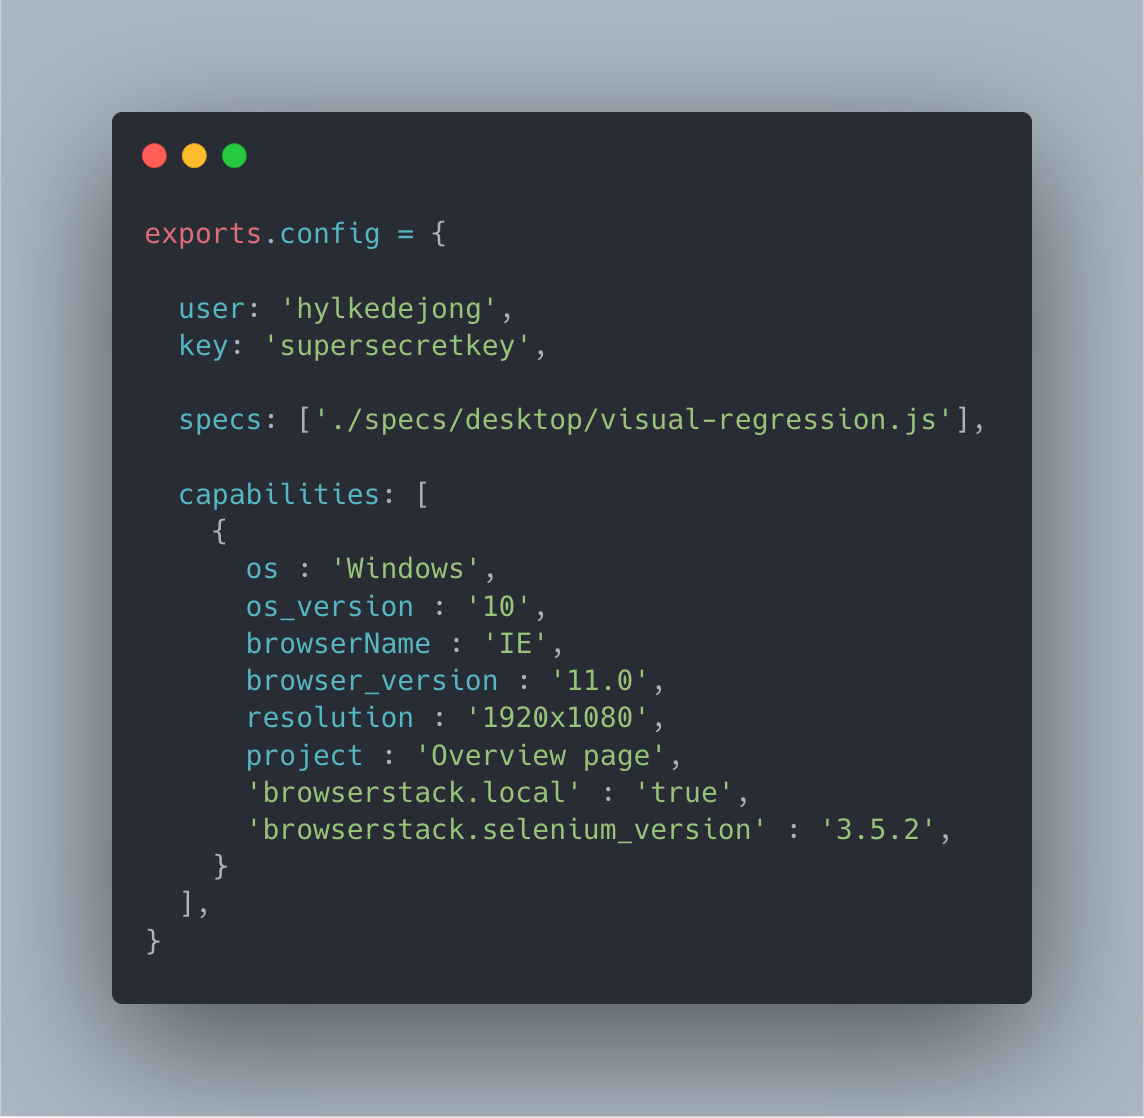
First thing to add is the BrowserStack username and key so we can connect to BrowserStack. You can find these in your BrowserStack account settings. We’re also going to add the path to our spec file (where the actual test is defined), and define that we want to run our test in IE11.
Next up, write a little test to see if it all works.
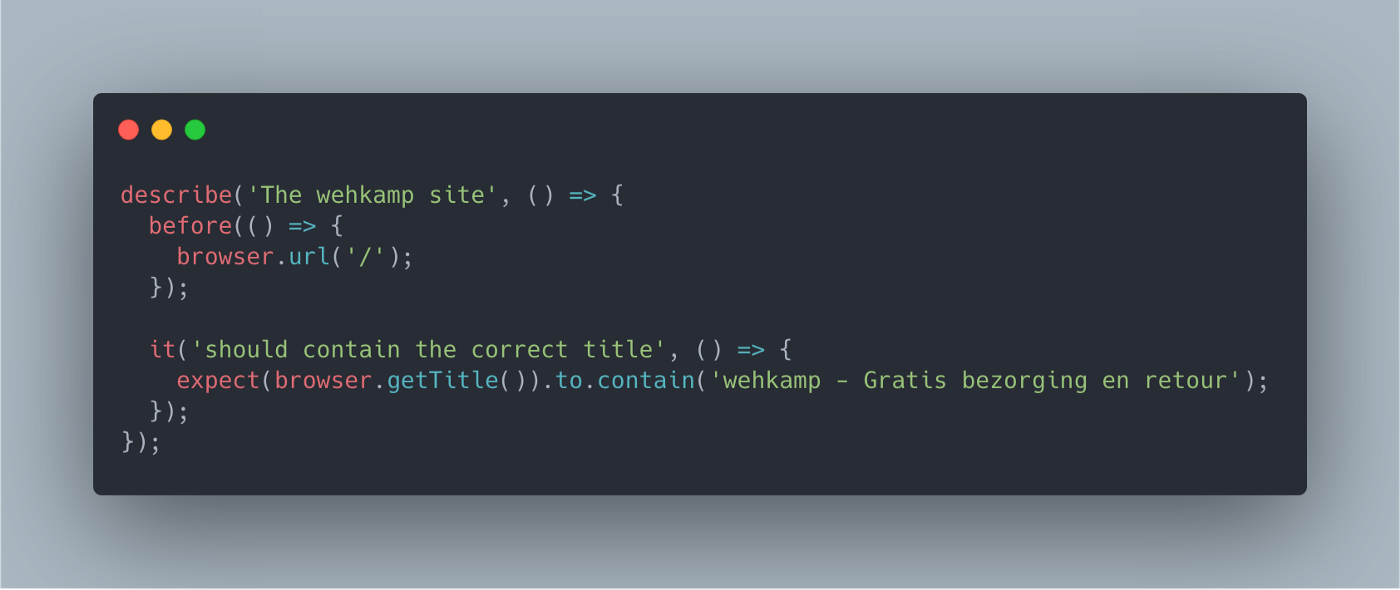
Pretty basic: visit wehkamp.nl (defined as baseUrl in wdio.conf.js) and check if the title contains a certain phrase. Let’s run it.
Now that we’re able to run automated tests in IE11, let’s start with creating some actual useful tests. As stated in the intro, we’re going to use visual regression to determine whether or not our site performs sufficiently or not. Before everyone gets all rattled up: yes I know visual testing is not the same as functional testing and yes I know that one can’t replace the other. However, I happen to have a lot of experience with the product under test. I know that you can immediately tell when something is broken in IE11, even functionality, by just looking at it.
wdio-visual-regression-service
WebdriverIO supports a lot of things right off the bat, but if you miss something you can extend functionality with the help of services. These are just NPM packages that you can configure through the wdio.conf.js file we’ve already used earlier. We’re going to use the wdio-visual-regression-service.
$ npm install wdio-visual-regression-service
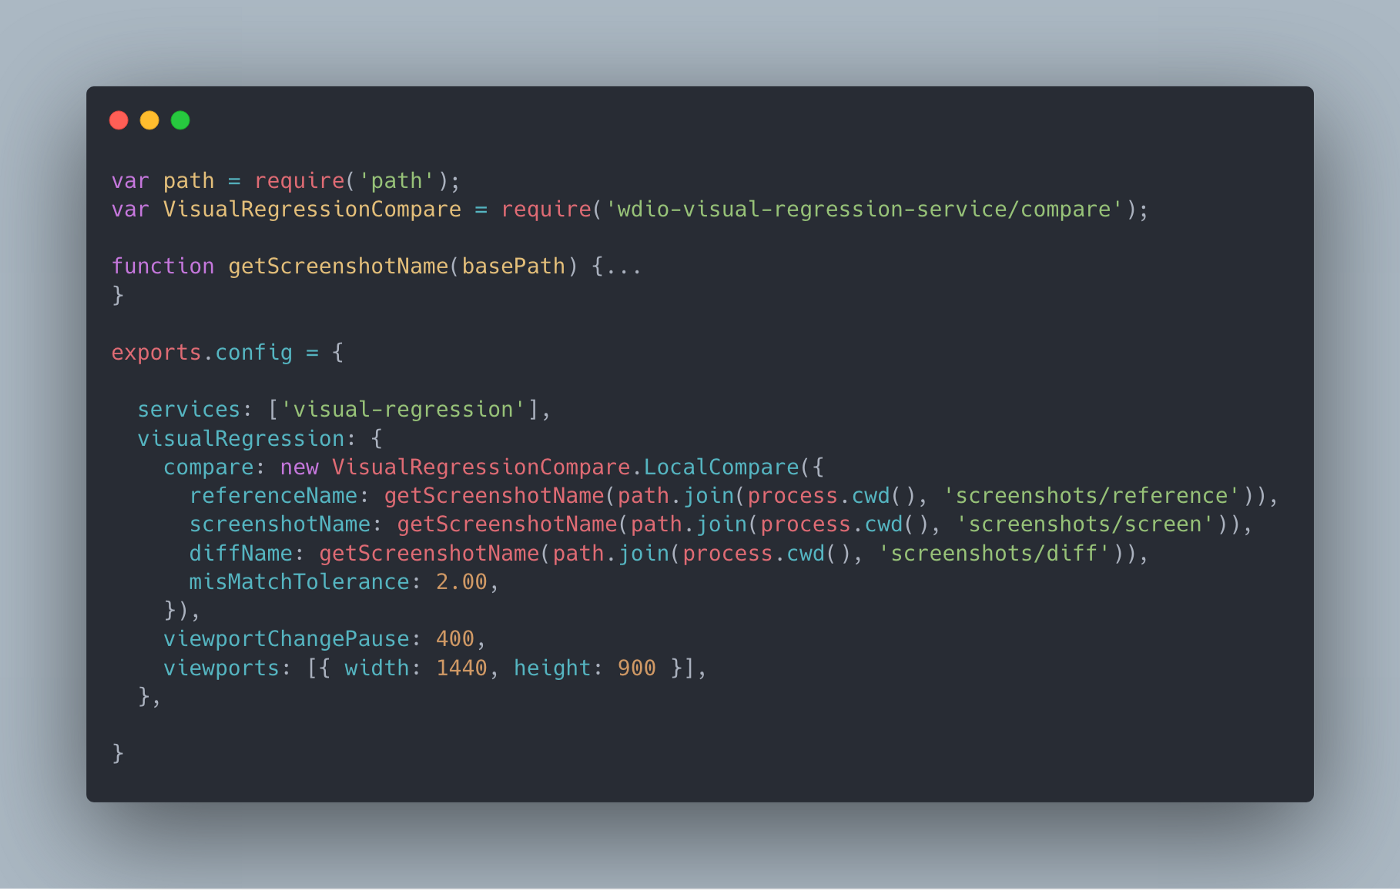
Next up, we need to define the service and its options in wdio.conf.js.
For the exact ins and outs of everything please check the README at the wdio-visual-regression-service GitHub repo.
Most of it is pretty self-explanatory. We have a function that takes care of naming each screenshot in a unique way. You can define some screenshot paths and set the mismatch tolerance percentage. Since visual testing is very sensitive (1 pixel can make your test fail), you can define how much of a mismatch is still allowed. Other important thing is the viewports array. Here you can define the different screen sizes you want to test. This is especially useful when testing responsive websites.
In this example there is only one viewport specified, but you can enter multiple screen sizes and the test will run all of them.
So that’s the config, now on to the actual test.
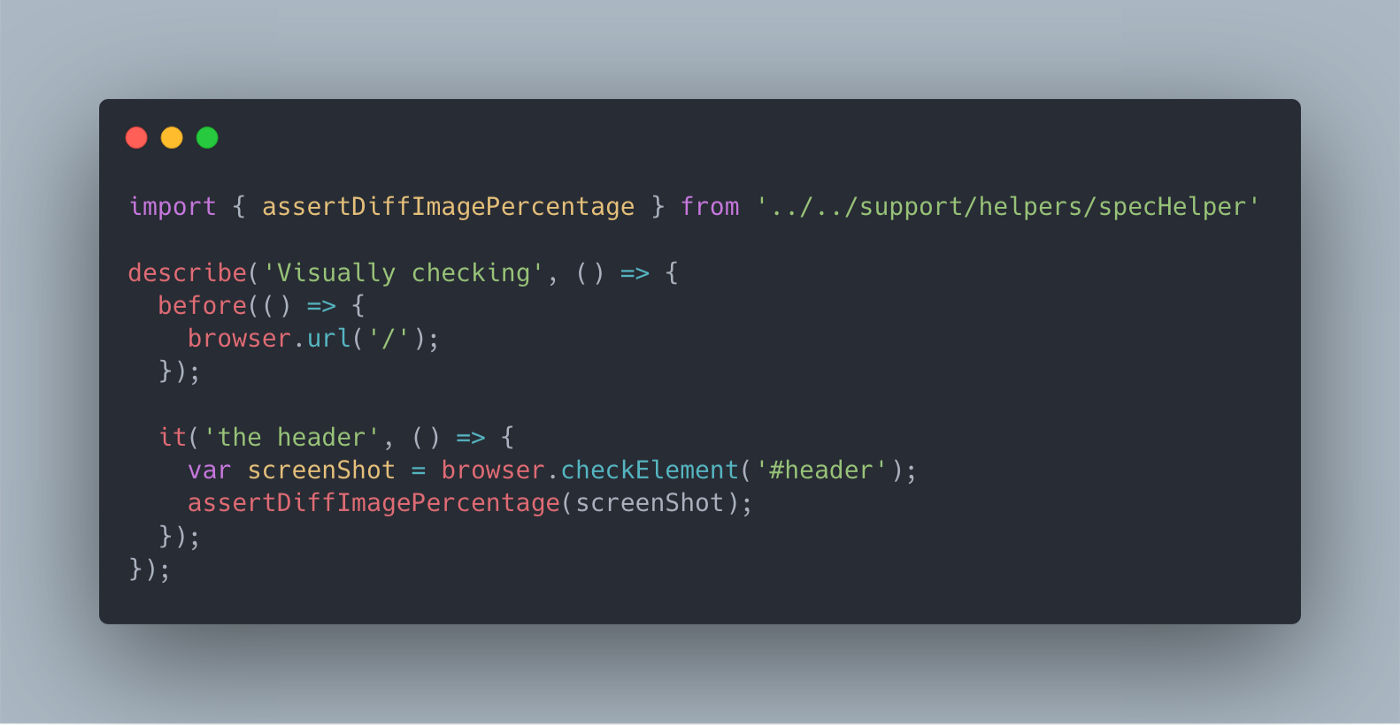
So what is happening here? First we import a helper function (more on that later) that asserts whether or not two screenshots are the same. It also takes the mismatch percentage we’ve set in the config into account. In the actual test we define a variable screenShot which we pass along to that function. The screenshot uses the checkElement command which means that we don’t check the whole page, but (in this case) just the header. Again, for more details, please see the README at the wdio-visual-regression-service GitHub repo.
Below is the test output.
[IE 11.0 Windows 10 #0-0] Spec: /work/specs/desktop/visual-regression.js
[IE 11.0 Windows 10 #0-0] Running: IE (v11.0) on Windows 10
[IE 11.0 Windows 10 #0-0]
[IE 11.0 Windows 10 #0-0] Visually checking
[IE 11.0 Windows 10 #0-0]   ✓ the header
[IE 11.0 Windows 10 #0-0]
[IE 11.0 Windows 10 #0-0]
[IE 11.0 Windows 10 #0-0] 1 passing (32s)
[IE 11.0 Windows 10 #0-0]``
The test passed first time around. The thing is, it always passes the first time you run it. The reference directory was still empty when we ran the test. So we didn’t have a reference screenshot yet for making a comparison. What we actually did when running the test for the first time, is creating a reference screenshot. Now that we have that we can run the test again and have it actually check something.
In order to assert the different screenshots against the reference images, I created a couple of helper functions.
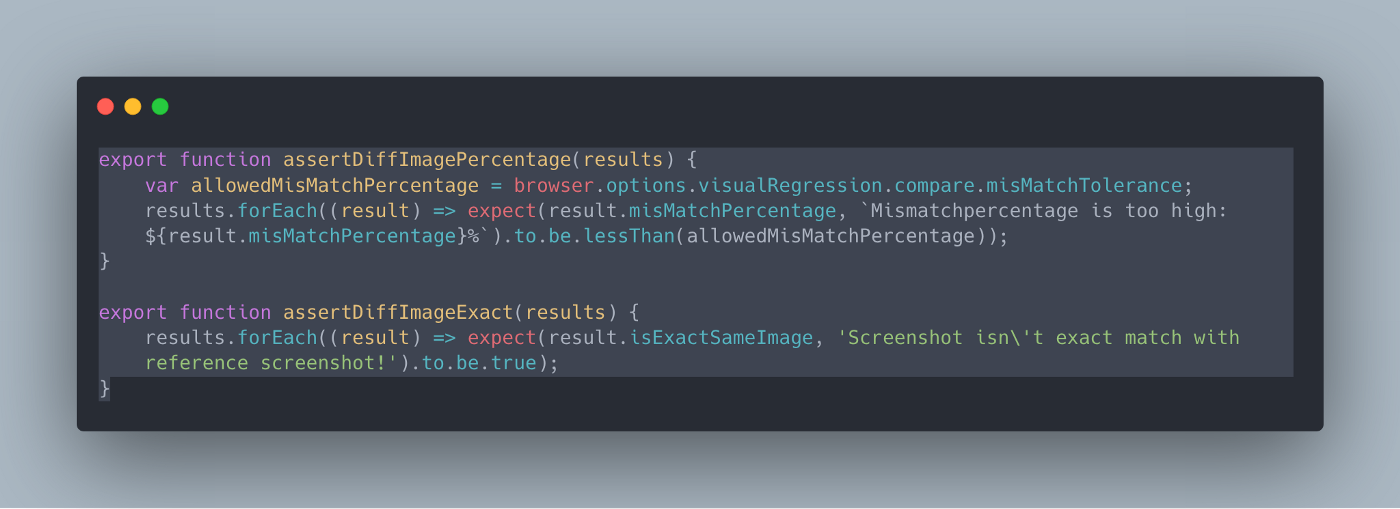
The first one compares the reference screenshot against the actual screenshot and takes the mismatch tolerance percentage we’ve set in wdio.conf.js into account. The second function also does a compare but expects to have a 100% match, or the test will fail. Both can take either one element or an array of elements as input (hence the .forEach), since it’s possible that a selector returns multiple elements. Just to show you the difference between these two, I created a test that runs both assertions.
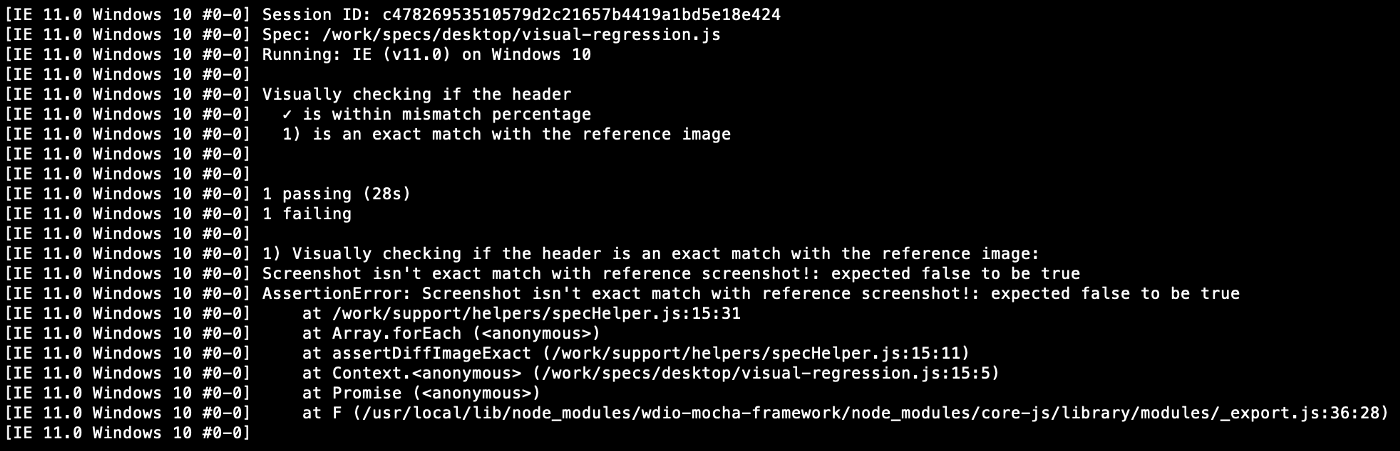
One test passed and one test failed. Apparently the taken screenshot is within the mismatch tolerance, but it’s not an exact match. When we log the screenShot variable to the console we can actually see what is going on.
isWithinMisMatchTolerance: true,
isSameDimensions: true,
isExactSameImage: false } ]``
Here we can see the different properties we can work with. Although the reference screenshot and the compare screenshot were taken minutes apart, there is a mismatch of 0.34%. For our first assert this is fine, since this is well within the mismatch tolerance of 2% we’ve set in the config. But the other test fails because the images are not an exact match. This goes on to show how sensitive visual regression testing really is.
Like I said before, the reference and the compare images are taken on the same platform, on the same OS, in the same browser with just minutes apart. And yet, there is a small mismatch because of rendering or aliasing. In order to prevent false positives, you’d probably want to configure a (small) mismatch tolerance percentage. How big or small depends entirely on what you’re checking and what you’re trying to accomplish with your tests.
Hylke de Jong works at wehkamp.nl. It's one of the largest e-commerce companies of Netherlands. 🇳🇱
Recommended: