Appium is a powerful open-source tool for automated testing of mobile applications. It supports both native and hybrid apps. When paired with Python, a versatile and popular programming language, Appium becomes an even more efficient solution for developers and testers seeking to streamline their testing workflows.
By integrating with BrowserStack App Automate, users can execute tests on real Android devices, further enhancing the testing process. This combination allows users to write clear, concise test scripts, harnessing the full potential of Appium’s capabilities while leveraging Python’s simplicity and the robust features of BrowserStack’s cloud-based platform.
This article explores getting started with app testing in Appium using the Appium-Python-Client and demonstrates how to use Python effectively with Appium. It also covers leveraging BrowserStack App Automate to execute tests on real Android devices.
Getting Started with App Testing in Appium Python using Appium-Python-Client
Consider testing the Android app “Notes” using Appium Python as an example. Testing on real Android devices can be achieved by integrating Appium Python tests with BrowserStack App Automate.
How to use Python with Appium?
Follow the Pre-requisite steps below and download Appium Python Client to use Python with Appium. Once you follow the below pre-requisite you can do mobile automation using Appium.
Prerequisites
- Install Python3
- Download the Appium Python client. Using the pip package installer would be the most efficient method for this. Simply use the following command:
pip install Appium-Python-Client
- Download Appium Inspector for your OS. Previously this was included with the Appium desktop; however, it must now be downloaded separately.
- Download git for your OS.
Here are the steps to run your first Appium test using Python –
Step 1: Create a BrowserStack account and use the free trial, which offers 100 minutes of free automated mobile app testing.
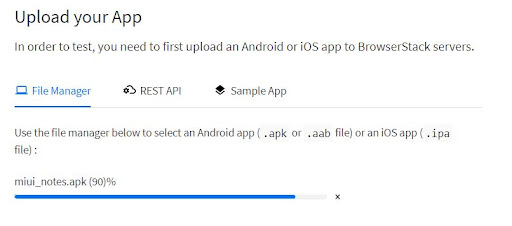
Step 2: For this example, the miui notes apk file (version 2.3.7) was used. The apk file of the app being tested needs to be uploaded to BrowserStack.
The apk file of the app can be uploaded either via the REST API or via file manager.
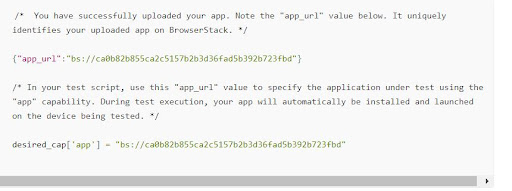
Step 3: Once the app is successfully uploaded, the user will be provided with an app_URL which needs to be noted and used later to set our desired capabilities.
Step 4: Open git bash at your desired location and use the following command:
git clone https://github.com/BrowserStack/python-appium-app-BrowserStack
This command clones the sample python repository provided by BrowserStack and provides an example python code snippet that can be directly edited.
Step 5: Navigate to the android folder in the repository and open the BrowserStack_sample.py file.
Step 6: First, import the necessary packages.
from appium import webdriver
from appium.webdriver.common.appiumby import AppiumBy
import time
Webdriver needs to be imported because Appium speaks the same protocol as Selenium, the WebDriver protocol. Following this, AppiumBy will be imported as well since it will be used later in the program to locate elements. Time needs to be imported next in order to execute commands after the app has loaded.
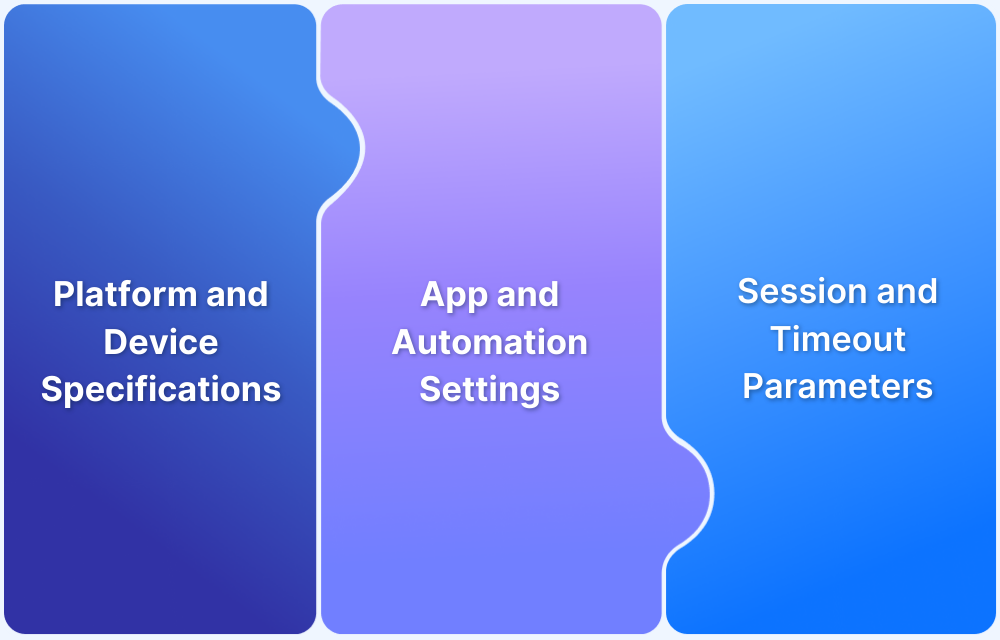
Step 7: Desired capabilities need to be set next. They are key-value pairs encoded into a JSON object. These will be sent by Appium Clients to the server and provide information to it on how you want your test to work.
desired_cap = {
# Set your access credentials
"browserstack.user" : “YOUR_BROWSERSTACK_USERNAME”,
"browserstack.key" : “YOUR_BROWSERSTACK_ACCESS_KEY”,
# Use the unique URL to specify the app to be downloaded
"app" : "bs://ca0b82b855ca2c5157b2b3d36fad5b392b723fbd",
# Provide device specifications
"device" : "Xiaomi Redmi Note 8",
"os_version" : "9.0",
# grant permissions automatically and accept any pop up alerts
"autoGrantPermissions":"true",
"autoAcceptAlerts":"true",
#Specify the project, build, and name
"project" : "Test Python project",
"build" : "BrowserStack-build-1",
"name" : "notes_app_test"
}
So here, the user needs to provide access credentials and the unique URL provided earlier when the apk file was uploaded.
Simply click on Access Key in the toolbar at the top of the screen upon logging into BrowserStack to obtain the user and key values.
Following this, device specifications need to be provided, and permissions need to be auto granted for any permission or alert pop-ups that may interfere with the test automation. For this example, the device specified was Xiaomi Redmi Note 8, and the OS was Android 9.0.
Finally, the project, build, and name can be specified. Utilize the BrowserStack desired capabilities builder for ease of use.
Read More: Desired Capabilities in Appium
Step 8: Initialize the WebDriver.
driver = webdriver.Remote(
command_executor="http://hub-cloud.BrowserStack.com/wd/hub",
desired_capabilities=desired_cap
)
Use the BrowserStack remote URL and the defined desired capabilities to initialize the WebDriver.
Step 9: Find and use locators to navigate and automate the app in order to test its functionality. Refer to the next section of this guide: “How to use Appium Inspector to find Element Locators” for an example of how to use Appium Inspector to find locators for elements.
time.sleep(5)
el_createnote = driver.find_element(AppiumBy.ACCESSIBILITY_ID,'Tap to create a text note. Press and hold to create a voice note. Release the button to stop recording and create the note, or slide up to cancel.')
el_createnote.click()
el_notetitle = driver.find_element(AppiumBy.ID,'com.miui.notes:id/note_title')
el_notetitle.click()
el_notetitle.send_keys("Watch Later")
el_note = driver.find_element(AppiumBy.ID,'com.miui.notes:id/rich_editor')
el_note.click()
el_note.send_keys("Naruto"+"\n"+"WandaVision"+"\n"+"The Little Mermaid")
back=driver.find_element(AppiumBy.ID,'com.miui.notes:id/home')
back.click()
driver.quit()
Give time for the app to initialize and accept any pop-ups. For this example, Accessibility ID and ID have been used for locators. However, there are several other locators which can be used.
Read More: Locators in Appium
First, the code snippet uses the Accessibility ID of the “+” button to create a new note. Following this, it clicks on the title bar, locating it by ID, and adds a title of “Watch Later” to it. It repeats this process on the text body and enters a list of shows the user wants to note and watch later. After this, it goes back to the home screen of the app, saving the note, and then disconnects from the remote BrowserStack URL.
Step 10: Open command prompt or Linux shell from the location of the python file. Run the file using the following command:
python3 BrowserStack_sample.py
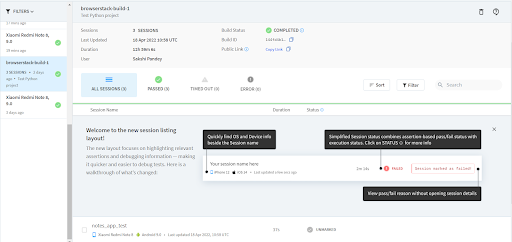
Step 11: Navigate back to BrowserStack, and in App Automate under browserstack-build-1 there will be a notes-app-test.
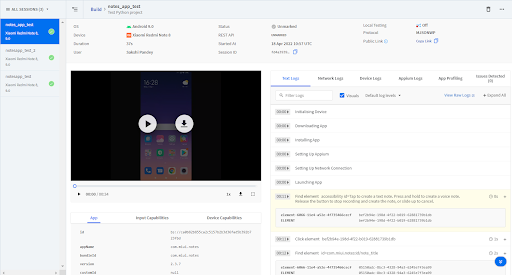
Clicking on this test will lead to the dashboard.
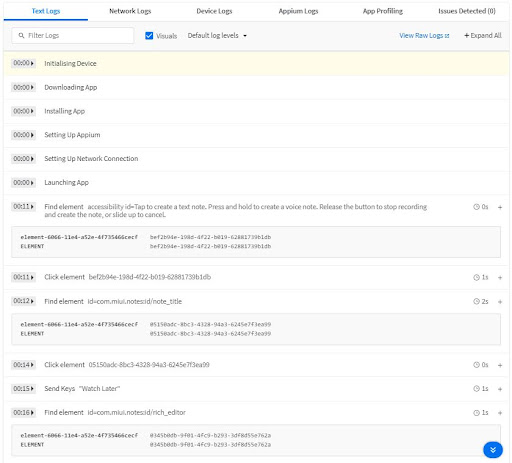
This window displays the user’s test results in a video format on the left. A log can be seen to the right of the screen; This shows a log of each event that took place during the test automation.

How to use Appium Inspector to find Element Locators in Appium Python: Example
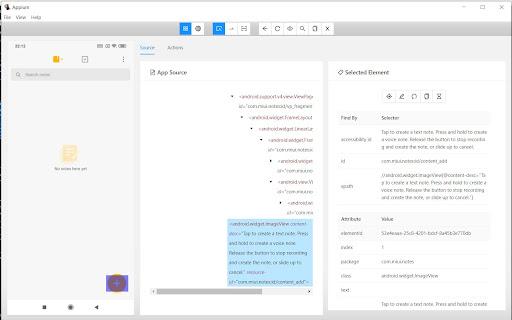
Appium Inspector is an Appium Client which allows the user to connect to a large variety of cloud Appium platforms. It further allows the user to select and interact with elements, providing a list of element locator strategies, which can be used in their automation and testing scripts.
Step 1: Open Appium Inspector and select BrowserStack from the cloud providers available.
Enter your previously obtained Username and Access Key, as well as the desired capabilities in JSON; Start the session.
Step 2: Locate the elements needed to automate and test the app. Note their XPath, IDs, or their accessibility IDs. These locators can be used to find elements and test/automate an application in Appium with Python.
In the previous section “Testing a Notes app by Integrating with BrowserStack: Example” a new note was created by using the Accessibility ID locator to find and click on this element; As demonstrated in the code snippet from the aforementioned example:
el_createnote = driver.find_element(AppiumBy.ACCESSIBILITY_ID,'Tap to create a text note. Press and hold to create a voice note. Release the button to stop recording and create the note, or slide up to cancel.')
el_createnote.click()
Similarly, other locators used in the example, such as the ID locator for the Title bar, were also found using Appium Inspector.
Test Results
As seen in the video, the test automation ran successfully with no errors, indicating that the app is fully functional.
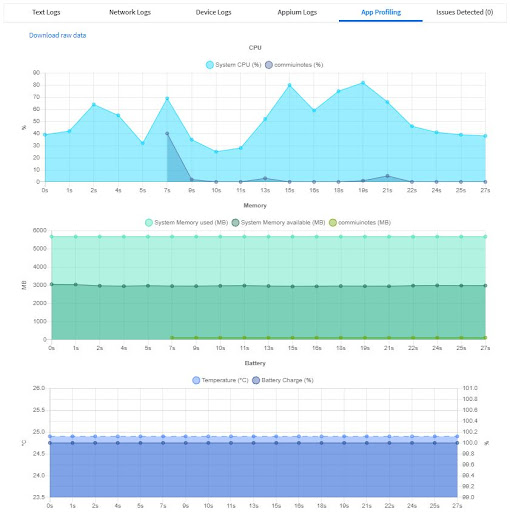
The text logs and app profiling provided by BrowserStack give insight into how the test ran and allow the user to optimize CPU and memory usage, as well as unearth any errors or issues with the apk.
Read More: Features of BrowserStack App Automate
Conclusion
Combining Appium with Python provides a powerful, flexible approach to mobile app automation testing. By integrating these tests with BrowserStack App Automate, teams can easily execute their test scripts on a wide range of real Android devices without needing an in-house device lab.
This setup improves test coverage and reliability and accelerates the overall testing process, helping teams deliver higher-quality applications faster. With the right tools and setup, mobile app testing becomes more scalable, efficient, and effective.


