Developers and testers must validate their iOS apps (.ipa files) across various iPhones and iPads running different iOS versions to ensure they are bug-free before App Store release.
While Xcode simulators and personal devices are commonly used, testing this way is time-consuming and often inefficient. Installing .ipa files via Xcode on specific devices or iOS versions can be cumbersome and effort-intensive.
This article addresses these challenges by demonstrating easy methods to install .ipa test files on real iPhones and iPads for thorough iOS app testing.
What are IPA files
An IPA (iOS App Store Package) file is an archive used to install apps on Apple devices like iPhones and iPads; it contains the compiled code, assets, and metadata of the app.
It is the standard format for distributing iOS apps both through the App Store and for internal testing.
How to Install test IPA files on iPhone and iPads
Here are the various methods used to install test IPA files on iPhone and iPads
- Using App Live
- Install IPA File Using Apple Configurator 2
- OTA (Over-the-Air) Deployment
- Installing IPA Files Using iTunes
1. Using App Live
BrowserStack is a cloud-based testing platform that empowers developers / QAs to test iOS apps on real devices at scale. Its real device cloud comprises the latest and legacy versions of iPhones and iPads (iPhone 6, iPhone X, iPhone12, iPad Pro, etc.) running on distinct iOS versions.
Follow the steps below to install .ipa test files on the desired iPhone or iPad:
1. Signup for a free trial or purchase a specific plan for Browserstack App-Live.
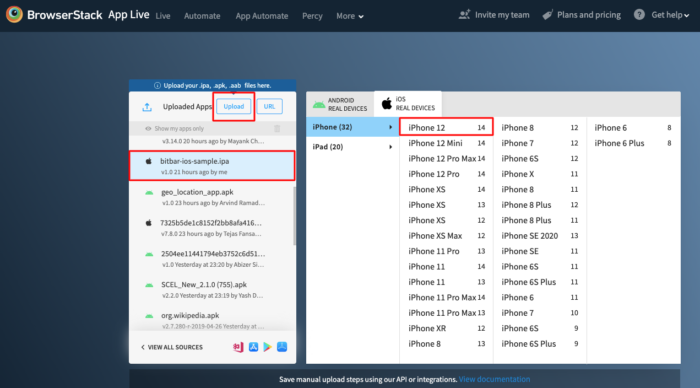
2. Once the App-live dashboard opens up, click on the Uploaded apps section.
3. Click on the Upload button and upload the .ipa file to be tested.
4. Select the desired Apple handset to test the app on. (Let’s consider the iPhone 12 in this example). Refer to the image below for more clarity on the process.
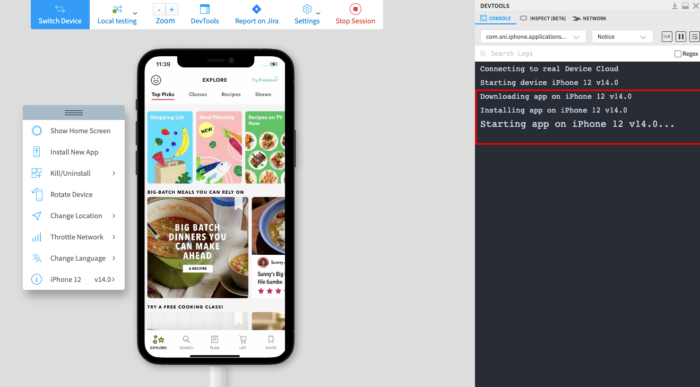
5. Clicking on the desired handset will initiate a new App-Live session on the desired handset.
6. The selected .ipa file is downloaded and installed on the chosen device (iPhone 12) once the session begins. Refer to the image below:
That’s how easily developers or QAs can install and run an ipa file on real iPhones or iPads for testing purposes. All tests on BrowserStack are conducted in real user conditions – actual iPhones or iPads hosted on a private cloud.
Developers and QAs can also leverage the following features for app testing:
1. Device rotation to view the app’s appearance in Portrait and Landscape mode.
2. Geolocation Testing for testing websites from different geographic locations.
3. Network throttler for simulating poor network conditions.
Note: Developers or QAs seeking to test use cases or features covered under iOS entitlements like Push Notifications, Keychain Sharing or Data Protection, etc., need to ensure that their iOS app is signed with an Enterprise Distribution Certificate.
Apps that are signed with a Developer Certificate won’t be able to support Entitlement testing. Learn about the difference between Enterprise and Developer Certificate.
2. Install IPA File Using Apple Configurator 2
Here’s a step-by-step guide to install an IPA file using Apple Configurator 2 :
Prerequisites
- A Mac with Apple Configurator 2 installed
- An IPA file you want to install
- A USB cable to connect your iPhone or iPad
- Your iPhone/iPad
Steps
Step 1: Install Apple Configurator 2
- Open the Mac App Store.
- Search for Apple Configurator 2.
- Click Get > Install.
Step 2: Connect Your iOS Device
- Plug your iPhone or iPad into your Mac via a USB cable.
- Unlock the device and keep it on the home screen.
Step 3: Open Apple Configurator 2
- Launch Apple Configurator 2.
- Your connected iOS device will appear in the main window.
Step 4: Install the IPA File
- Drag and drop the IPA file onto your device’s icon in Apple Configurator 2.
Step 5: Wait for Installation to Complete
- Apple Configurator will begin installing the app.
- Once done, the app will appear on your device’s home screen.
3. OTA (Over-the-Air) Deployment
Step 1: Create the Manifest (.plist) File
This file tells the iOS device where to find the IPA and provides app details.
<?xml version="1.0" encoding="UTF-8"?>

<!DOCTYPE plist PUBLIC "-//Apple//DTD PLIST 1.0//EN" "http://www.apple.com/DTDs/PropertyList-1.0.dtd">

<plist version="1.0">

<dict>

  <key>items</key>

  <array>

    <dict>

      <key>assets</key>

      <array>

        <dict>

          <key>kind</key>

          <string>software-package</string>

          <key>url</key>

          <string>https://yourserver.com/path/to/yourapp.ipa</string>

        </dict>

      </array>

      <key>metadata</key>

      <dict>

        <key>bundle-identifier</key>

        <string>com.yourcompany.yourapp</string>

        <key>bundle-version</key>

        <string>1.0</string>

        <key>kind</key>

        <string>software</string>

        <key>title</key>

        <string>Your App Name</string>

      </dict>

    </dict>

  </array>

</dict>

</plist>
The ipa file and plist file must be hosted on an HTTPS server.
Step 2: Host Files on a Secure Server
- Upload the .ipa file and .plist file to a public HTTPS server (or use AWS S3, Firebase Hosting, etc.).
- Ensure both files are accessible via a browser.
Step 3: Generate an Installation Link
Use this URL format to generate an installation link:
itms-services://?action=download-manifest&url=https://yourserver.com/path/to/manifest.plist
For Example:
itms-services://?action=download-manifest&url=https://example.com/yourapp.plist
Step 4: Open the Link on iOS Device (in Safari Only)
- Copy and paste the itms-services:// link into Safari on the iPhone/iPad.
- Tap Install when prompted.
- The app will begin downloading and appear on the home screen.
4. Installing IPA Files Using iTunes
Installing IPA (iOS App Store Package) files using iTunes used to be a straightforward process before Apple deprecated the App Management feature in iTunes 12.7. However, there are still ways to install IPA files using iTunes, depending on your version. Here’s how:
Steps:
- Uninstall your current iTunes version (if it’s a newer version)
- Download iTunes 12.6.5.3 from the Apple support page.
- Install iTunes 12.6.5.3.
- Connect your iPhone/iPad to your computer.
- Open iTunes and drag-and-drop the .ipa file into the Library or “Apps” section.
- Select your device and go to the “Apps” tab.
- Click Install next to the app, then Apply to sync.
Note: iTunes 12.6.5 is an older version released by Apple that retains App Management. It’s still available from Apple’s support site. However, it is not recommended for general use due to lack of updates.
Best Practices for IPA Installation on iPhone
- Use a properly signed IPA file to ensure the app installs and functions properly on the device.
- Ensure HTTPS hosting when using OTA (Over-the-Air) deployment, as iOS blocks non-secure installations.
- Trust the developer profile manually in device settings after sideloading to allow the app to launch.
- Use Apple ID credentials cautiously and only with reputable tools to avoid account security risks.
- Keep provisioning profiles updated to prevent apps from expiring or becoming unlaunchable.
- Use trusted tools such as Apple Configurator 2, BrowserStack App Live, etc.
Conclusion
Testing iOS apps across diverse iOS versions and handsets is mandatory to achieve necessary test coverage. Without a cloud-based testing platform like BrowserStack, QAs have to depend on extensive on-premise device labs with the latest and legacy versions of Apple devices. Needless to say, setting up such a lab requires huge investment and is not a feasible solution for small or medium-scale enterprises.
Here’s where adopting platforms like BrowserStack App Live becomes an effective solution for teams or individual testers. Simply sign up for free -> upload the .ipa file -> choose an iPhone or iPad -> start testing. Testers do not need to worry about complex setups or configurations.


