The popularity of mobile devices has only increased with time, thereby making users even more dependent on native mobile apps. With this growing demand, modern native apps provide rich, intuitive user interfaces delivering complex functionalities across multiple user workflows. These workflows involve secure data exchange between the native app on the device and the app’s backend servers in real-time.
Mobile native app’s backend servers establish a secure “two-way communication channel” with the native app to meet the compliance requirements for a reliable information exchange mechanism. In the client-server world, this secure communication is achieved by configuring HTTPS certificates for the backend servers. These HTTPS servers usually have a chained SSL certificate signed by a trusted third-party vendor i.e. a public Certificate Authority (CA) like Verisign, Go Daddy, Entrust etc. The “issuing public certificates” for such known third-party vendors are pre-configured on Android or iOS real devices by device manufacturers. Hence, the native app is able to securely communicate with the app’s backend servers using such public CA certificates, without any other additional steps.
However, most app developers or companies involved in native app development use custom self-signed SSL certificates on their staging HTTPS test servers. In some cases, they may be using a self-signed certificate on production servers as well. Such native apps require the backend server's custom SSL certificate explicitly installed and trusted on the real device. Without this step, the app would not be able to communicate securely with the backend server. This blog post outlines a unique approach to validate the backend server’s custom SSL certificate at runtime wherein the certificate validation process becomes an intrinsic part of the app’s core logic. This enables a uniform development and testing approach for such native apps on both Android and iOS.
Certificate Bundling and Pinning
What exactly is Certificate Bundling and Pinning?
App developers can bundle or import the backend server’s custom SSL certificate within the app’s code repository. Once this is done, additional logic can be configured in the codebase to validate the actual self-signed certificate at runtime with the existing bundled certificate in the app. This process is known as 'Certificate Bundling and Pinning'.
High level use cases
We will be covering the below two use cases illustrating the application of ‘Certificate Bundling and Pinning' approach in this blog post.
Use Case 1: App data sync with HTTPS servers: In this use case, the native app makes connection requests to the custom self-signed backend HTTPS server for receiving data or content from it.
Use Case 2: App using UIWidgets like WebView: In this use case, the native app uses UI widgets like a WebView (Android) / WKWebView (iOS) to load custom self-signed backend HTTPS server’s UI pages directly on the app.
Irrespective of the use case, the actual steps to implement “Certificate Bundling” remain the same. The conceptual approach or logic for “Certificate Pinning” also has commonalities across both use cases but the specific code snippets do vary. We will be covering high level implementation details with sample code snippets for both approaches, in the upcoming sections.
How do we achieve Certificate Bundling and Pinning?
Prerequisites
- Before proceeding with “Certificate Bundling and Pinning” in your native app, you need to get hold of the server’s self-signed custom “Root SSL certificate” or self-signed “Root Certificate Authority (CA)” from your Security / Network / Development team.
- This certificate must be in a “DER-formatted” binary encoded file. OpenSSL library can be used to convert the certificate from any format to “DER” format.
Certificate Bundling Steps
The process of bundling or importing the backend server’s custom SSL certificate within the app’s code repository is called ‘Certificate Bundling’.
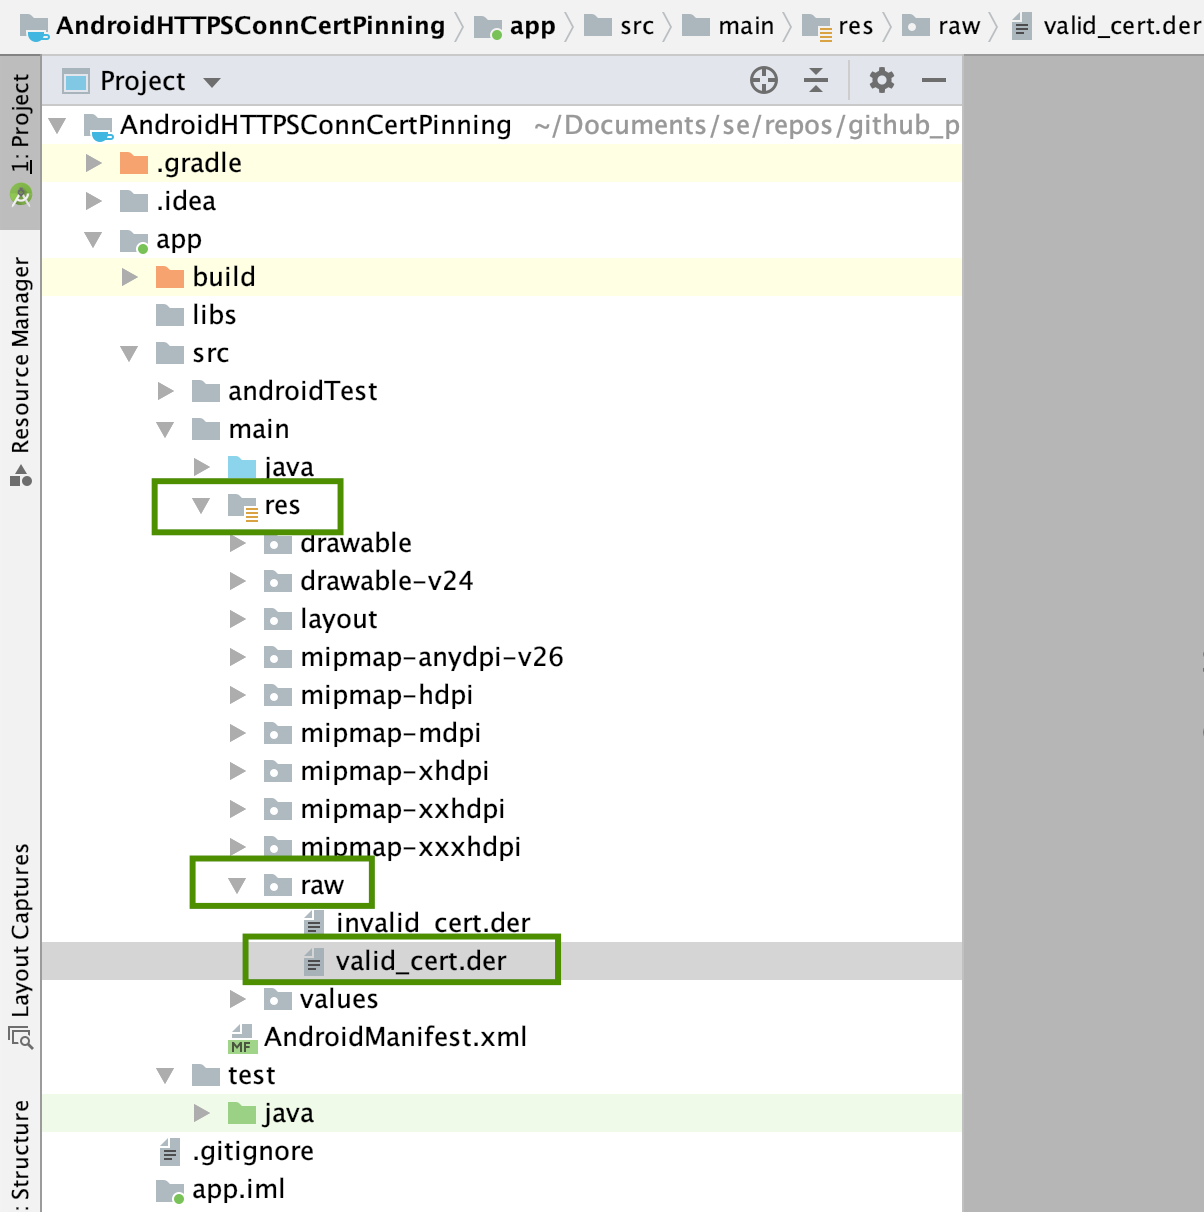
Android: Place the SSL certificate file in the app’s codebase => 'raw’ folder.
iOS: Open your iOS app’s codebase in Xcode. Drag and drop the certificate file from the Finder app to Xcode’s “Products” directory. Select the checkbox besides 'Add to targets' in the next screen and click Finish.


Certificate Bundling Summary
With these simple steps above, you have successfully bundled the server’s custom self-signed SSL certificate in your Android and / or iOS app’s codebase. Next, we will look into the high level steps required for Certificate Pinning.
Certificate Pinning Steps
Once the backend server’s SSL certificate is bundled in the app, it can be used to validate with the actual SSL certificate presented by the backend server at runtime. The network connection request should be allowed only when both certificate’s match. This process of validating the backend server’s certificate at runtime with the bundled certificate in the app is called ‘Certificate pinning'.
Android use case 1: App data sync with HTTPS server
Step 1: Adding the bundled certificate to the Trust store
1 a. Create the certificate object from the certificate file in the bundled 'raw' resource directory
// 1 a. Create the certificate object from the certificate file in the bundled 'raw' resource directory
Certificate bundledSelfSignedCert = CertificateFactory.getInstance("X.509").generateCertificate(getResources().openRawResource(R.raw.valid_cert));
1 b. Add the certificate in the KeyStore
// 1 b. Add the certificate in the keystore
KeyStore keyStore = KeyStore.getInstance(KeyStore.getDefaultType());
keyStore.load(null, null);
keyStore.setCertificateEntry("Test SSL cert", bundledSelfSignedCert);
1 c. Initialise the Trust manager with the KeyStore
// 1 c. Initialize the Trust manager with the keystore to use it further in the SSL context connections.
TrustManagerFactory trustManagerFactory = TrustManagerFactory.getInstance(TrustManagerFactory.getDefaultAlgorithm());
trustManagerFactory.init(keyStore);
SSLContext sslContext = SSLContext.getInstance("TLS");
sslContext.init(null, trustManagerFactory.getTrustManagers(), null);
Step 2: Validate the HTTPS server’s runtime certificate with the bundled certificate
2 a. Existing code in your app for creating a connection
// 2 a. Existing code in your app for creating a connection
final HttpsURLConnection connection = (HttpsURLConnection) new URL(<HTTPS server URL>).openConnection();
2 b. Adding the SSL context to the HTTPS connection
// 2 b. Adding the SSL context created in Step 2a to the HTTPS connection
connection.setSSLSocketFactory(sslContext.getSocketFactory());
2 c. (Optional) Restricting the HTTPS connection to known/valid hostnames
// 2 c. Restricting the HTTPS connection to a specific known hostname. This is not mandatory but highly recommended.
connection.setHostnameVerifier(new HostnameVerifier() {
   @Override
   public boolean verify(String sslHost, SSLSession sslSession) {
     try {
     // validHosts object could be a string or an array containing the list of
     // valid hostnames / ips for your application server domains
       if(validHosts.contains(sslHost)) {
         return true;
       }
     }
     catch (Exception ex) {
       // Handle exception based on your exception handling approach
     }
     return false;
   }
 });
2 d. Pin / Validate the SSL certificate presented by the HTTPS connection with the bundled certificate
 // 2 d. Pin / Validate the SSL certificate presented by the connection with the bundled certificate.
Certificate[] certs = connection.getServerCertificates();
Certificate server_cert = certs[0]; // For simplicity, just validating the server's cert and not entire chain in this documentation

// Bundled SSL cert from Step 1
if(bundledSelfSignedCert.toString().equals(cert[0].toString())) {
 // your code to fetch server response and process further
}
else {
 // Handle exceptions based on your exception handling approach. Example below.
 // throw new Exception("Connection is not honoured. Bundled certificate does not match the certificate in the incoming request.");
}
Android use case 2: App using UIWidgets like WebView
Step 1: Initialise the bundled certificate in your app’s code
private void initBundleCert() throws Exception {
   CertificateFactory certFactory = CertificateFactory.getInstance("X.509");
   InputStream ins = getResources().openRawResource(R.raw.valid_cert);
   X509Certificate cert = (X509Certificate) certFactory.generateCertificate(ins);
   SslCertificate bundledSelfSignedCert =  new SslCertificate(cert);
 }
Step 2: Define event handler to override the base 'onReceivedSSLError' event
 // Existing WebView object already defined in the code
WebView myWebView = (WebView) findViewById(R.id.webview);

// Add the onReceivedSslError event handler for the Webview - This event handler is defined to override the default behavior of the webview (which rejects the connection if the SSL certificate is self-signed.)
myWebView.setWebViewClient(new WebViewClient(){
 @Override
 public void onReceivedSslError(WebView view, SslErrorHandler handler, SslError error)  {
   // Custom method defined to validate the actual server's certificate with the bundled certificate
   validateWithBundledCertificate(view, handler, error);
 }
});
public void validateWithBundledCertificate(WebView view, SslErrorHandler handler, SslError error) {
// create this method definition. Actual method implementation in next step below
}
Step 3: Implement custom logic for the Event Handler bundled certificate validation
// Sample definition of the validateWithBundledCertificate method mentioned in the above step
 public void validateWithBundledCertificate(WebView view, SslErrorHandler handler,  SslError error) {
   try {
         SslCertificate receivedSslCertificate = error.getCertificate();
         String sslCertificateStr = receivedSslCertificate.toString();
         String bundledSslCertificateStr = bundledSelfSignedCert.toString();
         if (sslCertificateStr.equals(bundledSslCertificateStr)) {
           System.out.println("\nSuccessfully validated incoming certificate with bundled certificate! Allowing the connection to proceed ...\n\n");
           handler.proceed();
         } else {
         // Handle exceptions based on your exception handling approach. Example below.
           throw new Exception("Connection is not honoured as the bundled certificate does not match the certificate data in the incoming request.");
         }
       }
       catch (Exception ex) {
         // Handle exception based on your exception handling approach
         // handleAndPrintException(ex);
       }
 }
iOS use case 1: App data sync with HTTPS server
Step 1: Define a new class in your app’s codebase to validate the HTTPS connections
import Foundation
import Security
class URLSessionPinningDelegate: NSObject, URLSessionDelegate {

 func urlSession(_ session: URLSession, didReceive challenge: URLAuthenticationChallenge, completionHandler: @escaping (URLSession.AuthChallengeDisposition, URLCredential?) -> Swift.Void) {
   if (challenge.protectionSpace.authenticationMethod == NSURLAuthenticationMethodServerTrust) {
     if let serverTrust = challenge.protectionSpace.serverTrust {
       var secresult = SecTrustResultType.invalid
       let status = SecTrustEvaluate(serverTrust, &secresult)
       if(errSecSuccess == status) {
         // server certificate
         if let serverCertificate = SecTrustGetCertificateAtIndex(serverTrust, 0) {
           let serverCertificateData = SecCertificateCopyData(serverCertificate)
           let data = CFDataGetBytePtr(serverCertificateData);
           let size = CFDataGetLength(serverCertificateData);
           let cert1 = NSData(bytes: data, length: size)
           // bundled certificate
           let file_der = Bundle.main.path(forResource: bundledSslCert, ofType: bundledSslCertExt)
           if let file = file_der {
             if let cert2 = NSData(contentsOfFile: file) {
               // bundled certificate matches server's actual certificate
               if cert1.isEqual(to: cert2 as Data) {
                 completionHandler(URLSession.AuthChallengeDisposition.useCredential, URLCredential(trust:serverTrust))
                 return
               }
            }
          }
        }
      }
    }
  }
  // Certificate validation / Pinning failed
  completionHandler(.cancelAuthenticationChallenge, nil)
 }
}
Step 2: Use the new class while making HTTPS connection requests
if let url = NSURL(string: <Your application server's HTTPS endpoint>) {
 let session = URLSession(
               configuration: URLSessionConfiguration.ephemeral,
               delegate: URLSessionPinningDelegate(),
               delegateQueue: nil)
 let task = session.dataTask(with: url as URL, completionHandler: { (data, response, error) -> Void in
   if error != nil {
     // Print error example below
     // print("error: \(error!.localizedDescription)")
   } else if data != nil {
       if let str = NSString(data: data!, encoding: String.Encoding.utf8.rawValue) {
         // process HTTPs data retrieved from self signed certificate server successfully
       }
       else {
         // Handle data processing error. Example below
         // print("Unable to convert data to text")
       }
     }
   })
   task.resume()
 }
 else {
   // Handle other errors related to invalid Hosts / URL formats etc.
   // print("Unable to create NSURL")
 }
iOS Use case 2: App using UIWidgets like WebView
Step 1: Add WKNavigationDelegate extension to your WebView class
1 a. Update existing definition of the Class to added WKNavigationDelegate
 //1 a.
class ViewController: UIViewController, WKNavigationDelegate
1 b. Existing definition for WKWebView object (No change here)
//1 b.
@IBOutlet weak var webViewLoadHTTPS: WKWebView!
Step 2: Initialise the “navigationDelegate” event handler in the class
Specify the location where the “navigationDelegate” event handler’s custom methods are implemented. In this case, ‘self’ refers that the event handlers are defined in the same class.
override func viewDidLoad() {
 super.viewDidLoad() // existing code
 webViewLoadHTTPS.navigationDelegate = self
 // Other existing definitions below
 ...
 ...
}
Step 3: Add the custom event handler implementation for the WebView
This method below validates the bundled certificate with the actual one used during the connection.
public func webView(_ webView: WKWebView, didReceive challenge: URLAuthenticationChallenge, completionHandler: @escaping (URLSession.AuthChallengeDisposition, URLCredential?) -> Void) {
 if (challenge.protectionSpace.authenticationMethod == NSURLAuthenticationMethodServerTrust) {
   if let serverTrust = challenge.protectionSpace.serverTrust {
     var secresult = SecTrustResultType.invalid
     let status = SecTrustEvaluate(serverTrust, &secresult)
     if(errSecSuccess == status) {
       // server certificate
       if let serverCertificate = SecTrustGetCertificateAtIndex(serverTrust, 0) {
         let serverCertificateData = SecCertificateCopyData(serverCertificate)
         let data = CFDataGetBytePtr(serverCertificateData);
         let size = CFDataGetLength(serverCertificateData);
         let cert1 = NSData(bytes: data, length: size)
         // bundled certificate
         let file_der = Bundle.main.path(forResource: bundledSslCert, ofType: bundledSslCertExt)

         if let file = file_der {
            if let cert2 = NSData(contentsOfFile: file) {
               if cert1.isEqual(to: cert2 as Data) {
                 completionHandler(URLSession.AuthChallengeDisposition.useCredential, URLCredential(trust:serverTrust))
                 return
               }
            }
         }
      }
    }
  }
}
  // Certificate validation / Pinning failed
 completionHandler(URLSession.AuthChallengeDisposition.cancelAuthenticationChallenge, nil)
}
Certificate Pinning Summary
The “Certificate pinning” process enables app developers to validate the backend server’s actual public certificate at runtime with the existing known bundled certificate already imported in the app. Native app development and testing for the various app workflows now becomes more seamless, without the explicit need to install the backend server’s SSL certificate each time for every new pristine test session on a real device or a device emulator / simulator.
Benefits vs Limitations
“Certificate Bundling and Pinning” approach comes with some strong benefits and known limitations as listed below.
Benefits
- SSL Certificate Bundling and Pinning approach helps avoid repetitive and time-consuming manual / automation steps to install the server’s custom self-signed certificate for every pristine test session on a real device or a device emulator. This is highly invaluable in terms of development and testing time and effort saved.
- Installing “Self-signed root certificates” without an Intermediate or Root Certificate Authority may not work well with different Android versions. SSL Certificate Bundling and Pinning approach can be seamlessly used across different versions of Android and iOS devices.
- The approach is also extremely useful for testing on public vendor cloud platforms (e..g. BrowserStack), where Settings app may not be accessible on some devices.
- The approach uses Android and iOS built-in libraries for the technical implementation and is inline with the guidelines provided by Google and Apple for native apps to be published on their platforms i.e. Play Store and App Store.
Limitations
SSL Certificate Bundling and Pinning approach relies heavily on importing the backend server’s custom self-signed SSL certificate in the app’s codebase for certificate validations at runtime.
- One-time minor effort for certificate bundling is required each time the server’s certificate is updated due to different reasons. E.g. Certificate expiry etc.
- The certificate pinning logic as illustrated in this article also has to be implemented once per native app, when a new team starts using this approach.
Overall Summary
In this blog post, we introduced you to the high-level use cases where “Certificate bundling and pinning” approach can be applied to build secure native apps with custom self-signed SSL certificates. We also deep dived into the core technical implementation steps for both the use cases on Android and iOS.
Hope you enjoyed this post and now have a better know-how of Certificate bundling and pinning process. As we close, please find the reference sample GitHub projects which demonstrate a running end-to-end example in action, for both the use cases illustrated in this article.