Get your setup working faster. Join our Discord for optimisation tips from elite testers.Join our Discord
Integrate Your Java Test Suite with BrowserStack
BrowserStack’s Java SDK supports a plug-and-play integration. Run your entire test suite in parallel with a few steps!
Ready to integrate your existing Java Appium test suite with BrowserStack? This document walks you through the simple steps to connect your tests to our cloud infrastructure and start running them on real devices. You’ll learn how to configure your environment, upload your app, and execute tests seamlessly on BrowserStack’s device cloud and achieve faster, more reliable mobile test execution.
Prerequisites
An existing automated test suite.
Java v8+ if using Gradle, Java v9+ is required.
Maven or Gradle is installed on your machine, its environment variables are set, and its bin is added to system path, $PATH.
```bash
# Set these values in your ~/.zprofile (zsh) or ~/.profile (bash)
export BROWSERSTACK_USERNAME="YOUR_USERNAME"
export BROWSERSTACK_ACCESS_KEY="YOUR_ACCESS_KEY"
```
In your pom.xml file, add browserstack-java-sdk as a Maven dependency at the end of the dependencies list, within the <dependencies> element. Refresh the project.
If you are using the Surefire plugin to run tests, the steps to integrate might change. Check out framework-specific integration steps for TestNG.
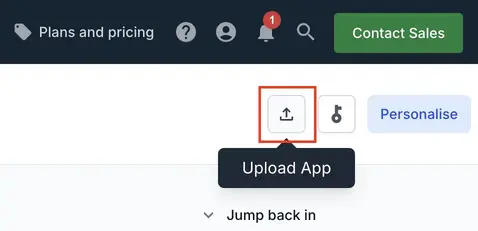
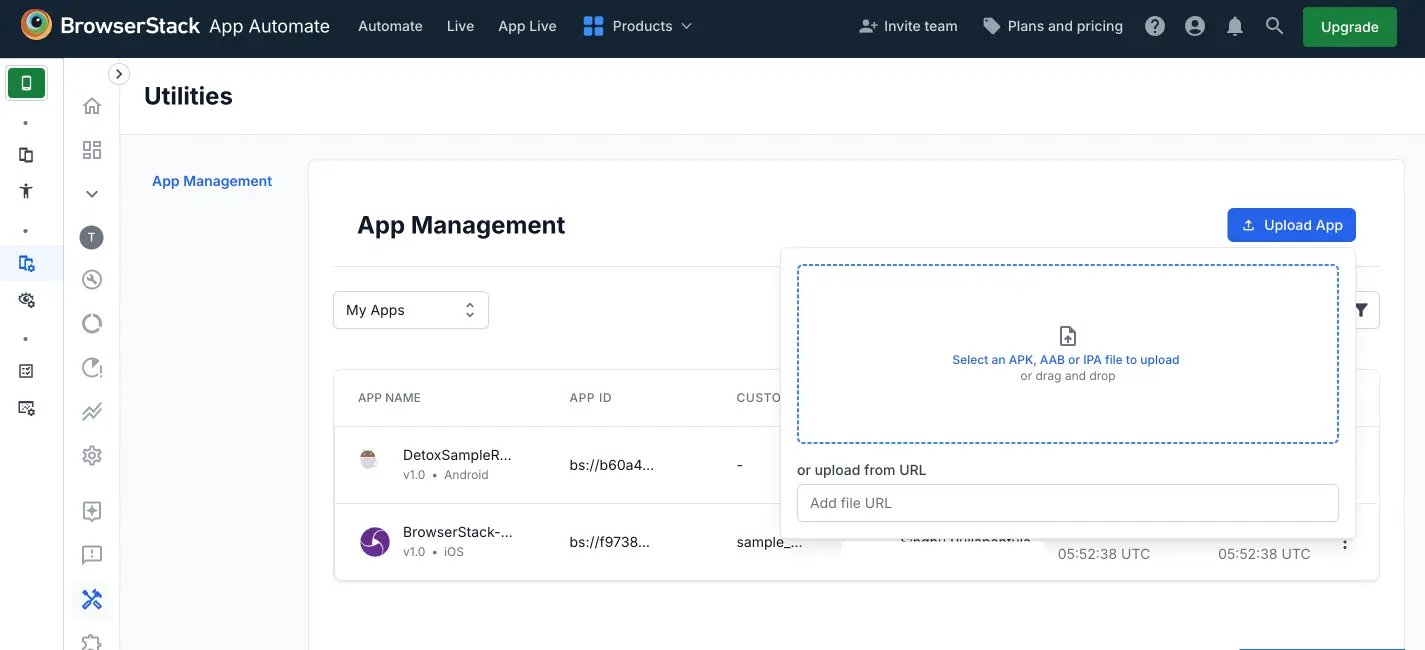
Select the app you want to upload from your filesystem. If you are uploading the app using a public URL, paste the URL of your app in the or upload from URL box.
After selecting the app, choose the App Automate framework you want to use for testing. You can optionally add flags and a custom ID.
Click Upload. The app is uploaded to the BrowserStack servers. You’ll receive an App ID, which you can use to run tests.
Facing issues with app upload? Visit the Troubleshooting section at the bottom of this page.
Create your BrowserStack config file
After installing the SDK, create a browserstack.yml config file at the root level of your project. This file holds all the required capabilities to run tests on BrowserStack.
Set app to be tested
The app property determines the app to be tested. You can upload an Android app (.apk or .aab file) or an iOS app (.ipa file) from your local filesystem.
Supported method
Description
path(Recommended)
SDK uploads the app using the specified relative or absolute path. Eg: app: ./SampleApp.apk.
Check out how to create IPA files for iOS app testing on BrowserStack.
App
Set the path to your app. Or, if you have already uploaded your app, provide one of the other acceptable app property values here
Set the devices you want to test under the platforms object.
Parallel thread
#1
Windows 10
Chrome 120
Parallel thread
#2
OS X Monterey
Safari 15.6
Parallel thread
#3
iOS 15
iPhone 13
Do you want to dynamically configure platforms?
To dynamically configure platforms across different tests, you can comment out the platforms capability while still passing platform-specific capabilities.
Configure AI Agents
You can enable the following AI agents by adding the respective configurations in your browserstack.yml file:
Enable Self Heal Agent
Auto-fix locator failures with the AI-powered self-heal agent and get up to 40% fewer locator failures. Learn more
True
False
Test Failure Analysis Agent
Auto-enabled
AI-powered root cause analysis for test failures that can reduce debugging time. Learn more
BrowserStack Reporting (part 1/2)
You can leverage BrowserStack’s extensive reporting features using the following capabilities:
Build Name
Set a name to your build (usually the same as the build ID that’s on your CI/CD platform). Accepted characters: A-Z, a-z, 0-9, ., :, -, [], /, @, &, ', _. All other characters are ignored. Character limit: 255
Project Name
Set a project name for your project
The projectName and buildName config must be static and not change across different runs of the same build. This is a deviation in approach as specified by BrowserStack Automate or App Automate as Test Reporting & Analytics will automatically identify different build runs.
Restrict the characters in your projectName and buildName to alphanumeric characters (A-Z, a-z, 0-9), underscores (_), colons (:), square brackets ([, ]), and hyphens (-). Any other character will be replaced with an underscore (_).
Enable Local Testing and debugging features
To enhance your testing experience on BrowserStack, you can enable additional features such as Local Testing and debugging features by adding the respective capabilities in your browserstack.yml file.
Enable BrowserStack Local
To enable testing of apps hosted on your local machine or behind a firewall, you can use BrowserStack Local Testing. This feature creates a secure tunnel between your local machine and the BrowserStack cloud, allowing you to test your apps in real-time. For more information, refer to the Local Testing documentation.
browserstackLocal:true
Enable debugging features
By default, BrowserStack provides prettified session logs, screenshots on every failed command, and a video of the entire test. Additionally, you can enable the following features by setting the respective capabilities in your browserstack.yml file:
Visual logs
Enables screenshots for every command ran
True
False
Network logs
Enables network capture for the session in HAR format. Reduces session performance slightly
True
False
Create browserstack.yml file
Create browserstack.yml file in the root folder of your test suite and add the code to it.
Use our Capability Generator to select from a comprehensive set of options you can use to customize your tests.
BrowserStack Reporting (part 2/2)
Test assertions are specific to selected language frameworks. BrowserStack requires explicit instruction to determine whether your tests have passed or failed based on the assertions in your test script.
Mark session name
You can use the sessionName capability to give your session a name (usually describing the test case) so that it is easy for you to debug later.
```java
final JavascriptExecutor jse = (JavascriptExecutor) driver;
JSONObject executorObject = new JSONObject();
JSONObject argumentsObject = new JSONObject();
argumentsObject.put("name", "<test-name>");
executorObject.put("action", "setSessionName");
executorObject.put("arguments", argumentsObject);
jse.executeScript(String.format("browserstack_executor: %s", executorObject));
```
```bash
# Set these values in your ~/.zprofile (zsh) or ~/.profile (bash)
export BROWSERSTACK_USERNAME="YOUR_USERNAME"
export BROWSERSTACK_ACCESS_KEY="YOUR_ACCESS_KEY"
```
In your pom.xml file, add browserstack-java-sdk as a Maven dependency at the end of the dependencies list, within the <dependencies> element. Refresh the project.
If you are using the Surefire plugin to run tests, the steps to integrate might change. Check out framework-specific integration steps for TestNG.
Select the app you want to upload from your filesystem. If you are uploading the app using a public URL, paste the URL of your app in the or upload from URL box.
After selecting the app, choose the App Automate framework you want to use for testing. You can optionally add flags and a custom ID.
Click Upload. The app is uploaded to the BrowserStack servers. You’ll receive an App ID, which you can use to run tests.
Facing issues with app upload? Visit the Troubleshooting section at the bottom of this page.
Create your BrowserStack config file
After installing the SDK, create a browserstack.yml config file at the root level of your project. This file holds all the required capabilities to run tests on BrowserStack.
Set app to be tested
The app property determines the app to be tested. You can upload an Android app (.apk or .aab file) or an iOS app (.ipa file) from your local filesystem.
Supported method
Description
path(Recommended)
SDK uploads the app using the specified relative or absolute path. Eg: app: ./SampleApp.apk.
Check out how to create IPA files for iOS app testing on BrowserStack.
App
Set the path to your app. Or, if you have already uploaded your app, provide one of the other acceptable app property values here
Set the devices you want to test under the platforms object.
Parallel thread
#1
Windows 10
Chrome 120
Parallel thread
#2
OS X Monterey
Safari 15.6
Parallel thread
#3
iOS 15
iPhone 13
Do you want to dynamically configure platforms?
To dynamically configure platforms across different tests, you can comment out the platforms capability while still passing platform-specific capabilities.
Configure AI Agents
You can enable the following AI agents by adding the respective configurations in your browserstack.yml file:
Enable Self Heal Agent
Auto-fix locator failures with the AI-powered self-heal agent and get up to 40% fewer locator failures. Learn more
True
False
Test Failure Analysis Agent
Auto-enabled
AI-powered root cause analysis for test failures that can reduce debugging time. Learn more
BrowserStack Reporting (part 1/2)
You can leverage BrowserStack’s extensive reporting features using the following capabilities:
Build Name
Set a name to your build (usually the same as the build ID that’s on your CI/CD platform). Accepted characters: A-Z, a-z, 0-9, ., :, -, [], /, @, &, ', _. All other characters are ignored. Character limit: 255
Project Name
Set a project name for your project
The projectName and buildName config must be static and not change across different runs of the same build. This is a deviation in approach as specified by BrowserStack Automate or App Automate as Test Reporting & Analytics will automatically identify different build runs.
Restrict the characters in your projectName and buildName to alphanumeric characters (A-Z, a-z, 0-9), underscores (_), colons (:), square brackets ([, ]), and hyphens (-). Any other character will be replaced with an underscore (_).
Enable Local Testing and debugging features
To enhance your testing experience on BrowserStack, you can enable additional features such as Local Testing and debugging features by adding the respective capabilities in your browserstack.yml file.
Enable BrowserStack Local
To enable testing of apps hosted on your local machine or behind a firewall, you can use BrowserStack Local Testing. This feature creates a secure tunnel between your local machine and the BrowserStack cloud, allowing you to test your apps in real-time. For more information, refer to the Local Testing documentation.
browserstackLocal:true
Enable debugging features
By default, BrowserStack provides prettified session logs, screenshots on every failed command, and a video of the entire test. Additionally, you can enable the following features by setting the respective capabilities in your browserstack.yml file:
Visual logs
Enables screenshots for every command ran
True
False
Network logs
Enables network capture for the session in HAR format. Reduces session performance slightly
True
False
Create browserstack.yml file
Create browserstack.yml file in the root folder of your test suite and add the code to it.
Use our Capability Generator to select from a comprehensive set of options you can use to customize your tests.
BrowserStack Reporting (part 2/2)
Test assertions are specific to selected language frameworks. BrowserStack requires explicit instruction to determine whether your tests have passed or failed based on the assertions in your test script.
Mark session name
You can use the sessionName capability to give your session a name (usually describing the test case) so that it is easy for you to debug later.
```java
final JavascriptExecutor jse = (JavascriptExecutor) driver;
JSONObject executorObject = new JSONObject();
JSONObject argumentsObject = new JSONObject();
argumentsObject.put("name", "<test-name>");
executorObject.put("action", "setSessionName");
executorObject.put("arguments", argumentsObject);
jse.executeScript(String.format("browserstack_executor: %s", executorObject));
```
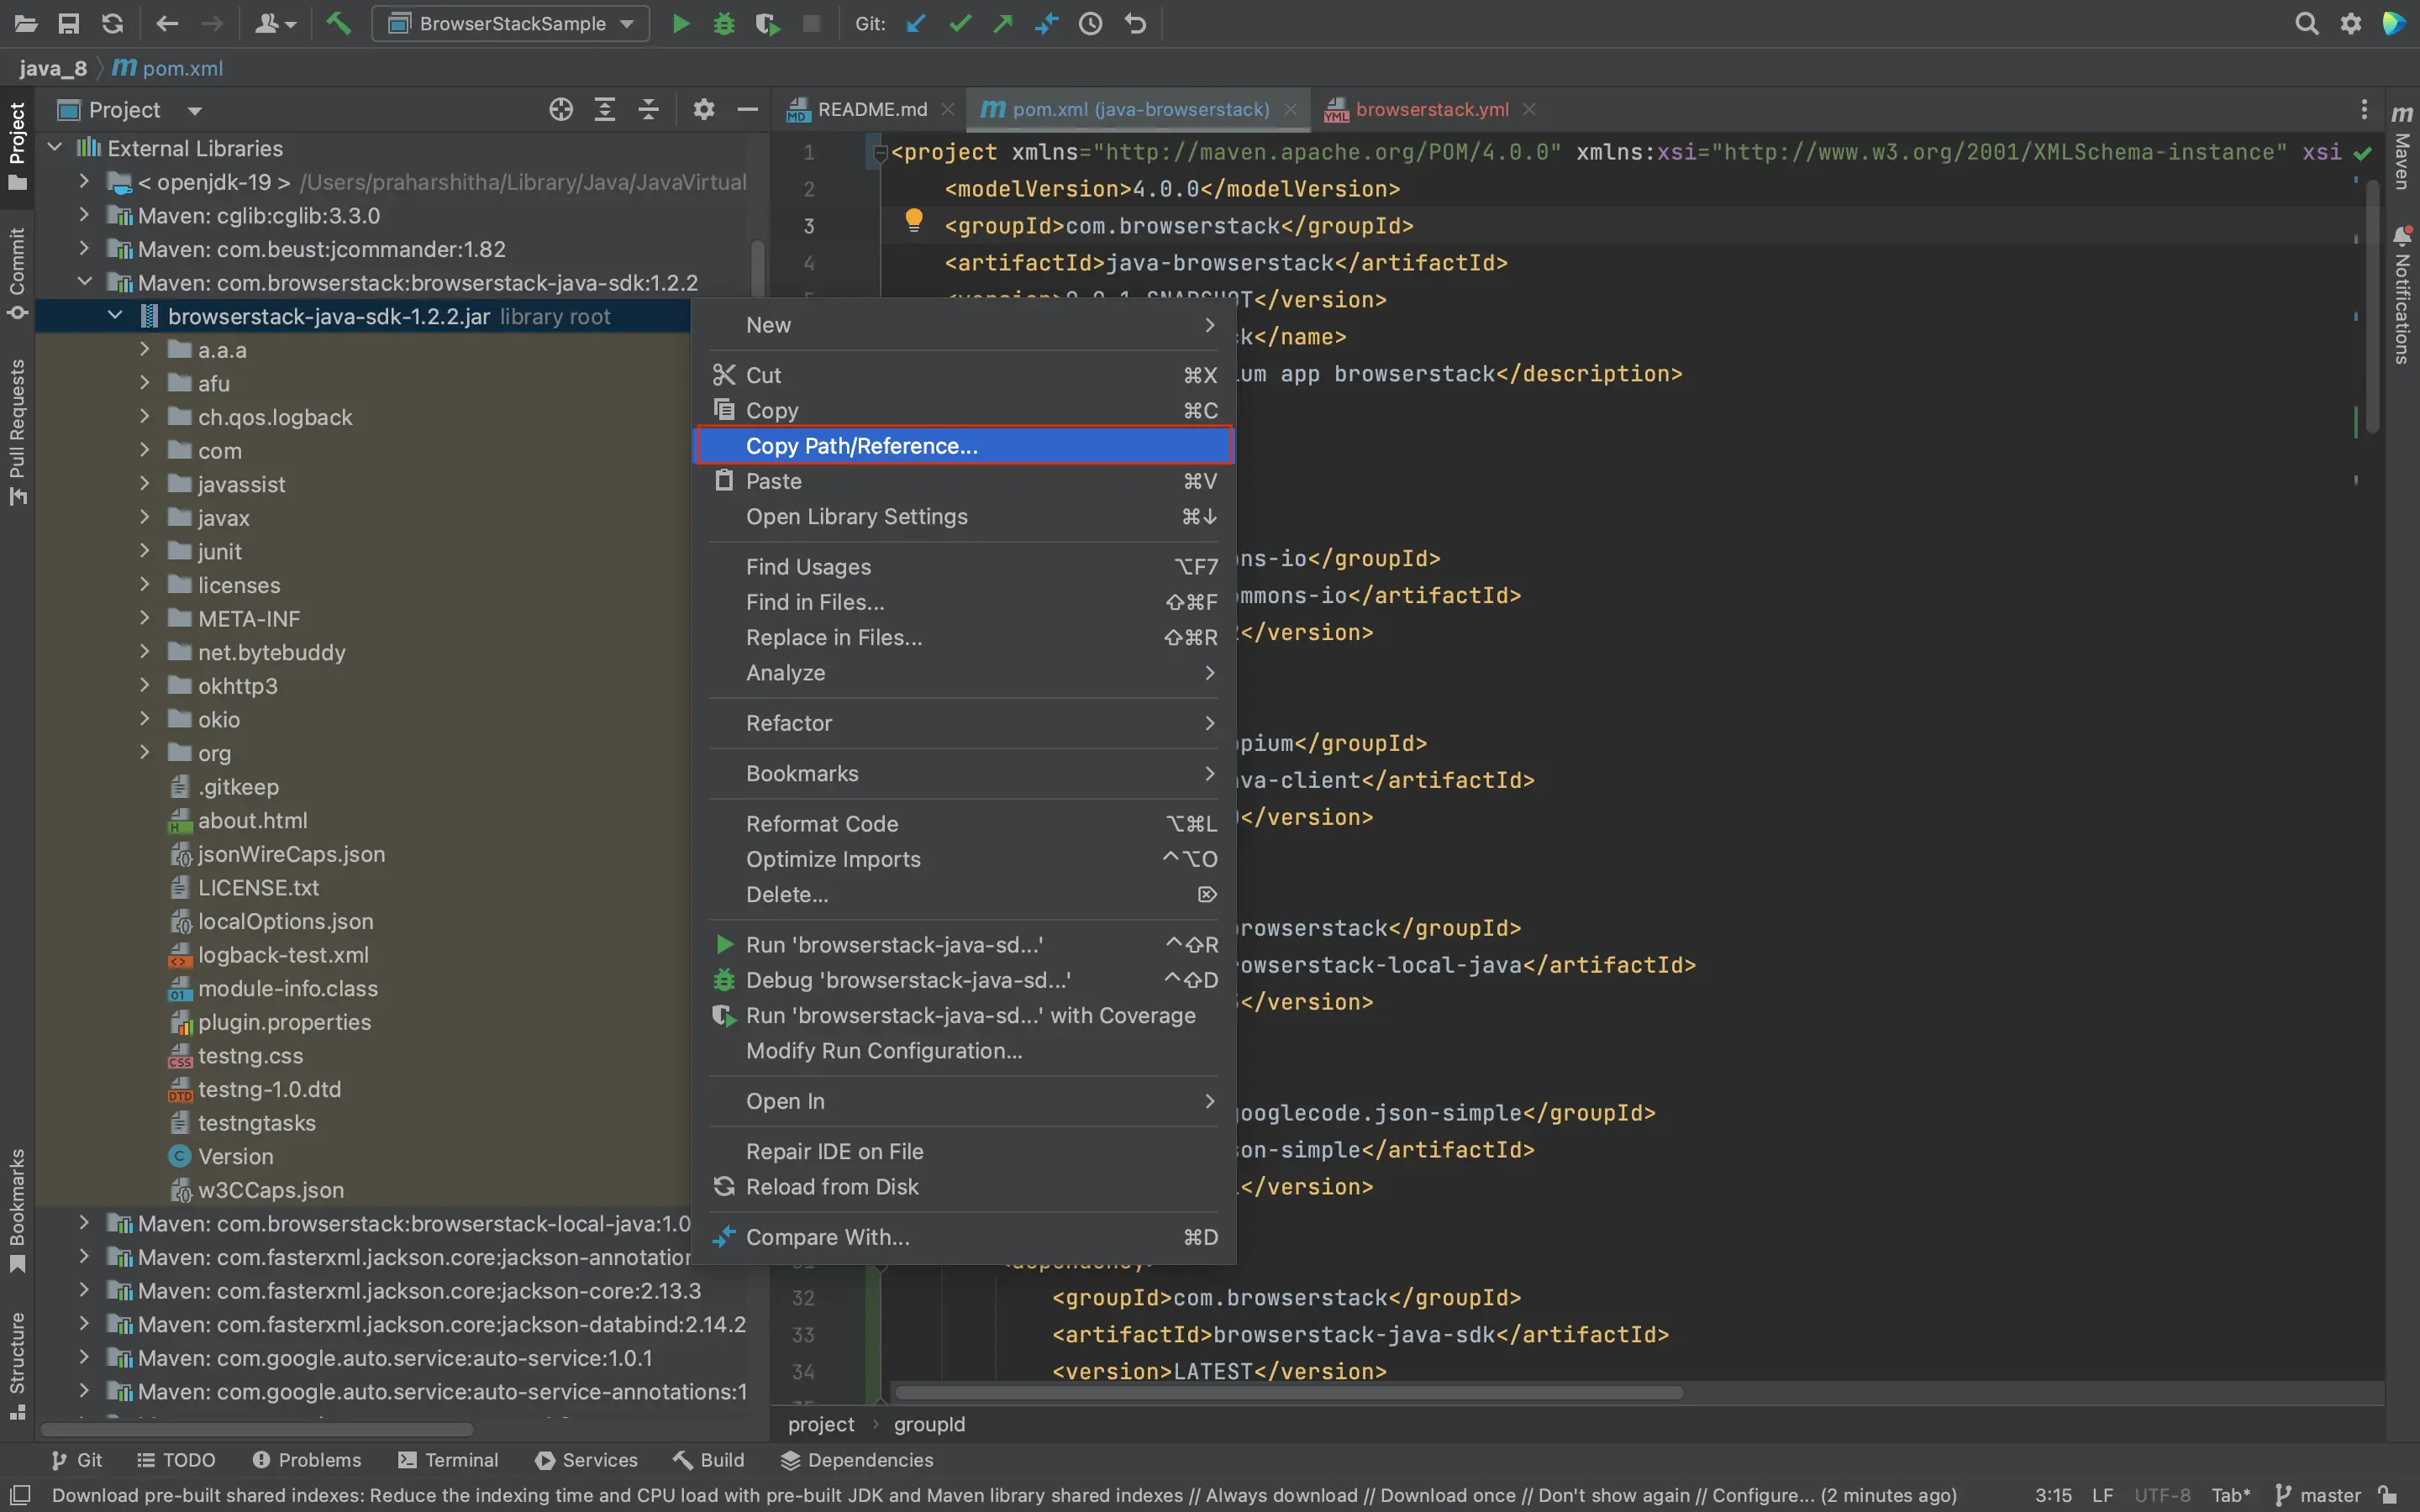
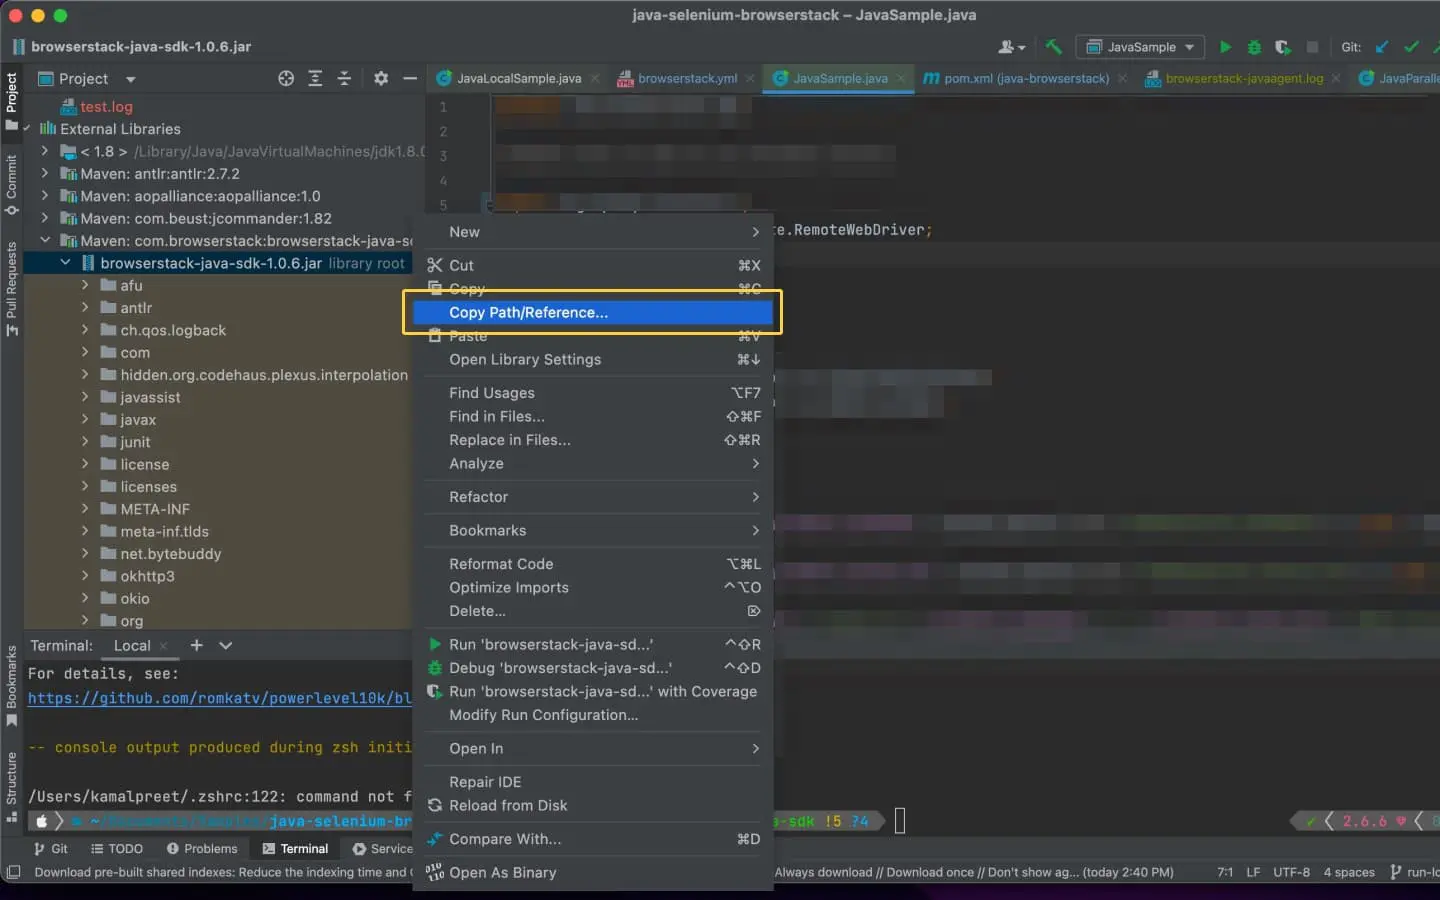
Search for the browserstack-java-sdk jar in External Libraries. Right-click the .jar file, select Copy Path/References, and then copy the absolute path:
Example Paths:
Mac or Linux: /Users/User_Name/.m2/repository/com/browserstack/browserstack-java-sdk/1.0.9/browserstack-java-sdk-1.0.9.jar
```bash
# Set these values in your ~/.zprofile (zsh) or ~/.profile (bash)
export BROWSERSTACK_USERNAME="YOUR_USERNAME"
export BROWSERSTACK_ACCESS_KEY="YOUR_ACCESS_KEY"
```
Maven Archetype provides a template to quickly configure your project. Copy & run the below command on your terminal/command prompt to add browserstack-java-sdk dependency in your pom.xml and browserstack.yml config file in your project.
If you are using the Surefire plugin to run tests, the steps to integrate might change. Check out framework-specific integration steps for TestNG.
Select the app you want to upload from your filesystem. If you are uploading the app using a public URL, paste the URL of your app in the or upload from URL box.
After selecting the app, choose the App Automate framework you want to use for testing. You can optionally add flags and a custom ID.
Click Upload. The app is uploaded to the BrowserStack servers. You’ll receive an App ID, which you can use to run tests.
Facing issues with app upload? Visit the Troubleshooting section at the bottom of this page.
Create your BrowserStack config file
After installing the SDK, create a browserstack.yml config file at the root level of your project. This file holds all the required capabilities to run tests on BrowserStack.
Set app to be tested
The app property determines the app to be tested. You can upload an Android app (.apk or .aab file) or an iOS app (.ipa file) from your local filesystem.
Supported method
Description
path(Recommended)
SDK uploads the app using the specified relative or absolute path. Eg: app: ./SampleApp.apk.
Check out how to create IPA files for iOS app testing on BrowserStack.
App
Set the path to your app. Or, if you have already uploaded your app, provide one of the other acceptable app property values here
Set the devices you want to test under the platforms object.
Parallel thread
#1
Windows 10
Chrome 120
Parallel thread
#2
OS X Monterey
Safari 15.6
Parallel thread
#3
iOS 15
iPhone 13
Do you want to dynamically configure platforms?
To dynamically configure platforms across different tests, you can comment out the platforms capability while still passing platform-specific capabilities.
Configure AI Agents
You can enable the following AI agents by adding the respective configurations in your browserstack.yml file:
Enable Self Heal Agent
Auto-fix locator failures with the AI-powered self-heal agent and get up to 40% fewer locator failures. Learn more
True
False
Test Failure Analysis Agent
Auto-enabled
AI-powered root cause analysis for test failures that can reduce debugging time. Learn more
BrowserStack Reporting (part 1/2)
You can leverage BrowserStack’s extensive reporting features using the following capabilities:
Build Name
Set a name to your build (usually the same as the build ID that’s on your CI/CD platform). Accepted characters: A-Z, a-z, 0-9, ., :, -, [], /, @, &, ', _. All other characters are ignored. Character limit: 255
Project Name
Set a project name for your project
The projectName and buildName config must be static and not change across different runs of the same build. This is a deviation in approach as specified by BrowserStack Automate or App Automate as Test Reporting & Analytics will automatically identify different build runs.
Restrict the characters in your projectName and buildName to alphanumeric characters (A-Z, a-z, 0-9), underscores (_), colons (:), square brackets ([, ]), and hyphens (-). Any other character will be replaced with an underscore (_).
Enable Local Testing and debugging features
To enhance your testing experience on BrowserStack, you can enable additional features such as Local Testing and debugging features by adding the respective capabilities in your browserstack.yml file.
Enable BrowserStack Local
To enable testing of apps hosted on your local machine or behind a firewall, you can use BrowserStack Local Testing. This feature creates a secure tunnel between your local machine and the BrowserStack cloud, allowing you to test your apps in real-time. For more information, refer to the Local Testing documentation.
browserstackLocal:true
Enable debugging features
By default, BrowserStack provides prettified session logs, screenshots on every failed command, and a video of the entire test. Additionally, you can enable the following features by setting the respective capabilities in your browserstack.yml file:
Visual logs
Enables screenshots for every command ran
True
False
Network logs
Enables network capture for the session in HAR format. Reduces session performance slightly
True
False
Create browserstack.yml file
Create browserstack.yml file in the root folder of your test suite and add the code to it.
Use our Capability Generator to select from a comprehensive set of options you can use to customize your tests.
BrowserStack Reporting (part 2/2)
Test assertions are specific to selected language frameworks. BrowserStack requires explicit instruction to determine whether your tests have passed or failed based on the assertions in your test script.
Mark session name
You can use the sessionName capability to give your session a name (usually describing the test case) so that it is easy for you to debug later.
```java
final JavascriptExecutor jse = (JavascriptExecutor) driver;
JSONObject executorObject = new JSONObject();
JSONObject argumentsObject = new JSONObject();
argumentsObject.put("name", "<test-name>");
executorObject.put("action", "setSessionName");
executorObject.put("arguments", argumentsObject);
jse.executeScript(String.format("browserstack_executor: %s", executorObject));
```
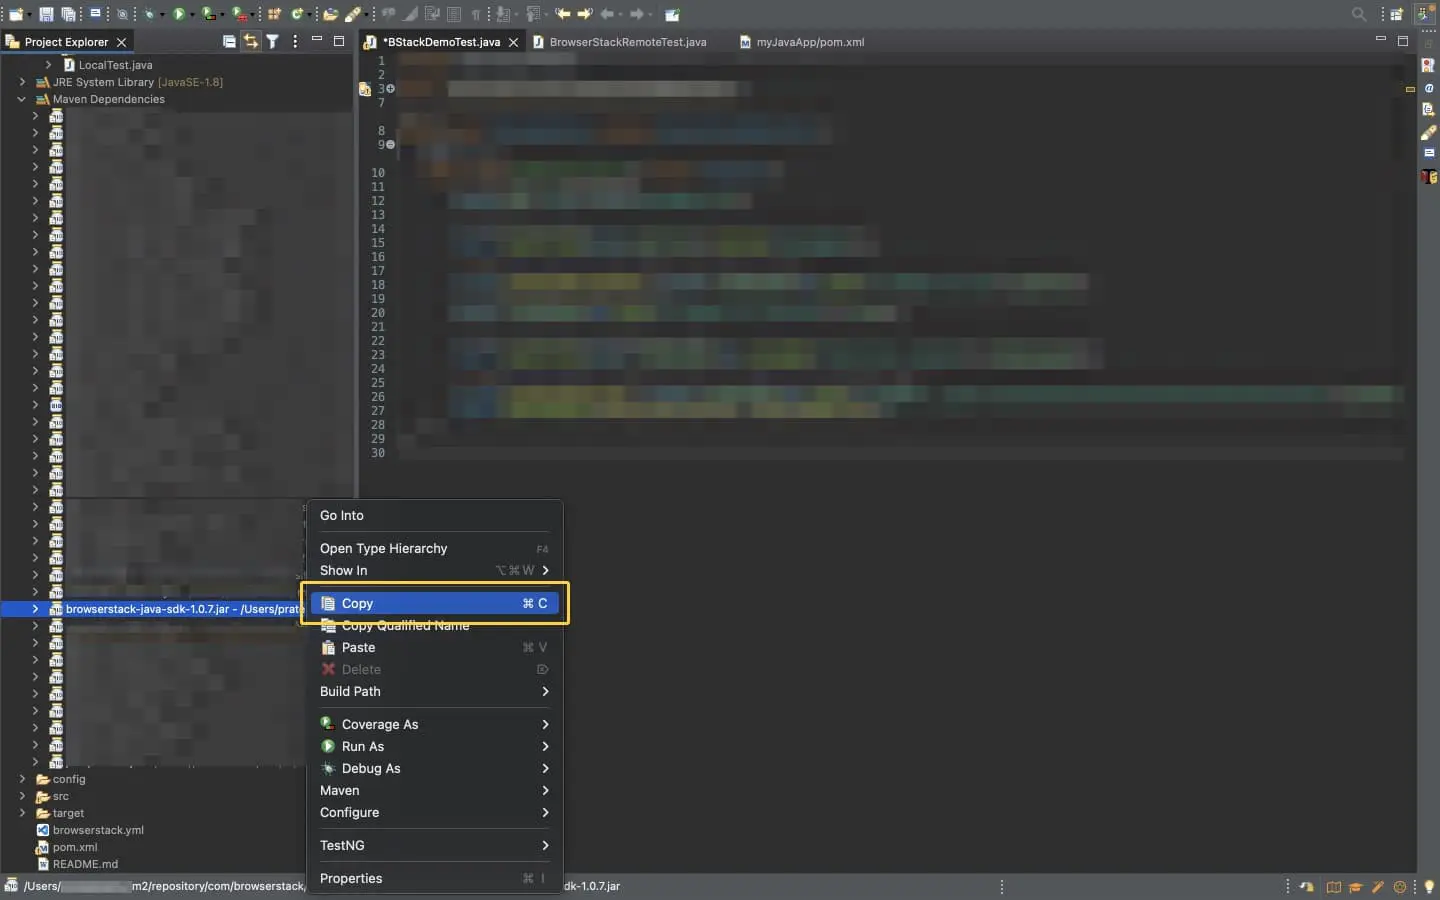
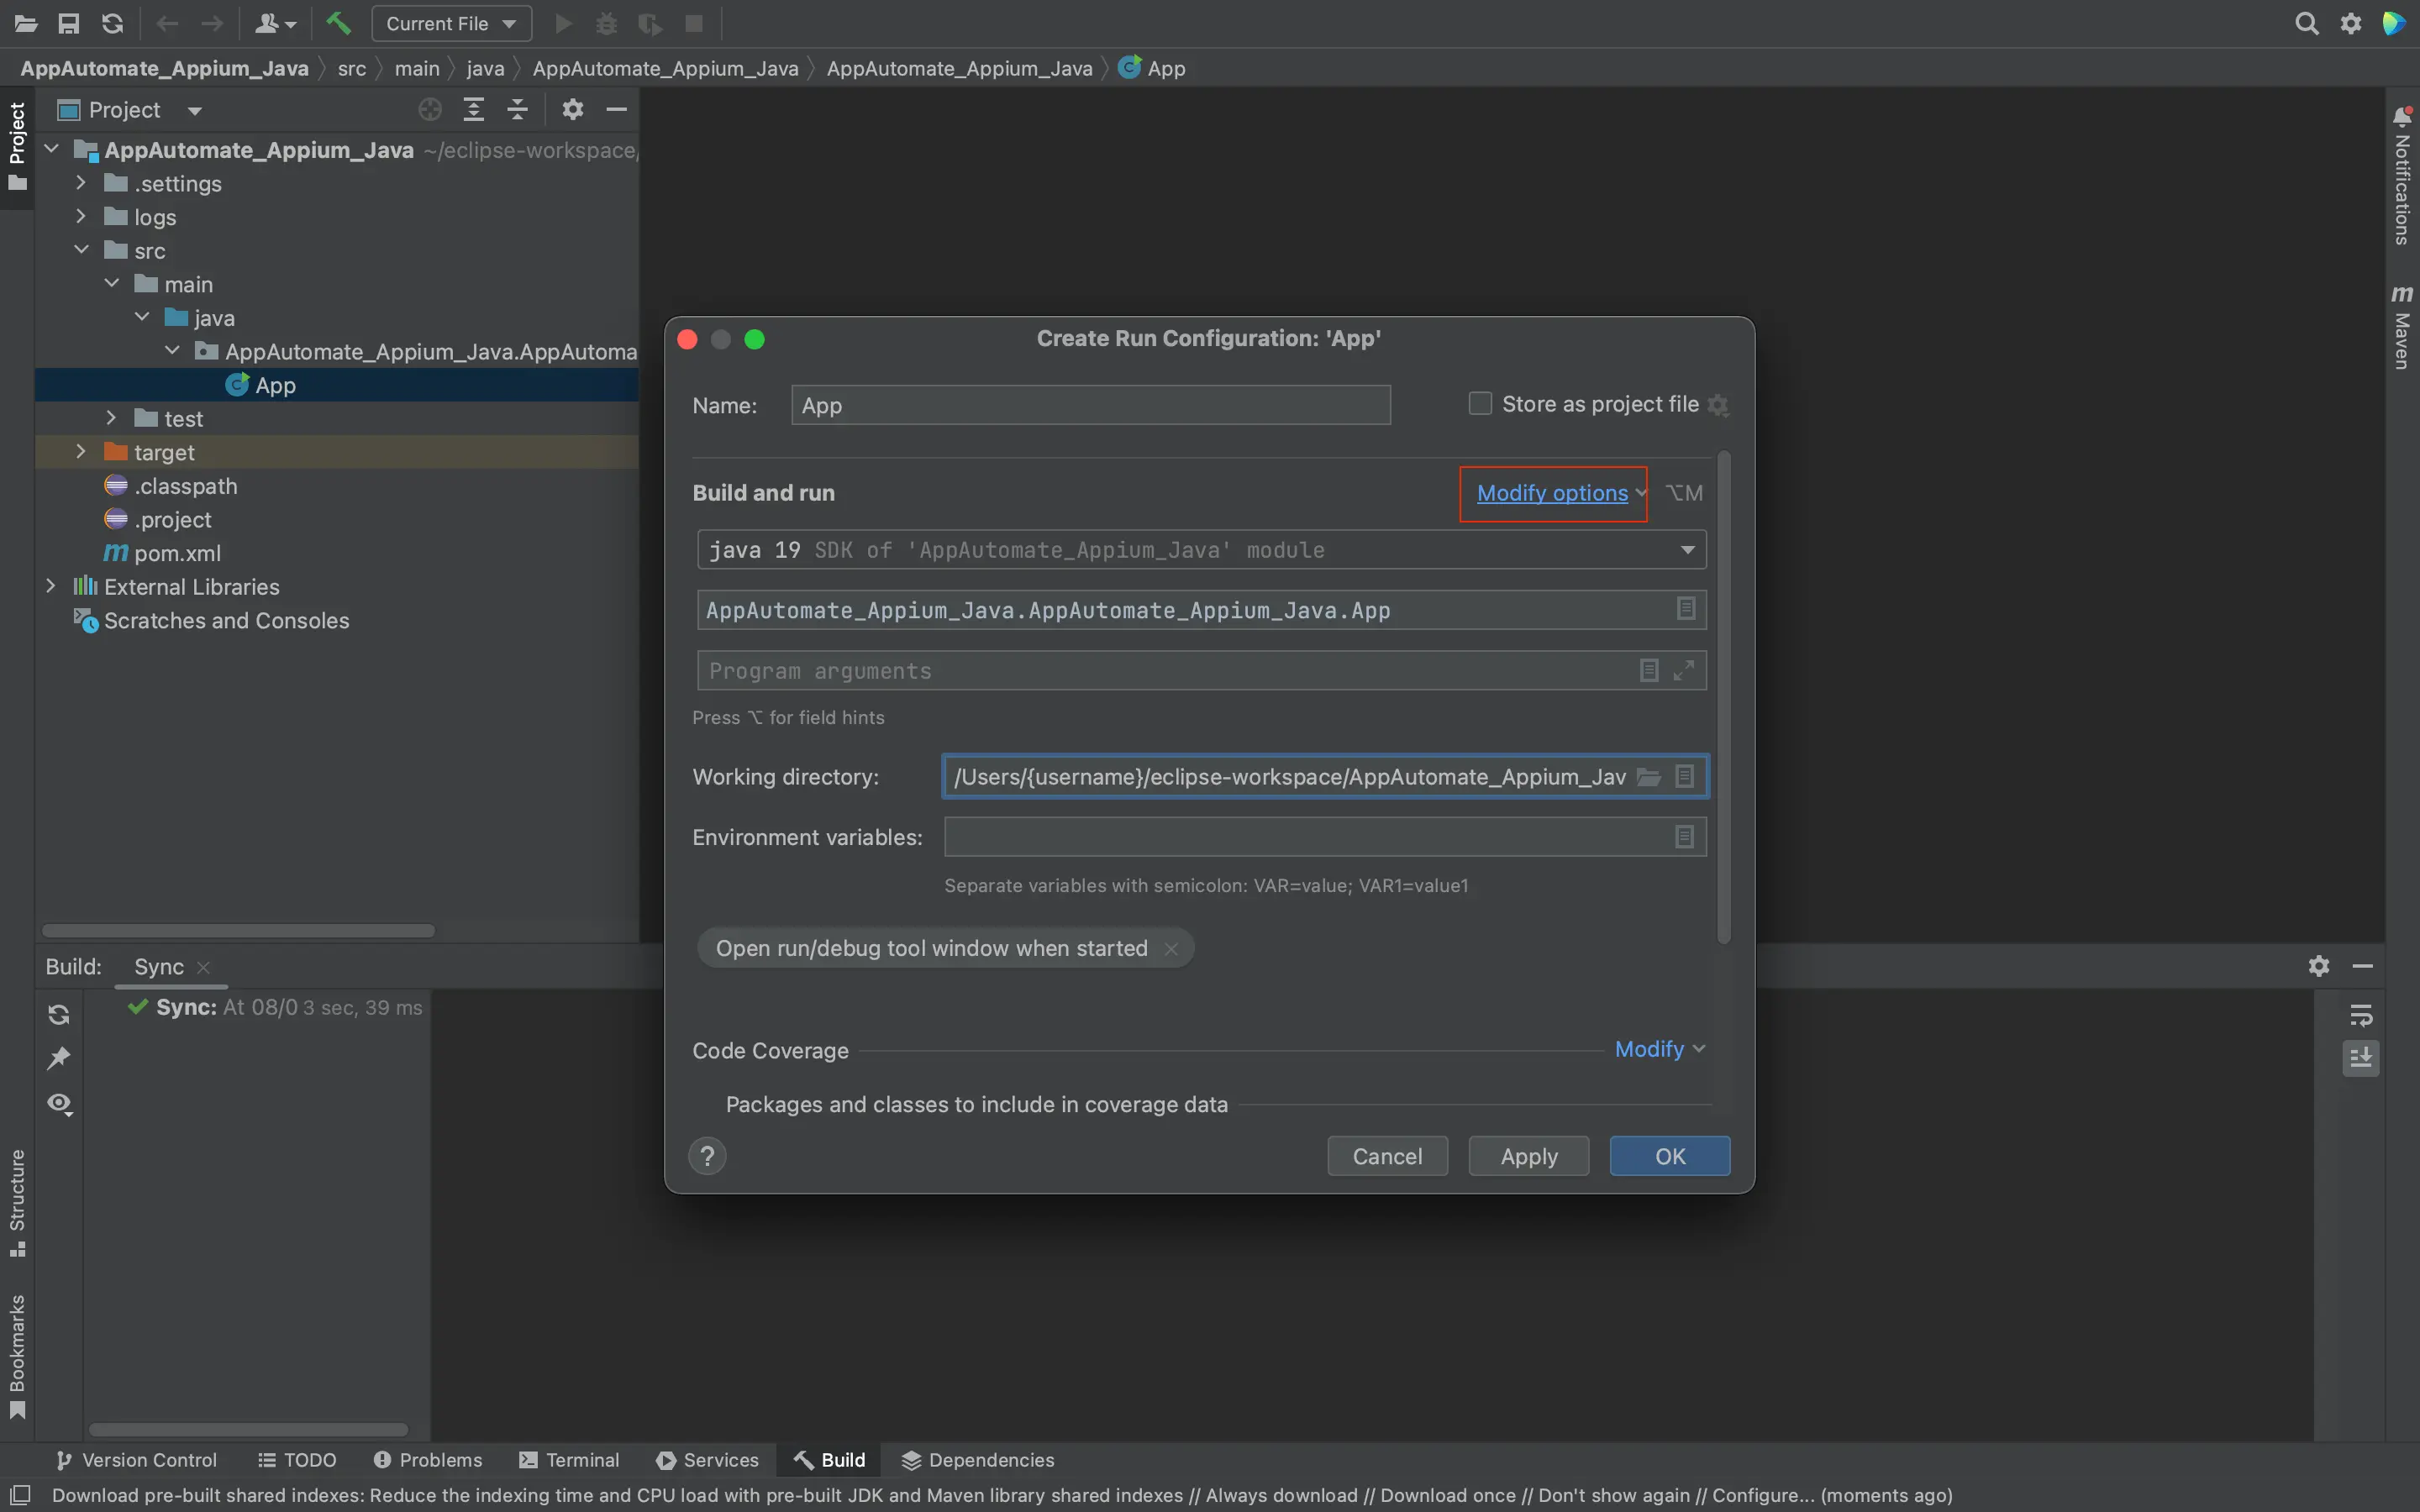
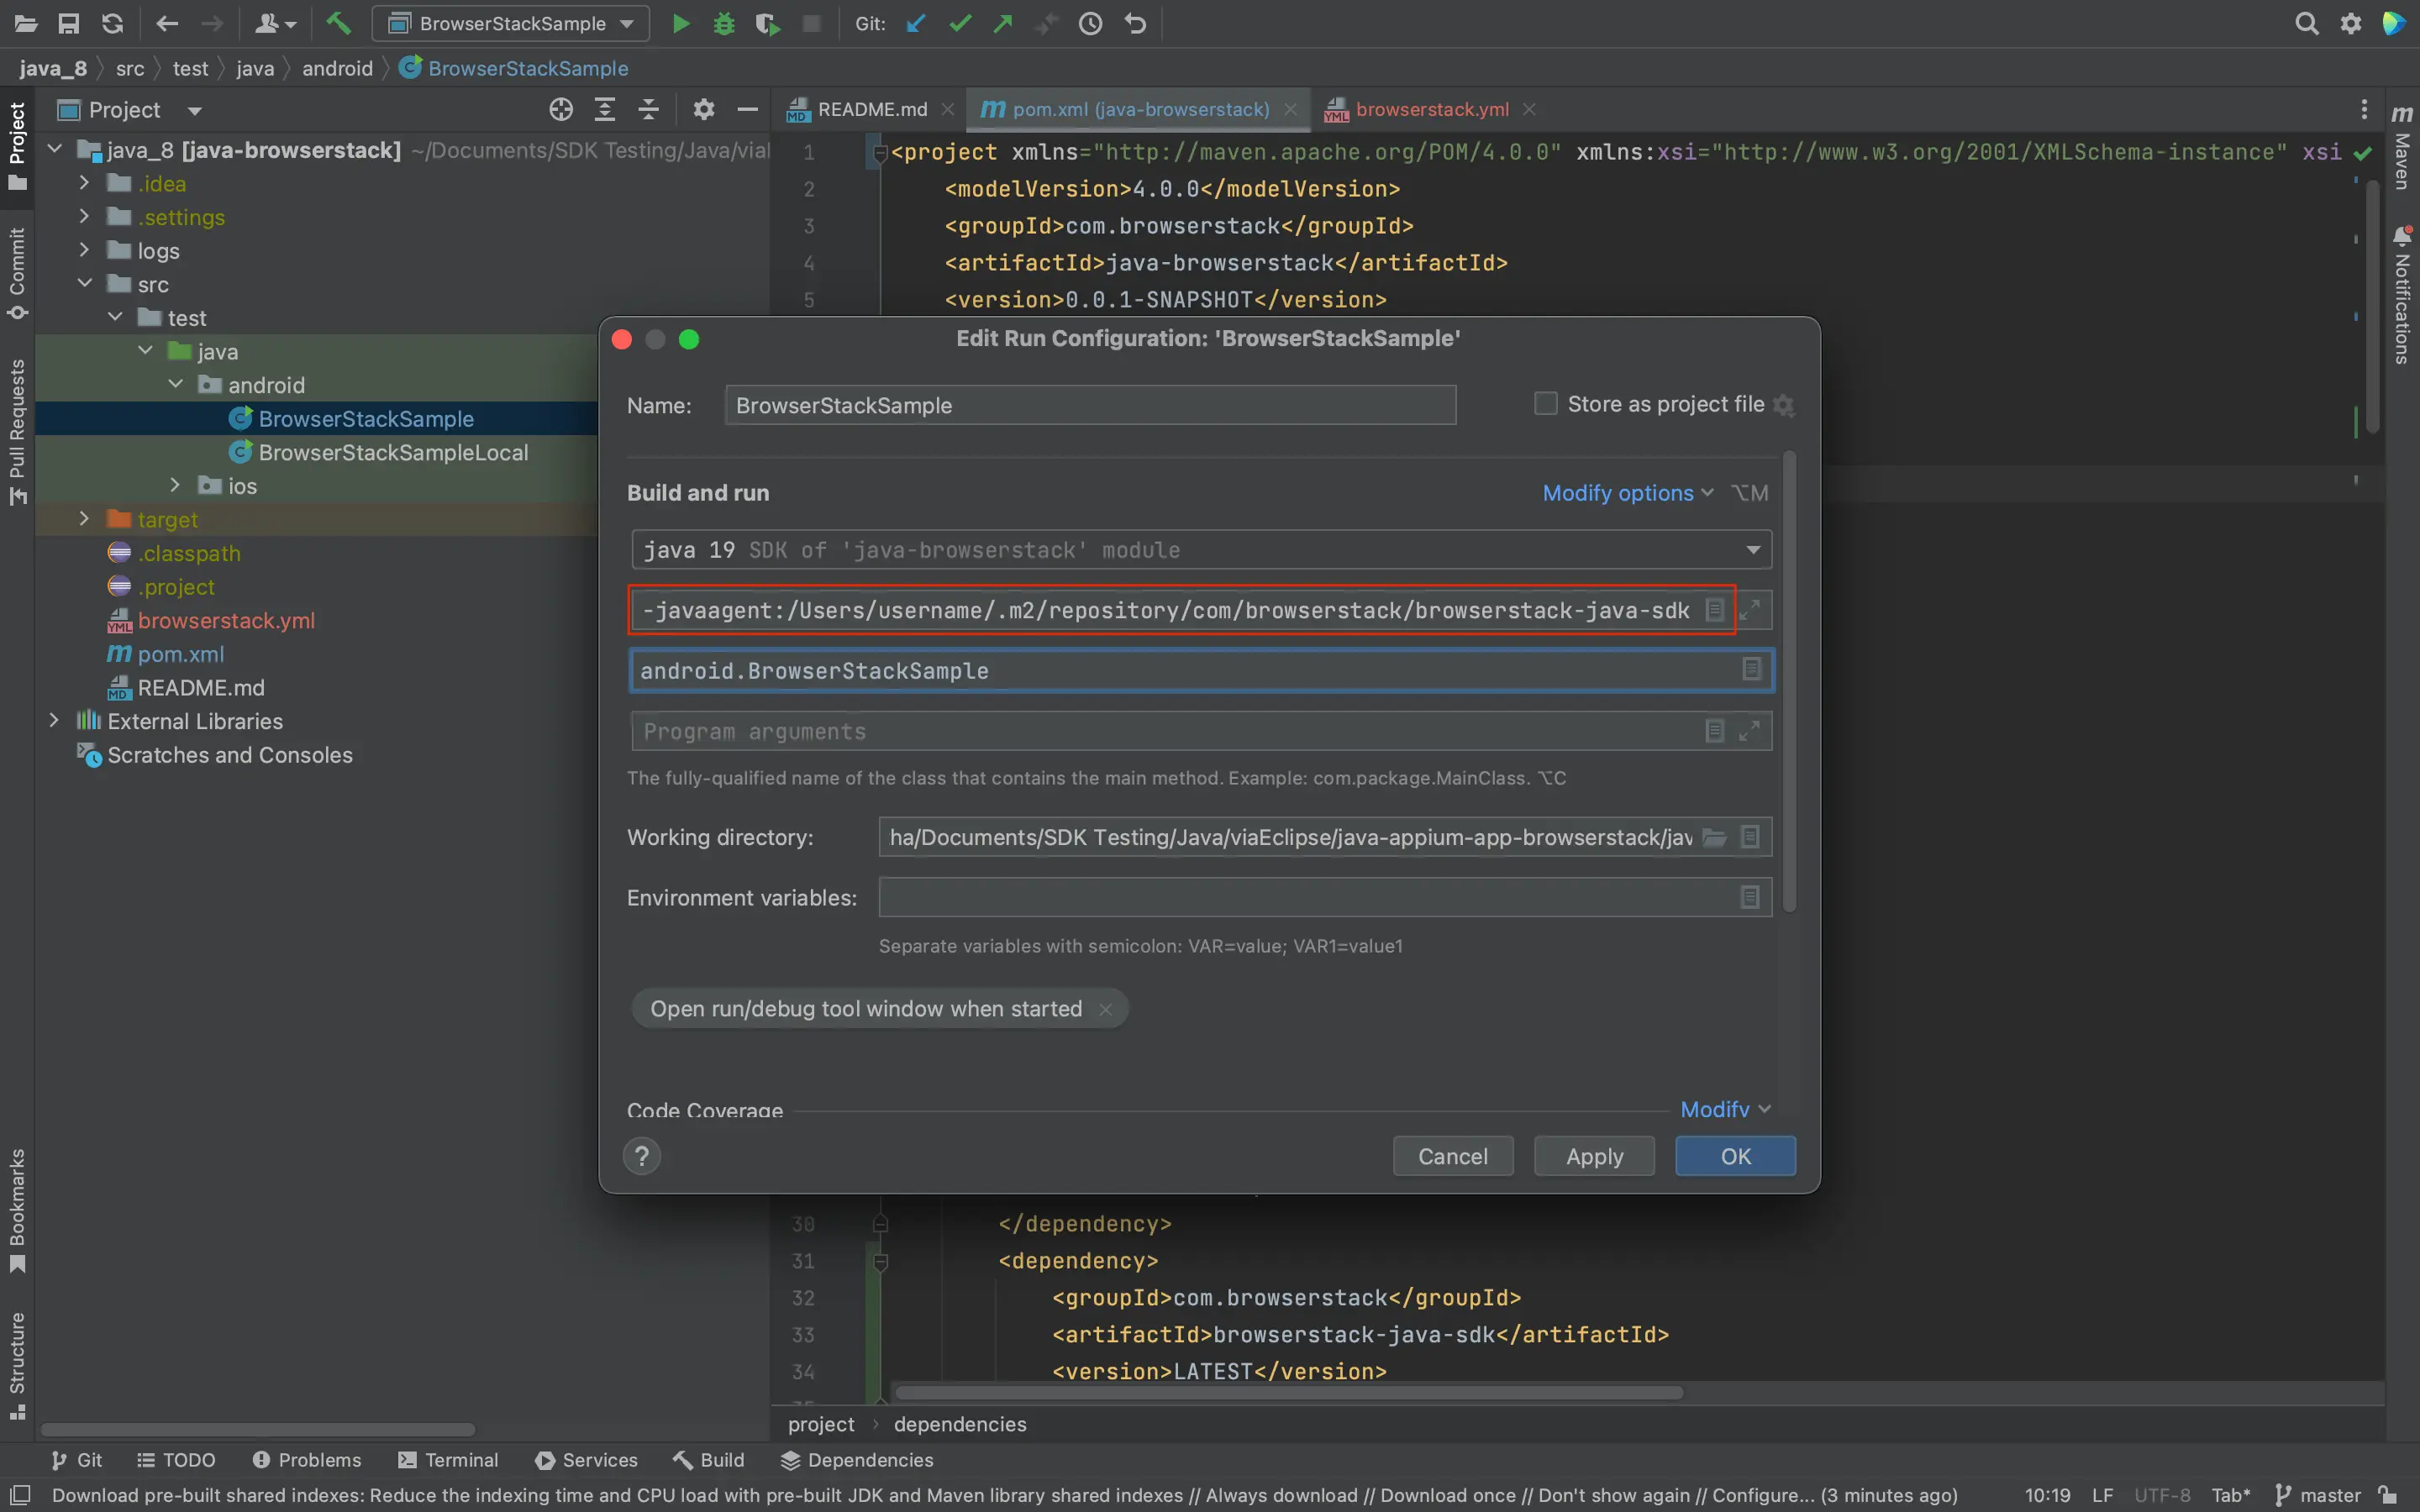
Search for the browserstack-java-sdk jar in Maven Dependencies, right-click the .jar file, and then click Copy:
Search for the browserstack-java-sdk jar in External Libraries. Right-click the .jar file, select Copy Path/References, and then copy the absolute path:
Example Paths:
Mac or Linux: /Users/User_Name/.m2/repository/com/browserstack/browserstack-java-sdk/1.0.9/browserstack-java-sdk-1.0.9.jar
Here’s a list of troubleshooting options you may find useful.
Errors faced during app upload
When you upload your app to BrowserStack, make sure that the app file and its path or URL are valid. If you see an error during app upload, first check the following:
The file path is correct and the app file exists on your machine.
The app URL is publicly accessible and not behind a firewall or authentication.
The app file type is supported by BrowserStack.
You can upload your app from the App Automate dashboard, App Management UI, or by using the REST API. For detailed information on uploading and managing apps, refer to Uploading and managing apps.
Invalid device OS combination errors
If you face errors related to invalid device OS combinations, ensure that the device and OS version combinations you are trying to run your tests on are supported on BrowserStack.
For detailed information on selecting devices, refer to the Select devices documentation.
To check the list of supported OS versions for devices on BrowserStack, refer to the App Automate supported devices documentation.
Resigned Apps and Third-Party Library Integration Issues
Uploading an unsigned version of an Android app will require us to sign it with our certificates before installing it on our devices. In the same manner, any uploaded .aab files will be converted into a universal APK and signed with our certificates.
If BrowserStack resigns the apps, third-party library integrations such as Google Firebase services, Google Maps SDK, Facebook SDK, etc., may not function properly if the use of API keys is restricted based on the SHA-1 certificate fingerprint of the app’s signing key.
To prevent this issue, it’s recommended to sign the APK with your own certificates before uploading it to BrowserStack.
Disabling Re-Signing for iOS Apps
If you upload an iOS app, we will re-sign the app with our own provisioning profile to be able to install your app on our devices during test execution.
However, if your app is signed using the Apple Developer Enterprise Program, you can disable this behavior to test features such as push notifications on BrowserStack devices.
Capability
Expected values
resignApp
A boolean. To disable re-signing, set the browserstack.resignApp capability to false in your Appium test scripts.

 Join our Discord


 Configure AI Agents