Cypress makes end-to-end testing efficient and reliable, and its headless mode allows tests to run without a graphical interface. This speeds up execution, simplifies CI/CD integration, and ensures smoother debugging. This article explains how to run Cypress in headless mode, debug effectively, and follow best practices for reliable results.
Overview
1. Understanding Cypress Headless Mode
- Runs Cypress tests without launching a browser UI.
- Useful in automation pipelines and environments where GUIs are not available.
- Default behavior when running via CLI (npx cypress run).
2. Running Cypress Tests in Headless Mode
- Execute tests directly from the terminal using:
- npx cypress run –spec <path>
- npx cypress run –headless –spec <path> (explicit).
- Add commands in package.json for easy execution.
- Works seamlessly in CI/CD pipelines.
3. Debugging and Capturing Results in Headless Mode
- Execution progress visible in terminal logs.
- Videos are automatically recorded in /videos folder.
- Screenshots captured on failures or with cy.screenshot().
- Helps quickly identify root causes of failing tests.
4. Best Practices for Reliable Headless Testing
- Set trashAssetsBeforeRuns: false to retain logs, videos, and screenshots.
- Always run on real devices and browsers to match user conditions.
- Keep tests modular and lightweight for faster headless execution.
This article provides a complete guide to running Cypress in headless mode, including setup, execution commands, debugging techniques, CI/CD integration, and best practices.
What is the Headless Mode in Cypress?
The headless mode in Cypress automation is a way of executing a test case. When we run a test case in Cypress, if the test case gets executed without any UI(User Interface), then it is called headless mode. Let’s discuss further setting it up and running Cypress in headless mode.
Setting up Cypress in Headless Mode:
Once you have installed Cypress, you will launch it with the command “npx cypress open”. In that way, you will get a UI, from which you can execute one-by-one test cases. But once the script is written, we may need to execute it directly from the command line interface.
To execute the script straight away from the command line, we need to run the command below,
npx cypress run –spec <path_of_script_to_be_executed>
By default, Cypress executes the test case in headless mode. But, we can also specify it explicitly by mentioning “–headless” like below,
npx cypress run –headless –spec <path_of_script_to_be_executed>
Note: <path_of_script_to_be_executed> should be replaced with the script name and its path.
Running Cypress tests in Headless Mode
Now let’s try to execute a test case in headless mode from Cypress. For this activity, we will have a script that will open the BrowserStack website and do assertions in the home page heading,
 describe('template spec', () => {
it('passes', () => {
//Visiting the browserstack website
cy.visit('https://browserstack.com')
//Making text assertion in browserstack home page heading
cy.get('h1').should('have.text','App & Browser Testing Made Easy')
})
})- The above script is saved with the name headlessMode.cy.js.
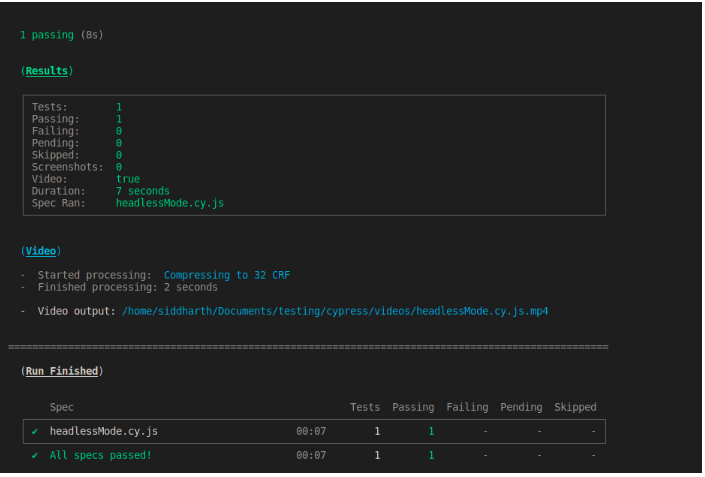
- As mentioned earlier, by default, when we execute the script from the command line, it will be executed in headless mode.
We can also explicitly mention the below command.
npx cypress run –headless –spec cypress/e2e/headlessMode.cy.js
Note: If you want to execute a specific spec file, you may need to add –spec in the command line.
Debugging in Headless Mode
When we execute the test script in headless mode, we can see the execution status over the command prompt or terminal.
Also, we can view the video of the execution under the Cypress/Video folder.
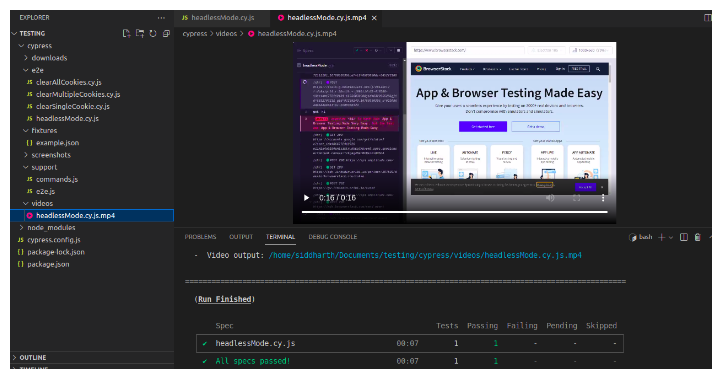
Let’s try to make our test script fail by modifying the assertion text with some other value.
 describe('template spec', () => {
it('passes', () => {
//Visiting the browserstack website
cy.visit('https://browserstack.com')
//Making text assertion in browserstack home page heading
cy.get('h1').should('have.text','App & Browser Testing Made Very Easy')
})
})
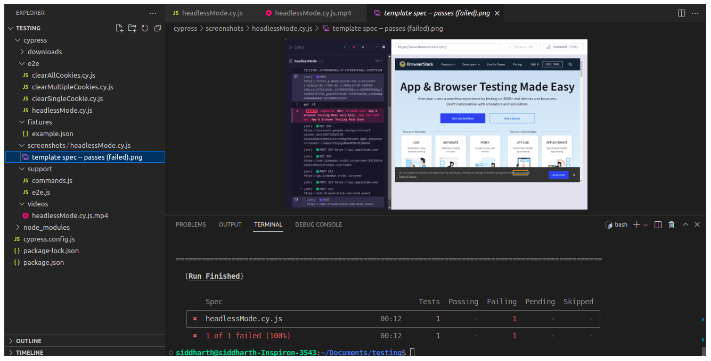
You will notice that the above script will fail during the assertion step and will take a screenshot of that page along with the video.
Taking Screenshots in Headless Mode
Sometimes, in a test case, we may need to take screenshots of a particular screen while executing the spec file. For that, we can use the cy.screenshot() command to take a screenshot. This command can be used for both the headless and headed mode.
Please refer below code to take screenshots while executing the test spec,
 describe('template spec', () => {
it('passes', () => {
//Visiting the browserstack website
cy.visit('https://browserstack.com')
//Making text assertion in browserstack home page heading
cy.get('h1').should('have.text','App & Browser Testing Made Easy')
//Takes screenshot after executing above step
cy.screenshot()
})
})
Cypress Headless Mode and CI/CD integration
Executing Cypress in headless mode is similar to running from the terminal. Also, you can pass the command inside package.json file to execute the script directly.
For example, let’s execute our script headlessMode.cy.js. We need to add the following piece of block inside the package.json file as mentioned below,
 "scripts": {
"cy:headless":"cypress run --headless --spec cypress/e2e/headlessMode.cy.js"
}
Save that package.json file and execute the below command to trigger the specified script inside the package.json file from the terminal,
npm run cy:headless
Once you execute the above command, you will notice that Cypress will execute the specified spec file in headless mode. This change can be pushed into the CI/CD environment, and that script can be executed directly from CI/CD.
Best Practices for Cypress Headless Mode Testing
By default, Cypress deletes screenshots and videos before executing a test case. Sometimes we may need to view the screenshots or videos of the previously executed test cases. In that case, we may need to add a parameter – trashAssetsBeforeRuns inside the cypress.config.js file as below,
const { defineConfig } = require("cypress");

module.exports = defineConfig({
e2e: {
setupNodeEvents(on, config) {
// implement node event listeners here
},
trashAssetsBeforeRuns: false
},
});
By making trashAssetsBeforeRuns false, we ask Cypress not to delete the content of the video and screenshot folder. This will help us clearly debug the failed test case while executing in headless mode.
Follow-Up Read: Cypress Best Practices for Test Automation
Troubleshooting Headless Mode Errors
While executing a test case in headless mode, Cypress will take a screenshot when it fails. We can determine the exact reason for that failed spec file with that screenshot. Also, it records video by default, giving us a clear picture of why the test case failed.
Conclusion
Using Cypress in headless mode can significantly speed up your testing process and make it more efficient. However, certain best practices should be followed to ensure that your tests run smoothly and deliver accurate results.
By properly configuring your Cypress environment, leveraging custom commands, and implementing effective testing strategies, you can ensure that your tests provide valuable feedback and help improve the quality of your web applications.
Cypress is an emerging testing framework and can test it across multiple devices. Browserstack provides you with a robust infrastructure to access:


