Getting Started with Website Test Automation
By Jash Unadkat, Community Contributor - November 19, 2024
Websites today must be flawless, responsive, and secure, yet managing every detail manually can be daunting. Website automation allows teams to optimize, test, and monitor their sites with accuracy and efficiency. Equipped with the right automation tools, businesses can deliver smooth user experiences, proactively address issues, and dedicate more time to innovation over repetitive tasks.
This guide explains website automation, its significance, and best practices to help you easily adopt automation testing for your websites.
- What is Website Test Automation?
- Why should you do Web Automation?
- How to approach Web Automation?
- How to write Web Automation Test Cases?
- Top Tools for Web Automation
- Benefits of Website Test Automation
- How to run website test automation with Selenium
- Best Practices for Automated Web Testing
- The Role of Real Browsers & Devices in Website Test Automation
- Factors to Consider While Choosing a Web Test Automation Tool
- Why use BrowserStack for Web Automation?
What is Website Test Automation?
Website test automation uses software tools and scripts to automatically test a website’s functionality, performance, and user experience.
Instead of manually checking each aspect, automation allows for rapid, repeatable testing across different browsers, devices, and operating systems. This approach saves time and improves accuracy, ensuring that websites meet quality standards before deployment.
Website test automation is essential for catching issues early, supporting continuous integration (CI) processes, and delivering a reliable, consistent experience to users.
It’s also important to bear in mind that automated testing doesn’t eliminate manual testing completely. In every testing pipeline, the latter has an important role to play. Refer to this Manual Testing tutorial to understand why manual testing can’t be avoided altogether.
Recommended read on – Manual vs Automated Testing: Core Differences
Why should you do Web Automation?
Web automation testing is key to ensuring that websites function flawlessly across devices and browsers. Here is why it is essential:
- Speeds Up Testing Cycles: Automates repetitive test cases, allowing faster release cycles and continuous testing.
- Increases Test Coverage: Runs tests across multiple browsers, devices, and scenarios, catching issues that manual testing might miss.
- Reduces Human Error: Provides consistent, reliable test results by minimizing the risk of manual mistakes.
- Enhances CI/CD Integration: Fits seamlessly into CI/CD pipelines, enabling smooth, automated deployments with every update.
- Frees Up QA Teams for Strategic Work: Allows QA teams to focus on complex test cases and exploratory testing instead of routine checks.
How to approach Web Automation?
Approaching web automation effectively requires a clear strategy and the right tools. Here’s a step-by-step guide to get started:
- Define Your Goals: Identify the main objectives, like reducing testing time, increasing test coverage, or ensuring compatibility across devices and browsers.
- Choose the Right Automation Tools: Select tools that fit your needs—like Selenium, Cypress, or Playwright—and ensure they support the browsers, devices, and languages you need.
- Identify Test Scenarios to Automate: Start with high-impact, repetitive tasks such as regression tests, form validations, and user flows. Prioritize tests that are time-consuming if done manually.
Read More: How to create Test Scenarios
- Set Up a Robust Test Framework: Create a framework that organizes test cases, handles data, and generates reports. Use design patterns like the Page Object Model (POM) for scalability and readability.
- Integrate with CI/CD Pipelines: Incorporate your tests into CI/CD pipelines for automated test execution with each code push, enabling continuous testing and faster feedback.
- Use Real Devices for Cross Browser Testing: Ensure accurate results by running tests on real devices or a cloud-based device lab, like BrowserStack Automate, to simulate actual user environments.
- Maintain and Update Tests Regularly: As your website evolves, so should your tests. Regularly review, update, and optimize test cases to keep them effective.
How to write Web Automation Test Cases?
Here is a straightforward approach to writing effective web automation test cases:
- Set Clear Objectives: Each test should have a specific goal, like verifying login or checkout.
- Map User Steps: Break down key user actions for each scenario (for example: login, add to cart) to make tests realistic.
- Use Clear Names: Name test cases simply, for example “Login with valid credentials,” for easy identification.
- Follow a Standard Structure: Include Preconditions, Steps, Expected Results, and Postconditions to keep tests organized.
- Apply Page Object Model (POM): Use POM to keep element locators and actions in one place, making tests easier to update.
- Write Reusable Functions: Create functions for repetitive tasks (like login) for cleaner, quicker updates.
- Add Assertions: Use assertions to check expected outcomes, such as a success message or page change.
- Specify Test Data: Document required data (for example: usernames) and use external sources to simplify updates.
- Optimize Speed and Stability: Use explicit waits instead of hard delays for faster, stable tests.
- Review and Maintain Regularly: Update tests as your site changes to keep them accurate.
Top Tools for Web Automation
Here is a look at some top tools and frameworks for web automation:
1. BrowserStack Automate
Primarily known for cross-browser testing, BrowserStack Automate excels in website test automation. It allows teams to run tests on real desktop environments across multiple platforms.
Key Features:
- Real Device Cloud: Run automated tests on actual devices on the cloud, bypassing the need for in-house physical devices.
- Comprehensive OS Coverage: Supports a range of Windows and macOS versions to ensure consistent performance across platforms.
- Local Testing of Internal Apps: Securely test desktop apps within private networks using BrowserStack Local, without internet exposure.
- Parallel Test Execution: Execute multiple tests concurrently across environments to speed up testing and align with CI/CD workflows.
- Integration with Top Automation Frameworks: Works seamlessly with Selenium, Appium, and other tools, supporting languages like Python and Java.
- Comprehensive Test Reports: Access detailed reports with screenshots, videos, and logs for quick debugging of test failures.
2. Selenium
Selenium is a popular open-source tool for automating across all major browsers, supporting multiple programming languages for custom test setups.
Features:
- Cross-browser Support: Automates across all major browsers for broad coverage.
- Multi-language Compatibility: Supports various languages, including Java, Python, and C#.
- Flexible Integrations: Works well with CI/CD pipelines and other test frameworks.
3. Cypress
Known for its speed and reliability, Cypress is ideal for end-to-end testing in JavaScript applications, offering a developer-friendly setup.
Features:
- Real-time Reloads: Instantly refreshes tests for fast feedback.
- Automatic Waits: Automatically waits for elements, reducing flakiness.
- Easy Debugging: Developer tools and detailed logs simplify debugging.
- JavaScript Native: Built specifically for JavaScript applications.
4. Playwright
Developed by Microsoft, Playwright supports versatile cross-browser testing and handles dynamic content well, with support for multiple languages.
Features:
- Cross-browser Support: Runs tests on Chrome, Firefox, and Safari for full coverage.
- Multi-language Compatibility: Works with Python, JavaScript, and other languages.
- Auto-wait for Stable Tests: Automatically waits for elements to load, enhancing stability.
5. Puppeteer
Puppeteer is a Node.js library for automating Chrome and Chromium, making it ideal for UI testing, performance monitoring, and web scraping.
Features:
- Headless Browser Control: Operates in a headless mode for faster, lightweight tests.
- Built-in Debugging: Provides robust debugging tools and insights.
- Network Emulation: Simulates different network conditions for performance testing.
Benefits of Website Test Automation
- Faster feedback
Automated testing is extremely beneficial for validation in various phases of development. This helps teams uncover potential bugs faster, save time, and enhance communication among the developers, testers, and designers. - Improved test efficiency
Although it may take more time to set up the test automation framework, the time is made up because test coverage rates are much wider, which means each test validates a greater number of features and functions. Since automation moves faster, the entire test suite takes less time to execute. Once automated tests are initiated, testers can focus on other tasks and evaluate test results once all the test cases are executed. - Reduced expenses
Automated tests help achieve excellent test coverage in shorter timelines. This helps deliver a quality product, thereby reducing the probability of bugs appearing post-release. This helps to save project costs. - Reusability of test cases
The repetitive nature of automation helps reuse test scripts. This is extremely useful when new patches are developed, and the software needs to be tested as a whole again. - Faster time to market
As discussed above, automation helps boost test coverage in restricted timelines. This helps QAs test newly developed features within tighter deadlines and release robust applications faster.
How to run website test automation with Selenium
Selenium is indisputably the most popular framework used for automated website testing across multiple browsers. Having said this, let’s go through seven fundamental steps to get started with test automation.
Read More: How to run your first Selenium test script
Let us see how we can use Selenium commands to test “Add To Cart” functionality using the BStackDemo application.
Prerequisites for setup:
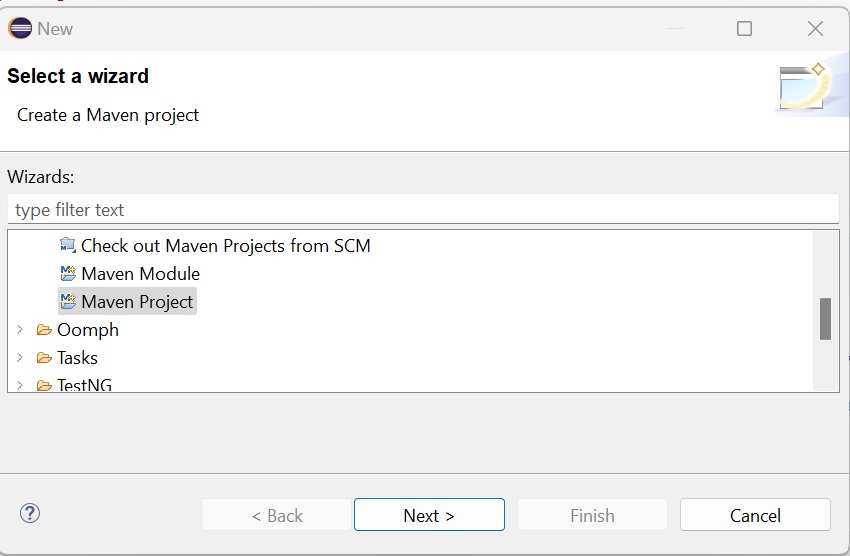
1. Eclipse or any other IDE installed.
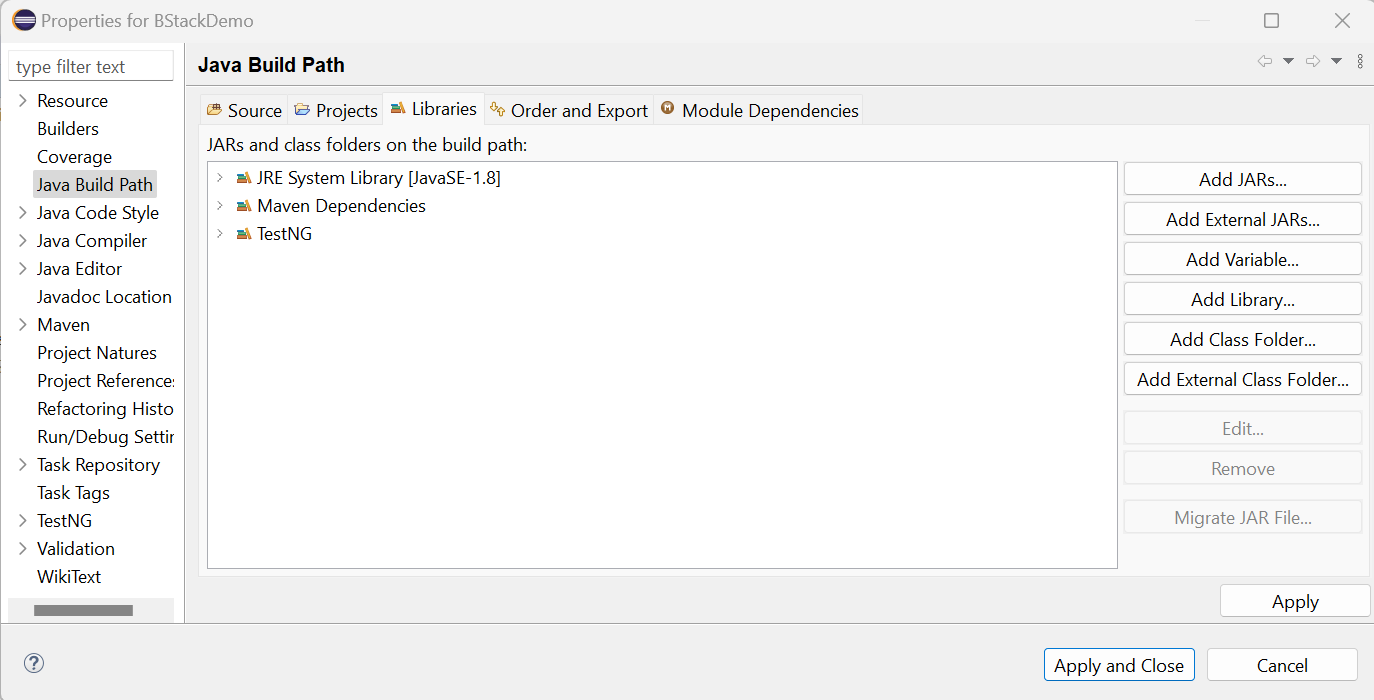
2. Install the TestNG library in Eclipse from the Eclipse marketplace and add it to the Project’s configuration.
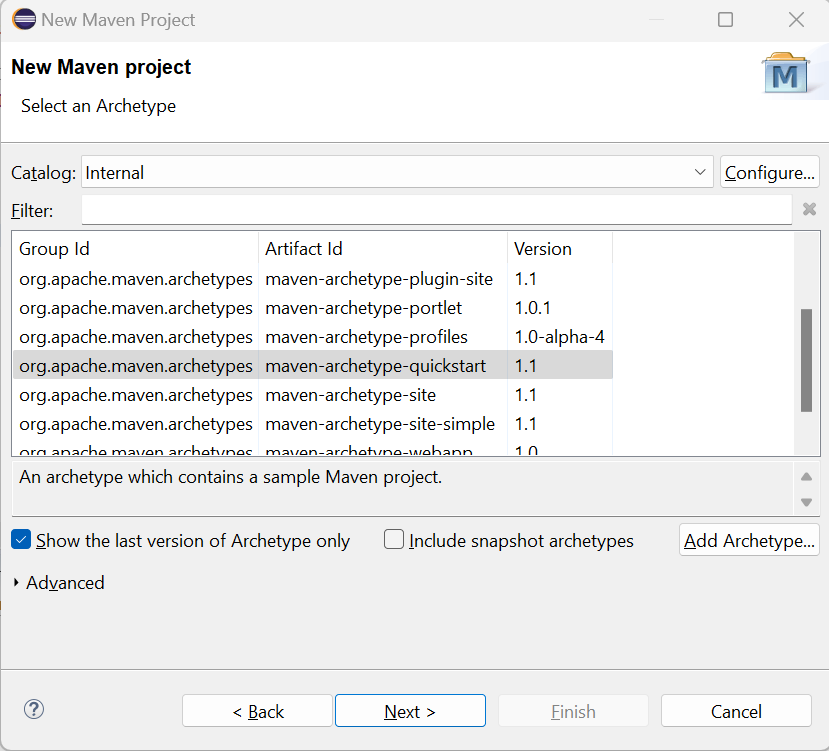
Choose maven-archtype-quickstart 1.1 as an archetype.
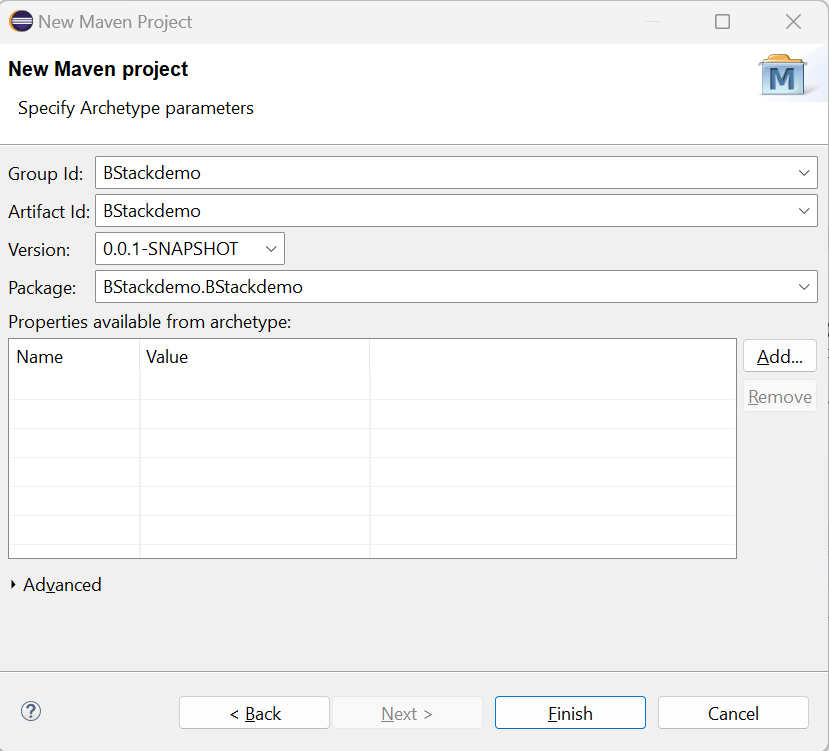
Enter a valid group id and artifact id and click on Finish.
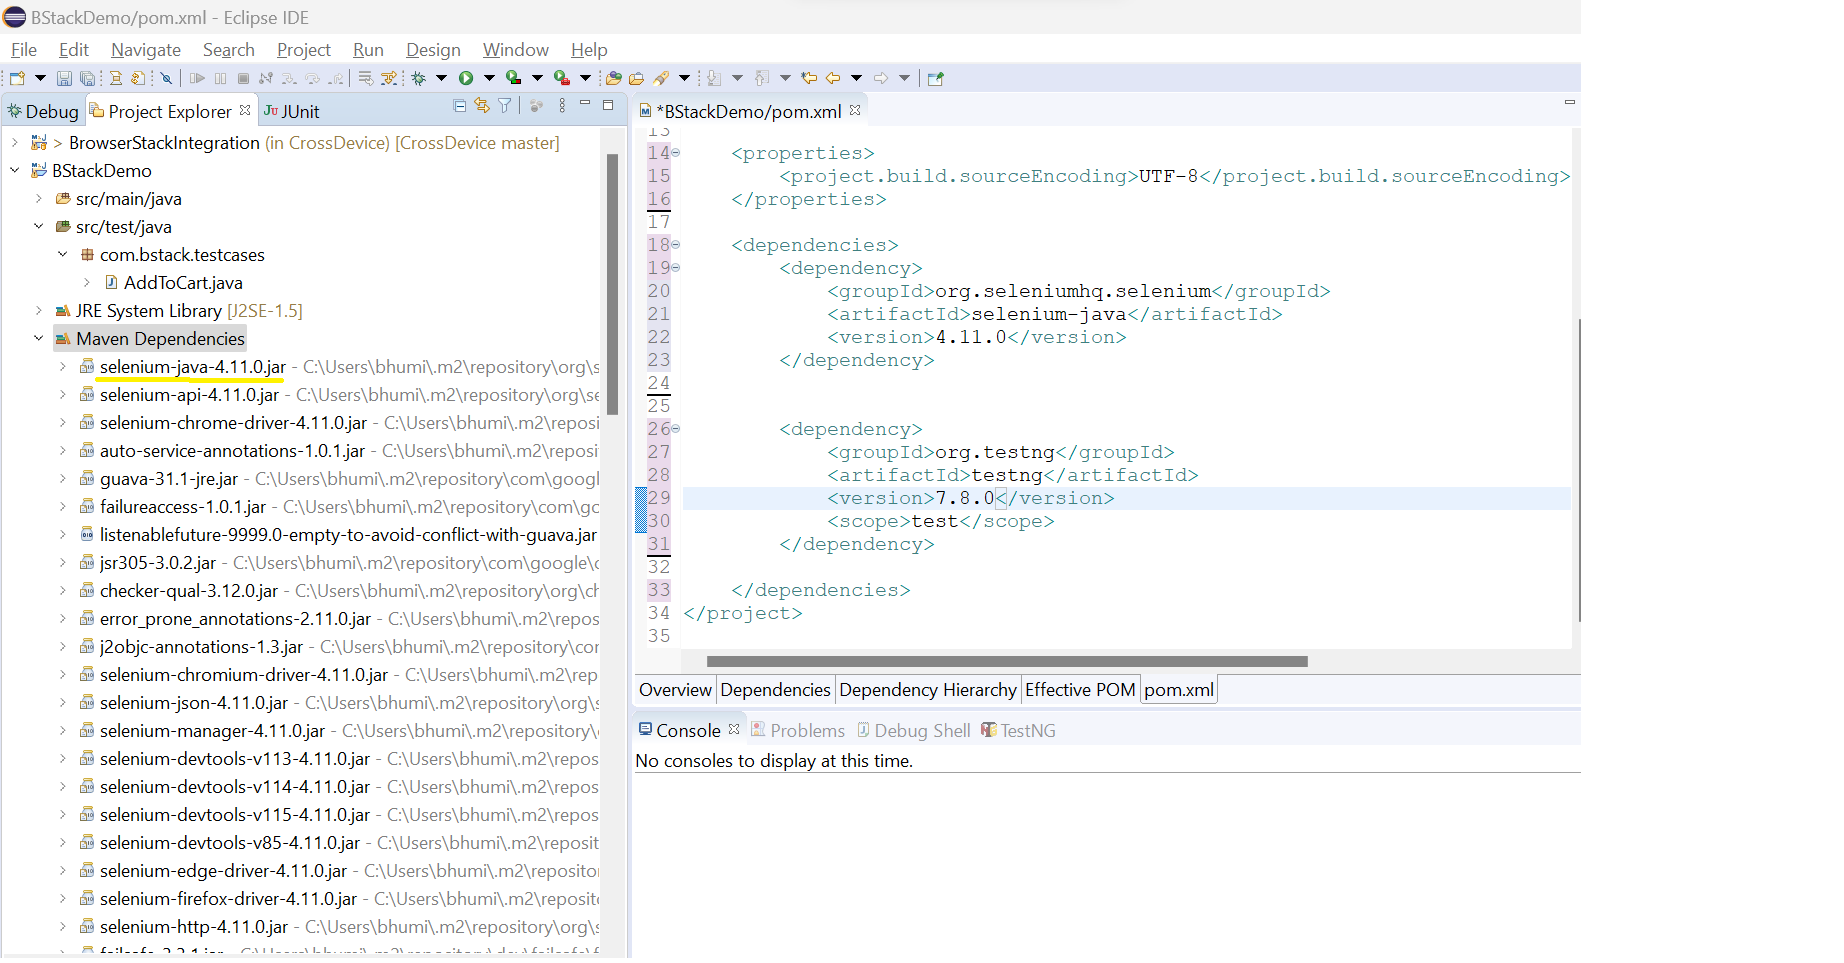
4. Add Selenium Java dependency and TestNG dependency in the pom.xml file and save it to download the dependencies.
<dependency>

    <groupId>org.seleniumhq.selenium</groupId>

    <artifactId>selenium-java</artifactId>

    <version>4.11.0</version>

</dependency>


<dependency>

<groupId>org.testng</groupId>

<artifactId>testng</artifactId>

           <version>7.8.0</version>

           <scope>test</scope>

</dependency>
Expand Maven Dependencies folder under the project to check if all the dependencies are downloaded.
Refer to these articles on Selenium with Java or how to execute Selenium projects to understand the basic configuration for Selenium testing.
Below are the 7 steps required for a basic Selenium test which includes creating the WebDriver instance, using the WebDriver instance to perform actions on the web and finally asserting the test.
1. Create a WebDriver instance and initialise it
Initialising the WebDriver interface is the first step in writing a Selenium test script. One needs to create the instance of the WebDriver interface using the constructor of a specific web browser. This instance then helps to invoke other methods.
WebDriver driver;

driver=new ChromeDriver();
2. Navigating to the desired web application URL
The next step is to navigate to a specific web page that needs to be tested. This is performed by invoking the get method of the WebDriver interface.
driver.get(“https://bstackdemo.com/”);
3. Locating specific Web Elements on the Web page and storing it in WebElement variable
To interact with a web-page, one needs to locate specific HTML elements first. Only then one can perform the desired operations. Refer to this article on locators in Selenium to understand different locator strategies like Xpath, id, name, etc. The findElement method of the WebDriver interface is used to locate elements.
WebElement firstAddToCartBtn = driver.findElement(By.xpath("(//div[@class='shelf-item__buy-btn'])[1];
4. Performing actions on HTML Elements
Once the desired element is identified, the next step is to interact with them using interaction methods. Interactions include entering text, clicking buttons, clearing text fields, etc.
firstAddToCartBtn.click();
5. Anticipating browser response
Once an operation is performed, for example, if a click operation is performed on the submit button, then one needs to wait for a second or two to get the server response.
To test server response, one needs to program the waiting time in the test scripts. WebDriver API supports two techniques for anticipating wait response: Implicit and Explicit Wait. Read this detailed article on Wait commands in Selenium to learn their implementation.
6. Asserting the test
In the previous steps, we have just performed the steps to execute the test. To verify that the given test is Pass or Fail, one needs to assert it against an expected result. In this case, we will assert that after adding the product to cart, product should be added to cart and this can be verified by checking the visibility of Checkout button.
WebElement checkoutBtn=driver.findElement(By.cssSelector("div.buy-btn"));

Assert.assertTrue(checkoutBtn.isDisplayed());
If the product is added successfully to cart, the checkout button should be visible and the above assert should return value true. In either case it should return false.
7. Terminating the test
Once all the test cases are executed, the test can be concluded by invoking the quit method. The quit method closes all active pages, terminates the browser, and ends the connection with the server that interacts with the browser.
driver.quit();
Complete Code:
package com.bstack.testcases;

import org.openqa.selenium.By;

import org.openqa.selenium.WebDriver;

import org.openqa.selenium.WebElement;

import org.openqa.selenium.chrome.ChromeDriver;

import org.testng.Assert;

import org.testng.annotations.Test;

public class AddToCart {

WebDriver driver;

@Test

public void addToCartTest() throws InterruptedException {

driver=new ChromeDriver();

driver.get("https://bstackdemo.com/");

Thread.sleep(2000);

WebElement firstAddToCartBtn=driver.findElement(By.xpath("(//div[@class='shelf-item__buy-btn'])[1]"));

firstAddToCartBtn.click();

WebElement checkoutBtn=driver.findElement(By.cssSelector("div.buy-btn"));

Assert.assertTrue(checkoutBtn.isDisplayed());

driver.quit();

}

}
To get started with the basics of Selenium testing, have a look at the video below. It discusses in detail what Selenium is, how you can set up and write your first test, what to look for in frameworks, and how to pick the best framework for you.
Best Practices for Automated Web Testing
Here are some of the key best practices that you should follow for Automated Web Testing:
- Analyse test cases to be automated: It is not feasible to automate all the test cases and therefore before starting the automation, we should plan and analyze the right candidates to proceed with the automation.
Test cases that are run very rarely should be executed manually. Also, test cases which require human intervention also fall under manual execution.
Test cases which are run very frequently are the right candidates for automation. In addition, test cases that are run for different data sets or multiple platforms, hardware and OS configurations should also be automated to minimize the test execution time. - Choose the right automation tool: Deciding the right automation tool depends upon the nature and budget of the Project.
For example: If it is a web application, Selenium, Cypress, Playwright can be used to test end-to-end flow. For mobile platforms, Appium is the most commonly used automation tool.
Proper research should be done for the tool regarding its feature, community support and maintenance. - Testing team skill set: This is the most important aspect, as the testing team who would eventually drive the automating testing should be well versed and comfortable with the selected tool.
Considering the team’s expertise and experience is pivotal in choosing the right automation tool.
For example: For a web project, if the majority of the team members are skilled in Java programming languages, Selenium or Playwright with Java should be chosen. - Record the test execution: In manual testing, we showcase the health of the application by executing test cases and maintaining test logs for every test iteration.
A test record is essential in analysing the failures, debugging, and proving that the test execution was performed for a particular software under some environmental conditions and time stamp.
In automating testing, we can achieve reporting by integrating test reporting libraries such as TestNG, JUnit, etc.
The Role of Real Browsers & Devices in Website Test Automation
Comprehensive and accurate website test automation, especially when it includes cross browser testing requires real browsers and devices. Testers need to check how the software renders and operates in real user conditions, for which they need to test on multiple unique browser-device-OS combinations.
To do so, QAs must run automated website tests on real browsers, devices, and operating systems. The software will have to render perfectly on each device, browser, and browser version, considering their technical variances and idiosyncrasies. Given device fragmentation, QA teams need access to a massive on-premise digital lab (constantly updated with newer devices) to perform satisfactory automated cross browser compatibility testing.
Not every organization has the finances or the human resources to set up and maintain such a lab, and they don’t have to. They can use BrowserStack, a cloud-based testing platform offering access to a real device cloud of 3000+ real browsers and devices for website test automation. Be it manual testing, automated Selenium testing, automated visual testing, or Cypress testing, testers can utilize BrowserStack’s infrastructure to get 100% accurate results in real-world circumstances. They can also use Puppeteer testing and Playwright testing.
Additionally, testers can also access multiple features designed to make testing faster and more convenient – integration with popular CI/CD tools like Jenkins, Travis, Circle CI to ensure a robust automation pipeline.
Run Selenium Tests on Real Browsers
Factors to Consider While Choosing a Web Test Automation Tool
Here are some of the essential factors to consider when evaluating a web test automation tool:
- Cross-Browser and Device Coverage: Ensure the tool supports the browsers and devices your users rely on for a smooth experience across platforms.
- Ease of Use: Consider the tool’s learning curve. Some tools are beginner-friendly, while others offer more flexibility but may require setup.
- CI/CD Integration: Look for tools that integrate with CI/CD pipelines. It enables automated test runs with each code push for fast feedback.
- Programming Language Support: Choose a tool that supports your team’s existing programming languages for smoother onboarding and development.
- Parallel Test Execution: Tools with parallel testing can run multiple tests simultaneously, saving time and enhancing efficiency for large test suites.
- Reporting and Debugging Features: Good tools offer detailed reports with screenshots, logs, and videos, making it easier to identify and resolve issues.
- Scalability and Cloud Support: Cloud-based tools provide on-demand access to real devices and scale as needed, eliminating the need to maintain device labs.
- Cost and Licensing: Consider your budget and the tool’s licensing options. Some tools are free, while others offer advanced features at a cost.
- Community and Documentation: A strong user community and clear documentation can be invaluable for troubleshooting and continuous learning.
Why use BrowserStack for Web Automation?
BrowserStack Automate is a top choice for web automation testing because it offers a seamless, cloud-based solution that lets teams test websites on real devices and browsers. This means you can be confident in how your site performs in the real world.
Unlike emulators or simulators, BrowserStack runs tests on actual devices, helping teams catch issues that only appear on physical devices. This ensures that websites function properly across both desktop and mobile platforms.
One of BrowserStack’s biggest advantages is its extensive cross-browser support. Instead of needing a device lab or complex setup, teams get instant access to all major browsers and versions directly from the cloud. This makes it easy to check that your website looks and works perfectly across the platforms your users rely on.
BrowserStack also saves valuable time with parallel testing. It lets you run multiple tests at the same time on different devices and browsers, which dramatically speeds up testing. This feature integrates smoothly with CI/CD pipelines, making it ideal for teams that need fast feedback and continuous integration as they develop.
When issues arise, BrowserStack’s detailed reporting features make it easy to spot and fix them. Test reports come with screenshots, videos, and logs, so you can quickly diagnose problems without any guessing.
This makes debugging faster and more effective. BrowserStack also scales with your needs. As testing demands grow, it provides access to more devices and browsers without the hassle of maintaining a physical lab.
Conclusion
Automating test cycles has become a basic necessity for teams operating in an agile ecosystem.
However, all automated tests must be run on real devices and browsers, because there is no other legitimate way to monitor website behavior in real-world scenarios. Not only does this enable more effective use of time and effort, but it also ensures that speed does not come at the cost of the accuracy of results.
BrowserStack Automate is a powerful web test automation tool that allows teams to run automated tests on real browsers and devices in the cloud. With robust support for parallel testing, seamless CI/CD integration, and detailed debugging features, it ensures faster, reliable testing and helps deliver high-quality web applications across all platforms.

