Cross browser testing is significant in test automation to ensure that the website or web application is working as intended across different browsers that the end-user may use. WebdriverIO is a great tool for cross-browser testing.
This article explains how to run tests in different browsers with WebdriverIO.
Why is Cross Browser Testing Important?
Cross browser testing ensures your web application works seamlessly for all users, no matter their browser or device. Here’s why it’s essential:
- Ensures a smooth, consistent experience across all browsers. This prevents user frustration caused by layout or functionality issues.
- Supports users on different browsers, devices, and operating systems. This expands your app’s accessibility and reach.
- Provides a reliable, bug-free experience for end users. It builds trust and enhances your brand’s reputation.
- Identifies compatibility issues early in development. This reduces costly fixes and speeds up deployment.
- Optimizes performance across browsers, ensuring faster load times and responsiveness for all users.
What is WebDriverIO?
WebDriverIO is an open-source automation framework for testing web and mobile applications, written in JavaScript and running on Node.js. Built on the WebDriver protocol, it provides tools to automate browser interactions.
With cross-browser testing capabilities, it is highly popular for end-to-end testing across different environments, including iOS-native applications.
WebDriverIO supports both Behavior Driven Development (BDD) and Test Driven Development (TDD), as well as various testing frameworks like Mocha, Jasmine, and Cucumber.
It integrates smoothly with CI/CD pipelines, making it ideal for automated UI testing in continuous deployment. Additional features like parallel testing and mobile testing improve test efficiency and coverage.
WebDriverIO Architecture
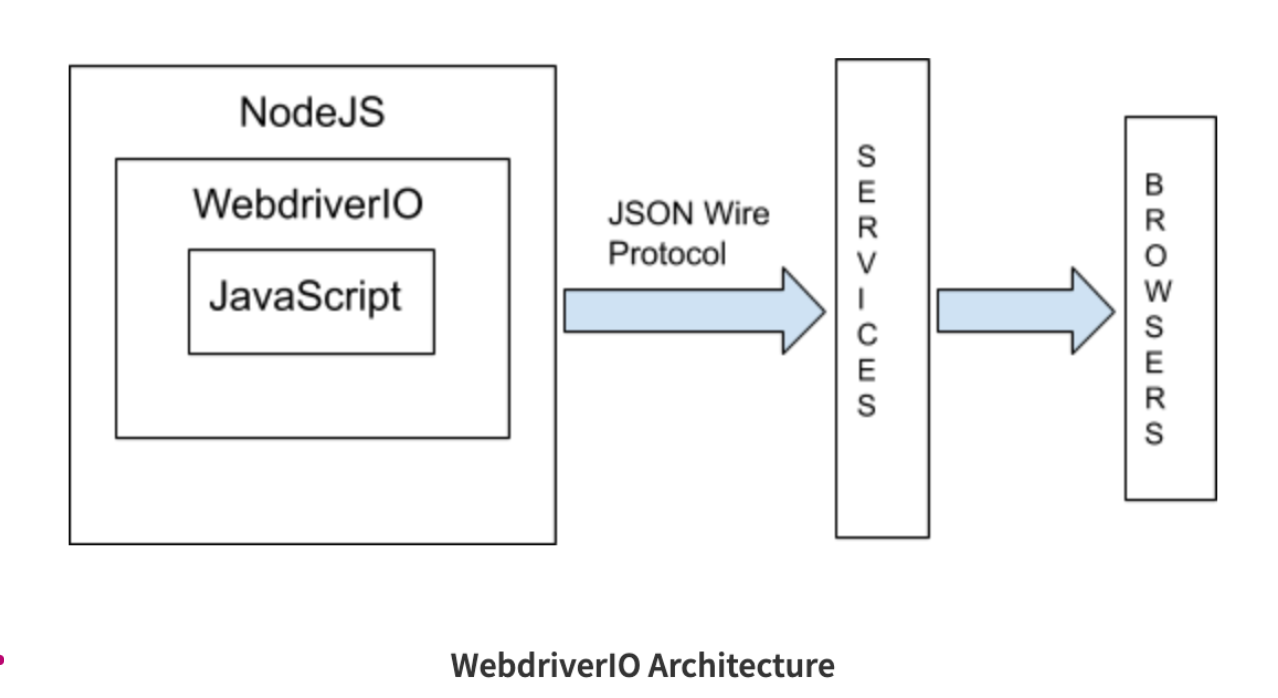
The WebDriverIO architecture is built on Node.js and uses the JSON Wire Protocol to talk to browsers. Packaged as an npm module, it follows RESTful principles, making it well-suited for modern development.
The core of WebDriverIO is the Test Runner, which controls tests and connects to a configuration file with settings for browsers, devices, and cloud services. Users write tests in JavaScript with the WebDriverIO library, where each command is sent as an HTTP request using Node.js. These requests go through the services module and reach the browser, which then performs the actions to test if the application works as expected.
Why choose WebDriverIO for Cross Browser Testing?
WebDriverIO is a top choice for cross-browser testing due to its extensive support and flexibility. Here is why it stands out:
- Wide Browser Compatibility: WebDriverIO supports major browsers, including Chrome, Firefox, Safari, and Edge, ensuring tests run consistently across various environments.
- Cross-Platform Testing Support: It can test both desktop and mobile browsers, making it ideal for diverse user bases.
- Integration with Testing Platforms: WebDriverIO easily integrates with cloud-based platforms like BrowserStack, which enables tests across multiple devices and OS combinations without the need for physical infrastructure.
- Parallel Testing: It allows parallel execution of tests, reducing testing time across different browsers significantly.
- Customizable Framework: With support for popular testing styles like BDD and TDD, testers can write cross-browser tests in familiar syntax using frameworks like Mocha, Jasmine, and Cucumber.
How to perform Cross Browser Testing Service using WebdriverIO
In this section, we are going to learn how to perform cross browser testing using WebdriverIO in BrowserStack. BrowserStack provides instant access to 3500+ real browsers and mobile devices. This makes it really easy to run the tests in different browsers and operating systems.
In case, you want to visit the official documentation of BrowserStack for WebdriverIO, visit here.
Cross browser testing helps run tests in various browsers to catch the errors that are occurring due to different browser compatibility. BrowserStack makes it easier to run the automation tests in an efficient and quick way. We can integrate BrowserStack with WebdriverIO via the npm package.
1. Pre-requisites
- Node.js
- WebdriverIO
To install WebdriverIO, pass in the below commands from the root of your project.
npm init wdio
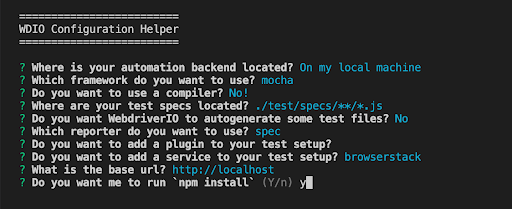
During installation, you’ll be prompted with questions, as shown in the image.
You can configure the options mentioned above. Please input BrowserStack for the ‘Do you want to add service to your test setup’ option.
To install the BrowserStack service, pass on the below command in the terminal to install it as a dev dependency.
npm install @wdio/browserstack-service --save-dev
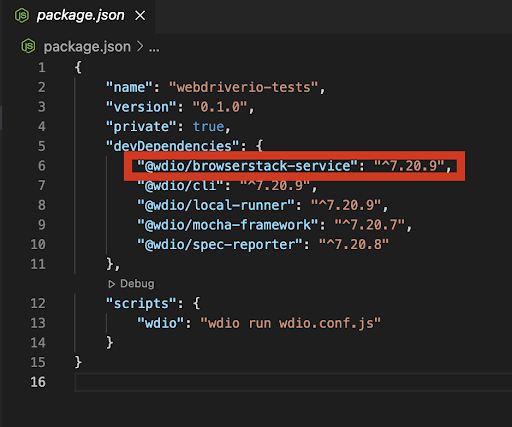
Once we install the service, we can see the package in package.json
2. Sign up to BrowserStack
To execute the cross browser testing, create a free account with BrowserStack and sign in.
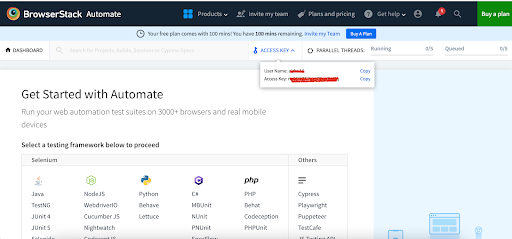
Once you are in, you will be directed to the dashboard page. Each user will be assigned a unique User Name and Access Key. We will be using them in our tests to connect to the BrowserStack server.
3. Configuration
To configure the BrowserStack access key, set the user and key value in the wdio.config.js file. Also set in browserstackLocal : true to route the connections from your local computer to the BrowserStack cloud.
exports.config = {

 user: process.env.BROWSERSTACK_USERNAME,

 Key: process.env.BROWSERSTACK_ACCESS_KEY,

 services: [

   ['browserstack', { browserstackLocal: true }]

],

}
Writing and executing tests in BrowserStack with WebdriverIO
Let’s write a simple test to execute them in BrowserStack. In the test, we are navigating to https://bstackdemo.com/ and passing in the credentials, and validating the success message.
describe("First Test", async ()=> {

   it("Execute the tests in different browser", async () => {

       await browser.url('https://bstackdemo.com');


       // adding the first product to cart

       const firstProduct = await browser.$("//div[@id='1']//div[@class='shelf-item__buy-btn'][normalize-space()='Add to cart']");

       await firstProduct.click();


       // clicking on the checkout button

       const checkOutButton = await browser.$("//div[@class='buy-btn']");

       await checkOutButton.click();

       await expect(browser).toHaveUrlContaining('checkout');


       // pass the username value

       const username = await browser.$("#username");

       await username.click();

       await browser.$('//*[@id="username"]/div[2]').click();


       // pass the password value

       const password = await browser.$("#password");

       await password.click();

       await browser.$('//*[@id="password"]/div[2]').click();


       // click on the login button

       await browser.$('#login-btn').click();


       // fill the first name

       const firstName = await browser.$('#firstNameInput');

       await firstName.setValue("Test");


       // fill the last name

       const lastName = await browser.$('#lastNameInput');

       await lastName.setValue("User");


       // fill the address

       const address = await browser.$('#addressLine1Input');

       await address.setValue("12, ABC apartment");


       // fill the province

       const province = await browser.$('#provinceInput');

       await province.setValue("TN");


       // fill the postal code

       const postalCode = await browser.$('#postCodeInput');

       await postalCode.setValue("123456");


       // clicking on the sumbit button

       await browser.$('#checkout-shipping-continue').click();

       const confirmationMessage = $('#confirmation-message')

       await expect(confirmationMessage).toHaveText('Your Order has been successfully placed.');

   });

});
To run the test case, pass the below command.
npm run wdio
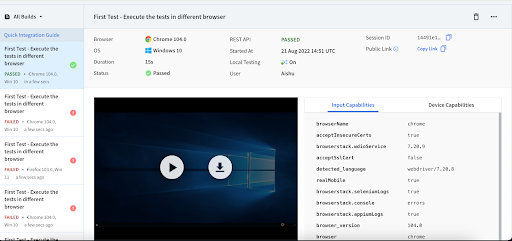
Once you run the test cases, WebdriverIO will interact with the BrowserStack cloud and will execute the tests. After the test run, you can see the result in the BrowserStack dashboard.
Note: Feel free to visit the official documentation of BrowserStack for WebdriverIO.
Running WebDriverIO Tests in Different Browsers
To run the tests in different browsers, you have to configure the browser capabilities in the wdio.config.js file. It is possible to run the tests in different browser configurations with BrowserStack. Under capabilities, pass the browser configuration as an array. We can also define the different browser versions that we indent to run in the capabilities by passing the version name.
capabilities: [

   {

     browserName: "chrome",

     acceptInsecureCerts: true,

   },

   {

     browserName: "firefox",

     acceptInsecureCerts: true,

   },

   {

     browserName: "safari",

     acceptInsecureCerts: true,

   },

 ],
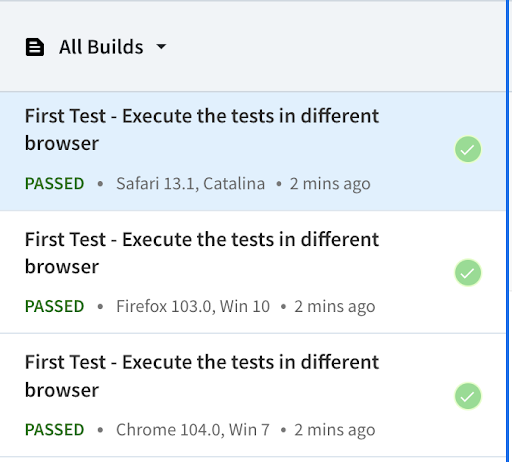
Once you run the tests in different browsers, you can view the results in the BrowserStack dashboard. Below is the sample test report attached.
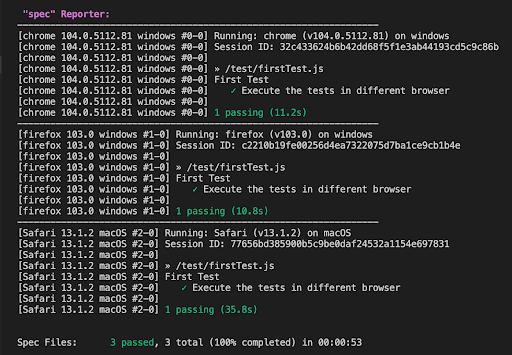
WebdriverIO also gives us the description of running the tests in the terminal.
Best Practices for Cross-Browser Testing Using WebDriverIO
To get the most out of cross browser testing with WebDriverIO, follow these best practices:
- Prioritize testing on your target audience’s most commonly used browsers and devices.
- Use a configurable setup in WebDriverIO to easily switch between browsers and environments, allowing for flexible testing.
- Leverage parallel testing with Cloud Selenium Grid in BrowserStack to run tests simultaneously, reducing test time and improving coverage.
- Isolate tests for browser-sensitive features to quickly identify compatibility issues without redundant checks.
- Optimize for performance by breaking down tests into smaller, focused cases, which speeds up testing and simplifies debugging.
- Incorporate responsive design testing by simulating different screen sizes and orientations to ensure a seamless experience across devices.
- Use clear assertions and logging in tests to accurately capture failures and identify issues specific to certain browsers or environments.
- Run regular regression tests to catch new cross-browser issues introduced by code changes or browser updates.
- Use text logs to document each command and visual logs to capture screenshots of every test step. This helps in quickly identifying and troubleshooting issues when the expected outcome isn’t met.
- Activate video recording only for failed tests to monitor exactly what went wrong without increasing runtime. Avoid recording passed tests to keep execution time efficient.
Conclusion
When performing cross-browser testing, users often face issues where they cannot test on an older version of the browsers or run multiple instances as it requires more memory and high infrastructure costs.
Browserstack helps you overcome this by providing a real device cloud. It allows testing on a range of browsers and devices like mobile phones, tablets, and smart TV with the most accurate results. You can execute tests on 3500+ desktop browsers such as older and latest versions of IE, Edge, Safari, Chrome, Firefox, etc.
Integration BrowserStack with WebDriverIO is effortless—simply update the *.conf.js configuration files with the BrowserStack Hub URL and the required credentials to connect to the BrowserStack Cloud Selenium Grid. This setup allows you to run WebDriverIO tests in parallel across various environments in the cloud. It reduces testing time and infrastructure costs while ensuring reliable and accurate cross-browser test results.


