Websites and APIs often behave differently depending on the browser, device, or tool making the request. These changes are triggered by something called the User-Agent string, a header that identifies the client.
If you’re debugging browser-specific issues, simulating bots like Googlebot, or testing mobile behavior from your desktop, you’ll likely need to set a custom User-Agent string.
This page explains what a User-Agent string is, why developers override it, and how you can set one using Requestly.
What Is a User-Agent String?
A User-Agent string is a piece of metadata sent with every HTTP request. It tells the server what browser, operating system, or device is making the request.
For example:
Mozilla/5.0 (iPhone; CPU iPhone OS 17_0 like Mac OS X) AppleWebKit/605.1.15 (KHTML, like Gecko) Version/17.0 Mobile/15E148 Safari/604.1
This tells the server that the request came from Safari on an iPhone running iOS 17. Based on this string, websites and APIs often change the content they return, load different versions of scripts, or enable or block specific functionality.
Why Set a Custom User-Agent String?
Setting a custom User-Agent string helps you control how the server sees your request. Common reasons include:
- Debug browser issues: Reproduce layout or functionality bugs that only appear in specific browsers like Safari or Firefox without switching devices.
Read More: Best Practices for Debugging Website Issues
- Test mobile behavior: Simulate a phone or tablet on your desktop to check how the mobile version of a site loads and behaves.
Also Read: How to Perform Mobile Browser Debugging
- Simulate crawlers: Use a crawler-like User-Agent to see what content search engines receive, especially for SEO or indexing checks.
- Check API responses: Test how APIs behave when requests come from different sources, such as browsers, apps, or automated tools.
Read More: What is API Testing? (with Examples)
- Bypass access filters: Access staging environments or endpoints that only respond to known or whitelisted clients by mimicking their User-Agent.
- Trigger feature flags: Activate experiments or conditional features that are only available to certain browsers or device types.
How to Set a Custom User-Agent String in Requestly
Requestly lets you easily override the User-Agent string for specific websites or requests. You can simulate popular devices and browsers or set a fully custom string to match any client behavior.
Step 1: Create a Modify User-Agent Rule
Start by creating a rule that lets you modify the User-Agent for selected requests.
- Open the Requestly dashboard.
- Go to the HTTP Rules section.
- Click + New Rule and select Modify User-Agent.
- The rule editor will appear where you can define matching conditions and modify headers.
Step 2: Choose the Target Website or Request
Specify where the rule should apply by setting a request match condition.
- Enter the domain, path, or wildcard pattern in the Source Condition field (for example, *google.com*).
- Choose whether the rule applies to just the main page request or to all sub-requests from that page.
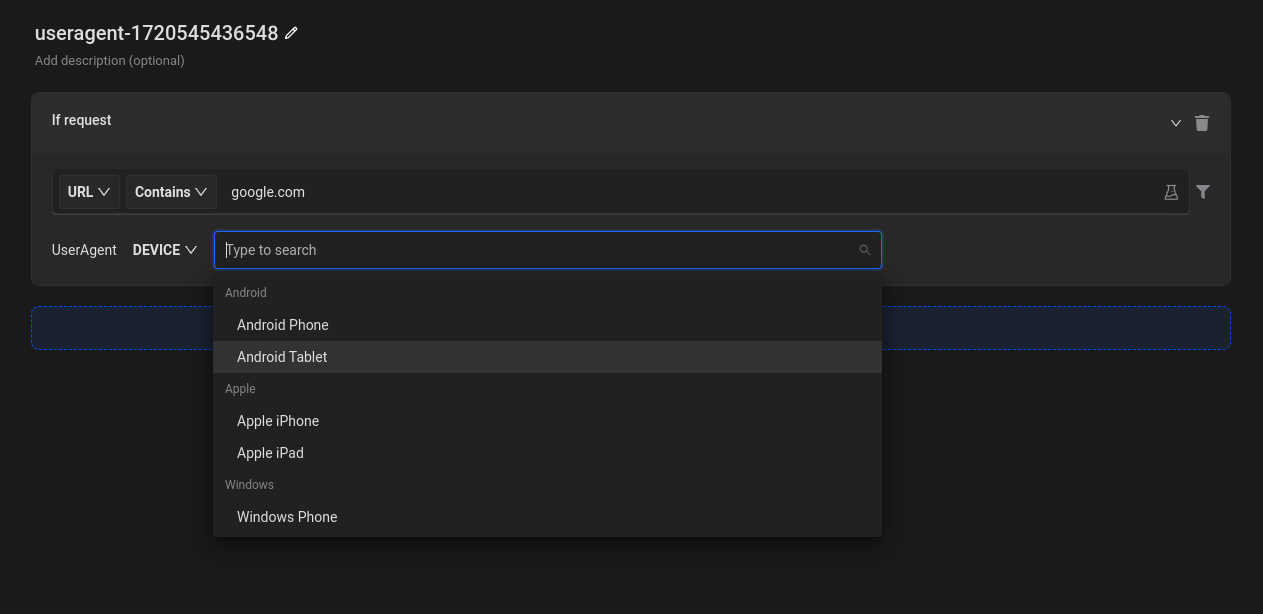
Step 3: Select a Device or Browser
Use one of Requestly’s preset options to simulate common environments without writing your own string. This helps you test mobile sites or browser-specific features.
- Click on Device Type and select a mobile, tablet, or desktop device (e.g., Android Phone, iPhone).
- Click on Browser Type and select a browser like Chrome, Firefox, Safari, or Internet Explorer.
- Save the rule and reload the target page to see the updated behavior.
Step 4: Set a Custom User-Agent
For more control, you can manually enter any User-Agent string. This is useful for simulating specific apps, bots, tools, or legacy environments that aren’t covered in presets.
- Click the option to use a Custom User-Agent.
- Paste your desired User-Agent string into the input field.
- Save the rule to apply it immediately.
- Open the target page to verify that the request uses your custom string.
Step 5: Run Multiple Rules at Once
You can set up different rules for different sites to simulate various clients in parallel. This is helpful when comparing how different user agents affect site behavior.
- Create separate rules for different domains or URL patterns.
- Assign different User-Agent values for each rule.
- Enable all relevant rules from the dashboard.
- Open each site in a separate tab to observe the differences.
Real-World Use Cases of Requestly
Modifying the User-Agent string may seem like a niche task, but it plays a critical role in debugging and testing how websites or APIs behave under different conditions. Here’s how developers and QA teams use Requestly in real scenarios:
1. Reproduce Browser-Specific Bugs
Web issues often appear only in certain browsers. A layout might break in Safari but work fine in Chrome. Instead of switching devices or operating systems, you can simply change your User-Agent to match the affected browser. Requestly makes it easy to simulate that environment directly in your current setup and isolate the problem faster.
2. Test Mobile Websites Without a Mobile Device
Many websites serve a different version of their content to mobile users. With Requestly, you can simulate an Android phone or iPhone by modifying your User-Agent string. This allows you to inspect mobile layouts, navigation, and SEO elements from your desktop browser.
Read More: How to test Website on Mobile Locally?
3. Simulate Crawlers to Verify SEO Content
Some websites deliver different content to bots, such as Googlebot or Bingbot. To verify what search engines actually see, you can use Requestly to spoof a crawler’s User-Agent. This helps check indexing rules, structured data visibility, and potential cloaking issues that could affect search performance.
4. Access APIs That Block Non-Browser Clients
APIs sometimes reject requests from tools like Postman or cURL based on their default User-Agent headers. By setting a browser-like User-Agent in Requestly, you can bypass those blocks and test the API as if it were being accessed from a standard browser session.
5. Trigger Feature Flags or A/B Tests
Certain features or experiments are rolled out only to users on specific browsers or devices. If a feature is live only for Chrome or iPhone users, you can use Requestly to simulate that client and access the hidden experience. This is especially useful during QA or staging reviews.
Also Read: The Ultimate Guide to A/B Testing
6. Validate CDN Behavior Based on Client Type
CDNs or edge servers often adjust their behavior depending on the requesting client. For example, they might compress assets differently or serve cached variants based on device type. With a custom User-Agent, you can test how these optimizations are applied without needing to change your physical device or browser.
Read More: How to Perform Geolocation Testing on Chrome
Conclusion
Setting a custom User-Agent string is a valuable technique for developers, testers, and SEO teams. Whether you’re reproducing browser-specific bugs, testing mobile site behavior, or simulating bots and APIs, modifying the User-Agent helps uncover how websites and servers tailor responses based on the client making the request.
Requestly makes this process simple and flexible. With its Modify User-Agent rule, you can quickly switch between browsers, simulate mobile devices, or enter a custom string for more advanced testing. It simplifies testing across environments and helps you control exactly how your requests are interpreted.


