Testing is critical in software development to ensure quality and reliability. Among the various testing methodologies, Behavior-Driven Development (BDD) stands out as a highly collaborative approach that bridges the gap between technical and non-technical stakeholders. One popular tool that brings BDD into Python is pytest-BDD.
Overview
What is the Pytest-BDD Framework?
Pytest-BDD is a Python-based testing framework that integrates Behavior-Driven Development (BDD) into the Pytest ecosystem. It allows testers to write test scenarios in Gherkin syntax (Given-When-Then) and map them to Python functions.
Why use PyTest BDD?
- Enables writing tests in plain Gherkin syntax
- Aligns tests with business requirements
- Utilizes Pytest’s powerful features and plugins
- Improves test readability and maintainability
- Integrates easily into existing Pytest setups
This article explores what BDD is, how pytest-BDD implements it, and why you should consider using pytest-BDD in your projects.
What is Behavior Driven Development (BDD)?
Behavior Driven Development(BDD) is a software development process that encourages collaboration between developers, testers, and business stakeholders. It focuses on the behavior of an application from the user’s perspective, allowing non-technical members of the team to contribute to the development process by describing how the system should behave in plain, understandable language.
These descriptions are typically written in the form of scenarios using Gherkin syntax, which provides a simple way to express the expected behavior of a system.
Read More: BDD vs TDD vs ATDD
What is Pytest BDD framework?
pytest-BDD is an extension of the popular pytest framework that integrates BDD principles into Python projects. It uses Gherkin syntax for writing scenarios and provides a seamless interface for translating those scenarios into test code.
The framework leverages pytest’s powerful testing capabilities while also making it easy to write feature files and automate tests that mirror real-world use cases. Essentially, Pytest-BDD acts as the bridge between human-readable behavior descriptions and actual test execution.
Why use the Pytest BDD framework?
pytest-BDD offers several benefits that make it an appealing choice for incorporating BDD into Python projects:
- Enhanced Collaboration: The use of Gherkin syntax allows non-technical stakeholders to participate in writing scenarios, aligning development with business needs.
- Automated Testing: Tests are directly linked to feature requirements, ensuring continuous verification of user stories and system behavior.
- Leverages pytest’s Strengths: You gain the powerful features of pytest, such as fixtures and plugins, making test automation more efficient and scalable.
- Readable and Maintainable Tests: Tests written in plain language are easier to maintain and understand, promoting long-term project sustainability.
- Seamless Integration: pytest-BDD integrates smoothly with existing pytest setups, allowing teams to adopt BDD without major changes to their testing infrastructure.
What are Pytest Fixtures?
pytest fixtures help manage setup and teardown tasks in tests, such as initializing objects or preparing test data, making your code cleaner and more reusable. You can define a fixture once and use it across multiple tests.
Fixtures also have different scopes, allowing them to be applied to individual tests, entire test classes, or even across a whole test session, optimizing resource usage.
import pytest

@pytest.fixture(scope="module")

def sample_data():

   return {"name": "Alice", "age": 30}

def test_sample_1(sample_data):

   assert sample_data["name"] == "Alice"

def test_sample_2(sample_data):

   assert sample_data["age"] == 30
In this example, the sample_data fixture has a module-level scope, meaning it will be shared across all module tests, ensuring consistent data and efficient resource management.
Prerequisites: Setting up the environment
Before you can start using pytest-BDD, it’s important to have the necessary tools and libraries installed. Follow these steps to set up your environment for writing BDD tests using pytest:
1. Install Python: Ensure that Python is installed on your system. You can download the latest version from Python’s official website. Verify the installation by running the following:
python --version
2. Set up a Virtual Environment: It’s a good practice to create a virtual environment for your project to manage dependencies.
python -m venv venv

source venv/bin/activate   # For Linux/Mac

.\venv\Scripts\activate    # For Windows
3. Install pytest and pytest-BDD: Use pip to install both the pytest framework and the Pytest-BDD plugin.
pip install pytest pytest-bdd
4. Install Additional Dependencies: Depending on your project, you might need additional libraries for things like Selenium or requests.
pip install selenium
5. Create Feature Files: Create a directory structure where you’ll store your feature files and test scripts. For example:
Once you’ve set up your environment, you’re ready to start writing feature files and automating tests using Pytest-BDD.
Read More: How to achieve advanced BDD test automation
How to write a BDD Test with Pytest?
To write a BDD test using pytest-BDD, you need to follow two key steps: creating a feature file and defining step functions that match the scenarios in the feature file.
Step 1: Create Feature File
In BDD, feature files play a critical role in defining the behavior of the application from the user’s perspective. These files are written using Gherkin syntax, a plain-text language that allows non-technical stakeholders to understand the test scenarios.
Each feature file represents a specific functionality and contains one or more scenarios, which describe the steps required to verify that functionality.
A feature file has the following structure:
- Feature: This keyword is used to describe the functionality being tested.
- Scenario: Each scenario describes a specific behavior or path the user might follow.
- Steps: Each scenario contains multiple steps that start with one of the Gherkin keywords: Given, When, Then, And, or But. These steps define the conditions, actions, and expected outcomes of the test.
Here’s an example feature file that tests the login functionality of a web application:
Example feature file (login.feature):
Feature: Login functionality

 Scenario: Successful login

   Given the user is on the login page

   When the user enters valid credentials

   Then the user should be logged in
The feature file helps translate user stories into automated tests, ensuring all team members—both technical and non-technical—can collaborate and understand the test cases. Each step in the scenario will later be mapped to Python functions using pytest-BDD to automate these behaviors.
Step 2: Create Step Definitions
Step definitions map the steps written in the feature file to Python functions that contain the actual test logic. pytest-BDD looks for these definitions to execute the test.
Example step definitions (test_login.py):
import pytest

from selenium import webdriver

from selenium.webdriver.common.by import By

from pytest_bdd import scenarios, given, when, then

scenarios('../features\login.feature')

@pytest.fixture

def driver():

   browser = webdriver.Chrome()

   yield browser

   browser.quit()

@given('the user is on the login page')

def navigate_to_login(driver):

   driver.get("https://bstackdemo.com/signin")

@when('the user enters valid credentials')

def enter_credentials(driver):

   #select username

   driver.find_element(by=By.ID, value="username").click()

   driver.find_element(by=By.CSS_SELECTOR,value="#react-select-2-option-0-0").click()

   #select password

   driver.find_element(by=By.ID,value="password").click()

   driver.find_element(by=By.CSS_SELECTOR, value="#react-select-3-option-0-0").click()

   #click submit

   driver.find_element(By.ID,"login-btn").click()

@then('the user should be logged in')

def verify_login(driver):

   assert driver.title=="StackDemo"
In this code, each step in the scenario is tied to a Python function that performs the corresponding action, like navigating to a page or entering credentials.
Step 3: Executing PyTest BDD
Once you’ve created both the feature file and step definitions, running the tests is straightforward. Simply use the pytest command to execute all tests, including BDD scenarios.
Pytest
Pytest will automatically detect the feature files, match them with the corresponding step definitions, and execute the test scenarios. You can see detailed logs for each step as pytest processes the feature file.
Read More: PyTest vs UnitTest: Comparison
How to Use Tags in Pytest?
Tags are useful when you want to selectively run certain tests based on their labels. You can assign tags to scenarios in feature files and use pytest to run tests associated with specific tags.
Example of using tags in a feature file:
Feature: Login functionality

 @smoke

 Scenario: Successful login

   Given the user is on the login page

   When the user enters valid credentials

   Then the user should be logged in
To run tests with a specific tag, use the -m flag with the tag name:
pytest -m smoke
This command will only execute scenarios marked with the @smoke tag, allowing you to organize your tests into different categories such as smoke, regression, or feature-based testing.
How to use Scenario Outlines and Parameterization in PyTest BDD?
Pytest-BDD allows you to efficiently test multiple input-output combinations using scenario outlines. This is done by defining variables in the Examples table within the .feature file and referencing them in your steps.
Feature File Example (login.feature):
gherkin
Scenario Outline: Successful login with valid credentials

  Given the user navigates to the login page

  When the user logs in with username "<username>" and password "<password>"

  Then the login should be successful


Examples:

  | username | password |

  | user1    | pass123  |

  | user2    | pass456  |
Step Definition Example (test_login.py):
python
@when(parsers.parse('the user logs in with username "{username}" and password "{password}"'))

def login_user(username, password):

    # Perform login logic here

    assert username.startswith('user')
This structure avoids code duplication and helps you test multiple cases with one reusable scenario.
How to use Tags and Selective Test Execution in PyTest BDD?
Tags in Pytest-BDD allow you to label scenarios or features for selective execution. This is especially useful for running subsets of tests (e.g., smoke, regression).
Feature File Example:
gherkin
@smoke

Scenario: Check homepage title

  Given the user opens the homepage

  Then the title should be "Welcome"
To run only the @smoke tagged tests, use:
bash
pytest --gherkin-terminal-reporter -m smoke
To run all except a certain tag:
bash
pytest -m "not regression"
Make sure your pytest.ini includes:
ini
[pytest]

markers =

    smoke: smoke tests

    regression: regression tests
How to use Hooks and Fixtures in PyTest BDD?
Pytest-BDD supports Pytest hooks and fixtures for powerful test setup and teardown management. You can define shared resources, authentication, or data cleanup logic using fixtures.
Example: Defining a fixture for setup:
python
import pytest


@pytest.fixture

def browser():

    # Setup code here (e.g., launching browser)

    yield "browser_instance"

    # Teardown code here (e.g., closing browser)
Using a BDD hook:
python
from pytest_bdd import hooks


@hooks.hookimpl

def pytest_bdd_before_scenario(request, feature, scenario):

    print(f"\n[Setup] Starting scenario: {scenario.name}")
Combining with Step Definition:
python
@given("the user is logged in")

def user_logged_in(browser):

    # Use the browser fixture to log in

    assert browser == "browser_instance"
Hooks give you fine-grained control over the test lifecycle, while fixtures help keep the code modular and maintainable.
Factors to consider while writing Pytest BDD
When writing BDD tests using Pytest-BDD, there are several important factors to ensure your tests are efficient, maintainable, and collaborative:
- Readable and Simple Gherkin Syntax: Feature files should be easy to understand by all team members, especially non-technical stakeholders. Use clear, concise language in your Given, When, and Then steps to avoid unnecessary complexity.
This helps bridge the gap between business and technical teams. - Reusable Step Definitions: Keep step definitions modular and reusable. If multiple scenarios have similar steps, you can reuse the same function in different tests. This prevents duplication and ensures consistency across test cases.
- Use of Tags for Organizing Tests: Tags help categorize your tests, making it easy to run specific sets of tests, such as smoke tests, regression tests, or tests for a particular feature. Plan your tag usage from the beginning to make test execution more flexible and organized.
- Fixture Usage for Test Setup: Leverage Pytest fixtures to set up the test environment, manage resources, or create data needed for your tests. This makes the test setup modular and reduces the need for repeated code.
- Clear Separation Between Feature Files and Step Definitions: Organize your test structure by keeping feature files and their corresponding step definitions separate. This promotes better project organization and makes it easier to navigate and maintain tests over time.
- Optimize for Performance: Ensure your BDD tests are functional and optimized for performance. Avoid unnecessary steps that slow down test execution, and parallelize tests where possible to reduce overall execution time.
By considering these factors, you’ll ensure that your BDD tests are robust and adaptable as your project grows.
Pros and Cons of PyTest BDD
Like any framework, pytest-BDD has its strengths and challenges, which are important to consider when deciding if it’s the right tool for your testing strategy.
Pros
- Readable and Collaborative: The use of Gherkin syntax allows non-technical stakeholders to easily understand test cases, fostering collaboration between developers, testers, and business teams.
- Integration with pytest Ecosystem: pytest-BDD seamlessly integrates with the powerful features of the Pytest framework, such as fixtures, plugins, and parameterization, making test management and execution efficient.
- Reusable Step Definitions: Step definitions can be reused across multiple scenarios, promoting code reusability and reducing duplication.
- Flexible Test Organization: Tags, fixtures, and modular organization make it easy to structure and execute tests selectively, optimizing test management.
Cons
- Verbose Step Definitions: Writing step definitions for every Gherkin step can become tedious and repetitive, especially for complex workflows.
- Limited Built-in Support for UI Testing: While pytest-BDD can be used with tools like Selenium for UI testing, it doesn’t provide out-of-the-box support for handling UI elements, requiring additional configuration.
- Overhead in Maintaining Feature Files: As your test suite grows, managing and maintaining large feature files with multiple scenarios can become challenging and time-consuming.
Overall, pytest-BDD offers a powerful approach for integrating behavior-driven testing into your workflow. However, it’s important to weigh these pros and cons based on the complexity and needs of your project to ensure it’s the best fit.
How to run and test PyTest BDD with BrowserStack?
The BrowserStack SDK simplifies running your pytest BDD tests on real devices and browsers in the cloud. With minimal setup, you can execute your tests across various platforms. Follow these steps to integrate the BrowserStack SDK into your pytest BDD workflow:
Step 1: Install BrowserStack SDK
To get started, install the BrowserStack SDK
pip install BrowserStack-sdk
Step 2: Configure BrowserStack SDK
Next, you’ll need to configure the SDK using the browserstack.yml configuration file at the root of your project. This file defines your BrowserStack credentials and the environments (browsers and devices) on which you want to run the tests.
Example browserstack.yml file:
userName: testuser

accessKey: testaccesskey

framework: pytest

platforms:

 - os: Windows

   osVersion: 10

   browserName: Chrome

   browserVersion: 120.0

parallelsPerPlatform: 1

browserstackLocal: true

buildName: pytest-bdd-build

projectName: BrowserStack Pytest BDD
Step 3: Run Tests with BrowserStack SDK
With your configuration and tests ready, you can run your tests on BrowserStack’s cloud infrastructure using the BrowserStack SDK. Use the following command to execute your PyTest BDD tests:
browserstack-sdk pytest
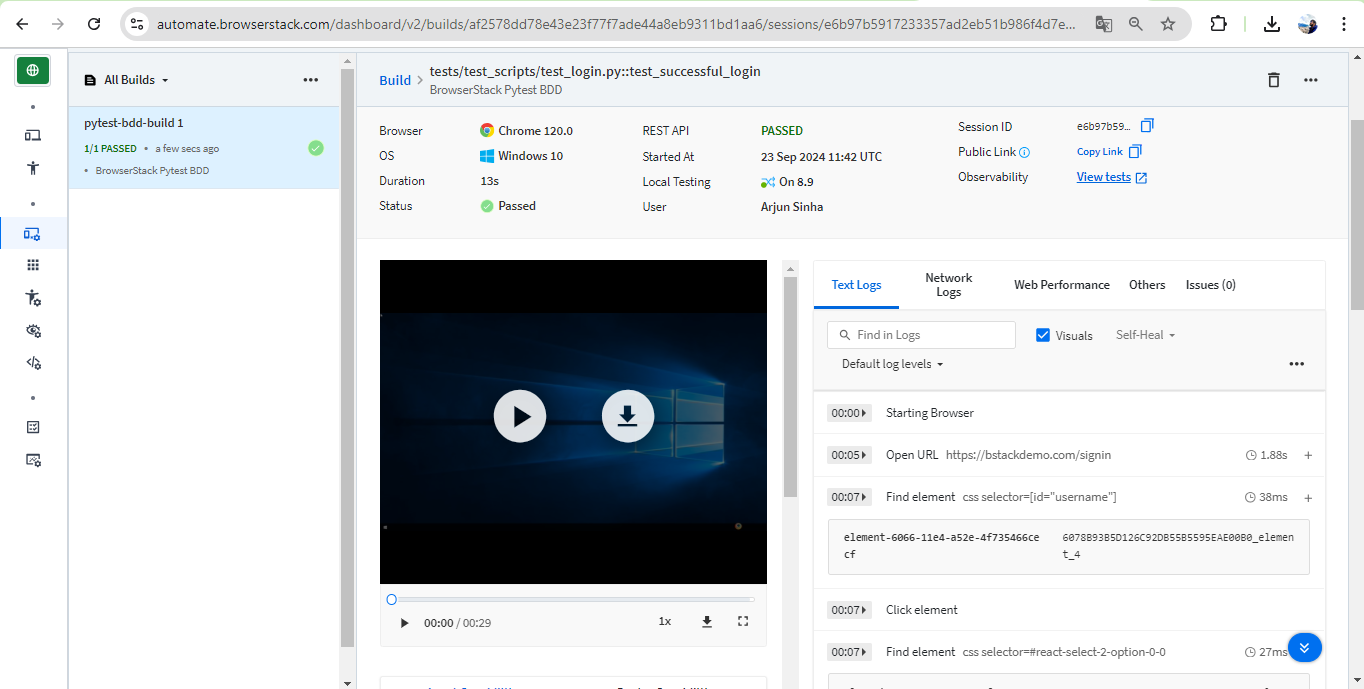
The SDK will handle session creation, running tests on the configured browsers and devices, and reporting results to the BrowserStack Automate dashboard.
Why run PyTest BDD Tests on Real Devices with BrowserStack?
Testing on real devices is crucial to ensuring your application performs well in real-world conditions. BrowserStack’s real-device cloud provides access to thousands of devices and browsers, offering several key advantages:
- Accurate User Experience Testing: Real devices reflect your app’s actual behavior and performance across various operating systems, screen sizes, and hardware configurations.
This helps identify device-specific bugs or UI glitches that emulators or simulators might miss. - Browser and OS Compatibility: Running PyTest BDD tests on real browsers and OS versions helps verify that your app works seamlessly across different environments, reducing the risk of bugs in production.
- Faster Debugging: BrowserStack’s comprehensive reports, logs, and video recordings make it easier to identify and debug issues in your PyTest BDD tests.
This speeds up your development and testing process, ensuring faster releases. - No Maintenance Overhead: You get access to a wide variety of real devices without the need to manage physical device labs. BrowserStack takes care of device availability, OS updates, and maintenance.
Running your pytest BDD tests on real devices ensures a more reliable, robust testing process, allowing you to deliver a better user experience.
Conclusion
Pytest BDD simplifies writing behavior-driven tests, and when integrated with BrowserStack Automate, it ensures these tests run on real devices and browsers for more accurate results. This combination helps teams catch device-specific bugs and browser issues early, without the need for maintaining a physical device lab.
With BrowserStack’s wide range of real devices and powerful debugging tools, teams can scale their testing efficiently, ensuring consistent performance across environments. Together, pytest BDD and BrowserStack provide a reliable, comprehensive testing solution for delivering high-quality applications.


