APIs often receive traffic spikes that can overload servers, slow down responses, or trigger outages. To handle this, developers use rate limiting and throttling to control request flow, protect backend systems, and maintain stability.
This article explores API rate limiting vs API throttling and shows how to implement both using HTTP interceptors in Angular and React (with Axios).
What is API Rate Limiting?
API rate limiting is a mechanism that restricts the number of requests a client can make to a server within a fixed time window. For example, you might allow 100 requests per user per hour.
This is usually enforced on the backend using API gateways like NGINX, Kong, or managed services like AWS API Gateway.
Below is an example that explains how it works. Imagine GitHub’s API allows up to 60 requests per hour for unauthenticated users. If that limit is exceeded, it returns:
{

  "message": "API rate limit exceeded for 192.30.255.113",

  "documentation_url": "https://developer.github.com/v3/#rate-limiting"

}
Why Limit API Rate on the Client Side?
Client-side rate limiting is useful for:
- Preventing accidental spamming from user actions
- Reducing load before it hits the backend
- Avoiding UI glitches due to repeated polling
Note: This alone will not block malicious users, but it will improve user experience and help you stay within third-party API quotas.
What is API Throttling?
API throttling delays or queues excessive requests instead of blocking them. If the user triggers multiple requests quickly, throttling ensures they are spread out over time.
This is useful when:
- A user is typing in a search bar and triggers multiple API calls
- A scroll event fetches paginated results on every small movement
- You want to avoid overloading external APIs like GitHub or Google Maps
For example, suppose a user types “React” in a search field. Instead of firing 5 requests for every keystroke, throttling can ensure only 1 request is made every 500ms.
const throttledSearch = throttle((query) => {

  fetch(`/api/search?q=${query}`);

}, 500);
API Throttling vs API Rate Limiting: Key Differences
Rate limiting blocks requests after a fixed quota is crossed, while throttling controls the timing between requests to reduce sudden bursts. Here is a table highlighting the core differences between API throttling and API rate limiting.
| Feature | API Rate Limiting | API Throttling |
|---|---|---|
| Goal | Enforce the maximum number of requests in a window | Prevent bursts by delaying or spacing requests |
| Behavior on Excess Requests | Rejects with error (like HTTP 429) | Delays or skips excessive requests |
| State Management | Needs counters and timestamps | Needs a timer and active request tracking |
| Reset Strategy | Based on the time window expiry | Continuous delay interval |
| Server Load Impact | Can block early and reduce load | Can still generate traffic, but spaced |
| Client Use Case | Limit user-triggered actions (like upload cap) | Smooth UI interactions like autocomplete |
| Server Use Case | Enforce quotas and prevent abuse | Avoid saturation during sudden request spikes |
| Feedback to User | Often includes quota info or retry headers | Usually silent or with optional loading states |
| Examples | GitHub, Twitter API quotas | Scroll loaders, search-as-you-type UIs |
When To Implement API Rate Limiting vs. API Throttling
Choosing between throttling and rate limiting depends on user interaction patterns and the API’s sensitivity. Both can coexist, but knowing where each fits prevents unnecessary delays or overloads.
Use API Rate Limiting When:
- You are consuming an API with hard limits (such as free-tier limits, SMS quotas).
- Your backend must protect itself from excessive client load/
- You want to enforce usage fairness across users or devices.
- Requests beyond the limit should not be queued or retried.
- You want to explicitly block certain actions after a threshold.
Use API Throttling When:
- Users can trigger frequent events (keypress, mouse scroll) that map to API calls.
- You want to reduce redundant calls during bursty input.
- It’s acceptable to delay or skip certain intermediate states.
- Your API supports high volume but benefits from spacing (example, UI remains snappy)
- You want to reduce backend load without enforcing hard limits.
How to Implement API Rate Limiting with HTTP Interceptors?
Client-side rate limiting is helpful when you want to reduce unnecessary traffic or enforce temporary caps before hitting the backend. This can be handled using HTTP interceptors in frameworks like Angular or middleware layers in libraries like Axios.
In both Angular and React, the interceptor runs before the request is sent and after receiving the response. This gives complete control over timing, retries, headers, or cancellation.
The goal is to limit outgoing requests per time window, typically using a request counter and a rolling or fixed timestamp window.
1. Rate Limiting Using Angular HTTP Interceptor
In Angular, you can set up rate limiting by creating a custom HttpInterceptor that tracks request timestamps and rejects requests once the configured limit is exceeded.
Here’s how to set it up
// rate-limit.interceptor.ts

import { Injectable } from '@angular/core';

import {

  HttpInterceptor, HttpRequest, HttpHandler, HttpEvent, HttpErrorResponse

} from '@angular/common/http';

import { Observable, throwError } from 'rxjs';


@Injectable()

export class RateLimitInterceptor implements HttpInterceptor {

  private timestamps: number[] = [];

  private MAX_REQUESTS = 5;

  private TIME_WINDOW_MS = 10000; // 10 seconds


  intercept(req: HttpRequest<any>, next: HttpHandler): Observable<HttpEvent<any>> {

    const now = Date.now();

    this.timestamps = this.timestamps.filter(ts => now - ts < this.TIME_WINDOW_MS);


    if (this.timestamps.length >= this.MAX_REQUESTS) {

      return throwError(() => new HttpErrorResponse({

        status: 429,

        statusText: 'Too Many Requests',

        error: 'Rate limit exceeded'

      }));

    }


    this.timestamps.push(now);

    return next.handle(req);

  }

}
Then, apply it in the App Module.
// app.module.ts

import { HTTP_INTERCEPTORS } from '@angular/common/http';

import { RateLimitInterceptor } from './rate-limit.interceptor';


@NgModule({

  providers: [

    { provide: HTTP_INTERCEPTORS, useClass: RateLimitInterceptor, multi: true }

  ]

})

export class AppModule {}
You can also narrow the logic to restrict rate limiting to specific routes by applying only to routes like /search.
if (req.url.includes('/search')) {

  // Apply rate limiting only to search requests

}
This prevents unrelated requests from being blocked. For more flexibility, define per-route thresholds in a config file or service.
2. Rate Limiting in React Using Axios Interceptor
In React, Axios does not maintain persistent shared state across interceptors. So you need to manage request timestamps manually to apply rate-limiting logic.
Here’s how to set it up:
// rateLimiter.js

import axios from 'axios';


const timestamps = [];

const MAX_REQUESTS = 5;

const TIME_WINDOW_MS = 10000;


axios.interceptors.request.use((config) => {

  const now = Date.now();

  const recent = timestamps.filter(ts => now - ts < TIME_WINDOW_MS);


  if (recent.length >= MAX_REQUESTS) {

    return Promise.reject({

      status: 429,

      message: 'Rate limit exceeded',

    });

  }


  timestamps.push(now);

  return config;

});
This blocks any request if more than five are made within ten seconds.
If you want finer control for specific components, use a wrapper around Axios that enforces the same logic:
const rateLimitedAxios = async (config) => {

  const now = Date.now();

  timestamps = timestamps.filter(ts => now - ts < TIME_WINDOW_MS);


  if (timestamps.length >= MAX_REQUESTS) {

    throw new Error('Rate limit exceeded');

  }


  timestamps.push(now);

  return axios(config);

};
Here is an example of disabling a button when the rate limit is reached:
const handleClick = async () => {

  try {

    await rateLimitedAxios({ url: '/api/submit', method: 'POST' });

  } catch (err) {

    alert('You hit the request limit');

  }

};
This is useful in places like search inputs, submit buttons, or pagination controls where the user can repeatedly trigger requests.
Read More: How to Debug React Code: Tools and Tips
How to Implement API Throttling with HTTP Interceptors
Throttling allows only one request to go through in a fixed time interval and delays or drops others. This is useful for endpoints like live search or data sync, where frequent input changes can cause excessive API calls.
1. API Throttling in Angular Using HTTP Interceptor
To implement throttling in Angular, modify the HttpInterceptor to enforce a minimum gap between consecutive requests.
Here’s how to implement it:
// throttle.interceptor.ts

import { Injectable } from '@angular/core';

import {

  HttpInterceptor, HttpRequest, HttpHandler, HttpEvent, HttpErrorResponse

} from '@angular/common/http';

import { Observable, throwError } from 'rxjs';


@Injectable()

export class ThrottleInterceptor implements HttpInterceptor {

  private lastRequestTime = 0;

  private MIN_INTERVAL_MS = 2000; // 2 seconds


  intercept(req: HttpRequest<any>, next: HttpHandler): Observable<HttpEvent<any>> {

    const now = Date.now();

    if (now - this.lastRequestTime < this.MIN_INTERVAL_MS) {

      return throwError(() => new HttpErrorResponse({

        status: 429,

        statusText: 'Too Many Requests',

        error: 'Throttling: Please wait before sending another request'

      }));

    }


    this.lastRequestTime = now;

    return next.handle(req);

  }

}
Then, apply it in the App Module:
// app.module.ts

import { HTTP_INTERCEPTORS } from '@angular/common/http';

import { ThrottleInterceptor } from './throttle.interceptor';


@NgModule({

  providers: [

    { provide: HTTP_INTERCEPTORS, useClass: ThrottleInterceptor, multi: true }

  ]

})

export class AppModule {}
To restrict throttling only to certain endpoints, wrap the check:
if (req.url.includes('/live-search')) {

  // Apply throttling here

}
This helps prevent unrelated requests from being delayed.
Also Read: Angular vs AngularJS
2. API Throttling in React Using Axios Interceptor
In React, Axios interceptors can throttle requests by comparing the current timestamp with the last request’s time.
Here’s how to set it up:
// throttleInterceptor.js

import axios from 'axios';


let lastRequestTime = 0;

const MIN_INTERVAL_MS = 2000; // 2 seconds


axios.interceptors.request.use((config) => {

  const now = Date.now();

  if (now - lastRequestTime < MIN_INTERVAL_MS) {

    return Promise.reject({

      status: 429,

      message: 'Throttling: Too many requests',

    });

  }


  lastRequestTime = now;

  return config;

});
This interceptor blocks requests made within the throttle interval.
For selective throttling or component-level logic, wrap the same logic in a function:
const throttledAxios = async (config) => {

  const now = Date.now();

  if (now - lastRequestTime < MIN_INTERVAL_MS) {

    throw new Error('Throttling: Try again later');

  }


  lastRequestTime = now;

  return axios(config);

};
Here is an example of applying it to a live search input:
const handleInputChange = async (e) => {

  const query = e.target.value;

  try {

    await throttledAxios({ url: `/api/search?q=${query}` });

  } catch (err) {

    console.log('Throttled');

  }

};
This ensures one search request is sent every few seconds, even if the user types rapidly.
Also Read: How to test React Apps
API Rate Limiting and Throttling Using Requestly
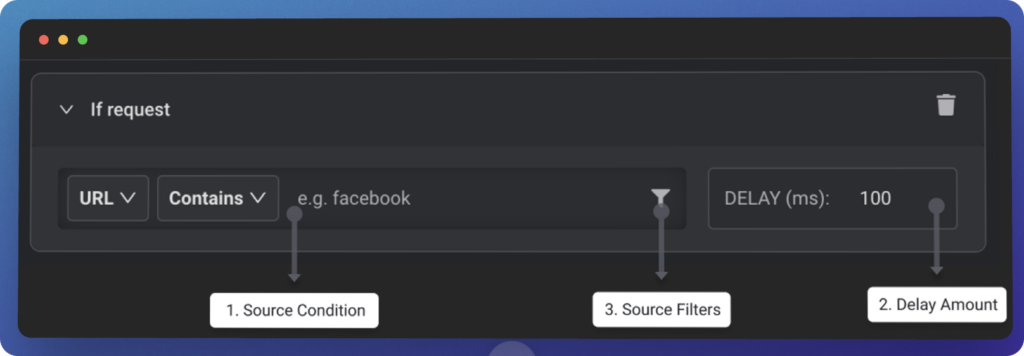
Requestly is a browser extension that lets you control how HTTP requests behave on the client side without editing your app code. It allows you to introduce artificial delay or simulate throttling during local development or staging. You can also create rules to delay, block, or modify requests based on URL, method, type, and more.
Here’s how to simulate throttling using Requestly’s Delay Network Requests rule.
- Install the Requestly Extension: Install Requestly from the Chrome Web Store or visit requestly.io to get the extension.
- Create a New Delay Rule: After installing, open the Requestly dashboard and click Create Rule. Select Delay Network Requests from the available rule types.
- Define the Request Match Conditions:
- URL Filter: Match requests using Contains, Wildcard, Regex, or Equals.
For example, use *api/search* to target all search endpoints. - Delay Time: Set how long to delay each request in milliseconds.
For example, 2000 adds a 2-second delay. - Request Type Filter: You can restrict the rule to affect only XHR or fetch requests.
- Method Filter (optional): You can apply the delay only to GET, POST, or any specific HTTP method.
- URL Filter: Match requests using Contains, Wildcard, Regex, or Equals.
- Apply the Rule: Click Create Rule and ensure it’s toggled ON. Open your application in a new tab and use browser dev tools to verify delays in the Network tab.
Here’s an example that explains how to delay every API call made to a search endpoint:
- Rule Type: Delay Network Requests
- URL: */api/search* (Wildcard match)
- Delay: 2000 ms
- Request Type: XHR
- Apply On: Only pages under your development domain, such as localhost:3000 or staging.example.com
This lets you test how your app handles slow responses in real time, especially useful for search inputs, typeahead, or pagination.
Requestly also lets you combine a delay rule with other rule types. For example, you can:
- First, delay a request to /api/user by 3000 ms.
- Then, modify the headers of that same request to simulate expired tokens.
- Or mock the response after the delay using a mock rule.
This chaining is helpful when you want to test how your frontend behaves when both timing and data change in the same flow.
You don’t need to write custom interceptors or edit backend logic for any of this. Just enable or disable rules directly from the extension UI.
Conclusion
API rate limiting and throttling help control traffic, protect resources, and improve client behavior. With HTTP interceptors in Angular or React, you can enforce limits directly on the frontend without server changes. This makes handling scenarios like rapid user input, background polling, or misconfigured integrations easier.
Requestly offers a no-code option for testing and simulation to delay, block, or alter HTTP requests directly in the browser. You can build complex test flows using delay, header modification, or mock response rules without modifying app code. It’s especially effective for validating how the UI reacts to network constraints or failure cases during development.


