Automating canvas elements is one of the most complex challenges in UI testing, given their pixel-driven, script-rendered nature. While Selenium and Cypress aren’t built specifically for canvas testing, they can still be adapted with the right techniques.
Overview
Selenium and Cypress offer powerful scripting capabilities and browser control, making them adaptable for Canvas testing when combined with visual validation or custom DOM inspection.
Best Practices for Canvas Automation:
- Use visual testing tools (e.g., Percy) for pixel-level comparisons
- Capture and compare canvas screenshots instead of relying on the DOM
- Use JavaScript execution to interact directly with canvas elements
- Avoid relying solely on element selectors, Canvas content isn’t DOM-accessible
- Automate only critical Canvas scenarios to reduce test flakiness
- Run tests on real browsers for accurate rendering validation
This article explores how Selenium and Cypress can be leveraged for automating Canvas elements, along with best practices to ensure accurate and reliable testing.
What is the <canvas> Element in HTML?
The <canvas> element in HTML is used to draw graphics directly on a web page, making it ideal for rendering animations, charts, and dynamic visual content. It renders elements pixel by pixel, enabling high-performance, real-time graphics.
Example of <canvas> Element
<canvas id="myCanvas" width="300" height="150" style="border:1px solid #000000;"></canvas>

<script>

  const canvas = document.getElementById("myCanvas");

  const ctx = canvas.getContext("2d");

  ctx.fillStyle = "red";

  ctx.fillRect(20, 20, 100, 50);

</script>
The above example creates the red rectangle at position (20, 20) with a width of 100 and a height of 50.
Understanding Canvas Behaviour in the DOM
Canvas elements behave differently compared to traditional components. Canvas elements do not have child elements.
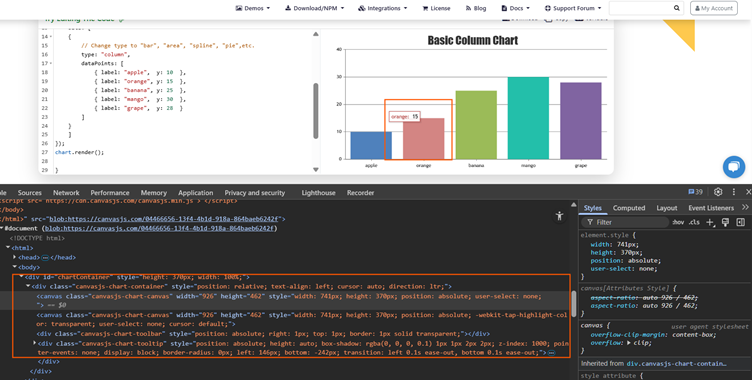
All graphics, shapes, and text are rendered as pixels directly onto the canvas. You cannot use the traditional selectors like XPath or ID to interact with the canvas.
As you can see in the above image, the graphics above rendered as <canvas>. It has a lot of information in it, but there are no child elements to validate it directly.
These behaviours of Canvas make it difficult to automate using traditional automation frameworks. Below are some reasons why traditional Selectors and Assertions do not work with Canvas.
- Elements rendered with canvas do not have a DOM structure. They exist only as rendered pixels, not as HTML nodes with attributes or styles.
- Canvas content is not readable or accessible via DOM inspection tools or automation libraries.
- As canvas uses the pixel-based rendering, once something is drawn, there’s no memory or reference to it.
- All visual content is dynamically drawn and updated using JavaScript code, which cannot be interacted with through HTML attributes.
The getBoundingClientRect() Method
The getBoundingClientRect() method is a built-in JavaScript function that returns the size and position of an element relative to the viewport. It provides properties such as top, left, right, bottom, width, and height, which describe the element’s layout on the screen.
For <canvas> automation, this method is handy for:
- Determining the exact location and dimensions of the canvas element
- Simulating user interactions like clicks, hovers, or drags within specific canvas regions
- Validating how the canvas resizes in responsive layouts
By using this method, testers can more precisely target areas within the canvas, enabling more reliable automation of interactive graphics.
Read More: Cypress API Testing: A Comprehensive Guide
Tracking Mouse Movements in Canvas Elements
Tracking mouse movements in a <canvas> element is challenging as it does not provide any DOM structure but renders pixel by pixel.
Instead of using the standard locators for tracking mouse movements, with <canvas>, one needs to use the coordinates to simulate the mouse events.
This makes coordinate-based event handling especially important when using automation tools like Selenium or Cypress, where direct access to canvas content isn’t possible.
For example, to trigger the mouse move event in canvas, the code looks like this.
cy.get('#canvasChartContainer').should('be.visible').then(($canvas) => {

      const canvas = $canvas[0];

      const rect = canvas.getBoundingClientRect();


      // Calculate coordinates to hover over

      const x = rect.left + 100; // 100px from left

      const y = rect.top + 50;   // 50px from top

      // Trigger mousemove event at calculated position

      cy.wrap(canvas)

        .trigger('mousemove', {

          clientX: x,

          clientY: y,

          force: true

        });

}
In the above code, you are getting the canvas properties using the getBoundingClientRect() based on the properties left and right, and you are calculating the x and y coordinates to click.
Using the trigger function with ‘mousemove’ event is triggered by passing the x and y coordinates.
Using Cypress for Canvas Automation
Cypress is a widely used front-end testing framework for automating modern web applications. While it doesn’t offer full support for canvas elements due to their pixel-based rendering, Cypress can still be used to automate specific interactions within the canvas.
For example, to simulate a click within a canvas element, you can use the following approach:
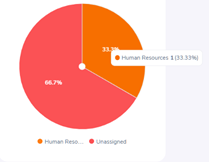
Consider the above chart, if you have to click/hover on the Human Resources section, then you need to get the canvas properties and perform a click/hover accordingly.
describe('Canvas Interaction Test in Cypress', () => {

  it('Interact with canvas element', () => {

    loginToApplication();

    cy.get('div.oxd-pie-chart > canvas').then(($canvas) => {

      const canvas = $canvas[0];

      const rect = canvas.getBoundingClientRect();

      const canvasProps = {

        width: rect.width,

        height: rect.height,

        x: rect.x,

        y: rect.y,

        top: rect.top,

        left: rect.left,

        right: rect.right,

        bottom: rect.bottom,

      };

      cy.log("***Canvas Properties***")

      Object.entries(canvasProps).forEach(([key, value]) => {

        cy.log(`${key} = ${value}`);

      });

      // Simulate click at x,y

      const x = canvasProps.width -100;

      const y = canvasProps.height - 200;

      cy.wrap($canvas).first().click(x,  y,{force: true});

      cy.wait(1000)

      cy.get('span#oxd-pie-chart-tooltip').should('contain', 'Human Resources')

    });

  });
In the above code, cy.get() is used to fetch the canvas element from the DOM. The getBoundingClientRect() method retrieves the canvas’s position and size relative to the viewport.
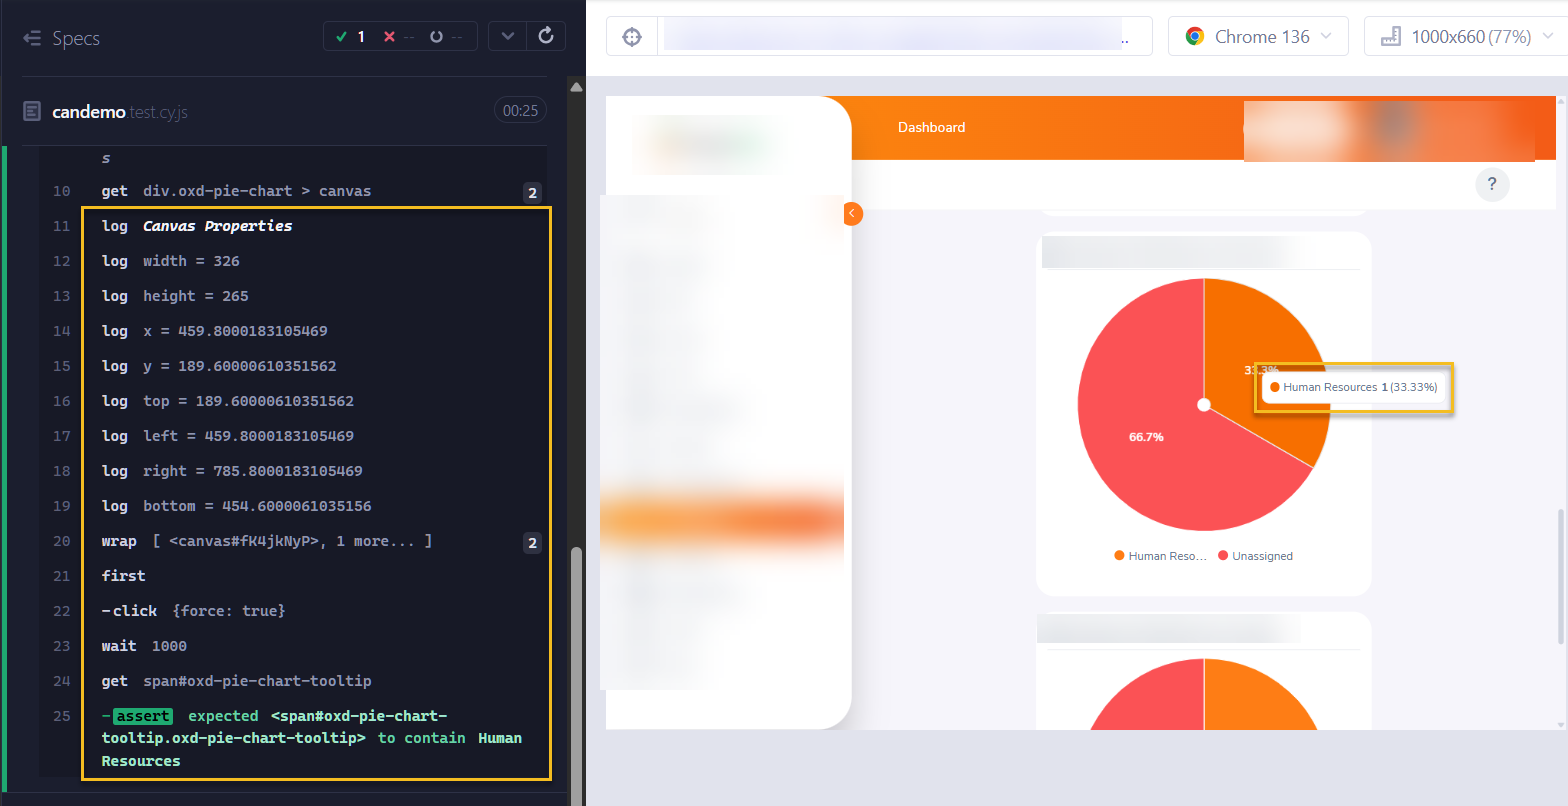
Using properties like width and height, you calculate the precise coordinates for simulating a click within the canvas. After performing the click, the chart displays a tooltip. Cypress assertions are then used to verify that the tooltip contains the expected text, confirming that the interaction was successful.
Output:
While the above code works for basic interactions, it may not always be accurate due to variations in canvas rendering. Additionally, it doesn’t allow verification of visual aspects like whether the percentage is correctly displayed within the chart or if specific colors (e.g., white) are visible. However, if your primary goal is to validate the presence and content of the tooltip, this approach is effective.
Read More: How to run specific test in Cypress
Using Selenium for Canvas Automation
Selenium is a powerful open-source test automation framework for web applications. While Canvas elements pose challenges due to their pixel-based nature, Selenium can still be used to automate interactions with them.
Based on the above scenario, the following example demonstrates how to automate Canvas interactions using Selenium.
public class SelCanvas {

  @Test

    public void firstTest() throws InterruptedException {

        WebDriverManager.chromedriver().setup();

        WebDriver driver = new ChromeDriver();

        loginToApplication(driver);

        WebElement canvasEle = driver.findElement(By.cssSelector("div.oxd-pie-chart > canvas"));

        JavascriptExecutor js = (JavascriptExecutor) driver;

        try {

        Map<String, Object> canvasProperties = (Map<String, Object>) js.executeScript(

            "const canvas = arguments[0];" +

            "const rect = canvas.getBoundingClientRect();" +

            "return {" +

            "    width: rect.width," +

            "    height: rect.height," +

            "    x: rect.x," +

            "    y: rect.y," +

            "    top: rect.top," +

            "    left: rect.left," +

            "    right: rect.right," +

            "    bottom: rect.bottom" +

            "};",

            canvasEle

        );


        System.out.println(canvasProperties);

        double bottom = toDouble(canvasProperties.get("bottom"));

        double height = toDouble(canvasProperties.get("height"));

        double left = toDouble(canvasProperties.get("left"));

        double right = toDouble(canvasProperties.get("right"));

        double top = toDouble(canvasProperties.get("top"));

        double width = toDouble(canvasProperties.get("width"));

        double x = toDouble(canvasProperties.get("x"));

        double y = toDouble(canvasProperties.get("y"));

        System.out.println("bottom = " + bottom);

        System.out.println("height = " + height);

        System.out.println("left = " + left);

        System.out.println("right = " + right);

        System.out.println("top = " + top);

        System.out.println("width = " + width);

        System.out.println("x = " + x);

        System.out.println("y = " + y);


        double absoluteX = left + 10;

        double absoluteY = top - 100;

        int offsetX = (int) ((int)absoluteX - left);

        int offsetY = (int) ((int)absoluteY - top);

        Actions actions = new Actions(driver);

        actions.moveToElement(canvasEle, offsetX, offsetY).click().perform();


        Thread.sleep(10000);

        String tooltipText = driver.findElement(By.cssSelector("span#oxd-pie-chart-tooltip")).getText();

        Assert.assertTrue(tooltipText.contains("Human Resources"));

        System.out.println(tooltipText);

        }

        finally{

          driver.quit();

        }

  }

private double toDouble(Object value) {

    if (value instanceof Number) {

        return ((Number) value).doubleValue();

    } else {

        throw new IllegalArgumentException("Expected a numeric value, but got: " + value);

    }

    }

    }
In the above code, a WebDriver instance is created to launch the browser. Using this instance, the canvas element (canvasEle) is located through a CSS selector.
Then, with the help of the JavaScript Executor, the script retrieves the element’s bounding properties, such as top, left, height, width, and others, which are stored in a map for further use in calculating the precise coordinates for interaction.
The code below returns a Map of canvas properties.
Map<String, Object> canvasProperties = (Map<String, Object>) js.executeScript(

            "const canvas = arguments[0];" +

            "const rect = canvas.getBoundingClientRect();" +

            "return {" +

            "    width: rect.width," +

            "    height: rect.height," +

            "    x: rect.x," +

            "    y: rect.y," +

            "    top: rect.top," +

            "    left: rect.left," +

            "    right: rect.right," +

            "    bottom: rect.bottom" +

            "};",

            canvasEle

        );
Once the canvas properties are retrieved, each value is extracted and converted to a double using the toDouble() utility method. These values are then used to calculate offsetX and offsetY, which determine the exact point within the canvas for interaction.
Using actions.moveToElement(), a click is performed at the calculated coordinates. Finally, the tooltip text is captured and verified using a JUnit assertion to ensure it contains the expected value.
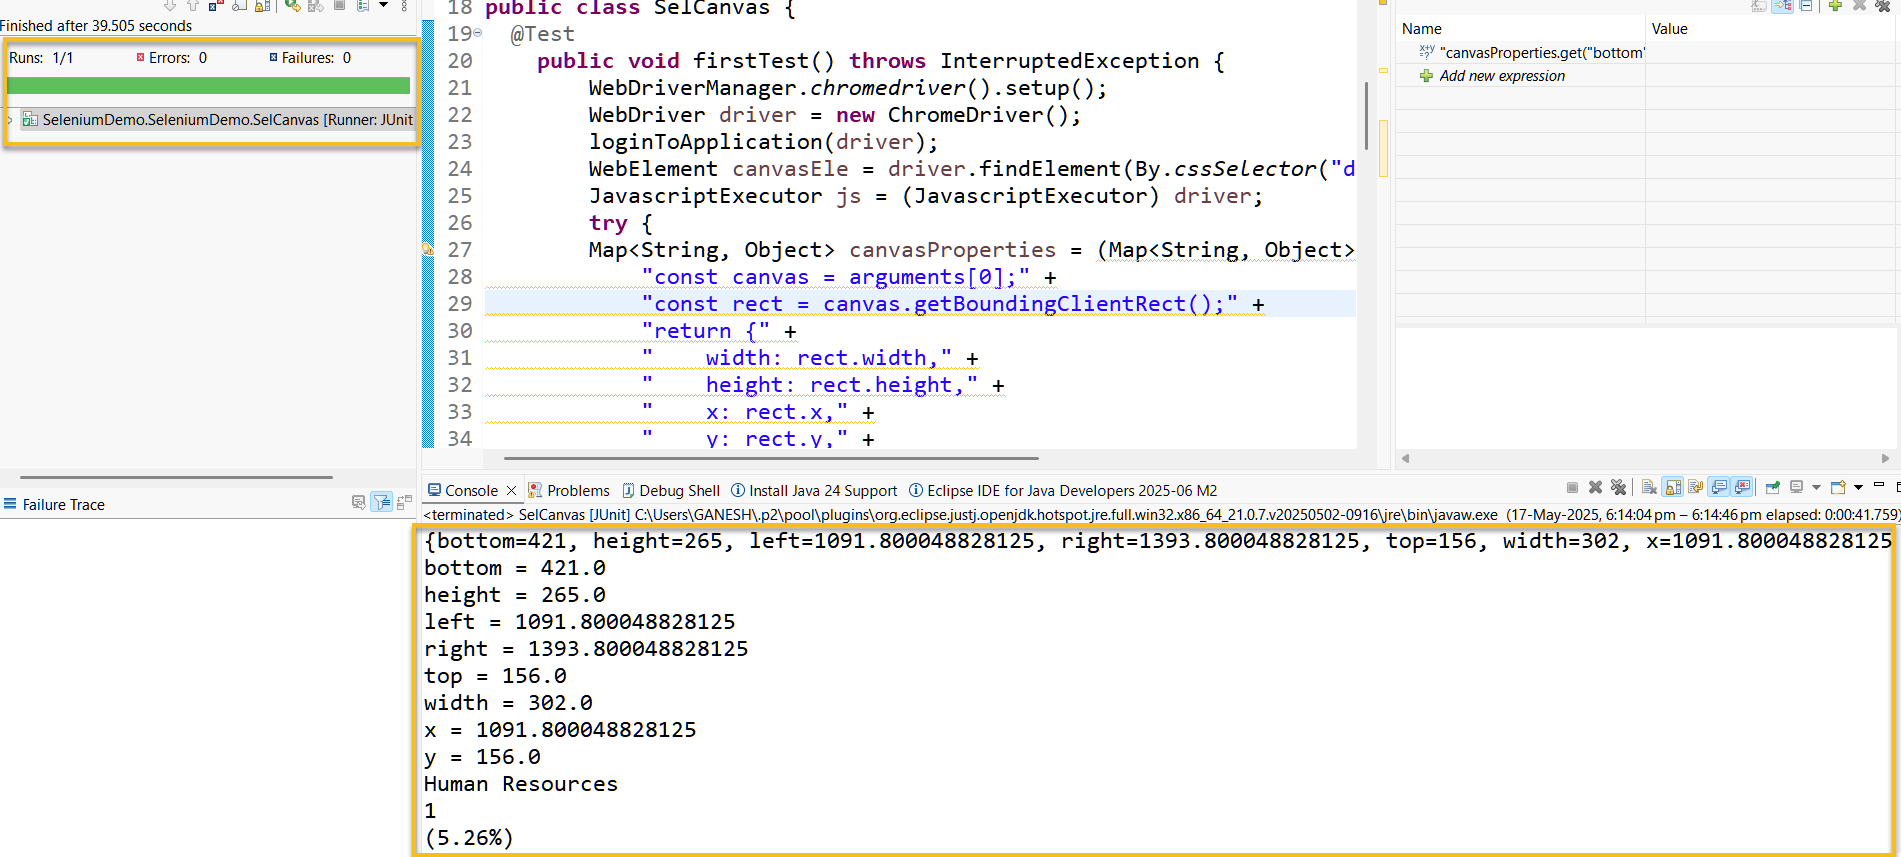
Output:
Like Cypress, Selenium can simulate basic interactions with canvas elements. However, since canvas content is rendered pixel by pixel and lacks a traditional DOM structure, the ability to interact with individual elements inside the canvas is limited.
Read More: Cypress vs Selenium: Key Differences
Challenges in Automating Canvas Interactions
Automating interactions with HTML <canvas> elements presents several unique challenges due to their non-DOM-based rendering and graphical nature. Unlike standard HTML elements, canvas content is not made up of individual nodes that can be easily located or asserted in test scripts.
Here are some key challenges:
- Lack of DOM Structure: Elements inside a canvas are drawn using JavaScript and do not exist as individual HTML nodes, making them inaccessible through traditional selectors.
- Pixel-Based Rendering: Since canvas renders pixel by pixel, verifying UI elements like colors, shapes, or text placement requires image-based or visual testing approaches rather than DOM inspection.
- Limited Event Targeting: Events like clicks or hovers need to be triggered at specific coordinate positions, which requires precise calculations and may vary with screen size or resolution.
- Dynamic and Responsive Layouts: Canvas elements may change size or layout in responsive designs, affecting the accuracy of hardcoded coordinates used for testing.
- No Built-in Accessibility: Canvas content is often not accessible to screen readers or test automation tools unless alternate text or ARIA attributes are provided.
- Challenging Assertions: Validating canvas behavior, like verifying tooltips, color changes, or animation states, often can’t be done through standard assertions and may require visual regression tools.
To overcome these limitations, teams can integrate BrowserStack Percy into their workflow. Percy enables pixel-perfect visual testing by capturing snapshots of canvas states across browsers and screen sizes, making it easier to catch UI regressions and verify canvas content visually and accurately.
Best Practices for Canvas Automation
Automating Canvas elements requires a different approach than traditional DOM-based testing. Since Canvas renders content graphically rather than through HTML nodes, it’s essential to adapt your strategy to ensure reliable and maintainable tests.
Here are some best practices for effective Canvas automation:
- Use Coordinate-Based Interactions: Since Canvas lacks internal DOM structure, simulate user actions (click, hover, drag) using precise x and y coordinates relative to the canvas bounds.
- Leverage getBoundingClientRect(): This method helps accurately calculate the canvas’s position and size, making it easier to determine where to perform interactions.
- Limit Scope of Automation: Focus on validating core functionalities like tooltips, click responses, or trigger zones rather than attempting full canvas state validations.
- Use JavaScript Execution When Needed: For more control, especially in Selenium, use JavaScript to fetch canvas properties or trigger custom events.
- Account for Responsive Behavior: Ensure your tests consider canvas resizing on different screen sizes to maintain reliability across viewports.
- Combine with Visual Testing: Use visual testing tools for UI validations like color, text placement, or graphic changes that can’t be asserted with traditional methods.
Conclusion
Automating interactions with HTML <canvas> elements can be complex due to their pixel-based rendering and lack of a traditional DOM structure. However, with the right strategies, such as using coordinate-based events, JavaScript execution, and selective validations, tools like Selenium and Cypress can be effectively used to simulate and test canvas behavior.
While these tools enable basic interaction testing, combining them with a visual testing solution like BrowserStack Percy ensures comprehensive coverage by capturing UI changes that standard assertions might miss. Together, they offer a practical and reliable approach to canvas automation across modern web applications.


