In performance testing, maintaining a steady request rate is key to evaluating system behavior under controlled load. JMeter’s Constant Throughput Timer helps achieve this by regulating the number of requests sent per minute or second, regardless of user count.
Overview
What is JMeter Constant Throughput Timer?
The Constant Throughput Timer in JMeter is used to maintain a steady rate of requests per minute (throughput) during test execution, ensuring consistent load on the server.
Key Features:
- Throughput Control: Regulates the number of samples executed per minute.
- Flexible Scope: Can be applied globally or to specific thread groups.
- Dynamic Adjustment: Automatically delays threads to achieve the target rate.
- Realistic Load Simulation: Helps mimic constant user traffic patterns.
Use Cases:
- Performance Benchmarking: Maintain fixed load levels for stability testing.
- Server Capacity Testing: Measure how systems perform at specific request rates.
- Service Level Agreement (SLA) Validation: Ensure consistent throughput to meet SLAs.
- Comparative Analysis: Compare application performance under uniform load conditions.
This article explores how the Constant Throughput Timer works, its configuration options, and best practices for using it effectively in JMeter test plans.
Different Types of JMeter Timers
JMeter timers are used to introduce delays between requests, helping simulate real-world user behavior and control the pace of test execution. They play a crucial role in performance testing by preventing all virtual users from hitting the server at the same time, which could otherwise create unrealistic load conditions.
Here are the main types of timers available in JMeter:
- Constant Timer: Adds a fixed delay (in milliseconds) before each request, simulating consistent wait times between actions.
- Uniform Random Timer: Introduces a random delay with an average and a deviation, helping to create more realistic user interactions.
- Gaussian Random Timer: Adds delays based on a Gaussian (normal) distribution, mimicking more natural variation in user behavior.
- Poisson Random Timer: Applies delays using a Poisson distribution, suitable for simulating traffic patterns like those seen in real-world systems.
- Constant Throughput Timer: Regulates the request rate to achieve a target throughput, ensuring the system is tested under a consistent load.
- Synchronizing Timer: Holds threads until a specified number have been reached, then releases them all at once to create a burst of traffic.
- BeanShell Timer / JSR223 Timer: Allows custom scripting (in BeanShell or Groovy) to define dynamic delays based on complex logic or external data.
Each timer serves a specific purpose, and choosing the right one depends on the testing scenario and goals.
What Is JMeter Throughput?
Throughput in JMeter refers to the number of requests sent by the tool to the server over a specific period, typically measured in requests per second (RPS) or requests per minute (RPM). It indicates how much load the system is handling during a test and is a key performance metric to assess server capacity and responsiveness under stress.
Throughput helps determine how efficiently a system can handle multiple simultaneous requests. High throughput generally reflects good performance, provided response times remain acceptable. It also helps identify performance bottlenecks, ensuring the system scales as expected under increasing load.
Why JMeter Throughput Is Needed For Testing
Here are key reasons why throughput is essential in JMeter testing:
- Helps determine how many requests the server can handle within a defined time frame.
- Mimics realistic traffic patterns by controlling the rate of incoming requests.
- Identifies limitations in application layers, databases, or infrastructure components under load.
- Assesses how the system performs as the number of users or requests increases.
- Validates whether the system meets service-level agreements related to response time and throughput.
- Provides consistent and repeatable load patterns, essential for comparing performance across builds or environments.
What is Constant Throughput Timer?
The Constant Throughput Timer in JMeter is a timer component used to maintain a steady and controlled rate of requests during test execution. It allows testers to define a target throughput (measured in requests per minute), and JMeter will automatically introduce delays between requests to match this rate.
This timer is especially useful in scenarios where a consistent load is required to assess system performance over time. Instead of sending requests as fast as possible, it ensures that the server is hit at regular intervals, helping identify performance trends, capacity limits, and response patterns under sustained traffic. It dynamically adjusts based on thread execution speed, making it ideal for load testing with precision.
Read More: Performance Testing Vs Load testing
Constant Throughput Timer vs Throughput Controller
While both the Constant Throughput Timer and Throughput Controller help regulate test execution in JMeter, they serve different purposes and are used in different contexts.
Constant Throughput Timer ensures requests are sent at a consistent, defined rate over time, while the throughput controller controls how often specific parts of the test plan are executed based on percentage or count.
| Feature | Constant Throughput Timer | Throughput Controller |
|---|---|---|
| Purpose | Maintains a fixed request rate | Controls execution frequency of test logic |
| Usage | Used to simulate consistent server load | Used to simulate user action distribution |
| Control Type | Time-based (requests per minute/second) | Execution-based (percent or request count) |
| Placement in Test Plan | Typically added at thread group or sampler level | Placed around samplers or controllers |
| Affects All Requests? | Yes, based on scope | Only affects samplers within its scope |
| Common Use Cases | Load testing, stress testing | User flow simulation, A/B testing logic |
In summary, the Constant Throughput Timer is ideal for managing test intensity, while the Throughput Controller is best for simulating varied user behaviors within a scenario.
Input Fields of the ‘Constant Throughput Timer’
This timer provides simple yet powerful configuration options to control how throughput is applied during test execution. Understanding these input fields is key to using the timer effectively.
Target Throughput (in samples per minute): Defines the number of requests to be sent per minute. For example, 120 means the system will aim for 2 requests per second.
Calculate Throughput based on: Determines the scope of throughput distribution. Options include:
- This thread only: Applies the throughput target individually to each thread.
- All active threads in the current thread group: Distributes the throughput across all threads within the selected thread group.
- All active threads: Applies the throughput target across all threads in the entire test plan.
- All active threads in current thread group (shared): Shares the throughput limit across all threads in the thread group.
- All active threads (shared): Shares the throughput across all active threads in all thread groups.
These settings allow flexible control over request distribution, making it easier to simulate a realistic user load.
How to Use the JMeter Constant Throughput Timer
The Constant Throughput Timer is used to apply a fixed load pattern during performance testing. It can be combined with thread groups and samplers to simulate a consistent number of requests over time. Below is a step-by-step example to demonstrate its usage in a simple HTTP request test.
Scenario: Simulate a load of 60 requests per minute (1 request per second) on a placeholder sampler for a duration.
Test Plan Setup
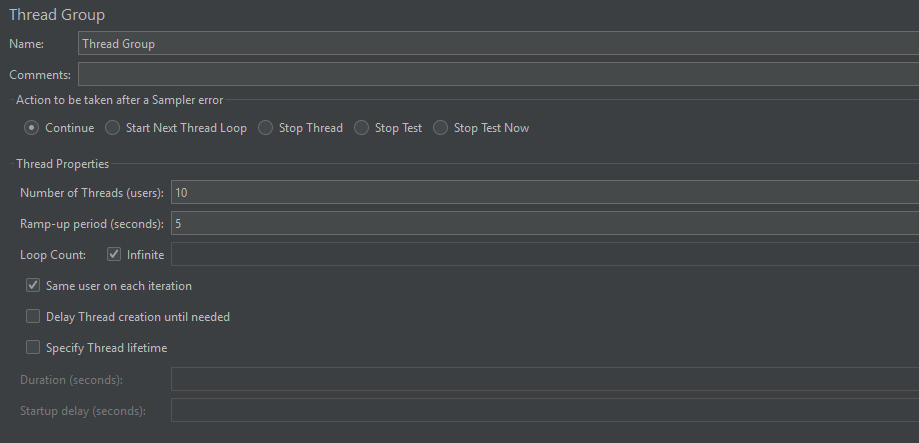
1. Thread Group: Add a Thread Group to your Test Plan.
- Set “Number of Threads (users)” to a value potentially higher than needed to achieve the target (e.g., 10 users) to ensure enough threads are available to generate the load if the system is responsive.
- Set “Ramp-up period (seconds)” to a small value (e.g., 5 seconds).
- Specify a duration in the Thread Group or Set “Loop Count” to “Infinite.
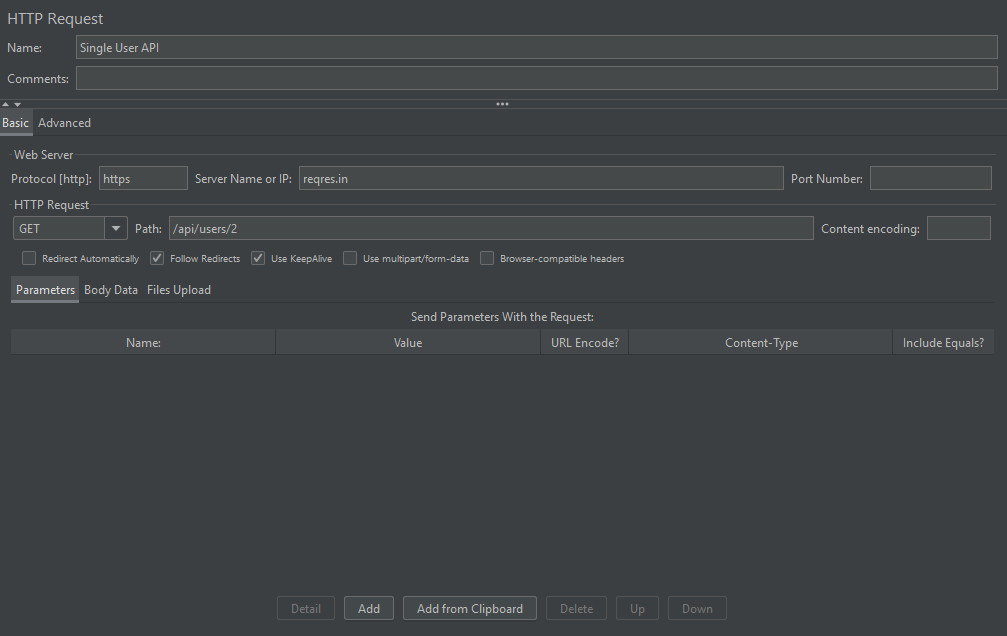
2. Sampler: Add a sampler under the Thread Group. An “HTTP Request” pointed at a simple URL.
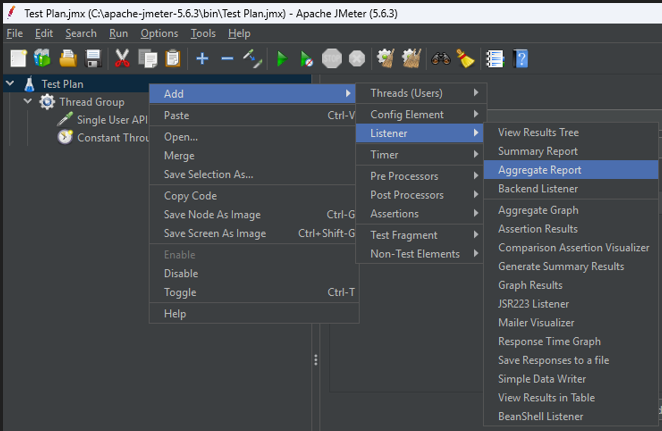
3. Constant Throughput Timer: Add a Constant Throughput Timer under the Thread Group.
- Target Throughput (in samples per minute): Set this to 60.0. This is the desired rate of 60 samples every minute (1 sample per second).
- Calculate Throughput based on: Select “all active threads in current thread group”. This tells the timer to consider the total requests from all threads in this Thread Group when calculating the delay needed to maintain the 60 samples/minute rate.
4. Listeners: Add an “Aggregate Report” and a “View Results Tree” listener to the Test Plan (preferably under the Test Plan element to see results for everything).
Execution
Upon running, the threads execute samplers. The Constant Throughput Timer intervenes before each eligible sampler, introducing pauses as necessary to ensure the collective rate of sampler executions across all active threads averages out to the specified target throughput (60 samples/minute).
Output
Examine the “Throughput” column in the Aggregate Report. A value of 1.0/sec (which is equivalent to 60 samples per minute) confirms that the Constant Throughput Timer successfully regulated the execution pace. By introducing necessary pauses between requests, the timer enabled the test to collectively maintain an average rate of approximately 1 sample per second across all active threads over the test’s duration, aligning with the target of 60 samples per minute set in the timer.
Best Practices for Working with a Constant Throughput Timer Element
Using the Constant Throughput Timer effectively can help simulate realistic user load and ensure accurate performance test results. Below are the best practices to follow:
- Base Throughput on Real Data: Base the target throughput on expected user traffic or historical production data to simulate meaningful load.
- Timer Placement: Add the timer either at the Thread Group level to apply globally or to individual samplers when targeting specific requests.
- Throughput Calculation Option: Choose the correct “Calculate Throughput based on” option based on your test design. Using a shared option helps distribute the load evenly across threads.
- Sufficient Thread Count: Ensure the number of threads is adequate to meet the specified throughput. Too few threads may prevent JMeter from reaching the target rate.
- Avoid Interfering Delays: Extra delays from other timers or scripts can interfere with achieving the desired throughput.
- Verify Achieved Throughput: Always verify the achieved request rate in listeners like Summary Report or Aggregate Report to ensure it aligns with your target.
- Use Scheduler for Consistency: Use the Scheduler in the Thread Group to run the test for a fixed time and get consistent data for analysis.
- Realistic Behavior and Validation: Pair the timer with Assertions, Controllers, or Pre/Post Processors to mimic realistic user behavior and validate responses.
Conclusion
The Constant Throughput Timer in JMeter is a powerful tool for maintaining a steady and predictable request rate during performance testing. It helps simulate real-world traffic by pacing requests based on a defined throughput, allowing teams to assess system behavior under consistent load. When configured thoughtfully and combined with best practices, it plays a vital role in generating accurate, reliable performance data and ensuring test scenarios reflect actual user activity.
Additionally, integrating real device testing platforms like BrowserStack lets you verify performance on 3500+ real devices and browsers. This ensures your application delivers a consistent user experience across different devices.


