Android emulators allow Linux machines to run Android applications, making it easier to test, develop and use mobile apps without a physical device. Whether for app development, gaming or general use, having a reliable emulator enhances the Android experience on Linux.
Overview
Benefits of Using Android Emulators on Linux
- App Development & Testing: Test apps without physical devices.
- Gaming: Play Android games with better controls.
- Multi-Tasking: Run multiple apps simultaneously.
- Cost-Effective: No need for multiple devices.
- Customizability: Adjust settings and configurations.
- Access to Android Apps: Run mobile apps on Linux.
Best Android Emulators for Linux
- Anbox
- Genymotion
- Bluestacks
- Android Studio Emulator
What is an Android Emulator?
An Android emulator is a software application that simulates an Android environment on a different operating system. It allows Android apps and games to run without needing a physical Android device. These emulators simulate the hardware and software of a real Android phone or tablet, making them useful for app testing, development, and gaming.
Benefits of Using Android Emulators on Linux
Some of the benefits include:
- App Development & Testing: Developers can test and debug Android apps without needing a physical device.
- Gaming: Android games can be played on a larger screen with better controls using a keyboard and mouse.
- Multi-Tasking: Multiple apps can run at the same time, improving productivity.
- Cost Effective: There is no need to buy multiple Android devices for testing different versions and screen sizes.
- Customizability: Emulators allow changing device settings, screen sizes and performance configurations.
- Access to Android Apps: Mobile only applications can be used on Linux without switching to an Android device.
Limitations of Using Android Emulators on Linux
Some of the limitations include:
- Performance Constraints: Emulators consume a significant amount of system resources leading to slow performance and lagging.
- Hardware Optimisation Issues: Hardware acceleration and GPU utilisation are often inefficient affecting overall responsiveness.
- Limited Real World Simulation: Factors like user interactions, environmental conditions and real time app behavior cannot be accurately replicated.
- Network Limitations: Emulators struggle to simulate real network conditions like slow or unstable internet connections.
- High Disk Usage: Emulators require substantial storage space and lack effective disk management capabilities.
- Debugging Complexity: Troubleshooting issues may require additional tools and integrations making the debugging process difficult.
Best Android Emulators for Linux (Features & Installation Steps)
Below is the list of the best android emulators for Linux:
1. Anbox
Anbox or Android in a Box is an open source emulator that allows Android applications to run natively on Linux. It uses a container-based approach to integrate Android with the Linux system efficiently.
Key Features:
- Runs Android Apps on Linux: Enables Android applications to function natively without emulation.
- Container-Based Architecture: Uses a lightweight container to integrate Android seamlessly with Linux.
- No Performance Overhead: Runs directly using system resources without relying on a virtual machine.
- Seamless Integration: Allows Android applications to work alongside Linux applications for a smooth user experience.
Installation:
Anbox requires specific kernel support and snap installation.
Step 1: Check Support for Kernel
Anbox relies on binder and ashmem kernel modules. These are already included in Ubuntu 18.04+ and Debian Buster+.
To verify these modules are loaded, run:
ls -1 /dev/{ashmem,binder}If /dev/ashmem and /dev/binder appear, the system is ready.
If SecureBoot is enabled, loading ashmem_linux may fail. To check SecureBoot status:
sudo mokutil –sb-state
If enabled, either disable SecureBoot or sign in the kernel module. Detailed instructions can be found here.
Step 2: Install Anbox Snap
Anbox is distributed via snap packages. If snap support is unavailable, installation instructions can be found at Snapcraft.
To install Anbox via snap, run:
sudo snap install –devmode –edge anbox
If not logged into the Ubuntu Store, the snap command may prompt for elevated privileges by requiring ‘sudo’. The –devmode flag is required as Anbox is not yet fully confined.
As a consequence of using –devmode, automatic updates are not enabled.
To manually update Anbox to the latest version, run:
sudo snap refresh –edge –devmode anbox
2. Genymotion
Genymotion is an Android emulator that works on Linux with an embedded QEMU hypervisor. It supports Ubuntu 24.04 LTS, Debian 12 and Fedora Workstation 40.
Key Features:
- Multiple Android Versions: Supports testing apps across different Android versions for better compatibility.
- Diverse Device Options: Allows choosing from various virtual devices with different screen sizes and hardware specs.
- Google Play Store Access: Enables downloading and testing popular apps from the Google Play Store within the emulator
- User friendly Interface: Ensures easy set up and management of virtual devices with a simple and intuitive UI.
Installation:
Step 1: Download Genymotion
- Visit the Genymotion website and log in or create an account.
- Download the Genymotion for Linux (.bin file).
Step 2: Prepare for Installation
Open a terminal and navigate to the folder where Genymotion was downloaded:
cd ~/Downloads
Grant execute permission to the installer:
chmod +x genymotion-*.bin
Step 3: Install Genymotion
Run the installer, replacing X.Y.Z with the actual version:
./genymotion-X.Y.Z-linux_x64.bin -d /opt/genymotion
Step 4: Start Genymotion from terminal:
/opt/genymotion/genymotion
3. Bluestacks
BlueStacks is one of the most popular Android emulators known for its performance and gaming capabilities. It enables users to run Android apps and games on a PC with enhanced speed, high graphics quality and features like keymapping etc.
Key Features:
- Keymapping Tool: Helps customising game controls for a better playing experience.
- Instance Manager: Enables running multiple emulator instances to play different games simultaneously.
- Eco Mode: Reduces system resource usage for smoother performance in heavy games.
- Android Version Support: Supports Android versions 9 to 13 with regular updates for better compatibility.
Installation:
Since BlueStacks does not have a Linux version, it can be used by setting up a Windows VM via VirtualBox.
Step 1: Update System Packages
Open the terminal and update all the packages:
sudo apt update
Step 2: Install VirtualBox
sudo apt-get install virtualbox -y
Step 3: Download ISO
Download anyWindows ISO file from the Microsoft website based on the required system specifications.
Step 4: Create a Windows VM
- Open VirtualBox and click New.
- Select Windows as the OS.
- Allocate enough RAM and CPU cores for smooth performance.
Step 5: Load Windows ISO and Install Windows
- Open Settings -> Storage in VirtualBox.
- Select the downloaded Windows ISO file.
- Start the VM and follow the Windows installation steps.
Step 6: Install BlueStacks
- Launch the Windows VM and open a browser.
- Visit the BlueStacks website and download the installer.
- Run the installer as Administrator and follow the setup.
Step 7: Use BlueStacks on Linux
After installation, BlueStacks can be used inside the Windows VM to run Android apps on Linux.
4. LDPlayer
LDPlayer is a powerful Android emulator optimized for gaming. It provides a smooth and lag free experience allowing users to play mobile games on any PC with a high performance.
Key Features:
- Optimised for Gaming: Delivers high performance gaming with smooth FPS and reduced lag.
- Keymapping: Allows users to assign keyboard and mouse controls for better gameplay.
- Multiple Instance Support: Enables multiple games or apps to run simultaneously on different emulator windows.
- Compatibility: Supports a range of Android games and apps including resource intensive ones.
Installation:
LDPlayer is primarily designed for Windows and there is no official version for Linux. However, it can be installed on Linux using Windows VM.
Follow the same method as above for setting up a Windows Virtual Machine (VM). Once installed and set up:
Install and launch LDPlayer in Windows
- Open Microsoft Edge or another browser in the Windows VM and go to LDPlayer’s official website.
- Download the LDPlayer installer.
- Run the installer and follow the prompts to complete the installation.
- After installation, launch LDPlayer in the VM.
5. Android Studio Emulator
The Android Studio Emulator is the official emulator from Google, designed for app development and testing. It provides a fully featured Android environment that allows developers to test apps on different virtual devices, screen sizes and Android versions without needing any physical devices.
Key Features:
- Easy Installation: Comes bundled with Android Studio making setup quick and simple.
- Custom Virtual Devices: Can create and configure virtual devices with different screen sizes, resolutions and hardware settings.
- Cross-Version Testing: Supports multiple Android versions to test app compatibility across different OS versions.
- Direct App Deployment: Install and test apps directly on the emulator without needing a physical device.
Installation:
Step 1: Install all Required Libraries for 64-bit Linux
For Ubuntu (64-bit):
sudo apt-get install libc6:i386 libncurses5:i386 libstdc++6:i386 lib32z1 libbz2-1.0:i386
Step 2: Download Android Studio
- Go to the official Android Studio website.
- Download the Linux version of Android Studio.
Step 3: Extract and Install Android Studio
- Extract the .tar.gz file to a suitable location like /usr/local/ for personal use or /opt/ for shared users:
tar -xvzf android-studio-*.tar.gz
- Move the extracted folder to a directory (eg., /opt/):
sudo mv android-studio /opt/
Step 4: Launch Android Studio
- Open a terminal and navigate to the bin directory of Android Studio:
cd /opt/android-studio/bin
- Execute the studio.sh script to launch Android Studio:
./studio.sh
Step 5: Complete the Setup Wizard
- The Android Studio Setup Wizard will appear. Choose whether to import previous settings or select OK to proceed.
- The wizard will download the required Android SDK components for development.
Step 6: Install the Android Emulator
- Open Android Studio and go to AVD Manager by selecting Tools > AVD Manager.
- Click on Create Virtual Device, choose a device (eg., Pixel 6) and click Next.
- Select a System Image (eg., Google APIs x86).
- Click Next, then Finish to create the virtual device.
- The emulator can now be launched from the AVD Manager.
Step 7: Start the Emulator
Once the Android Emulator is set up:
- Open the AVD Manager in Android Studio.
- Click the play icon next to the virtual device to start the emulator.
6. ARChon
ARChon is a unique Android emulator that runs as a Chrome extension allowing Android apps to run directly in the Chrome browser. It’s lightweight & cross platform and does not require a virtual machine.
Key Features:
- Runs Android Apps on Chrome: Works as a Chrome extension enabling Android apps to run on any system with Chrome.
- Cross Platform Compatibility: Supports Windows, macOS and Linux without needing a full emulator.
- Lightweight and Fast: Consumes fewer system resources as compared to other emulators.
- No Virtual Machine Required: Runs apps directly within Chrome eliminating the need for any additional virtualization software.
Installation:
Step 1: Install Google Chrome
For Ubuntu:
sudo apt updatesudo apt install wget

wget https://dl.google.com/linux/direct/google-chrome-stable_current_amd64.deb

sudo dpkg -i google-chrome-stable_current_amd64.deb

sudo apt –fix-broken install
Step 2: Download ARChon
- Go to the ARChon GitHub page.
- Download the latest ARChon zip file.
Step 3: Extract ARChon
Extract the downloaded ARChon zip file:
unzip archon-*.zip -d ~/archon
Step 4: Install ARChon in Chrome
- Open Google Chrome and go to chrome://extensions/.
- Enable Developer mode.
- Click Load unpacked and select the extracted ARChon folder (~/archon).
Step 5: Convert APK Files
- Install Chrome APK Packager by following the instructions here.
- Convert APKs using this command:
chromeos-apk /path/to/your/app.apk
Step 6: Load Converted APK in Chrome
- Go back to chrome://extensions/ in Chrome.
- Click Load unpacked and select the converted APK folder.
- The app should now appear in the Chrome App Launcher.
7. Shashlik
Shashlik is an Android emulator built specifically for Linux users. It offers a simple and efficient way to run Android apps on Linux and has a lightweight setup, direct APK installation and OpenGL support.
Key Features:
- Integration: Designed specifically for Linux allowing Android apps to run natively.
- Minimalistic Approach: Uses a lightweight setup without requiring a full Android system.
- Direct APK Installation: Enables users to install and run APK files directly without any extra configurations.
- Uses Native OpenGL: Provides good graphics performance by utilising the system’s OpenGL support.
Installation:
Step 1: Install all the Dependencies
For Ubuntu:
sudo apt updatesudo apt install wget git unzip lib32z1 lib32ncurses5 lib32stdc++6
Step 2: Download and Install Shashlik
- Download the latest version of Shashlik:
wget https://github.com/shashlik/shashlik/releases/download/v0.9/shashlik-0.9-x86_64.tar.xz
- Extract the downloaded tarball:
tar -xvf shashlik-0.9-x86_64.tar.xz
- Move the extracted files to /opt:
sudo mv shashlik-0.9 /opt/shashlik
Step 3: Install Android Runtime Environment
Shashlik requires the Android runtime to run Android apps. To install it, run:
cd /opt/shashlik./install.sh
Step 4: Install the app APK
- Download APK for the app to be installed (eg., from the Play Store or other sources).
- Install the APK using Shashlik:
./shashlik install /path/to/your/app.apk
Step 5: Run the Android App
Once the APK is installed, run it using:
./shashlik run /path/to/your/app.apk
Read More:How to Use APK File on iOS Device
Key Features to Look for in an Emulator
Some key features include:
- Performance and Speed: A good emulator should run apps smoothly without any lag and ensuring a smooth experience.
- Compatibility: Support for different Android versions and apps is essential for testing or gaming.
- Customizable Controls: The ability to map keys or use a game controller enhances usability especially for gaming.
- Multi Instance Support: Support running multiple apps or games simultaneously to improve productivity and testing.
- Geolocation Testing: Ensures the app works properly for users in different locations.
- Device Simulation: The ability to mimic different screen sizes, resolutions and hardware configurations is useful for app development.
- Google Play Store Access: Built-in Play Store support makes it easy to download and install apps.
- Stability & Regular Updates: Frequent updates and bug fixes ensure the emulator remains reliable and secure.
- Low Resource Consumption: Efficient performance without consuming excessive CPU or RAM helps maintain overall system stability.
Testing Android Apps on Real Device Cloud on Linux using BrowserStack App Live
BrowserStack App Live allows testing Android apps on real devices offering a more reliable testing environment compared to emulators.
Step 1: Sign in and Select Device
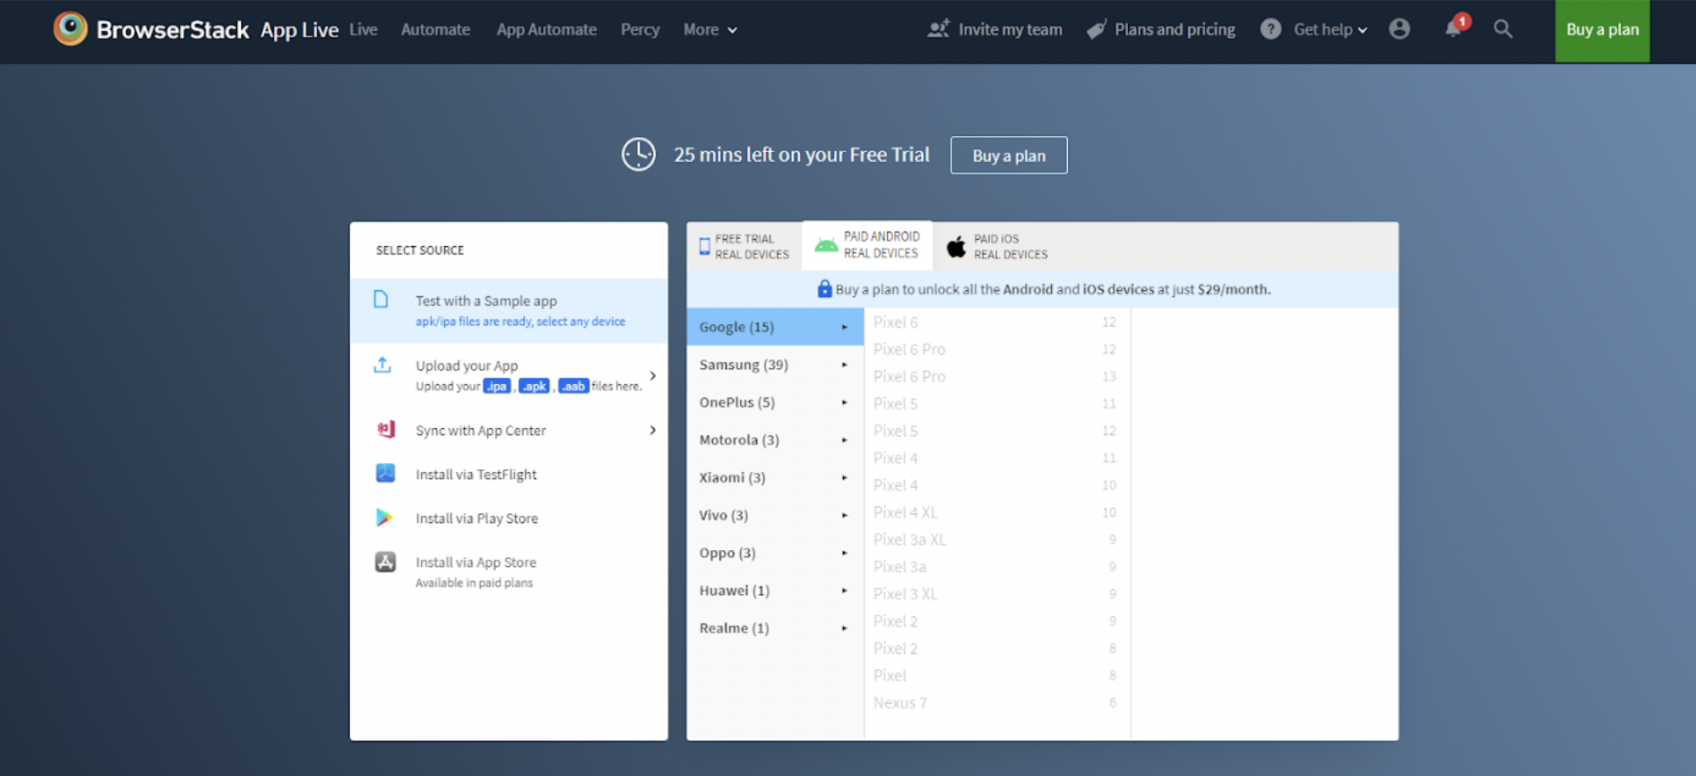
Sign in to the BrowserStack account. Choose the desired Android device from the given list or select a preconfigured option.
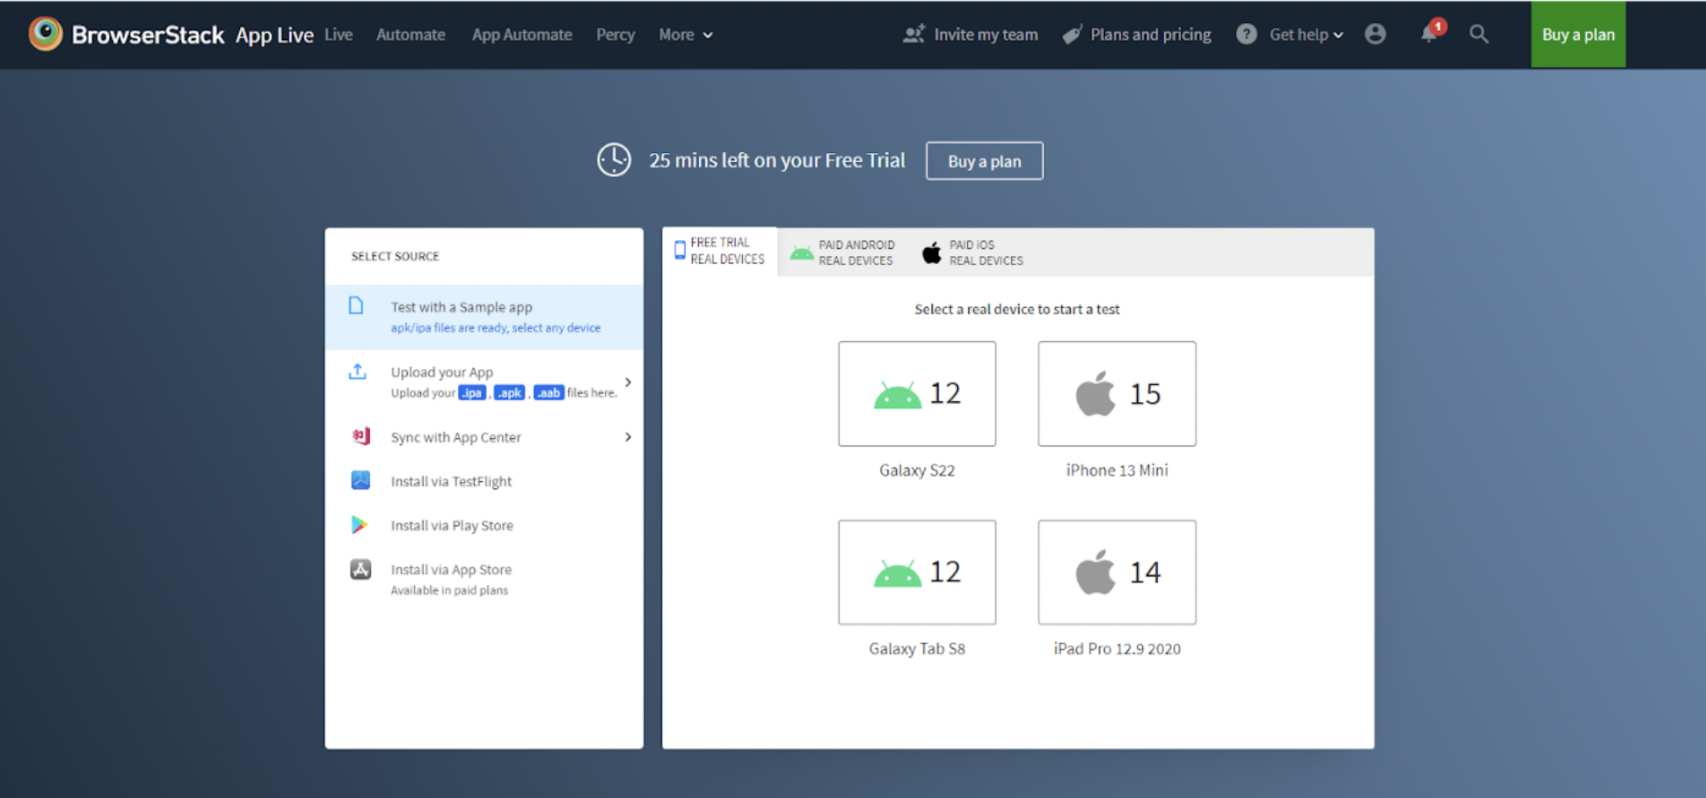
Upload the app directly and sync it with App Center or install it via the Play Store, TestFlight or App Store. A sample app can also be used for testing.
Once the app is installed, start testing it on the selected Android device.
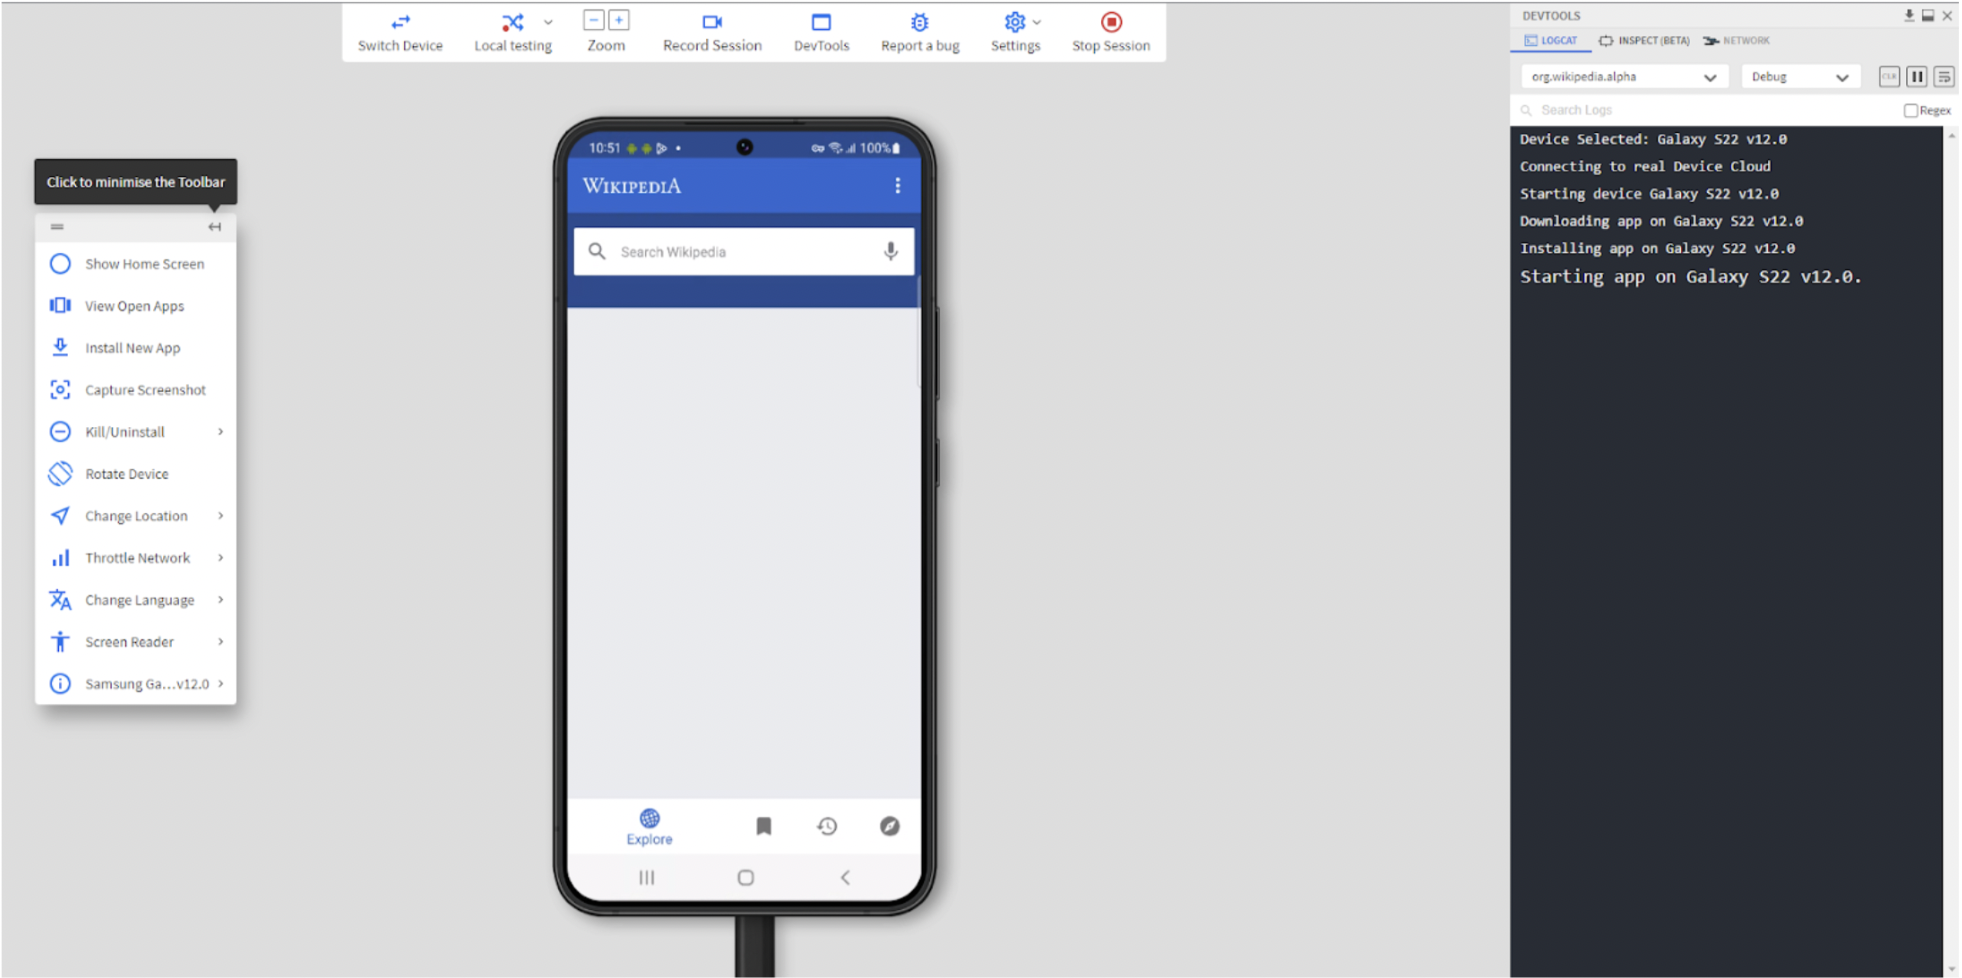
During testing, sessions can be recorded and bugs can be reported using tools like JIRA, Trello or Slack. The recorded session or analytics can then be downloaded or shared to assist with debugging and improving the testing process.
Why Prefer Real Device Cloud Instead of Android Emulators?
When testing Android apps, real device testing provides a more accurate and reliable experience as compared to emulators:
- Real Validation: Emulators can generate false positives or negatives, leading to inaccurate test results. They are useful for preliminary checks but do not fully replicate real world conditions. Testing on real devices helps identify issues that might otherwise go unnoticed ensuring functionality across different hardware and software configurations.
- Accurate UI and Usability Testing: Real devices provide an authentic UI experience. Emulators may display applications differently leading to design mismatches. Testing on real devices helps in identifying usability concerns ensuring a seamless interaction that matches actual user expectations.
- Performance Testing: Precise performance measurements require real hardware. Factors like transaction times, responsiveness and battery consumption are best evaluated on physical devices. Emulators often fail to replicate these aspects accurately leading to misleading results.
- Testing Hardware Specific Features: Many applications depend on hardware components like GPS, cameras, sensors and multi touch capabilities. Real devices enable testing these features effectively, ensuring smooth functionality under different scenarios. Emulators lack full support for such hardware interactions, making real device testing essential.
- Reliability Across Device Variations: Android devices vary in hardware specifications, operating system versions and network conditions. Emulators do not fully replicate this diversity which can lead to unexpected behavior in real environments. Testing on real devices helps verify compatibility across multiple configurations.
- Avoiding Emulator Limitations: Emulators come with several limitations, including incompatibility with certain applications and features. They often struggle with real-world conditions like varying network speeds, touch responsiveness and hardware specific optimizations. Testing on physical devices eliminates these concerns ensuring accurate results.
Why Use BrowserStack App Live for Testing Android Apps on Linux?
BrowserStack App Live allows testing Android apps on real Linux devices, providing a more realistic environment compared to simulators. With access to over 3,500+ device and OS combinations, BrowserStack makes it easy to test Android apps under real world conditions. This includes testing key features like gestures, geolocation, connectivity and localization.
Key Features of BrowserStack App Live:
- Real Device Testing: Test apps on real devices for a more accurate evaluation.
- Native Feature Testing: Test Android features like gestures and geolocation to simulate real user interactions.
- Parallel Testing: Run multiple tests at the same time on different devices, speeding up the process.
- Debugging Tools: Use logs, video recordings and screenshots to quickly find and fix issues.
- Screenshot Capture: Keep sensitive data secure during testing.
- Device Rotation: Test app performance in both portrait and landscape modes.
- Network Throttling: Simulate slow network conditions to test app behavior under poor connectivity.
- Location Change: Check how the app works in different geographic regions.
- Language Change: Test app compatibility with multiple languages.
Conclusion
Choosing the right method for Android testing on Linux depends on the specific needs of the project – whether for development, performance testing or general use. While emulators provide a convenient way to run Android applications, real device cloud solutions like BrowserStack App Live offer greater accuracy, performance, and a more realistic testing environment.
By selecting the best approach based on project requirements, teams can ensure a seamless and efficient Android testing experience, ultimately delivering high-quality apps to users.


