Writing Cypress tests is a more efficient and quicker option for debugging E2E testing and executing them parallel to any pull request as part of Continuous Integration.
Overview
What is Cypress?
Cypress is a JavaScript-based front-end testing framework catering to web applications. It lets developers and testers write tests like unit tests, integration tests and end-to-end tests for different development stages.
Why Write and Run Tests on Cypress?
- End-to-End Test Automation
- Automatic Waiting
- Time-travel debugging
- Quick and simple debugging
- Ease of Use
This article walks you through the basics of writing Cypress tests, including setting up your test environment, writing test code, and running and debugging your tests in the Cypress Test Runner.
Setting up Cypress for your project
Before writing your first test, you must first install Cypress. Enter the following commands in CMD:
npm install cypress --save-dev
Once Cypress has been set up, you can launch it by using:
npx cypress open
After installing Cypress, you can use the IDE to create a project and begin creating Cypress tests. The directory cypress/integration/ contains all of the tests.
Also Read: What is Cypress Test Suite?
Understanding Cypress Syntax and Commands
The BDD syntax from Mocha, which is ideal for both integration and unit testing, has been adopted by Cypress. Every test you’ll be writing rests on the basic harness that Mocha offers, namely:
- describe()
- context()
- it()
- before()
- beforeEach()
- afterEach()
- after()
- .only()
- .skip()
Cypress Commands
Cypress commands provide you with the option to create custom functionality and even replace preexisting commands. Making a custom command is typically a smart idea when you start to truly understand that you are repeatedly writing the same functionality across several tests, or repeating yourself.
This command could take the form of a click, website navigation, or even finding an element. As a result, you will include commands as one of the key components in our test.
Also Read: How to handle Click Events in Cypress
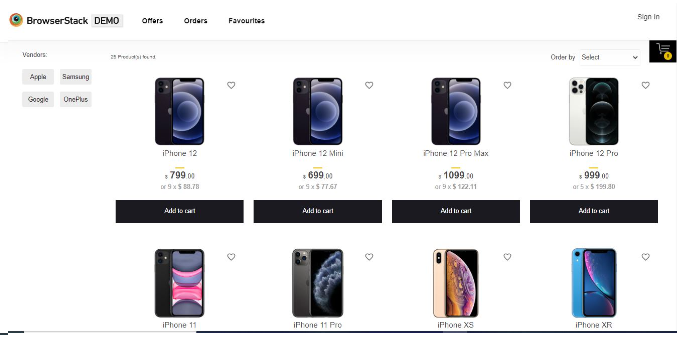
Consequently, the first command you will execute will be to open the website bstackdemo.com. ‘Visit’ is the command’s name.
You must have heard the frequently used command. It’s known as ‘get’:
cy.get('selector');This command returns an element based on the selector it uses. In order to locate the components to interact with, you would execute this command.
Also Read: Cypress Locators
Typically, you would utilize it to initiate a series of instructions.
The statements in the tests, or commands, can be organized in a chain (or chained, in other words).
This implies that, as you know from many test frameworks, commands can pass on a subject (or return value) of one command to the subsequent command.
You will utilize commands to mimic the actions a user would take.
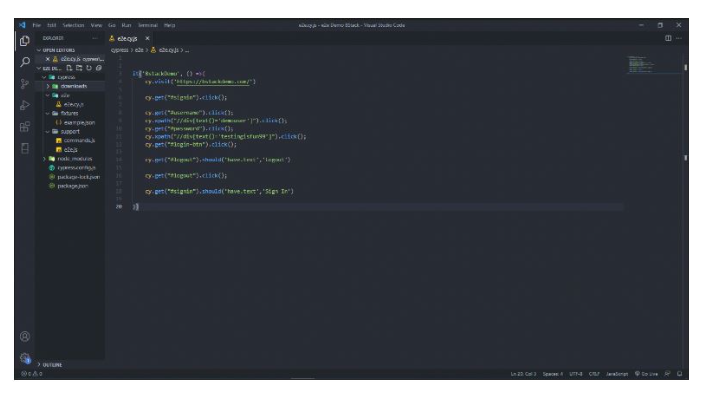
it('BstackDemo', () =>{
cy.visit('https://bstackdemo.com/')

cy.get("#signin").click();

cy.get("#username").click();
cy.xpath("//div[text()='demouser']").click();
cy.get("#password").click();
cy.xpath("//div[text()='testingfun23']").click();
cy.get("#login-btn").click();

cy.get("#logout").should('have.text','Logout')

cy.get("#logout").click();

cy.get("#signin").should('have.text','Sign In')

})
Execute the automated Cypress end-to-end test after that, then record and study the results. Cypress tests may be executed using the Cypress Runner or Cypress CLI.
Writing your first Cypress test
To start, you will make a new file in the integration folder. author.spec.js is what you will call it. The suffix .spec stands for “specification”. These are the technical requirements that your application must meet to pass a test for a particular feature or application.
You will begin by giving the test suite structure such that this blank JavaScript file may house a test. You are going to use the ‘describe’ Hook. The tests are contained and arranged using context() or describe(). In other words, our tests are framed by this strategy. Thus, our test file will appear as follows:
// find-author.spec.js
describe('Find authors at browserstack', () => {
//...
});
What is describe, it, and expect ? These all originate from bundled libraries that Cypress has baked in.
- ‘describe’ and ‘it’ come from Mocha
- ‘expect’ comes from Chai
Also Read: How to run specific test in Cypress
Making the real test is the next stage. The method it(), or specify(), represents the actual test. As you can see, yo can capture several tests in a single file, giving us a variety of fantastic structuring options.
// author.spec.js
describe('Find authors at browserstack', () => {
it('Find the author Hamid Akhtar', () => {
cy.log('This is our first test');
});
});
If you use Cypress test runner to execute our test, you will see that Cypress launches a browser to carry out the test.
Refer to our help documentation to execute your first Cypress test using BrowserStack. The username and access key for BrowserStack is located in your account settings.
Sign up for a Free BrowserStack Account
Create a real test
A reliable test typically includes three stages:
- Organize the application state.
- Action needed.
- Make an assertion regarding the state of the resultant application.
Now the concept would be that you first set the application in a certain state, then you do something in the application that changes it, and then you verify the new state of the application.
An in-depth look:
- Go to a website.
- Look up an element.
- Engage with that element.
- Make an assertion regarding the page’s content.
Or
Let us start:
- Visit the home page of BStackDemo (https://www.bstackdemo.com/).
- Login using the login page.
- Make sure the home page loads properly.
- Sign off
Writing the test scripts for the test case using Cypress is the next step after determining the test flow, as shown in the image and code below.
You will now go over the commands used in the aforementioned image.
Also Read: How to run UI tests in Cypress
Organizing your Cypress tests
When Cypress is first started in your codebase, it already has a top-level cypress folder with a suggested structure. Included in this are additional directories like integration for your specification files, fixtures for JSON data files, plugins for your cy.task(…) functions and other configurations, and a support folder for your custom commands and types.
When you run Cypress tests on BrowserStack, if your spec file has errors, the test session keeps running and eventually blocks a parallel that could have been used by another spec. You can get detailed instructions on how to organize your test runs and tests for better test reporting. Learn how to organize your tests and builds.
Tips for structuring your tests and making them maintainable
Here are a few best practices to follow while writing Cypress tests to structure and maintain your tests seamlessly:
- The “Writing and Organizing tests” documentation explains the fundamentals of test organization. Tests should be arranged by pages and components as it is best to test each component separately.
- To give context to your selectors and shield them from CSS or JS changes, use data-* attributes.
- Tests must always be able to be executed separately and still pass.
- Set state directly / programmatically. It’s not always as simple to set state programmatically as it is to send requests to endpoints. To manually set desired values for the application state in the store, you might need to manually dispatch, say, Vue actions. The Cypress documentation provides a useful example of how to test Vue web apps using a REST backend and a Vuex data store.
- Try to refrain from needing a third-party server. When interacting with third-party services using their APIs, such as testing log-in when your app utilizes another provider through OAuth, always use cy.request().
- Don’t be concerned, just add more assertions.
- Before running tests, clean up the state.
- Use assertions or route aliases to prevent Cypress from continuing unless a certain condition is fulfilled.
- In your configuration file, specify a baseURL.
- Making an assertion fail on purpose allows you to examine the output and error message to see if you can determine why it did so.
- By utilizing the debugger keyword, you may halt the test’s execution. Verify that DevTools are open.
- Cypress records test run videos, allowing you to compare the failed test run video to the most recent successful test run if a test fails.
Common errors while launching Cypress
Here are some common errors to avoid while writing Cypress tests:
- Not making commands/assertions retry-able
- Repeating DOM selectors and having large, bloated specs files. To overcome this establish a class (page object) for each page that has the selectors and commands required for the page. The page objects then serve as a user-friendly abstraction, simplifying the specification files.
- Use a specific selector for GUI tests that instructs developers when an element is included in a GUI test to make selections more reliable.
- Due to issues including device constraints and network latency, real-world apps are asynchronous and sluggish. You are tempted to utilize arbitrary cy.wait command values while developing tests for such apps. Instead, you should watch for visual components, such as the loading to be finished. Cypress commands like cy.get, for instance, wait for the element before making the assertion, of course for a predetermined timeout value that you may adjust.
- The inability to use more than one domain name in a single test is one of Cypress’s limitations. In some tests, it may be necessary to visit more than one domain. To achieve this, you may divide our test logic into several test blocks and place them all in a single test file.
Benefits of Writing Tests on Cypress
Writing tests on Cypress comes with several benefits, which is why it is quite popular among the testing community:
- Fast and Reliable Testing: Real-time reloading and quick execution help boost testing efficiency.
- Full-Stack Testing: Facilitates end-to-end, unit , and integration testing within the same framework.
- Easy Debugging: Detailed error messages and real-time snapshots simplify the debugging process.
- Automatic waiting: You don’t have to depend on explicit waits, as Cypress smartly waits for elements and requests.
- Ease of Use: Cypress has a simple syntax and efficient built-in features which are easy to use.
- Time-travel debugging: With Cypress, you can inspect the state of the app at any point during test execution via the time-travel debugging feature.
Why Choose BrowserStack for Cypress Testing
BrowserStack is a cloud-based testing platform that lets you run Cypress tests efficiently across multiple device-OS-browser combinations. Here are a few reasons why you should choose BrowserStack:
- Cross-browser testing: Cypress runs on limited browsers, mainly Chrome-based ones. BrowserStack helps you expand your Cypress tests to many other browsers, such as Safari, Edge, IE, and more.
- Video Recording: The ability to record videos of test execution is a significant benefit of using BrowserStack to execute Cypress tests.
- Cloud Infrastructure: This cloud-based platform does not require setting up or maintaining browsers or physical devices locally.
- Parallel Testing: With parallel testing, you can run multiple Cypress tests concurrently, speeding up test execution and eventually the release cycles.
- Real-device testing: BrowserStack offers you a vast real-device cloud, letting you run Cypress tests on 3500+ real device, browser, and OS combinations, thus allowing you to test under real user conditions.
- Integrations: BrowserStack offers seamless integrations with several CI/CD tools like Jenkins, Travis CI, Circle CI, Bamboo and more.
- Scalability: BrowserStack supports real-device and parallel testing on a cloud-based infrastructure, enabling you to run hundreds of Cypress tests across different environments.
Conclusion
Cypress is a powerful weapon for end-to-end testing. Thanks to its user-friendly interface and robust features, you can write, run, and debug tests seamlessly to validate the functioning of your apps.
To further enhance your testing, you can run Your Cypress Tests on BrowserStack. To speed up the testing process, you may use Parallel Testing with Cypress to run cross-browser tests simultaneously on several browser-device combinations using BrowserStack.
Run your Cypress Tests with BrowserStack
Useful Resources for Cypress
Understanding Cypress
- Cross Browser Testing with Cypress : Tutorial
- Run Cypress tests in parallel without Dashboard: Tutorial
- Handling Test Failures in Cypress A Comprehensive Guide
- Cypress Test Runner: Tutorial
- Handling Touch and Mouse events using Cypress
- Cypress Automation Tutorial
- CSS Selectors in Cypress
- Performance Testing with Cypress: A detailed Guide
- Cypress Best Practices for Test Automation
- Test React Native Apps with Cypress
- Cypress E2E Angular Testing: Advanced Tutorial
- Cypress Locators : How to find HTML elements
- Maximizing Web Security with Cypress: A Step-by-Step Guide
- Conditional Testing in Cypress: Tutorial
- Cypress Web Testing Framework: Getting Started
- Cypress Disable Test: How to use Skip and Only in Cypress
- What’s new in Cypress 10? How it will change your current testing requirements
Use Cases
- How to Record Cypress Tests? (Detailed Guide)
- How to run your first Visual Test with Cypress
- How to Fill and Submit Forms in Cypress
- How to Automate Localization Testing using Cypress
- How to run Cypress Tests in Chrome and Edge
- How to use Cypress App Actions?
- How to Run Cypress Tests for your Create-React-App Application
- How to Run Cypress Tests in Parallel
- How to handle Click Events in Cypress
- How to Test React using Cypress
- How to Perform Visual Testing for Components in Cypress
- How to run UI tests in Cypress
- How to test redirect with Cypress
- How to Perform Screenshot Testing in Cypress
- How to write Test Case in Cypress: (with testing example)
Tool Comparisons


