Automated accessibility testing for Android and iOS apps helps teams detect issues early, avoid compliance risks, and improve user experience. Android and iOS Accessibility Scanners allow you to automate tests with every update.
Overview
What are Android & iOS Accessibility Scanners?
Android and iOS accessibility scanners are tools used to identify accessibility issues in mobile apps. They scan app interfaces to detect problems like low contrast, missing labels, or improper element sizes that can affect users with disabilities.
Why Use Android & iOS Accessibility Scanners?
Accessibility scanners help you catch and fix issues early in development and reduce the risk of non-compliance and poor user experience. They provide clear, practical suggestions to make your app more usable for people with disabilities and ensure it meets Android and iOS accessibility standards.
Key Features of Android & iOS Accessibility Scanners
These scanners offer targeted insights to help developers and testers build more accessible apps:
- Detect low color contrast that can affect readability
- Identify missing labels or content descriptions for screen readers
- Highlight small touch targets that are hard to tap
- Point out improper element hierarchy or focus order
- Suggest improvements based on platform guidelines like WCAG, Google’s Material Design, and Apple’s Human Interface Guidelines (HIG)
This article explains the importance of automating accessibility testing of Android and iOS apps, including the best scanner tools in 2025.
Why Prioritize Accessibility Testing in Android and iOS Apps?
Accessibility testing ensures your app works for people with visual, auditory, motor, or cognitive disabilities. It helps you meet Web Content Accessibility Guidelines (WCAG), Americans with Disabilities Act (ADA), European Accessibility Act (EAA), and Colorado House Bill 21‑1110 (HB 21‑1110).
Failing to address accessibility can lead to legal risks, reduced user reach, and a poor experience for people with disabilities.
- Inaccessible UI elements: Unlabeled buttons, icons, or images block interaction for screen reader users.
Read More: How to test UI components?
- Poor readability: Low contrast text or fixed font sizes make content hard to read for users with low vision.
- Navigation issues: Broken focus order or missing keyboard support disrupt navigation for users with motor impairments.
Also Read: What is Navigation Testing?
- App store rejection: Google Play or the App Store may reject apps that do not meet accessibility guidelines.
- Compliance violations: Ignoring accessibility can lead to legal penalties under WCAG, ADA, or regional laws.
Rules Defining Accessibility in Mobile Apps
Accessibility in mobile apps is shaped by several major regulations that set clear expectations for how digital content should accommodate users with disabilities. Below are the key standards and what they require:
1. Americans with Disabilities Act (ADA)
ADA mandates equal access for individuals with disabilities to public services, employment, and digital platforms, including websites and mobile applications. This act primarily applies to state and local governments and businesses providing public-facing digital services in the U.S.
Here’s what the ADA expects from mobile apps:
- Support users with visual, auditory, and motor impairments through accessible design.
Also Read: ADA Standards for Accessible Design
- Ensure all public-facing services are usable with screen readers, keyboard navigation, and voice control.
- Provide captions for multimedia content and meaningful labels for interactive elements.
- Avoid designs that block or limit access for assistive technology users.
2. Web Content Accessibility Guidelines (WCAG)
Created by the World Wide Web Consortium (W3C), WCAG provides globally accepted standards for digital accessibility. The guidelines are divided into three levels (A, AA, AAA), with level AA being the most commonly adopted for accessibility compliance.
Below are the key WCAG requirements for mobile apps:
- Perceivable: Provide text alternatives for non-text content, use clear typography, ensure sufficient color contrast, and support captions or transcripts for media.
- Operable: Allow full functionality via keyboard or assistive inputs, give users enough time to interact, and avoid flashing content that can cause seizures.
- Understandable: Use clear language, maintain consistent navigation patterns, and offer helpful error messages and instructions.
- Robust: Build interfaces that work reliably with a wide range of assistive technologies, screen readers, and future tech updates.
Read More: Must-have Chrome extensions for WCAG Testing
3. Twenty-First Century Communications and Video Accessibility Act (CVAA)
The CVAA applies to apps that provide communication features such as voice calls, messaging, or video streaming. It ensures these functions are usable by people with hearing, vision, or speech disabilities.
Below are the CVAA guidelines.
- Include closed captions or transcripts for all audio and video content
- Provide visual alternatives for audio alerts and support adjustable font sizes
- Ensure compatibility with screen readers, voice input, and other assistive tools
- Make emergency features like real-time text and calling fully accessible
4. European Accessibility Act (EAA)
The EAA standardizes accessibility laws across all EU member states. It focuses on improving access to digital services for people with disabilities and applies to key industries such as banking, e-commerce, media, telecommunications, and public transport.
Here are the requirements for mobile apps in the EU market under the EAA:
- Comply with WCAG 2.1 Level AA.
- Ensure accessibility for services like banking, ticket booking, and online shopping.
- Enable users to complete tasks like login, payments, and customer support without barriers.
- Provide accessible alternatives like readable text, screen reader support, and logical navigation.
- Ensure consistent experiences across native apps and web platforms.
Checklist for Mobile Accessibility Testing
Follow this comprehensive checklist to streamline mobile accessibility testing.
1. Visual and Display Consistency
Ensure design elements are easily distinguishable, scalable, and clear across all devices and contexts. Here’s how:
- Use sufficient color contrast between text and background to meet WCAG guidelines for readability (at least 4.5:1 for normal text, 3:1 for large text).
- Do not rely on color alone to convey critical information like status indicators (like errors, success). Use text labels or patterns alongside colors.
- Maintain consistent font sizes, weights, and styles for headings, subheadings, and body text to improve legibility and ensure a clear content hierarchy.
- Follow the recommended size of 44×44 pixels for touch targets (buttons, links) to ensure they are large enough for easy interaction.
2. Media Accessibility
Accessible media ensures all users can engage with and understand the content, regardless of their abilities. Ensure all media content is accessible to users with visual, auditory, or cognitive impairments. Here’s how.
- Include closed captions for all video content: Captions help users with hearing impairments follow along with the dialogue and important non-verbal cues like sound effects or music.
- Provide descriptive alt text for images and non-text content: Alt text allows screen readers to describe visual elements like images and graphs for users with visual impairments.
- Offer transcripts for audio content: Transcripts provide users with hearing impairments a readable version of audio materials, such as podcasts or voice notes.
- Provide audio descriptions for visual content: Audio descriptions help users with visual impairments by narrating essential visual elements during videos.
3. Forms and Input Accessibility
Well-designed forms enable users with disabilities to submit data without barriers. Ensure all forms in the app are easy to navigate and complete using assistive tools like screen readers and voice input. Here’s how.
- Associate input fields with accessible labels: Use the appropriate HTML <label> tags or equivalent to link labels to input fields.
- Provide helpful and descriptive error messages: If an error occurs in the form, give users clear instructions on how to correct it. Error messages should specify which field needs correction and why.
- Support auto-fill and keyboard tabbing: Allow auto-fill to speed up data entry and ensure users can easily navigate between fields using the keyboard’s tab key.
- Highlight required fields clearly: Indicate required fields with a clear visual cue, such as an asterisk or bolded label, to help users easily identify what is necessary to complete the form.
4. Keyboard Navigation and Input Options
Ensure that all app functions are accessible via keyboard or non-touch interfaces. This allows users who rely on keyboard navigation to interact with the app effectively. Here’s how:
- Ensure all interactive elements are reachable by keyboard: Every clickable button, link, or form field should be accessible through keyboard navigation.
- Follow a logical tab order: The tab order should be intuitive and guide users through the screen chronologically.
- Provide clear visual focus indicators: Users should be able to easily see where the keyboard focus is, with a visible highlight or outline around the focused element.
5. Compatibility with Assistive Technologies
Ensure smooth interaction with assistive technologies like screen readers, switch devices, and voice assistants. This reduces complexity and provides an inclusive experience for users with disabilities. Here’s how:
- Test with tools like TalkBack (Android) and VoiceOver (iOS): Regularly verify that your app works seamlessly with these screen readers to ensure accessibility.
- Avoid non-standard gestures: Ensure users can operate your app with standard gestures, especially when using switch devices or other assistive input methods.
- Provide text alternatives for images and icons: Add alt text for images and aria-label for icons to provide a meaningful description of visual elements.
6. Screen Behavior and Responsiveness
Ensure your app functions as expected across various screen sizes, resolutions, and user preferences. This ensures all users, including those with visual impairments, can easily navigate and use your app. Follow these tips:
- Support orientation changes: Your app should work correctly in both portrait and landscape modes, without cutting off or distorting content.
- Ensure content remains legible with system-level zoom: Ensure text and UI elements scale appropriately when users zoom in or adjust their device’s font size settings.
- Confirm UI functionality in dark/light modes: Test the app in both dark and light modes to ensure content remains readable and UI elements are not hidden or hard to interact with.
7. Touch Interaction and Sizing
Ensure touchable UI elements are large enough and well-spaced for users with motor impairments. Proper touch interaction design is essential for making the app usable by everyone. Here’s how:
- Follow the recommended tap target size of 48x48dp: Ensure buttons, links, and other touchable elements meet this minimum size for easier interaction.
- Provide enough spacing between interactive elements: Avoid crowding interactive elements together. Proper spacing helps prevent accidental taps and enhances user experience.
Android and iOS Accessibility Scanner Tools
Here are the best Android and iOS Accessibility Scanner tools in 2025.
1. BrowserStack App Accessibility Testing
BrowserStack offers a comprehensive, cloud-based platform for mobile app accessibility testing, enabling developers and QA teams to ensure compliance with standards like WCAG. With zero setup required, teams can test on over 20,000 real iOS and Android devices, facilitating accurate and efficient accessibility assessments.
Key Features:
- Real Device Cloud: Access a vast array of real devices to test native, hybrid, and cross-platform apps, ensuring authentic user experiences.
- Spectra Rule Engine: Leverage BrowserStack’s proprietary rule engine to automatically detect a wide range of accessibility issues, including missing labels, improper touch target sizes, and inadequate color contrast.
- Workflow Analyzer: Automatically detect common WCAG issues, such as color contrast, app & screen orientation, and text resizing in your Android and iOS app.
- Screen Reader Testing: Conduct tests using built-in screen readers like TalkBack for Android and VoiceOver for iOS on real devices to ensure compatibility with assistive technologies.
- Central Reporting Dashboard: Generate comprehensive reports with annotated screenshots, detailed descriptions of issues, and actionable remediation steps, all accessible from a centralized dashboard.
Benefits of BrowserStack App Accessibility Testing:
- Zero Setup: Initiate testing without any complex configurations—simply upload your app and begin.
- Comprehensive Compliance: Ensure adherence to multiple accessibility standards, including WCAG, ADA, Section 508, EAA, and AODA.
- Efficient Issue Detection: Quickly identify and prioritize accessibility issues, reducing the risk of releasing non-compliant apps.
- Enhanced Collaboration: Share reports instantly to keep team members and stakeholders aligned on progress, issues, and outcomes.
Customer Reviews:
- G2: 4.5/5 stars
- TrustRadius: 8.6/10 stars
- Capterra: 4.6/5 stars
Freemium Version: BrowserStack provides a free Accessibility Testing plan that lets you test your website for compliance with key accessibility standards across real devices and browsers.
2. Google Scanner for A11y (GSCXScanner)
GSCXScanner is an open-source accessibility tool developed by Google that is designed to help identify and fix accessibility issues in iOS apps. Integrated directly into the app, it enables developers to detect problems during the development process and resolve them promptly.
Key Features of GSCXScanner:
- In-App Overlay Interface: Provides a movable overlay within the app, enabling real-time accessibility scans without disrupting the user experience.
- GTXiLib Integration: Utilizes Google’s GTXiLib to perform comprehensive accessibility checks, including custom checks defined by developers.
- Easy Integration: Integrates easily into your Xcode projects for on-device scanning.
Limitations of GSCXScanner:
- One major limitation is that it only supports iOS apps and requires integration into the codebase.
- Scans from GSCXScanner need to be manually initiated during app runtime.
3. Accessibility Scanner (Android)
The Accessibility Scanner by Google is a tool for developers and testers to assess accessibility in Android apps quickly. Once installed, it can scan any screen and provide actionable improvement suggestions to enhance accessibility.
Key Features of Accessibility Scanner:
- User Interface Analysis: Scans app screens to detect issues such as missing content descriptions, low contrast, and small touch targets.
- Actionable Suggestions: Provides recommendations on how to enhance the accessibility of the app’s UI elements.
- Easy Integration: Operates directly on the device without requiring any code modifications or integrations.
Limitations of Accessibility Scanner:
- Designed for manual use and doesn’t support automation.
- Scans only the visible content on the screen.
4. Xcode Accessibility Inspector
Xcode’s Accessibility Inspector is a built-in tool by Apple that allows developers to evaluate iOS apps for accessibility issues. It emulates assistive technologies like VoiceOver to help identify usability problems and ensure the app is accessible to all users.
Features of Xcode Accessibility Inspector:
- Better Debugging: Visualizes accessibility hierarchy for better debugging.
- Element Inspection: Allows developers to examine the accessibility properties of UI elements, including labels, traits, and hints.
- VoiceOver Simulation: Simulates VoiceOver interactions to help developers understand how users with visual impairments experience the app.
- Audit Functionality: Provides an audit feature that identifies accessibility issues and suggests improvements.
Limitations of Xcode Accessibility Inspector:
- Only available on macOS through Xcode.
- Primarily used for manual inspection.
5. Compose UI Check (Android Studio)
Compose UI Check is a feature in Android Studio designed explicitly for apps that use Jetpack Compose. It helps developers identify and address accessibility issues within UI components as they write code to ensure better accessibility throughout the development process.
Features of Compose UI Check:
- Real-Time Feedback: Provides immediate suggestions on accessibility improvements as developers build UIs using Jetpack Compose.
- Issue Detection: Highlights problems such as low contrast, missing content descriptions, and improper touch target sizes.
- Integration with Android Studio: Works seamlessly within the Android Studio environment, enhancing the development workflow.
Limitations of Compose UI Check:
- Works only with Jetpack Compose UIs.
- Doesn’t cover full end-to-end app accessibility audits.
How to Perform Automated Mobile Accessibility Testing
Automated mobile accessibility testing involves planning, setting up the tools, and validating app behavior under various conditions to detect and resolve accessibility issues.
1. Define the Accessibility Scope and User Journeys
Start by identifying key user flows based on customer behavior and traffic data, such as sign-up, login, or checkout. Prioritize these flows for accessibility testing. Clearly define the testing scope by selecting the accessibility standard level you want to meet, such as Level AA or Level AAA. This helps plan the testing effort and ensures the right level of compliance.
2. Understand Compliance Standards
Familiarize yourself with the accessibility standards that apply to your app, such as WCAG, ADA, or EAA. Understanding these guidelines will help you identify the specific requirements your app must meet to ensure accessibility compliance.
3. Set Up the Testing Environment
Prepare the necessary tools and configurations to integrate accessibility testing into your test environment. This includes setting up testing frameworks and installing required plugins or extensions. For example, if you’re using the BrowserStack App Accessibility tool, follow these steps.
Step 1: Setup
For this example, WebdriverIO will be used for test automation, and BrowserStack’s accessibility service will run the tests on a real device cloud.
You can download the sample project using one of the two options.
- Download it from here
- Clone it with the below command
git clone -b sdk https://github.com/browserstack/webdriverio-appium-app-browserstack
Here are the prerequisites to integrate with BrowserStack
- BrowserStack Username and Access Key
- Node.js v20.11.1 or above installed.
- WebdriverIO (WDIO) version 8 or 9.
Step 2: Configure the tests
Here’s how to configure the tests.
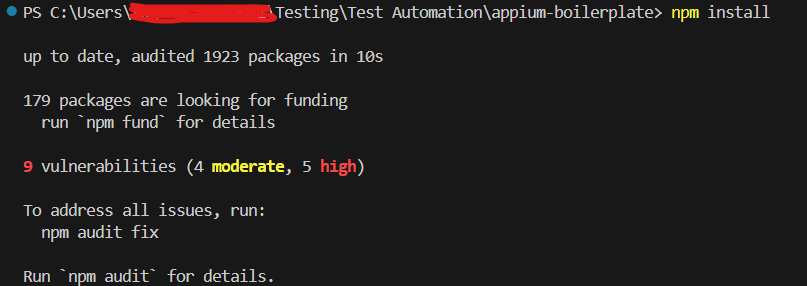
- Open the downloaded WebdriverIO (WDIO) project in your preferred IDE. In this example, VSCode is being used. Then run the command below to install dependencies.
npm install
Output:
Step 3: Configure wdio.config.js to run on BrowserStack.
Follow these steps to configure the wdio.config.js file for running tests on BrowserStack.
- Add BrowserStack service to the configuration and enable accessibility options.
services: [

        [

            'browserstack',

            {

              accessibility: true,

              buildIdentifier: '${BUILD_NUMBER}',

              browserstackLocal: true,

              opts: { forcelocal: false, localIdentifier: "webdriverio-appium-app-browserstack-repo" },

              app: process.env.BROWSERSTACK_APP_PATH || 'path_to_your_apk',

              accessibilityOptions: {

                wcagVersion: 'wcag21aaa',

                scannerProcessingTimeout: 10,

                includeIssueType: {

                  bestPractice: true

                }

              },

            }

          ]

],- Add BrowserStack username and access key.
// User configuration

    user: process.env.BROWSERSTACK_USERNAME || 'BROWSERSTACK_USER',

    key: process.env.BROWSERSTACK_ACCESS_KEY || 'BROWSERSTACK_ACCESS_KEY',
- Add BrowserStack capabilities
capabilities: [

        {

            "platformName" : "android",

            "appium:platformVersion" : "12.0",

            "appium:deviceName" : "Samsung Galaxy S22 Ultra",

            'bstack:options': {

                // Set your BrowserStack config

                debug: true,


            }

        },

    ]
Step 4: Execute The Tests
Run the below command to execute the tests on BrowserStack.
npm run test
Step 5: Observe the results
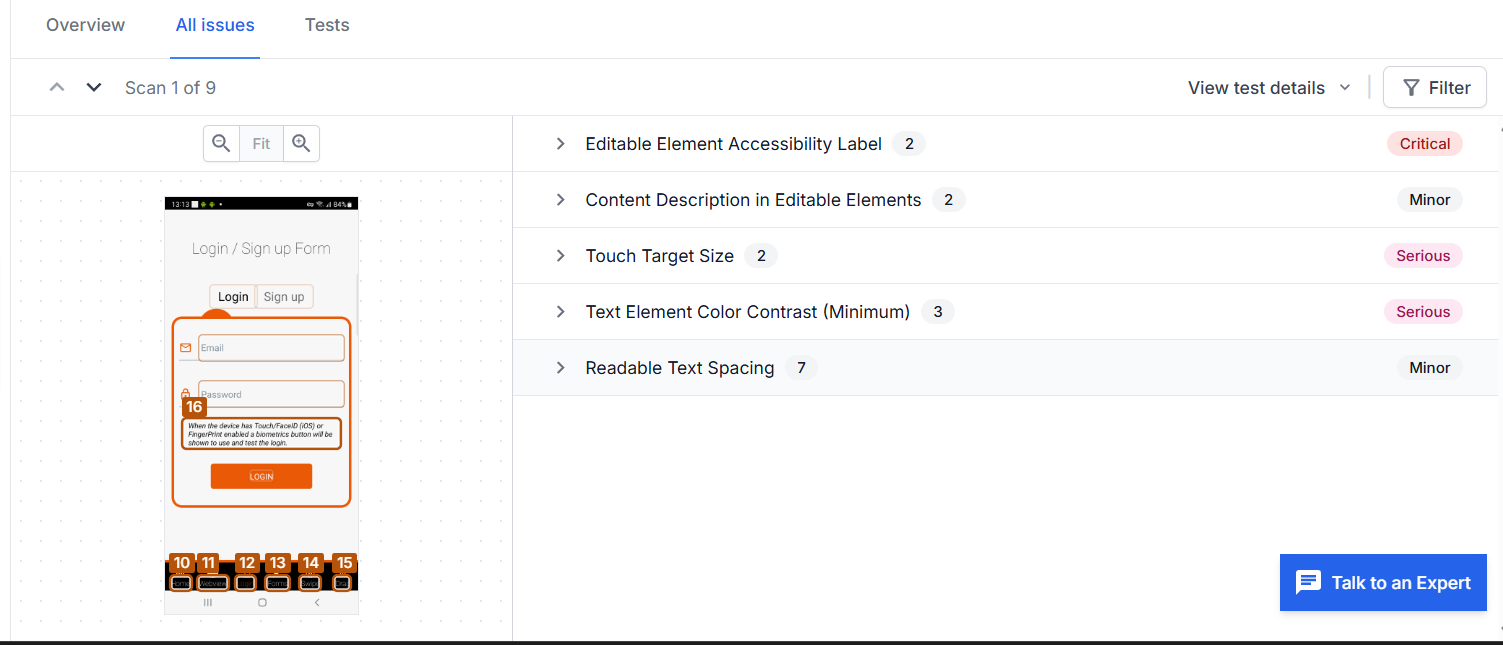
Once the tests are executed, verify the results on App Accessibility > Automated Tests Dashboard. Here’s what the BrowserStack App Accessibility reports look like.
Here’s an overview of issues in the app accessibility testing report and their severity.
4. Test Across Device Modes
Ensure your app is accessible in various modes, such as dark mode, font scaling, and zoom settings. Test how your app behaves when users change system settings or orientations. This will confirm that accessibility features, such as contrast, font size, and readability, remain intact under different user conditions.
5. Switch to Assistive Navigation
Test app navigation using assistive technologies like screen readers, external keyboards, and voice control tools. This will verify that your app supports alternative navigation methods, ensuring it remains functional and usable for users with different needs. BrowserStack provides tools like Screen Reader and VoiceOver on real devices to test accessibility with assistive technologies.
6. Retest and Monitor for Regressions
After fixes are applied, rerun accessibility tests to confirm issues are resolved and haven’t reappeared in future updates. Or add it to your CI/CD pipeline to run them after each deployment and observe the result on the dashboard.
Common Mobile Accessibility Testing Myths
These myths often lead to deprioritization or incorrect interpretation of accessibility requirements in mobile apps. Below are common myths and the facts that correct them.
- Accessibility is only for users with disabilities: Accessibility enhances user experience for everyone, including those using devices in challenging environments, such as bright sunlight or when using the phone with one hand.
- Only public-facing apps need accessibility: Accessibility applies to all apps, including internal tools, to ensure equal access for all users, regardless of disability.
- Accessibility testing is a one-time task: Accessibility is an ongoing responsibility. Regular testing is needed to prevent regressions and ensure inclusivity as app features evolve.
- Accessibility is just about visual design: Accessibility extends beyond visual design, including semantic structure, alternative input methods, and compatibility with assistive technologies.
Conclusion
Automated accessibility testing for Android and iOS apps is essential for building inclusive, user-friendly mobile experiences. By integrating tools like the Android & iOS accessibility scanner and following established guidelines, teams can ensure their apps are both compliant and genuinely accessible.
BrowserStack makes accessibility testing scalable and more efficient by providing access to 3,500+ real Android and iOS devices. It integrates with CI/CD tools to run automated accessibility tests on every build and helps comply with WCAG, ADA, EAA, and other accessibility regulations.
Frequently Asked Questions
1. Can automated testing tools replace manual testing for mobile accessibility?
No. While automated tools are excellent for detecting common issues, they can’t replace human judgment. Manual testing is essential for evaluating real user experiences, especially for cognitive and nuanced interactions.
2. Can I delete the Android accessibility app?
Yes, but it’s not recommended. The Android Accessibility Suite includes important tools like TalkBack, which many users rely on. Removing it may impact the usability of accessibility features on the device.
