Appium’s native support for visual testing reduces script brittleness. Its Image Comparison feature revolutionizes UI testing by introducing an Image Locator strategy, making test scripts more effective.
Overview
Why Perform Appium Visual Testing
- Ensures UI consistency
- Detect visual regressions
- Spot pixel-level discrepancies
- Improve user experience
What does Appium Image Comparison Feature do?
The Appium Image Comparison feature compares app screenshots to baseline images to detect visual differences in them. Thus, it helps spot UI regressions and establish visual consistency.
This guide explores the fundamentals of Appium visual testing, image comparison techniques, best practices, and tools like Percy for accurate UI validation.
What is Visual Testing?
Visual testing is a crucial type of testing that may identify both visual defects and functional defects. Although it is generally complementary to functional testing, visual testing is combined.
- Visual testing assesses visual changes to ensure that only deliberate UI changes have been implemented in production.
- Many businesses mistakenly believe that visual testing is not required while conducting thorough functional tests.
- Visual testing finds flaws that functional testing misses and verifies that your program looks as it should
- Visual regressions are equally important as functional regressions, especially when they reveal issues that a functional test suite might miss.
Benefits of Visual Testing
No matter how well your application’s functionality works, it will be useless to the consumer unless it can give a decent user interface and user experience. Nowadays, we talk about UI (User Interface) and put a lot of emphasis on UX (User Experience).
- When we give a better user experience, the visual testing suite becomes much more crucial since a more appealing visual design may be recognized as more usable.
- The benefits of automating visual tests are that they provide long-term cost efficiency, are faster than manual tests, are more precise because they cannot include human issues, and deliver pixel-perfect visual tests.
- They are reusable and clear because they offer automatic reports that are easily and readily accessible by anyone on the team.
Given its importance, businesses should devote substantial time and resources to visual testing. Combined with current developer tests, it will aid in detecting visual problems in the early phases of the development lifecycle.
Visual Validation in Appium
We know how to take screenshots using Appium. But how do we balance two screenshots to detect visual differences?
A basic approach to the visual distinction would be far too greedy because even condensation algorithms may produce nearly undetectable differences. In the realm of open-source software, OpenCV is an assortment of image manipulation capabilities that can be used without the user needing to comprehend the intricate details of its inner workings. Appium has OpenCV support, but it is not enabled by default since developing OpenCV and its Node.js bindings takes time and must be done on each platform independently.
For the easiest way to get everything ready for usage with Appium, run npm install -g opencv4nodejs.
Steps for Visual Validation
The primary goal is to snap screenshots of each view we encounter while traveling through our app (maybe during a functional test). We compare these screenshots to a prior screenshot of the identical view using an image analysis application.
We may have detected a visual regression if there are any significant changes. At that point, we may either reject the test or record the difference in a database for further assessment by the team.
Step 1: In this step, We’ll need to test the application and take screenshots.
Step 2: In this step, These screenshots are compared to the baseline screenshots by the automation tool. Typically, baseline screenshots are photographs a tester has confirmed were taken during previous test sessions.
Step 3: After getting the results of the image comparisons, the application generates a report detailing all the discrepancies observed.
Step 4: In the last step, The tester reviews the report, determining if each difference is a bug or a valid change (false positives). The baseline photographs are updated as a result of this.
You don’t have any baseline photos for the first test run. As a result, photographs from the first run are frequently utilized as baseline images. They are compared to the screenshots starting with the following run.
Visual Comparison Example
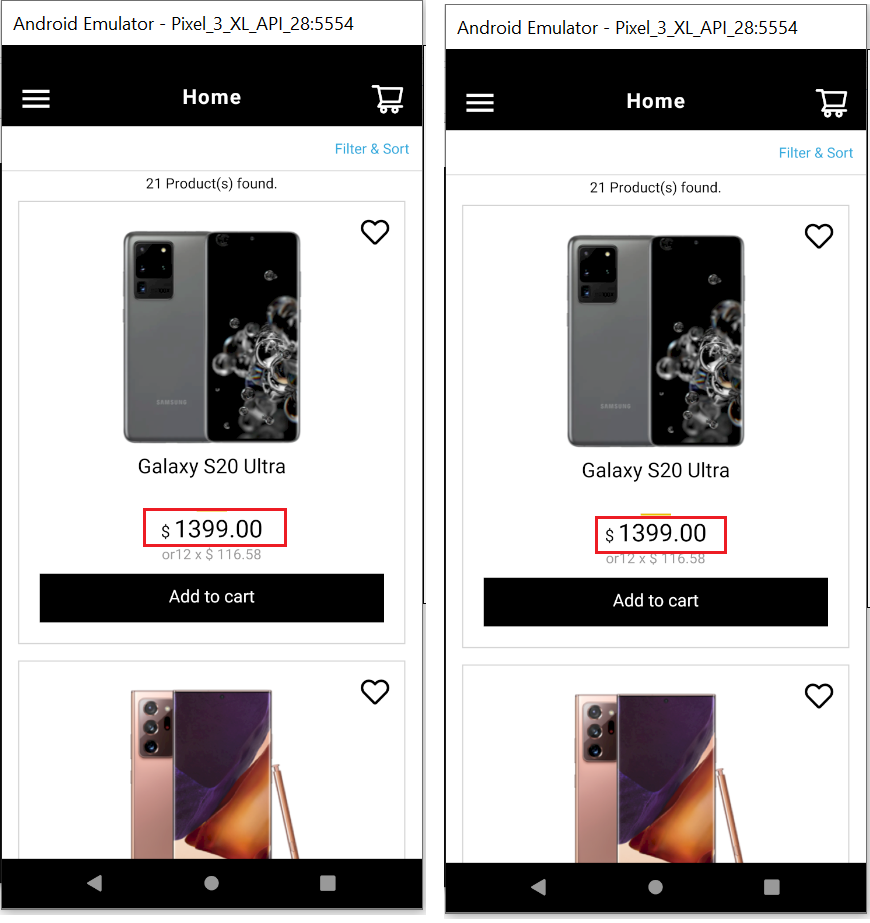
We are validating the “$” sign in this image because $ is not having your locator. First, we take a screenshot of the UI and then use OpenCV, to compare the images if the images are not the same then we will raise a bug to the responsible team.
Setting up the Appium Visual Testing Environment
Here’s how you can set up the Appium Visual Testing Environment:
Setup Appium
Download and install Java (JDK) and set a JDK and bin folder path.
- Download the “.exe” file from here (Version: jdk1.8.0_91 or whichever is the latest you find there).
- Install the “.exe” file.
- Setup the JDK bin folder path in your system’s environment variable.
Download the Android SDK
- Click on the link “android-sdk_r24.4.1-windows.zip” (or whichever is the latest you find there) and click the download button.
- Once the zip file gets downloaded, unzip the folder.
- Now click on the “SDK Manager.exe” file
- This opens the Android SDK Manager window. Select “Tools” and the Android platform on which you will perform your tests.
Install Appium
- Open the Appium Official link.
- Click on the Download link.
- Select the OS of the machine you are working on and download the appropriate version.
- Unzip the downloaded zip folder.
- Install the .exe file “appium-installer”.
Learn More: How to Setup your Appium Grid?
Setting up Appium for visual testing
Appium has support for OpenCV, albeit not enabled by default since developing OpenCV and its Node.js bindings takes time and must be done on specific systems.
- The simplest method to get things ready for usage with Appium is to run npm install -g opencv4nodejs.
- This will try to install the Node bindings globally and download and build OpenCV on your machine.
- If that doesn’t work, you may install OpenCV via Homebrew and then install the Node bindings with the OPENCV4NODEJS_DISABLE_AUTOBUILD=1 env flag in front to instruct it to use the system-installed binaries.
Once you’ve installed the opencv4nodejs package, you must ensure it is accessible to Appium when it starts. One method is to execute the npm install command without the -g parameter within the Appium directory. Another option is to include your global node_modules folder in the NODE_PATH environment setting.
Performing Appium Visual Testing
Here is a tutorial on how you can perform visual testing:
1. Test Case: Visual Validation of the Cart Screen
This test ensures the cart screen remains visually consistent by comparing it with a stored baseline image.
Follow the below test steps for visual testing:
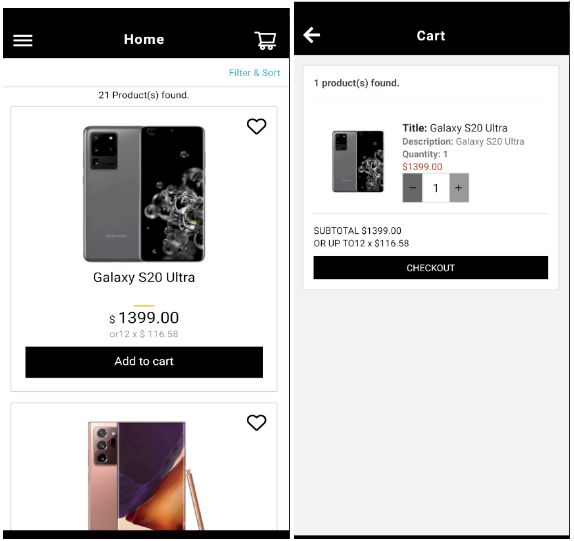
- Capture and save an image of the app’s home page as a reference for comparison.
- Start the application using the Appium capabilities file.
- Ensure the homepage fully loads before proceeding.
- Click to add an item to the shopping cart.
- Tap on the cart button to navigate to the cart screen.
- Compare the cart screen with the baseline image using a screenshot to check for visual differences.
In the first execution, it will be same as the baseline images at the given path. And in the second execution its returns a match threshold value which we already set up in our code.
2. Framework Design and Code
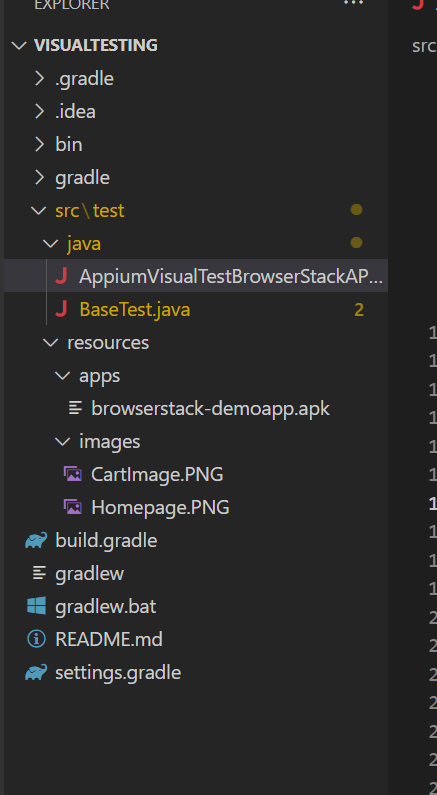
A well-structured framework enhances test efficiency and maintainability. Follow the structure below for the best results.
3. Test Script
Execute the test script to validate UI consistency using Appium’s image comparison feature.
AppiumVisualTestBrowserStackAPP.java


import io.appium.java_client.MobileBy;

import io.appium.java_client.imagecomparison.SimilarityMatchingOptions;

import io.appium.java_client.imagecomparison.SimilarityMatchingResult;

import java.io.File;

import java.net.URISyntaxException;

import org.apache.commons.io.FileUtils;

import org.junit.Test;

import org.openqa.selenium.By;

import org.openqa.selenium.OutputType;

import org.openqa.selenium.WebElement;

import org.openqa.selenium.remote.DesiredCapabilities;

import org.openqa.selenium.support.ui.ExpectedConditions;

import org.openqa.selenium.support.ui.WebDriverWait;


public class AppiumVisualTestBrowserStackAPP extends BaseTest {


// Give a file path where we can save the matched file

private final static String path_to_validate = "/Users/Download/bs_demo/";


private final static String CHECK_HOME = "home_screen";

private final static String CART_PAGE = "cart_page";

private final static String BASEIMAGE = "BASEIMAGE_";


private final static double Breakpoint_for_Match = 0.99; //Thresold Value


private final static By ADD_TO_CART = MobileBy.AccessibilityId("add-to-cart-12");

private final static By NAV_TO_CART = MobileBy.AccessibilityId("nav-cart");


@Override

protected DesiredCapabilities getCaps() throws URISyntaxException {

DesiredCapabilities capabilities = new DesiredCapabilities();

capabilities.setCapability("platformName", "Android");

capabilities.setCapability("deviceName", "Android Emulator");

capabilities.setCapability("automationName", "UiAutomator2");

capabilities.setCapability("app", getResource("apps/browserstack-demoapp.apk").toString());

//Make sure we uninstall the app before each test regardless of version

capabilities.setCapability("uninstallOtherPackages", "io.cloudgrey.the_app");


return capabilities;

}


private WebElement waitForElement(WebDriverWait wait, By selector) {

WebElement el = wait.until(ExpectedConditions.presenceOfElementLocated(selector));

try { Thread.sleep(750); } catch (InterruptedException ign) {}

return el;

}


@Test

public void testAppDesign() throws Exception {

WebDriverWait wait = new WebDriverWait(driver, 5);


// wait for an element that's on the home screen

WebElement addToCart = waitForElement(wait, ADD_TO_CART);


// now we know the home screen is loaded, so do a visual check

doVisualCheck(CHECK_HOME);


// Click on add to cart btn for adding item in card

addToCart.click();

WebElement navToCart = waitForElement(wait, NAV_TO_CART);


//click to cart btn

navToCart.click();


//Perform our second visual check, this time of the cart page

doVisualCheck(CART_PAGE);

}


private void doVisualCheck(String checkName) throws Exception {

String basematchFilename = path_to_validate + "/" + BASEIMAGE + checkName + ".png";

File basematchImg = new File(basematchFilename);


// If there is no basematch picture for this check, one should be made.

if (!basematchImg.exists()) {

System.out.println(String.format("No basematch found for '%s' check; capturing baseline instead of checking", checkName));

File newBasematch = driver.getScreenshotAs(OutputType.FILE);

FileUtils.copyFile(newBasematch, new File(basematchFilename));

return;

}


// Otherwise, obtain the picture similarity from Appium if we discover a basematch. Obtaining the resemblance

// We also enable visualisation so that, should something go wrong, we can see what went wrong.

SimilarityMatchingOptions opts = new SimilarityMatchingOptions();

opts.withEnabledVisualization();

SimilarityMatchingResult res = driver.getImagesSimilarity(basematchImg, driver.getScreenshotAs(OutputType.FILE), opts);


// If the similarity is not high enough, consider the check to have failed

if (res.getScore() < Breakpoint_for_Match) {

File failViz = new File(path_to_validate + "/FAIL_" + checkName + ".png");

res.storeVisualization(failViz);

throw new Exception(

String.format("Visual check of '%s' failed; similarity match was only %f, and below the breakPoint of %f. Visualization written to %s.",

checkName, res.getScore(), Breakpoint_for_Match , failViz.getAbsolutePath()));

}


// Otherwise, it passed!

System.out.println(String.format("Visual check of '%s' passed; similarity match was %f",

checkName, res.getScore()));

}


}
BaseTest.java
import io.appium.java_client.android.AndroidDriver;

import java.io.IOException;

import java.net.URISyntaxException;

import java.net.URL;

import java.nio.file.Files;

import java.nio.file.Path;

import java.nio.file.Paths;

import java.util.Base64;

import org.junit.After;

import org.junit.Before;

import org.openqa.selenium.remote.DesiredCapabilities;


public class BaseTest {


AndroidDriver driver;


protected DesiredCapabilities getCaps() throws Exception {

throw new Exception("Must use getCaps");

}


@Before

public void setUp() throws Exception {

URL server_url = new URL("http://localhost:4723/wd/hub");

driver = new AndroidDriver(server_url, getCaps());

}


@After

public void tearDown() {

if (driver != null) {

driver.quit();

}

}


Path getResource(String file_name) throws URISyntaxException {

URL ref_img_url = getClass().getClassLoader().getResource(file_name);

return Paths.get(ref_img_url .toURI()).toFile().toPath();

}


private String getResourceB64(String file_name) throws URISyntaxException, IOException {

Path ref_img_path = getResource(file_name);

return Base64.getEncoder().encodeToString(Files.readAllBytes(ref_img_path ));

}


String getReferenceImageB64(String file_name) throws URISyntaxException, IOException {

return getResourceB64("images/" + file_name);

}


}
You can run this test script directly from the main class.
4. Result Analysis
Analyze test results by comparing captured images against the baseline to detect visual discrepancies.
After the first execution, baseline images are saved for both the app’s homepage and the cart screen after adding items. A threshold value is set in the code for image comparison.
- We put a threshold value in the code for the comparison of images.
- If the actual getScore value exceeds the threshold, the test case fails.
- If the getScore value is below the threshold, the test case passes.
private final static double Breakpoint_for_Match= 0.99;

if (res.getScore() < Breakpoint_for_Match) {

File failViz = new File(path_to_validate + "/FAIL_" + checkName + ".png");

res.storeVisualization(failViz);

throw new Exception(

String.format("Visual check of '%s' failed; similarity match was only %f, and below the Breakpoint_for_Match of %f. Visualization written to %s.",

checkName, res.getScore(), Breakpoint_for_Match, failViz.getAbsolutePath()));}

// Otherwise, it passed!

System.out.println(String.format("Visual check of '%s' passed; similarity match was %f",

checkName, res.getScore()));
5. Image Comparison Commands
Appium’s image comparison feature evaluates visual differences by generating a similarity score between two images.
When you run the command with the appropriate image byte arrays (img1 as the baseline and img2 as the current snapshot) and the correct SimilarityMatchingOptions, it produces a SimilarityMatchingResult object.
The key function of this result object is getScore, which returns a similarity score between 0 and To validate the images:
- If the score exceeds the predefined threshold, no significant visual differences are detected.
- If the score falls below the threshold, discrepancies are identified, and the test may fail or flag the differences for further analysis.
SimilarityMatchingResult res = driver.getImagesSimilarity(baselineImg, driver.getScreenshotAs(OutputType.FILE), opts);
Why Perform Image Comparison using Appium
Performing image comparison is important due to the following reasons:
- Ensures Visual Consistency: Verifies that the design and layout are consistent across different browsers, devices, or screen sizes.
- Detects Visual Defects: Identifies issues like incorrect styles, missing elements, or misaligned components.
- Catches UI Bugs: Helps find visual bugs that may not be caught during regular functional testing.
- Supports Frequent Updates: Ensures new updates don’t break the application’s visual appearance.
- Improves User Experience: Confirms that the application looks as expected enhancing the overall user experience.
Read More: Top 17 Visual Testing Tools
How to Perform Image Comparison in Appium
In Appium, image comparison allows you to detect visual differences and validate UI elements by using methods such as feature-based matching, occurrence lookup, and similarity calculation.
1. Prerequisites
Before using image comparison in Appium, ensure the following:
- OpenCV 3+ native libraries: Required for image processing.
- opencv4nodejs npm module: Install with
npm i -g opencv4nodejs
This module handles OpenCV libraries.
- Appium Server 1.8.0+: Required to use image comparison features.
Additionally, these features allow visualization of the comparison results, so you can track and fine-tune the comparison parameters for optimal results.
2. Feature-based Comparison
This method compares images by matching features or templates to detect parts of an image within a larger image. It is ideal when the image might be rotated or scaled.
Example Use Case: Verifying if a small part of the screen (like an icon or button) appears anywhere on the screen, even if its size or angle has changed.
Java Example:
byte[] screenshot = Base64.encodeBase64(driver.getScreenshotAs(OutputType.BYTES));

FeaturesMatchingResult result = driver.matchImagesFeatures(screenshot, originalImg, new FeaturesMatchingOptions()

.withDetectorName(FeatureDetector.ORB)

.withGoodMatchesFactor(40)

.withMatchFunc(MatchingFunction.BRUTE_FORCE_HAMMING)

.withEnabledVisualization());
This method visualizes the matching points and helps adjust parameters to improve the results.
3. Occurrences Lookup
This comparison method looks for specific occurrences of a partial image within a full image. It’s useful when a part of the image needs to be located within a larger image.
Example Use Case: Searching for a small icon or button within a larger image, such as finding a “search” icon on a webpage.
Java Example:
byte[] screenshot = Base64.encodeBase64(driver.getScreenshotAs(OutputType.BYTES));

OccurrenceMatchingResult result = driver.findImageOccurrence(screenshot, partialImage, new OccurrenceMatchingOptions()

.withEnabledVisualization());
This comparison will highlight the detected match and help visualize where the partial image appears within the full image.
4. Similarity Calculation
This method calculates the similarity score between two images. It’s particularly useful when comparing an original image to its modified version to see how much it has changed.
Example Use Case: Comparing screenshots of a webpage before and after a UI update to check for visual consistency.
Java Example:
byte[] screenshot1 = Base64.encodeBase64(driver.getScreenshotAs(OutputType.BYTES));

byte[] screenshot2 = Base64.encodeBase64(driver.getScreenshotAs(OutputType.BYTES));

SimilarityMatchingResult result = driver.getImagesSimilarity(screenshot1, screenshot2, new SimilarityMatchingOptions()

.withEnabledVisualization());
This comparison gives you a similarity score, indicating how closely the two images match, with a score closer to 1.0 indicating high similarity.
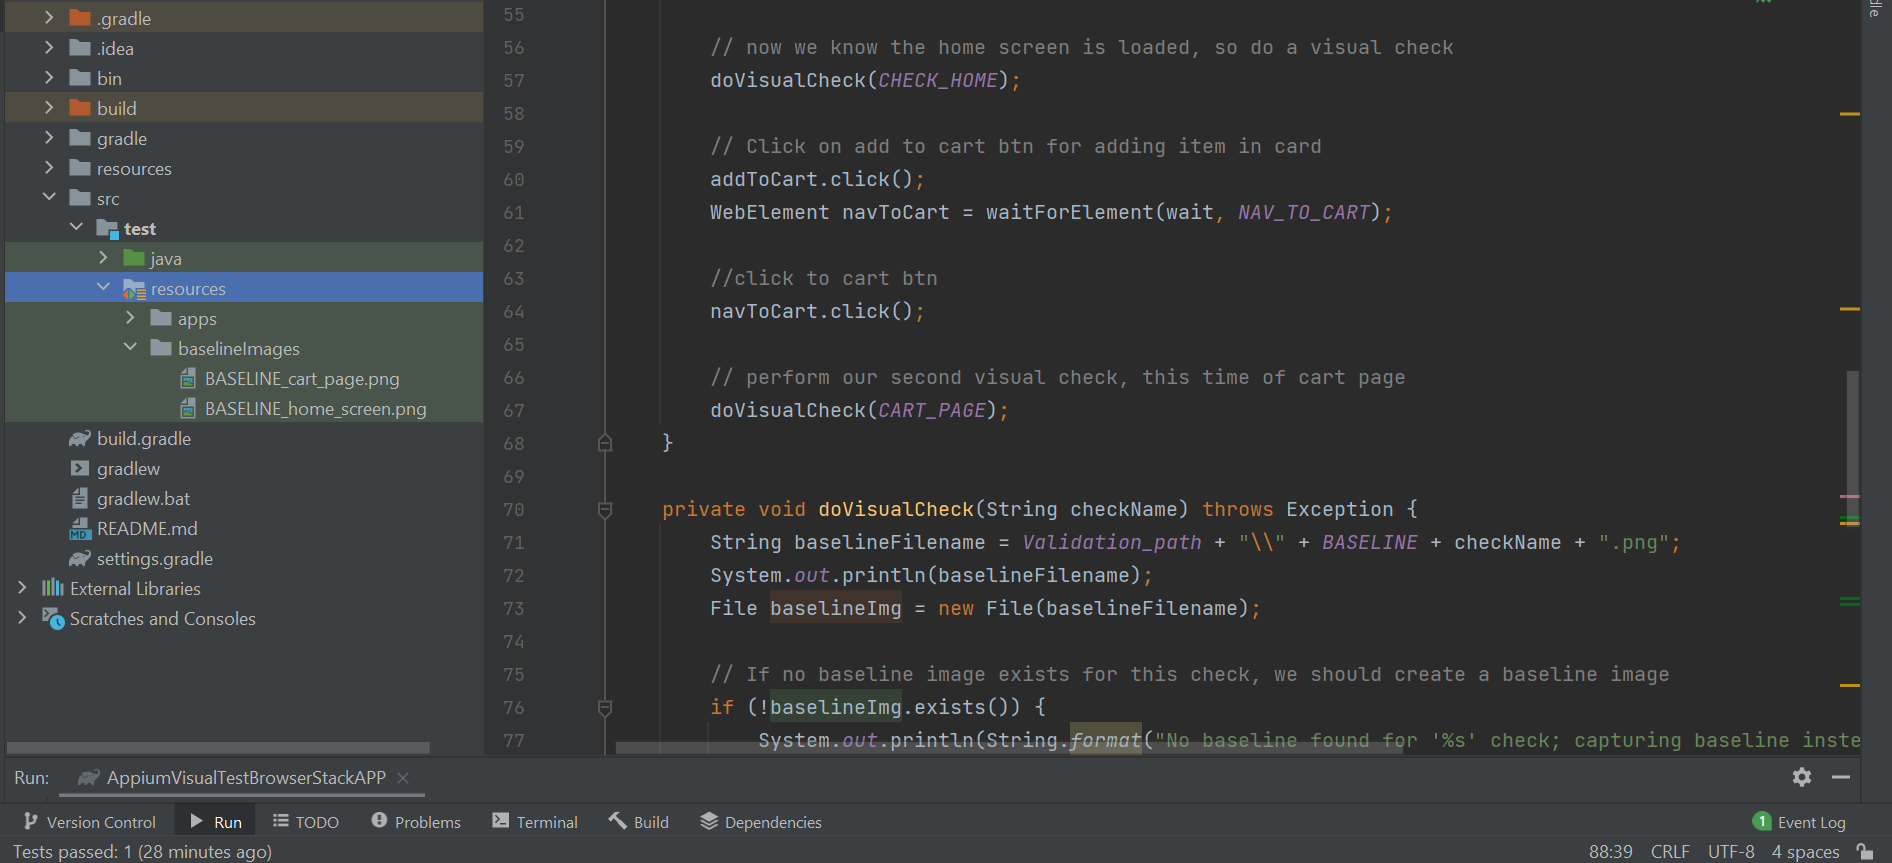
The similarity score for the below two pictures is ~0.98.
Source : Appium
Limitations of Image Comparison in Appium
While Appium supports image comparison, there are several challenges to keep in mind:
- Basic Comparison Methods: Appium mainly relies on pixel-by-pixel matching, which can be affected by minor variations like anti-aliasing or slight color changes, leading to false positives.
- Dependency on External Libraries: Advanced image comparison, such as detecting structural changes, requires integrating libraries like OpenCV, which adds complexity and requires additional coding skills.
- Limited Text Recognition: Image comparison does not work well for detecting text differences; OCR tools are needed for that.
- Lighting and Color Differences: Variations in brightness or minor UI changes may cause false positives or negatives.
- Device-Specific Variations: Differences in screen resolution, pixel density, and rendering across devices can lead to inconsistent comparison results.
- No Direct Access to Image Elements: Since Appium interacts with the UI through the DOM, it cannot directly target specific image elements, making precise image comparison more difficult.
Read More: How to report bugs in Appium UI Testing?
Why Use Percy for Visual Testing?
Visual testing for mobile applications presents unique challenges like varying screen sizes, device-specific rendering, OS differences, and dynamic UI elements can all introduce visual regressions that are difficult to catch manually.
Percy by BrowserStack offers an AI-powered solution designed specifically to handle the complexities of mobile visual testing with Appium.
Key Advantages of using Percy for Appium Visual Testing:
- AI-Powered Precision: Percy’s Visual AI Engine uses advanced algorithms to automatically filter out visual noise from dynamic elements, animations, and rendering differences across devices. Features like “Intelli ignore” and OCR help distinguish meaningful visual changes from insignificant pixel-level variations, drastically reducing false positives that plague traditional visual testing.
- Real Device Testing: App Percy runs tests on a cloud of real iOS and Android devices, ensuring pixel-perfect UI consistency across the actual hardware your users rely on. This eliminates emulator inconsistencies and provides authentic visual validation.
- Effortless Integration: With plug-and-play integration requiring just one line of code, Percy seamlessly works with popular Appium frameworks including WebdriverIO, Java, and Python. It fits naturally into your existing test automation workflow without requiring extensive setup.
- Accelerated Testing at Scale: Percy’s highly scalable parallel test execution accelerates build times by up to 10x, allowing you to run comprehensive visual tests across multiple devices simultaneously without bottlenecks.
- Streamlined Review Workflow: The Visual Review Agent highlights impactful changes with bounding boxes and human-readable summaries, accelerating review workflows by up to 3x. A unified dashboard provides logs, screenshots, and video recordings for efficient debugging and root cause analysis.
- Enterprise-Ready: Percy complies with key data privacy standards and offers comprehensive monitoring capabilities, making it suitable for teams of any size, from startups to large enterprises.
Pricing
- Free Plan: Available with up to 5,000 screenshots per month, ideal for getting started or for small projects.
- Paid Plan: Starting at $199 for advanced features, with custom pricing available for enterprise plan.
Best Practices for Appium Visual Testing
- For the tool to pass your testing, it must be able to handle anti-aliasing, pixel offsets, etc.
- Release faster with DOM snapshotting and advanced parallelization capabilities designed for executing complex test suites at scale
- Review, collaborate, and approve snapshots, keeping the rest of the team updated throughout the process
- Choose a tool like Percy that can ignore false positives in visual testing.
- Test automation should be capable of dealing with dynamic and shifting information.
- Don’t rely on threshold settings or error ratios. The only thing that should be important is if a person can tell the difference and whether it will affect how the user interacts with the product.
- The automation program must be able to evaluate the page’s structure and perform layout comparisons.
- Validate the full UI page rather than individual parts. More comprehensive coverage will result from this. You risk missing unexpected issues if you validate only particular components.
- Put the correct image data in the framework to ignore more thresholds.
Conclusion
Visual testing is important for making sure that an application’s user interface remains consistent, functional, and visually appealing across different platforms. By automating the comparison of screenshots and detecting visual regressions, visual testing helps identify issues that traditional testing might miss.
Popular tools like Percy simplify this process, enabling seamless integration with your CI/CD pipelines and offering a collaborative approach to reviewing changes. With visual testing, teams can maintain high-quality, consistent user experiences, reduce manual checks and catch potential UI issues early in the development cycle.
Appium Useful Resources
Tutorials
- How to perform Parallel Test Execution in Appium?
- Appium Visual Testing: The Essential Guide
- How to run Appium iOS Tests on Real Devices?
- How to perform Debugging in Appium
- How to Run Your First Appium Test Script
- How to report bugs in Appium UI Testing?
- How to run Appium Tests on macOS?
- XPath in Appium: Tutorial
- How to Analyze Appium Logs
- How to perform Drag and Drop using Appium
- How to test mobile app in Landscape or Portrait mode using Appium
- How to Run Same Script in Multiple Devices using Appium
- How to change Time Zones for Mobile App Testing using Appium
- How to Perform Localization of Mobile Apps using Appium
- What is Appium Inspector? (Benefits & How to Use it?)
- How to run Appium tests on Android devices
- How to scroll down to an element in Appium
- How to Download and Install Appium
- How to set up your Appium Grid
- How to test Biometric authentication using Appium?
- How to use touch actions in Appium?
- How to Automate a Real E2E User Flow involving App and Browser with Appium
- How to Inspect Element using UIAutomatorViewer in Appium
- How to Test Flutter Apps Using Appium Automation
- Understanding Appium Desktop: Tutorial
- Appium Tutorial for Mobile Application Testing
- React Native and Appium Tutorial
- Understanding FindElements in Appium
- Getting Started with Appium and NUnit framework
- WebdriverIO Tutorial: Getting started with Test Automation using Selenium and Appium
- Appium with Python: Getting Started with App Automation Testing
- Appium with Java: Getting Started to Run Automated Tests
- Test Windows Desktop App using Appium-Compatible WinAppDriver
Best Practices, Tips, and Tricks
- Appium Best Practices Every Developer Must Know
- Effective Locator Strategies in Appium
- Top Appium Commands every Developer must know
- Desired Capabilities in Appium
- Overcoming Top Challenges faced in Appium Automation
Differences and Comparisons


