Run TestProject tests with Automate
A step-by-step guide to running TestProject tests with BrowserStack Automate
Checkout our AI-enabled and intuitive low-code recorder for scalable, reliable test execution

TestProject is an automation framework that allows you to create automated tests for web applications. Integrating TestProject with BrowserStack will help you to run your TestProject tests on 3000+ real devices and desktop browsers.
This guide will help you:
- Run TestProject tests on BrowserStack
- Run parallel tests on BrowserStack using TestProject
Prerequisites
- An active TestProject account. If you don’t already have one, you can sign up for a free forever plan.
- A recorded test using TestProject’s Web recorder, or use TestProject’s SDK to code a test for execution on BrowserStack.
- BrowserStack
UsernameandAccess Keyto set up the BrowserStack integration. After logging into your BrowserStack account, visit the Settings page and copy your Username and Access Key.

Running TestProject tests on BrowserStack
Once you have the BrowserStack Username and Access Key, you can proceed with setting up the integration.
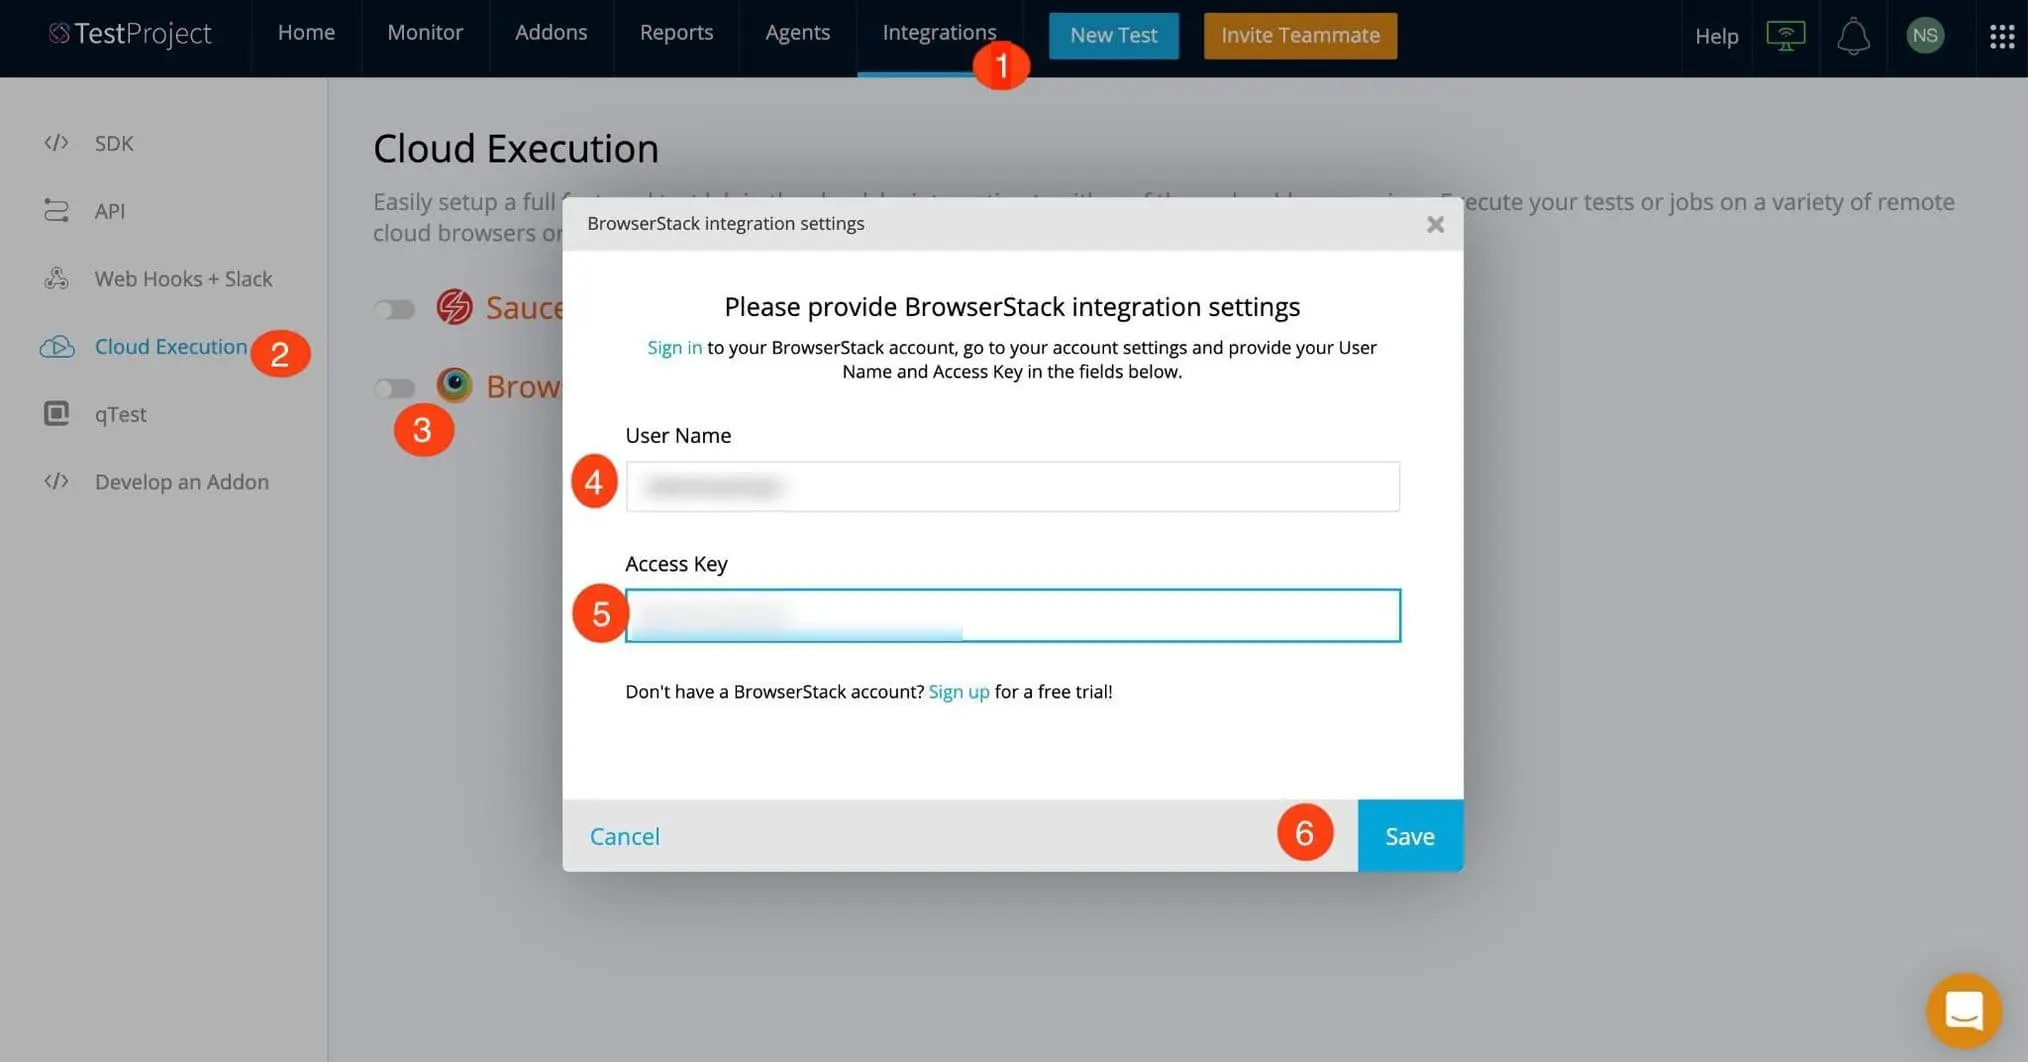
Go to the Integrations (1) tab of your TestProject account and click on the Cloud Execution (2) option on the left hand side menu. Click on the toggle (3) near the BrowserStack logo to enable the integration. You will now see the BrowserStack integration settings window, just paste your Username (4) and Access Key (5) in the relevant places and click Save (6).
Once saved, TestProject validates the credentials and if successfully validated the integration becomes active. You can also change your credentials by clicking on the cog icon.
Now that we’re all set up, you can go ahead and start running your tests and jobs on the BrowserStack cloud. Before continuing, let’s understand the various options to run your tests.
There are two ways to run your tests on BrowserStack:
-
Running tests on BrowserStack Cloud using own Agents:
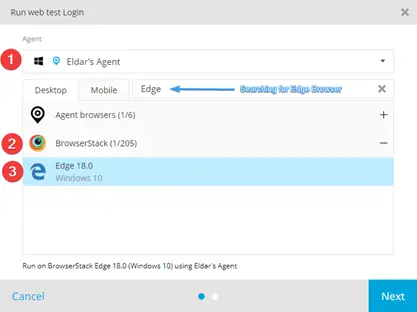
Once you have the integration set up, you can use your own TestProject Agents to run tests and jobs on the BrowserStack cloud. This means that your agents (wherever they are installed) will be running your tests in the cloud using BrowserStack browsers. To achieve that, choose one of your Agents (1), expand the BrowserStack (2) section, and select a browser (you can use the search option to quickly find the desired target) (3) from the BrowserStack cloud and run your test. That’s it!
This method is useful for cases where tests need access to your local resources that are not accessible from the cloud. For example, let’s say that in some of your steps you are using the TestProject RESTful API Client Addon to access your back office API. You can test your website in the cloud and make your validations internally.
-
Running tests on BrowserStack Cloud using the Virtual Agent:
In addition to the above method, another great option is running tests entirely on cloud using the Virtual Agent. Once you’ve set up your BrowserStack integration you will see that a Virtual Agent was added to your lab.

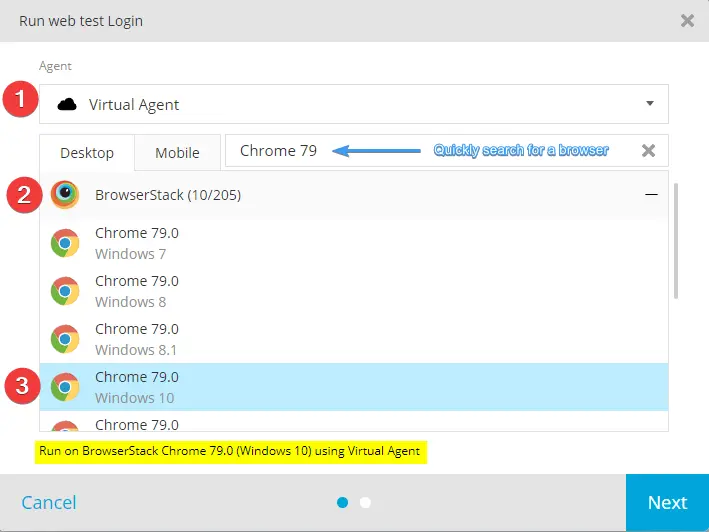
This type of execution does not require an Agent at all. This means that you can execute your tests and jobs even if you do not have any agents that are currently available for execution. To use this capability when running a test, just choose the Virtual Agent (1), expand the BrowserStack section (2), choose the desired browser (you can use the search option to quickly find the desired target) (3), and run your test.
Virtual Agents can take up to a minute to initialize before starting the execution.
Defining jobs to run on BrowserStack cloud
Now that we understand all the options to run tests, let’s discuss about jobs. After you have your tests created, the next logical step is to put all or some of them into a job that can be scheduled or executed from a CI pipeline (in addition to just clicking the play button).
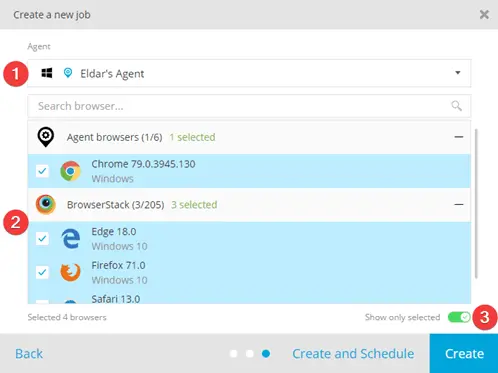
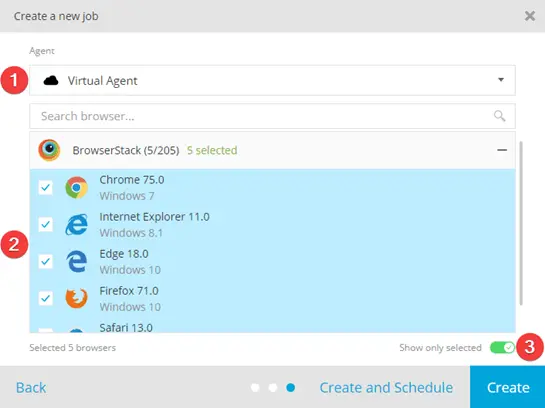
When creating a new job or editing an existing one, you have the option to define it to run using any of the methods mentioned above. Jobs can be defined to run on multiple browsers and therefore after selecting an Agent (1), just choose on which browsers (2) to run the job. If you select one of your own agents (like in the image below), you will be able to select both local browsers (that are installed on or connected to that agent’s machine) and/or BrowserStack browsers.
Once the jobs are triggered, the Agent will run all of your tests on each of the selected browsers. If you choose to assign the Virtual Agent to the job (instead of selecting one of your own agents), no physical agents are required to be available when the job is executed.
When using the Virtual Agent, local browsers are not displayed. Meaning that only BrowserStack browsers will be available.
Reviewing the progress and the results of execution
After we’ve successfully defined our integration and ran our tests on various targets using all the different methods (or just one), it is time to see if everything that we’ve tested, performed as expected or if there are some issues in the tested applications that need to be investigated and dealt with. When you choose to use the BrowserStack cloud to run your TestProject tests, you get double the data in test run reports!
Real-time progress
First of all, when tests or jobs are executed on the BrowserStack cloud, you can see the progress in the TestProject Monitor with some additional information about the executed test or job.
![]()
While in the Monitor, notice that the browser has a BrowserStack icon over it, indicating that it is running in the BrowserStack cloud. Hovering over the browser icon will show the exact version of the used browser.
In addition to that, if you open your BrowserStack Automate Dashboard, you can see the execution happens in real time.
Execution reports
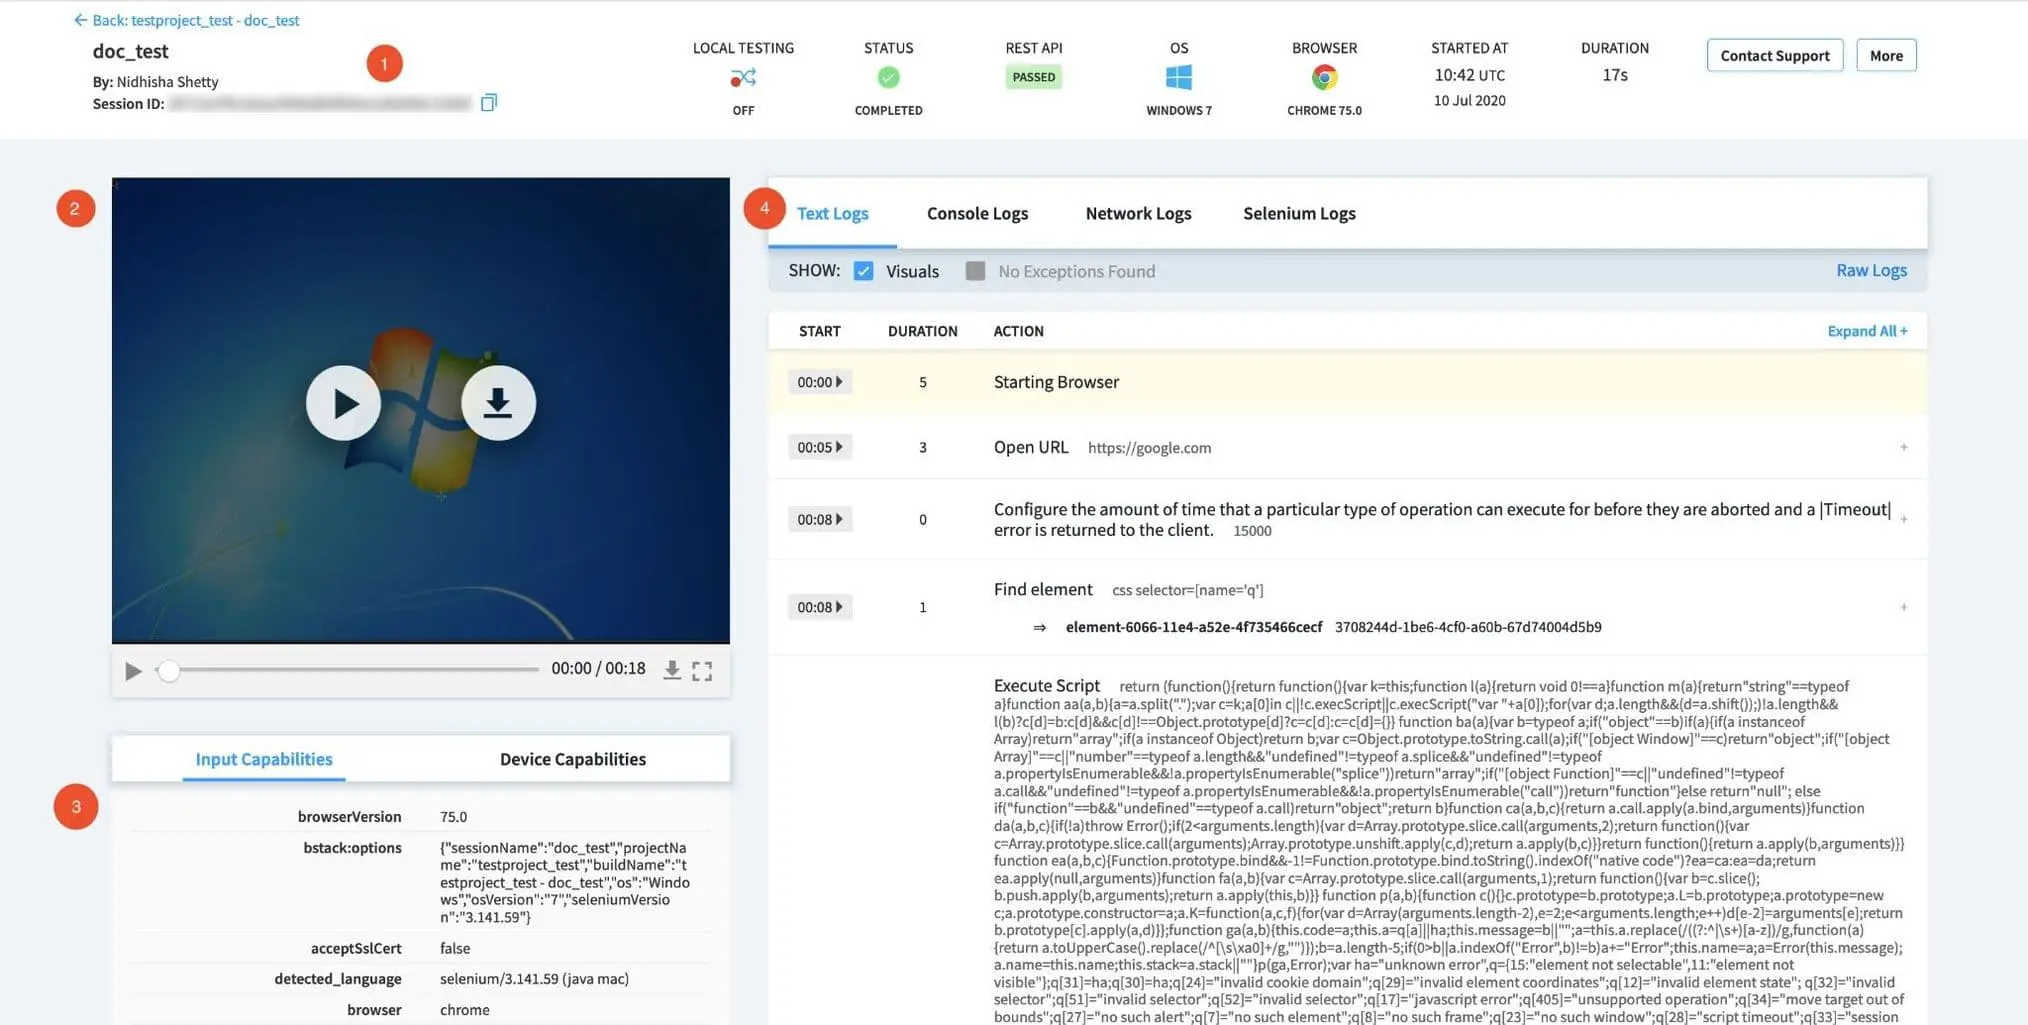
Once your execution has finished, you can hop over to the Reports section in your TestProject account to see the results of your test(s). As you are already used to, all the information is here with some additional elements. You can see that the browser (1) has the BrowserStack logo on it (just like in the Monitor tab) which indicates that the execution was performed on a BrowserStack browser. Hovering with your mouse on the browser icon will show the exact used version. On the right-hand side (3), you can still see all the steps of your test with all the information that you are used to seeing there, including full screenshots. Besides that, all the tests of your job will have a link (2) that will take you directly to the related execution session in the BrowserStack Dashboard.

Once you click the Open BrowserStack report link, you will be redirected to BrowserStack where you will be able to see some additional information about that execution:
- Information about the execution (Name, Time, OS, Browser, Device, and so on.).
- A video recording of the execution itself.
- Driver capabilities that were used for the execution.
- The exact Selenium commands that were executed and other logs.
Running TestProject tests in parallel on BrowserStack
On BrowserStack, you can run multiple TestProject tests at the same time across various browser, device and OS combinations, this is Parallel Testing. Parallel Testing gives you the same benefits as running a multi-threaded application.
With Parallel Testing, you can run the same test on different browser/device combinations, or run different tests on the same browser/device combination. Parallel Testing will help you reduce the run time of your tests execution, resulting in faster build times and faster releases.
The number of TestProject tests that can be executed in parallel is dependent on the parallel limit permitted by your BrowserStack account. You can find the Parallel limit for your account.
Setting up parallel execution in TestProject is a simple three step process:
-
Create the tests you’d like to execute in parallel, either through scripting using TestProject’s SDK or Test Recorder.
-
Create a job for each parallel branch of tests to be executed against a certain configuration of browsers. You can create as many jobs as is required to achieve the number of parallel threads desired.
-
Launch these jobs at the same time, either by
a. Executing on demand
b. Running on a schedule
c. Triggering through a CI/CD pipeline (including TestProject’s Jenkins integration or via TestProject’s API
Parallel testing can be supported using either locally installed agents or virtual agents connected to your BrowserStack account.
Example:
You have 3 tests that average a 30 second execution time (Test #1, Test #2, and Test #3) which you want to execute against Chrome, Firefox, and Safari. Your test matrix looks like the below:
| Chrome | Firefox | Safari | |
|---|---|---|---|
| Test #1 | X | X | X |
| Test #2 | X | X | X |
| Test #3 | X | X | X |
There are foreseeably 4 different ways you could set up the jobs to complete in TestProject:
-
1 Job: Set up all 3 tests to run against the 3 different browsers as a single job. These tests will run in series. The total execution time would be roughly 4m 30s. This option requires the least setup and maintenance.
-
3 Jobs (organized by test): Set up 3 jobs, each with 1 test each. Select all 3 browsers for each job. Each job will run 3 executions in series: the test it contains against each one of the 3 browsers. The total execution time would be roughly 1m 30s. This option requires more setup and maintenance.
-
3 jobs (organized by browser): Set up 3 jobs, each with 3 tests each. Select only 1 browser for each job. Each job will run 3 executions in series: the 3 tests it contains, only against the single browser specified. The total execution time would be roughly 1m 30s. This option requires more setup and maintenance.
-
9 jobs (organized by test and browser): Set up 9 jobs, each with a single test against a single browser. Each job will run only a single execution: the specified test against the specified browser. The total execution time would be roughly 0m 30s. This option requires the most setup and maintenance.
You should now be able to execute TestProject tests on BrowserStack, if you need any further help, feel free to contact our Support team who are always ready to help you out!
We're sorry to hear that. Please share your feedback so we can do better
Contact our Support team for immediate help while we work on improving our docs.
We're continuously improving our docs. We'd love to know what you liked
We're sorry to hear that. Please share your feedback so we can do better
Contact our Support team for immediate help while we work on improving our docs.
We're continuously improving our docs. We'd love to know what you liked
Thank you for your valuable feedback!