Integrate BrowserStack Automate with Concourse CI
A step-by-step guide to help you integrate Concourse CI with the BrowserStack device cloud for running all your Selenium tests on BrowserStack Automate.
Concourse is an open-source continuous integration tool. Built on the simple mechanics of resources, tasks, and jobs, Concourse presents a general approach to automation that makes it great for CI/CD.
In this guide, you’ll learn how to:
- Set up a pipeline in ConcourseCI
- Integrate existing test cases
- Integrate test cases for privately hosted websites
Prerequisites
Before you can start integration, ensure that the following tasks are complete.
-
Docker,Concourse, andflyCLI are installed on your machine. Check out ConcourseCI documentation for more information. - You have access to the BrowserStack account credentials, namely Access Key and Username.
Set up Concourse Pipeline
To create a pipeline in Concourse, complete the following steps:
- Start your Concourse server at port 8080 and open
http://localhost:8080/in your browser. - Open your terminal/command line, run the following command to log in to your Concourse server and save the target.
$ fly -t tutorial login -c http://127.0.0.1:8080 -u <username> -p <password> - Navigate to the
project-folder/concourse-cidirectory, and open thepipeline-config.ymlfile. - Under the
runsection in thepipeline-config.ymlfile, export your BrowserStack credentials.- export BROWSERSTACK_USERNAME="YOUR_USERNAME" - export BROWSERSTACK_ACCESS_KEY="YOUR_ACCESS_KEY" - After you edit the
pipeline-config.ymlfile with BrowserStack details, create a Concourse pipeline and run a job with the help of theflyCLI.- Create the pipeline:
$ fly -t tutorial set-pipeline -p nodejs-browserstack-sample -c pipeline-config.yml - Unpause the pipelines, which are paused when they were created:
$ fly -t tutorial unpause-pipeline -p nodejs-browserstack-sample - Trigger the job:
$ fly -t tutorial trigger-job --job nodejs-browserstack-sample/browserstack-concourse --watch
- Create the pipeline:
- View the results on the BrowserStack Automate dashboard.
The pipeline runs, and the test result is also displayed on your Concourse Dashboard page.
Integrate existing test cases
With existing test cases, integrating BrowserStack involves editing your test cases to add BrowserStack capabilities, credentials, and, remote URL.
Though your existing test scripts include capabilities, BrowserStack also provides specific capabilities that help determine how tests are run. The following example code snippet sets the build name, declares Access Key and Username as environment variables, and creates a remote driver connection.
Using the default BUILD_JOB_NAME or BUILD_NAME environment variables in the BrowserStack build name helps generate a unique build name for every test run. To learn more about this environment variable, check out the Concourse task metadata page.
Set capabilities using the following code snippet:
String username = System.getenv("BROWSERSTACK_USERNAME");
String accessKey = System.getenv("BROWSERSTACK_ACCESS_KEY");
String buildName = System.getenv("BUILD_NAME");

MutableCapabilities capabilities = new MutableCapabilities();
HashMap<String, Object> browserstackOptions = new HashMap<String, Object>();
browserstackOptions.put("buildName", "BStack Build Number: " + buildName);
browserstackOptions.put("seleniumVersion", "4.0.0");
capabilities.setCapability("bstack:options", browserstackOptions);

WebDriver driver = new RemoteWebDriver(new URL("https://" + username + ":" + accessKey + "@hub.browserstack.com/wd/hub"), capabilities);
username = process.env.BROWSERSTACK_USERNAME
accessKey = process.env.BROWSERSTACK_ACCESS_KEY
buildName = process.env.BUILD_NAME

var capabilities = {
  'bstack:options' : {
    "buildName" : "BStack Build Number: " + buildName,
    "userName" : username,
    "accessKey" : accessKey,
    "seleniumVersion" : "4.0.0",
  },
}
var driver = new webdriver.Builder().
  usingServer("https://hub.browserstack.com/wd/hub").
  withCapabilities(capabilities).
  build();
String username = Environment.GetEnvironmentVariable("BROWSERSTACK_USERNAME");
String accessKey = Environment.GetEnvironmentVariable("BROWSERSTACK_ACCESS_KEY");
String buildName = Environment.GetEnvironmentVariable("BUILD_NAME");

ChromeOptions capabilities = new ChromeOptions();
Dictionary<string, object> browserstackOptions = new Dictionary<string, object>();
browserstackOptions.Add("buildName", "BStack Build Number: " + buildName);
browserstackOptions.Add("userName", username);
browserstackOptions.Add("accessKey", accessKey);
browserstackOptions.Add("seleniumVersion", "4.0.0");

capabilities.AddAdditionalOption("bstack:options", browserstackOptions);
driver = new RemoteWebDriver(new Uri("https://hub.browserstack.com/wd/hub/"), capabilities);
$username = getenv('BROWSERSTACK_USERNAME');
$accessKey = getenv('BROWSERSTACK_ACCESS_KEY');
$buildName = getenv('BUILD_NAME');

$caps = array(
	'bstack:options' => array(
		"buildName" => "".$buildName,
		"seleniumVersion" => "4.0.0",
	),
);
$web_driver = RemoteWebDriver::create(
  "https://".$username.":".$accessKey."@hub.browserstack.com/wd/hub",
  $caps
);
username = os.environ.get('BROWSERSTACK_USERNAME')
accessKey = os.environ.get('BROWSERSTACK_ACCESS_KEY')
buildName = os.environ.get('BUILD_NAME')

bstack_options = {
    "buildName" : "BStack Build Number: " + buildName,
    "seleniumVersion" : "4.0.0",
    "userName": username,
    "accessKey": accessKey
}
options = ChromeOptions()
options.set_capability('bstack:options', bstack_options)
driver = webdriver.Remote(
    command_executor="https://hub.browserstack.com/wd/hub",
    options=options)
username = ENV['BROWSERSTACK_USERNAME']
accessKey = ENV['BROWSERSTACK_ACCESS_KEY']
buildName = ENV['BUILD_NAME']

# to run on Chrome
options = Selenium::WebDriver::Options.chrome
capabilities = {
  'bstack:options' => {
    "buildName" => "BStack Build Number: " + buildName,
    "seleniumVersion" => "4.0.0",
  },
}

options.add_option('bstack:options', bstack_options)
driver = Selenium::WebDriver.for(:remote,
  :url => "https://"+username+":"+accessKey+"@hub.browserstack.com/wd/hub",
  :capabilities => options)
my $username = $ENV{"BROWSERSTACK_USERNAME"};
my $accessKey = $ENV{"BROWSERSTACK_ACCESS_KEY"};
my $buildName = $ENV{"BUILD_NAME"};

my $caps = {
  'bstack:options' => {
    "buildName" => "BStack Build Number:".$buildName,
    "seleniumVersion" => "4.0.0",
    },
  }
my $host = "$username:$accessKey\@hub.browserstack.com";
my $driver = new Selenium::Remote::Driver('remote_server_addr' => $host,
  'port' => '80', 'extra_capabilities' => $caps);
String username = System.getenv("BROWSERSTACK_USERNAME");
String accessKey = System.getenv("BROWSERSTACK_ACCESS_KEY");
String buildName = System.getenv("BUILD_NAME");

DesiredCapabilities capabilities = new DesiredCapabilities();
capabilities.setCapability("build", "BStack Build Number: " + buildName);
driver = new RemoteWebDriver(new URL("https://" + username + ":" + accessKey + "@hub.browserstack.com/wd/hub"), capabilities);
username = process.env.BROWSERSTACK_USERNAME
accessKey = process.env.BROWSERSTACK_ACCESS_KEY
buildName = process.env.BUILD_NAME

var capabilities = {
 "browserstack.user" : username,
 "browserstack.key" : accessKey,
 "build" : "BStack Build Number: " + buildName
}

var driver = new webdriver.Builder().
  usingServer("https://hub.browserstack.com/wd/hub").
  withCapabilities(capabilities).
  build();
String username = Environment.GetEnvironmentVariable("BROWSERSTACK_USERNAME");
String accessKey = Environment.GetEnvironmentVariable("BROWSERSTACK_ACCESS_KEY");
String buildName = Environment.GetEnvironmentVariable("BUILD_NAME");

OpenQA.Selenium.Chrome.ChromeOptions capability = new OpenQA.Selenium.Chrome.ChromeOptions();
capability.AddAdditionalCapability("name", "BStack-[C_sharp] Sample Test", true); // test name
capability.AddAdditionalCapability("build", "BStack Build Number: " + buildName, true); // CI/CD job or build name
capability.AddAdditionalCapability("browserstack.user", username, true);
capability.AddAdditionalCapability("browserstack.key", accessKey, true);

driver = new RemoteWebDriver(
  new Uri("https://hub.browserstack.com/wd/hub/"), capability
);
$username = getenv('BROWSERSTACK_USERNAME');
$accessKey = getenv('BROWSERSTACK_ACCESS_KEY');
$buildName = getenv('BUILD_NAME');

$caps = array(
  "build" => "BStack Build Number: ".$buildName, // CI/CD job or build name
);
$web_driver = RemoteWebDriver::create(
  "https://".$username.":".$accessKey."@hub.browserstack.com/wd/hub",
  $caps
);
username = os.environ.get('BROWSERSTACK_USERNAME')
accessKey = os.environ.get('BROWSERSTACK_ACCESS_KEY')
buildName = os.environ.get('BUILD_NAME')

desired_cap = {
 'build': "BStack Build Number: " + buildName, # CI/CD job or build name
 'browserstack.user': username,
 'browserstack.key': accessKey,
}
driver = webdriver.Remote(
    command_executor='https://hub.browserstack.com/wd/hub',
    desired_capabilities=desired_cap)
username = ENV['BROWSERSTACK_USERNAME']
accessKey = ENV['BROWSERSTACK_ACCESS_KEY']
buildName = ENV['BUILD_NAME']

caps = Selenium::WebDriver::Remote::Capabilities.new
caps['build'] = 'BStack Build Number: ' + buildName# CI/CD job or build name

driver = Selenium::WebDriver.for(:remote,
  :url => "https://"+username+":"+accessKey+"@hub.browserstack.com/wd/hub",
  :desired_capabilities => caps)
my $username = $ENV{"BROWSERSTACK_USERNAME"};
my $accessKey = $ENV{"BROWSERSTACK_ACCESS_KEY"};
my $buildName = $ENV{"BUILD_NAME"};

my $caps = {
  "build" => "BStack Build Number:".$buildName,
};

my $host = "$username:$accessKey\@hub.browserstack.com";

my $driver = new Selenium::Remote::Driver('remote_server_addr' => $host,
  'port' => '80', 'extra_capabilities' => $caps);
Integrate test cases for privately hosted websites
If you are testing websites hosted locally as part of your testing or development environment, you need to configure your Concourse pipeline to use the Local testing.
Using the Local testing feature of BrowserStack, remote browsers at the BrowserStack cloud can access websites hosted on your private or internal networks. To learn more about how Local testing works, check out the Local testing guide.
Apart from setting up a Local connection, you must also add the browserstack.local capability in your test scripts.
This section guides how to:
Enable Local Testing
You can enable Local testing using the ways as shown in the following tab:
Using Local binary, the remote browsers in the BrowserStack cloud can access your private or locally-hosted website through the connection established between BrowserStack and the Local binary running on your machine.
To create Concourse pipeline that uses BrowserStack Local, complete the following steps:
- Complete the steps mentioned in the Setup Concourse pipeline section.
- Under the run section in the
.ymlfile, along with the commands that your tests need to run, add the following commands based on your OS.
These commands use the--daemon startand--daemon stopflags to start and stop the Local binary, respectively. To learn about additional flags used in running Local binary, check out the Binary parameter guide.# For Linux-based systems, add the following commands to download the binary, run it, and stop its execution after the test has been executed. - wget "https://local-downloads.browserstack.com/BrowserStackLocal-linux-x64.zip" - unzip BrowserStackLocal-linux-x64.zip - ./BrowserStackLocal --key $BROWSERSTACK_ACCESS_KEY --daemon start - <your-test-command> - ./BrowserStackLocal --key $BROWSERSTACK_ACCESS_KEY --daemon stop # For macOS-based systems, add the following commands to download the binary, run it, and stop its execution after the test has been executed. - wget "https://local-downloads.browserstack.com/BrowserStackLocal-darwin-x64.zip" - unzip BrowserStackLocal-darwin-x64.zip - ./BrowserStackLocal --key $BROWSERSTACK_ACCESS_KEY --daemon start - <your-test-command> - ./BrowserStackLocal --key $BROWSERSTACK_ACCESS_KEY --daemon stop # For Windows-based systems, add the following commands to download the binary, run it, and stop its execution after the test has been executed. - wget "https://local-downloads.browserstack.com/BrowserStackLocal-win32.zip" - powershell.exe Expand-Archive BrowserStackLocal-win32.zip - ./BrowserStackLocal-win32/BrowserStackLocal.exe --key %BROWSERSTACK_ACCESS_KEY% --daemon start - <your-test-command> - ./BrowserStackLocal-win32/BrowserStackLocal.exe --key %BROWSERSTACK_ACCESS_KEY% --daemon stop - Save the changes made to the
.ymlfile.
Note: To download another Local binary version, check out the releases and downloads section.
If you prefer to manage the Local connection through your test scripts, you can use the language bindings.
Check out the enabling Local testing using language bindings guide to edit your test scripts.
Note: Ensure that you complete the steps mentioned in the set up Concourse pipeline section to create your Concourse pipeline.
Apart from these configurations, you can set other Local options, such as, testing behind a proxy, folder testing, or using multiple local instances. Check out Introduction to Local Testing for more information.
Add browserstack.local capability to test scripts
Add the browserstack.local capability to test scripts using the following code snippets. When you set this capability to true, BrowserStack resolves the request via the Local agent running in your network.
browserstackOptions.put("local", "true");
'bstack:options' : {
	"local" : "true",
},
browserstackOptions.Add("local", "true");
'bstack:options' => array(
	"local" => "true",
),
'bstack:options' : {
	"local" : "true",
},
'bstack:options' => {
	"local" => "true",
},
'bstack:options' : {
	"local" : "true",
},
capabilities.setCapability("browserstack.local", "true");
"browserstack.local" : "true",
capability.AddAdditionalCapability("browserstack.local", "true", true);
"browserstack.local" => "true",
"browserstack.local" : "true",
caps["browserstack.local"] = "true",
"browserstack.local" => "true",
After these configurations, when you commit any code change, Concourse automatically runs the test scripts as configured.
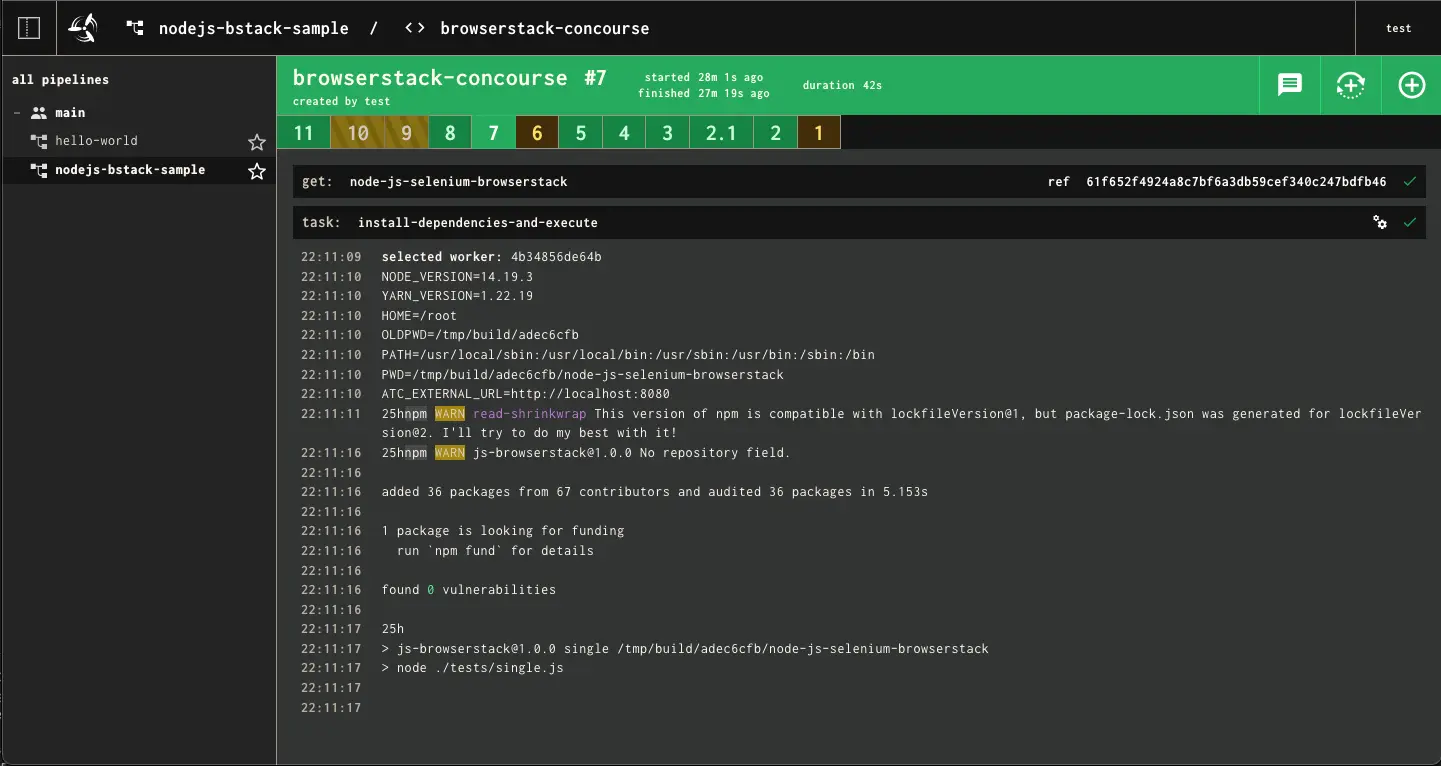
You can verify if the test passed or failed on the Concourse Dashboard, as shown in the following image:
We're sorry to hear that. Please share your feedback so we can do better
Contact our Support team for immediate help while we work on improving our docs.
We're continuously improving our docs. We'd love to know what you liked
We're sorry to hear that. Please share your feedback so we can do better
Contact our Support team for immediate help while we work on improving our docs.
We're continuously improving our docs. We'd love to know what you liked
Thank you for your valuable feedback!