Integrate Your Test Suite with BrowserStack
BrowserStack’s Serenity SDK supports a plug-and-play integration. Run your entire test suite in parallel with a few steps!
Prerequisites
- An existing automated test suite.
- Serenity v2+, Java v8+, Selenium v2.5+ (W3C/JSON Wire).
- If you are using CLI for running tests, ensure that Maven is installed on your machine, Maven environment variables are set, and Maven bin is added to the system path,
$PATH.
Looking for a starter project? Get started with our Serenity sample project.
Integration steps
Based on the method you use to build your project, complete the steps in the following tabs to integrate with BrowserStack.
Install BrowserStack Plugin
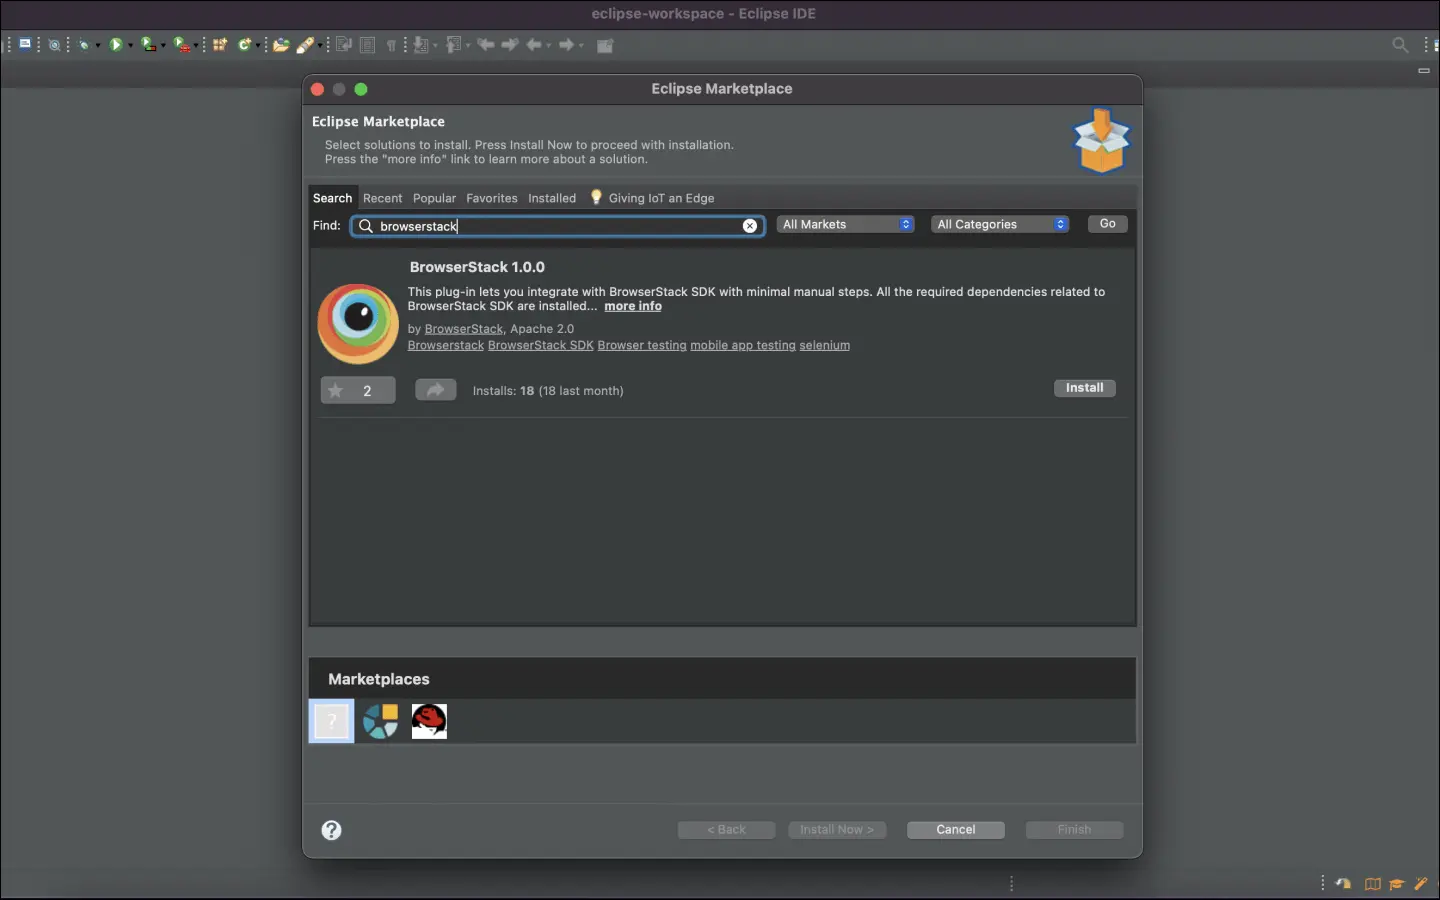
On the Eclipse toolbar, click Help > Eclipse Marketplace.
In the Eclipse Marketplace, search for BrowserStack > click Install > Finish.
Configure your test suite with BrowserStack SDK
BrowserStack plugin automatically adds the browserstack-java-sdk dependency to your pom.xml file and generates a browserstack.yml configuration file.
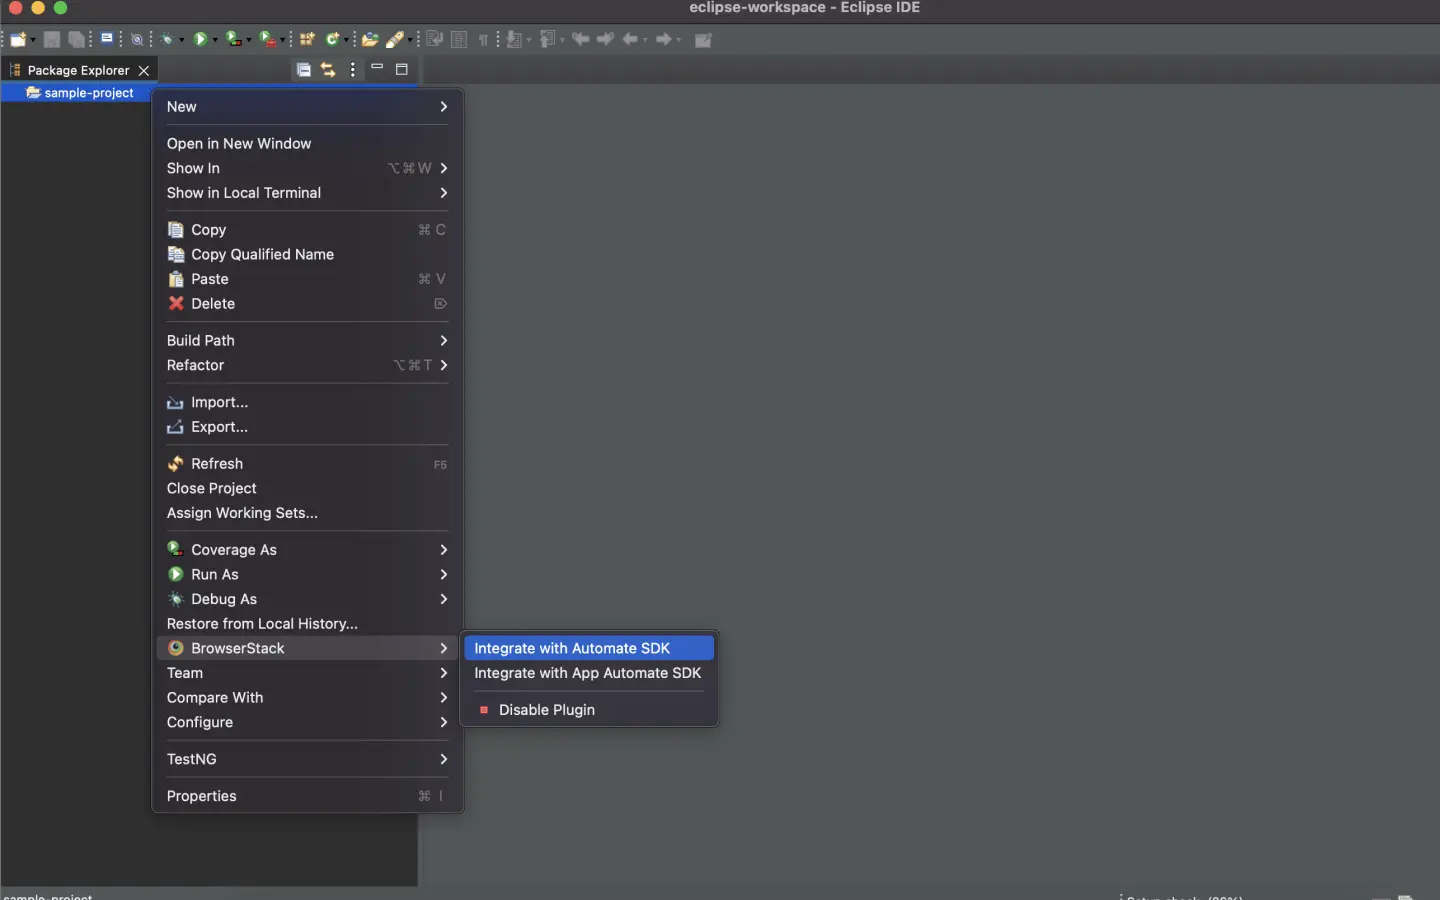
Right-click on your project folder > BrowserStack > select Integrate with Automate SDK.
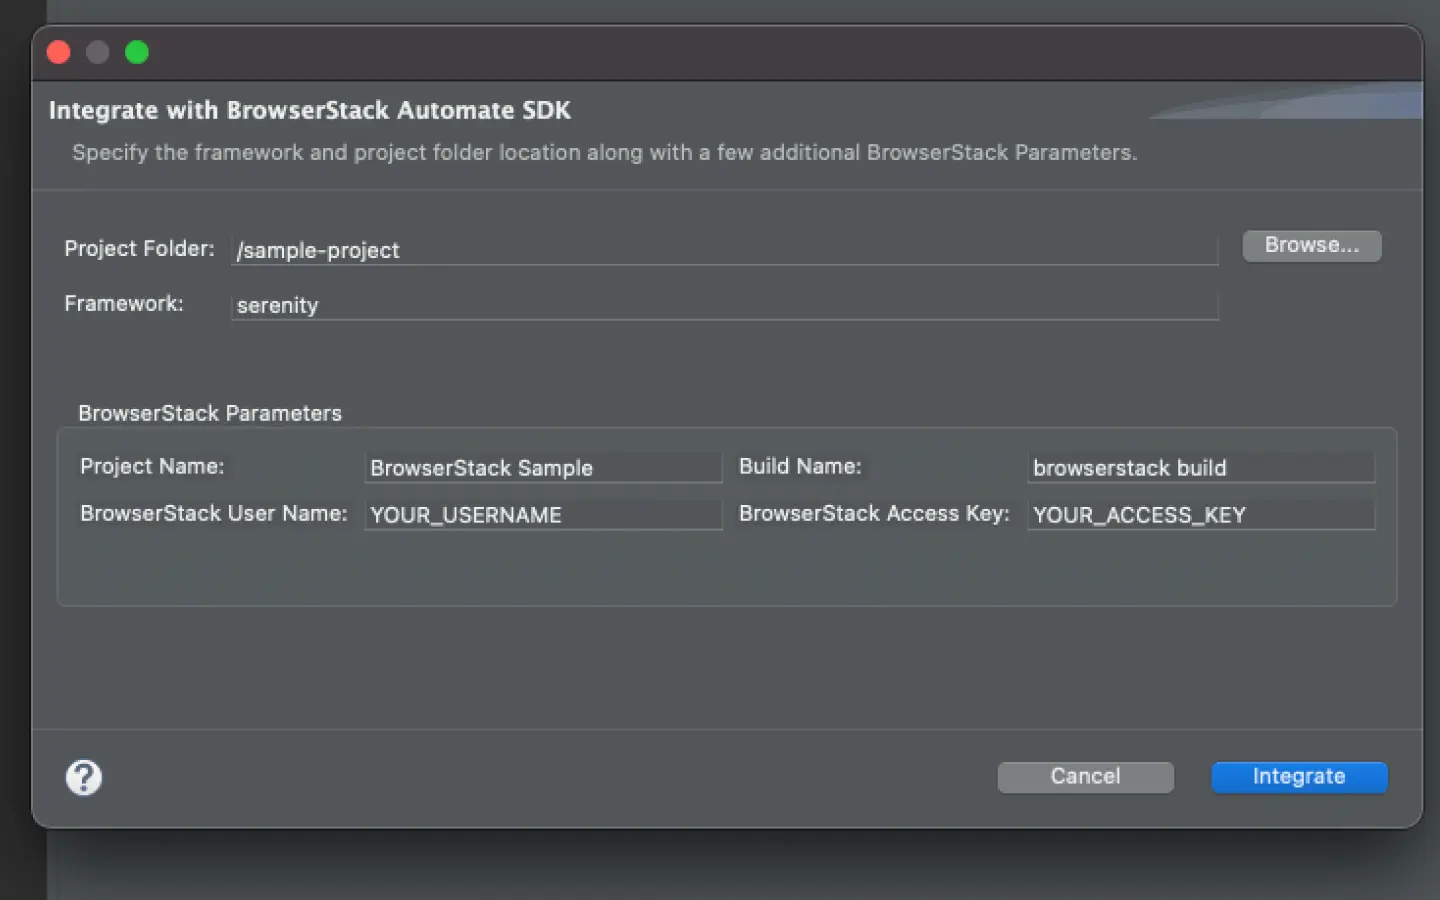
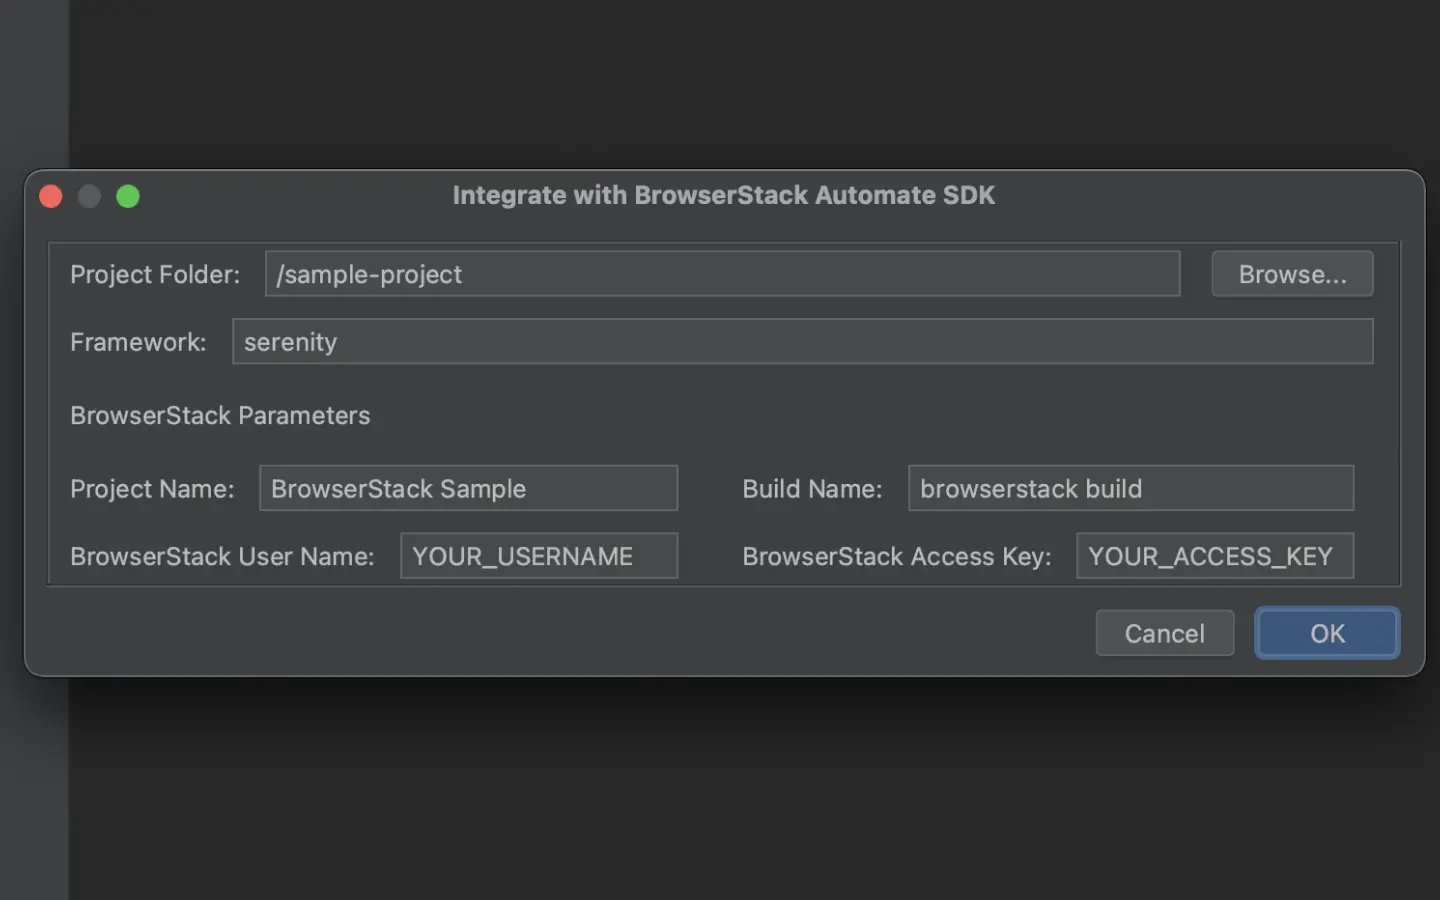
Select your Project Folder, Framework, and other BrowserStack Parameters, and then click Integrate.
Framework: serenity
BrowserStack User Name: YOUR_USERNAME
BrowserStack Access Key: YOUR_ACCESS_KEY
Set up serenity.conf file
Since project uses the Serenity BrowserStack plugin, set the remote URL and add your BrowserStack credentials in the serenity.conf file of your project.
Update your BrowserStack config file
Update your browserstack.yml config file at the root level of your project. This file holds all the required capabilities to run tests on BrowserStack.
Set platforms to test on
Set the browsers/devices you want to test under the platforms object. Our config follows W3C-formatted capabilities.
Do you want to dynamically configure platforms?
To dynamically configure platforms across different tests, you can comment out the platforms capability while still passing platform-specific capabilities.
 Configure AI Agents
You can enable the following AI agents by adding the respective configurations in your browserstack.yml file:
Enable BrowserStack Local
Test localhost/internal servers in your network
BrowserStack’s Local Testing feature connects with test suites pointing to your localhost URL

BrowserStack Local supports all advanced use cases and restricted networks. Contact our support team for assistance in configuring BrowserStack Local for your enterprise.
BrowserStack Reporting
You can leverage BrowserStack’s extensive reporting features using the following capabilities:
Set a name to your build (usually the same as the build ID that’s on your CI/CD platform).
Accepted characters: A-Z, a-z, 0-9, ., :, -, [], /, @, &, ', _. All other characters are ignored.
Character limit: 255

Set a project name for your project.
The projectName and buildName config must be static and not change across different runs of the same build. This is a deviation in approach as specified by BrowserStack Automate or App Automate as Test Reporting & Analytics will automatically identify different build runs.
Restrict the characters in your projectName and buildName to alphanumeric characters (A-Z, a-z, 0-9), underscores (_), colons (:), square brackets ([, ]), and hyphens (-). Any other character will be replaced with an underscore (_).
Do you want to enable/disable auto-marking of test status and session?
The sessionName and sessionStatus are the names of your test sessions and status of your test sessions respectively. They are automatically picked from your test class/spec names and statuses. They do not need to be set manually when using the BrowserStack SDK. To override the sessionName and sessionStatus capabilities, use the following in your browserstack.yml file:
You can configure local testing to start without initializing the BrowserStack binary, or even with an existing binary using a local identifier
testContextOptions:
    skipSessionName: true
    skipSessionStatus: true
Use additional debugging features
By default, BrowserStack provides prettified session logs, screenshots on every failed selenium command, and a video of the entire test. Additionally, you can enable the following features:
Update browserstack.yml file
Copy the given code snippet and replace contents of browserstack.yml file in the root folder of your test suite.
Use our Capability Generator to select from a comprehensive set of options you can use to customize your tests.
Run your test suite
You can continue running your tests as you have been previously.
Install BrowserStack Plugin
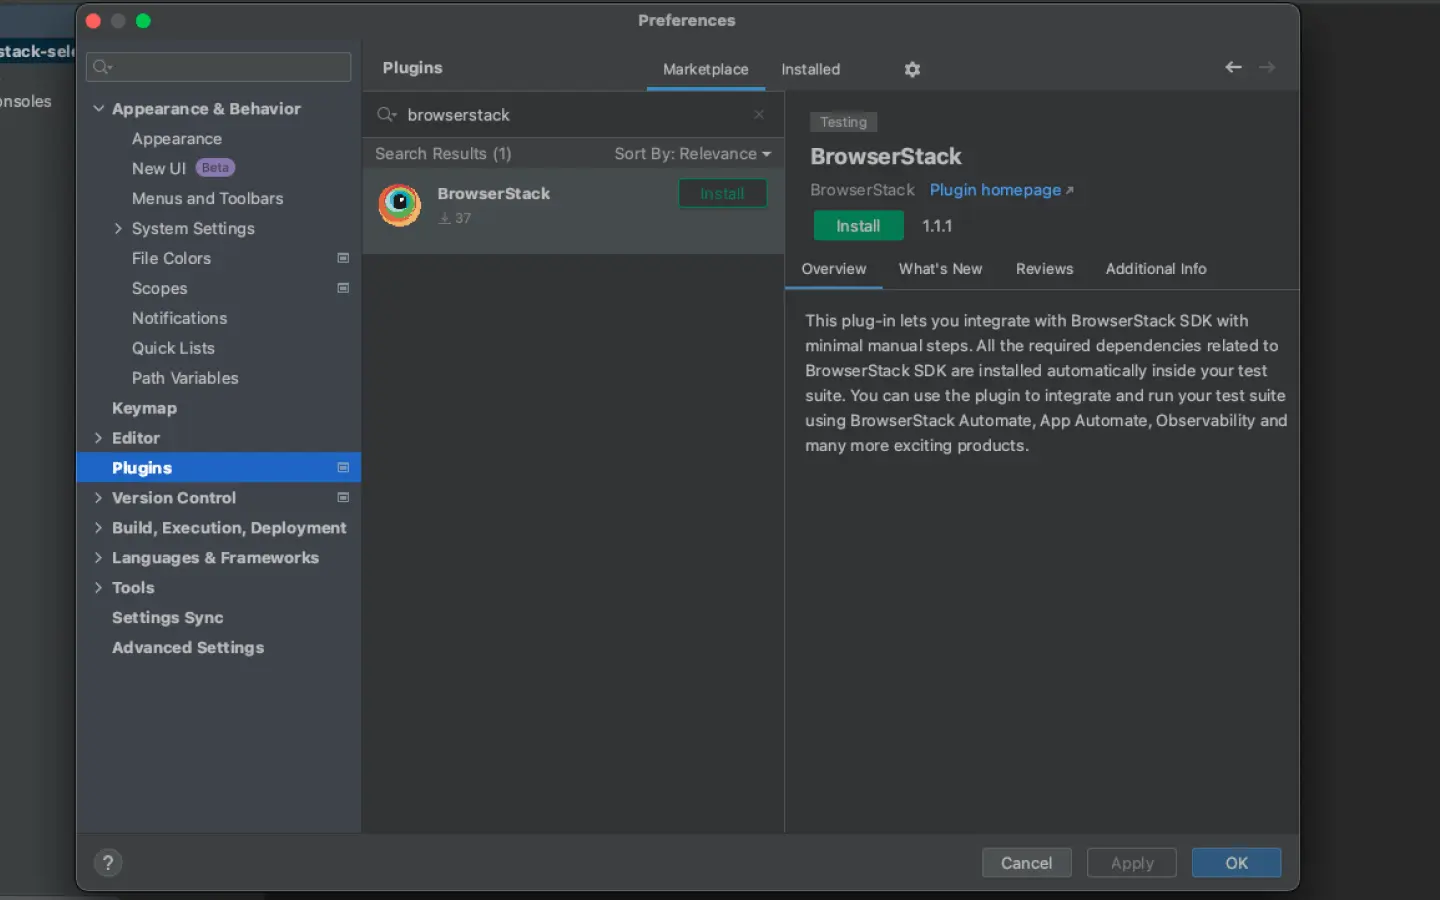
Click IntelliJ IDEA > Preferences > Plugins.
Search for BrowserStack and click Install.
Configure your test suite with BrowserStack SDK
BrowserStack plugin automatically adds the browserstack-java-sdk dependency to your pom.xml file and generates a browserstack.yml configuration file.
Right-click on your project folder > BrowserStack > select Integrate with Automate SDK.
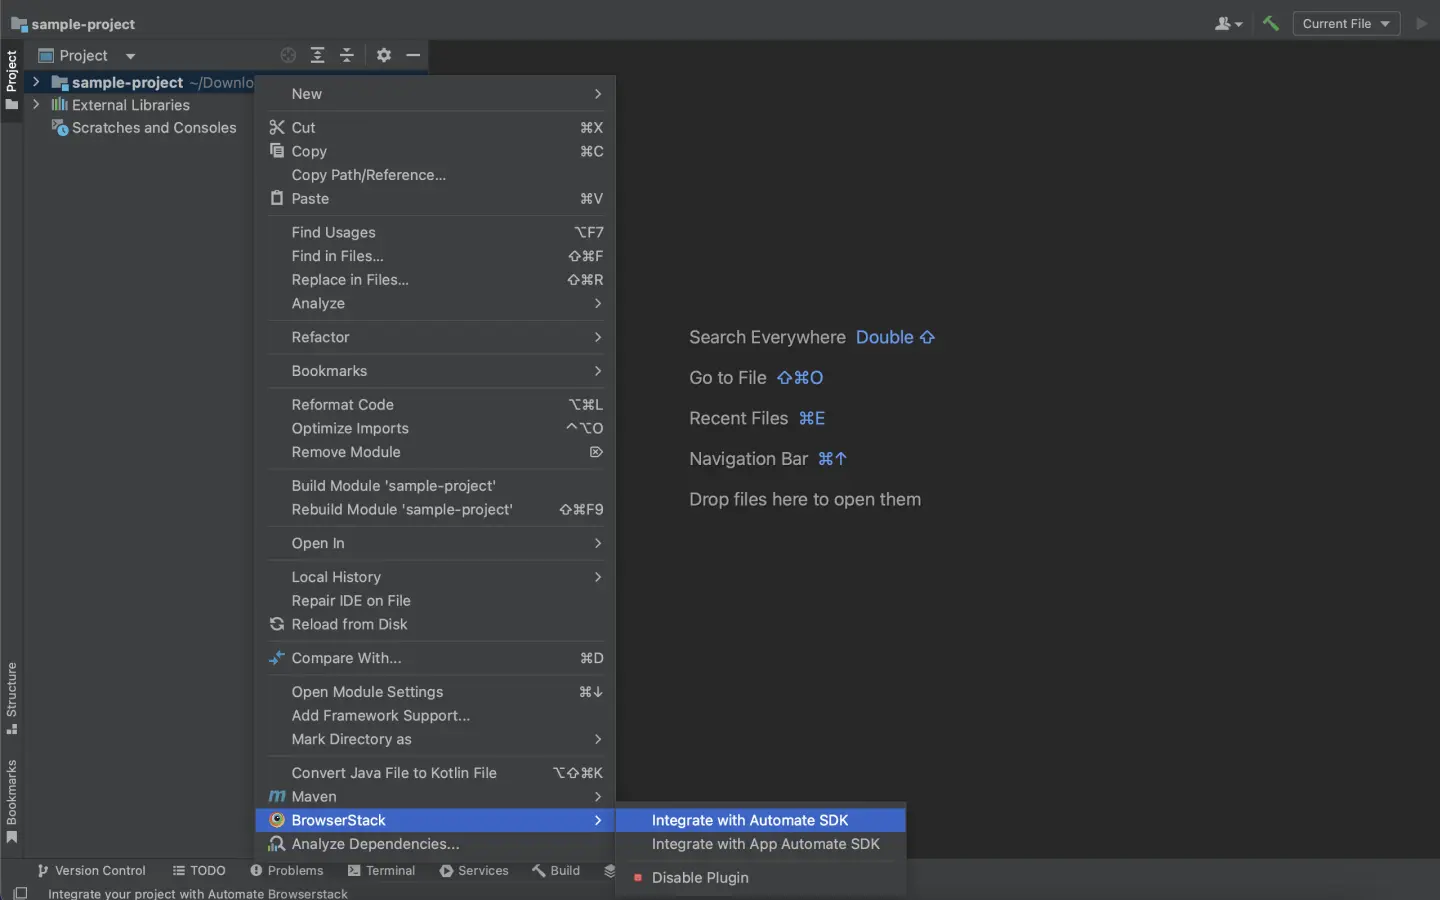
Select your Project Folder, add Framework and other BrowserStack Parameters then click OK.
Framework: serenity
BrowserStack User Name: YOUR_USERNAME
BrowserStack Access Key: YOUR_ACCESS_KEY
Set up serenity.conf file
Since project uses the Serenity BrowserStack plugin, set the remote URL and add your BrowserStack credentials in the serenity.conf file of your project.
Update your BrowserStack config file
Update your browserstack.yml config file at the root level of your project. This file holds all the required capabilities to run tests on BrowserStack.
Set platforms to test on
Set the browsers/devices you want to test under the platforms object. Our config follows W3C-formatted capabilities.
Do you want to dynamically configure platforms?
To dynamically configure platforms across different tests, you can comment out the platforms capability while still passing platform-specific capabilities.
Configure AI Agents
You can enable the following AI agents by adding the respective configurations in your browserstack.yml file:
Enable BrowserStack Local
Test localhost / internal servers in your network
BrowserStack’s Local Testing feature connects with test suites pointing to your localhost URL
BrowserStack Local supports all advanced use cases and restricted networks. Contact our support team for assistance in configuring BrowserStack Local for your enterprise.
BrowserStack Reporting
You can leverage BrowserStack’s extensive reporting features using the following capabilities:
Set a name to your build (usually the same as the build ID that’s on your CI/CD platform).
Accepted characters: A-Z, a-z, 0-9, ., :, -, [], /, @, &, ', _. All other characters are ignored.
Character limit: 255
Set a project name for your project.
The projectName and buildName config must be static and not change across different runs of the same build. This is a deviation in approach as specified by BrowserStack Automate or App Automate as Test Reporting & Analytics will automatically identify different build runs.
Restrict the characters in your projectName and buildName to alphanumeric characters (A-Z, a-z, 0-9), underscores (_), colons (:), square brackets ([, ]), and hyphens (-). Any other character will be replaced with an underscore (_).
Do you want to enable/disable auto-marking of test status and session?
The sessionName and sessionStatus are the names of your test sessions and status of your test sessions respectively. They are automatically picked from your test class/spec names and statuses. They do not need to be set manually when using the BrowserStack SDK. To override the sessionName and sessionStatus capabilities, use the following in your browserstack.yml file:
You can configure local testing to start without initializing the BrowserStack binary, or even with an existing binary using a local identifier
testContextOptions:
    skipSessionName: true
    skipSessionStatus: true
Use additional debugging features
By default, BrowserStack provides prettified session logs, screenshots on every failed selenium command, and a video of the entire test. Additionally, you can enable the following features:
Update browserstack.yml file
Copy the given code snippet and replace contents of browserstack.yml file in the root folder of your test suite.
Use our Capability Generator to select from a comprehensive set of options you can use to customize your tests.
Run your test suite
You can continue running your tests as you have been previously.
Add serenity-browserstack dependency in pom.xml
Add serenity-browserstack as Maven dependency in your pom.xml file and save the file.
This dependency adds the Serenity BrowserStack plugin to your project.
Set up serenity.conf file
Since project uses the Serenity BrowserStack plugin, set the remote URL and add your BrowserStack credentials in the serenity.conf file of your project.
Update your BrowserStack config file
Once you have installed the SDK, a browserstack.yml config file will be created at the root level of your project. This file contains all the required capabilities to run tests on BrowserStack.
Set platforms to test on
Set the browsers/devices you want to test under the platforms object. Our config follows W3C-formatted capabilities.
Do you want to dynamically configure platforms?
To dynamically configure platforms across different tests, you can comment out the platforms capability while still passing platform-specific capabilities.
Configure AI Agents
You can enable the following AI agents by adding the respective configurations in your browserstack.yml file:
Enable BrowserStack Local
Test localhost/internal servers in your network
BrowserStack’s Local Testing feature connects with test suites pointing to your localhost URL
BrowserStack Local supports all advanced use cases and restricted networks. Contact our support team for assistance in configuring BrowserStack Local for your enterprise.
BrowserStack Reporting
You can leverage BrowserStack’s extensive reporting features using the following capabilities:
Set a name to your build (usually the same as the build ID that’s on your CI/CD platform).
Accepted characters: A-Z, a-z, 0-9, ., :, -, [], /, @, &, ', _. All other characters are ignored.
Character limit: 255
Set a project name for your project.
The projectName and buildName config must be static and not change across different runs of the same build. This is a deviation in approach as specified by BrowserStack Automate or App Automate as Test Reporting & Analytics will automatically identify different build runs.
Restrict the characters in your projectName and buildName to alphanumeric characters (A-Z, a-z, 0-9), underscores (_), colons (:), square brackets ([, ]), and hyphens (-). Any other character will be replaced with an underscore (_).
Do you want to enable/disable auto-marking of test status and session?
The sessionName and sessionStatus are the names of your test sessions and status of your test sessions respectively. They are automatically picked from your test class/spec names and statuses. They do not need to be set manually when using the BrowserStack SDK. To override the sessionName and sessionStatus capabilities, use the following in your browserstack.yml file:
You can configure local testing to start without initializing the BrowserStack binary, or even with an existing binary using a local identifier
testContextOptions:
    skipSessionName: true
    skipSessionStatus: true
Use additional debugging features
By default, BrowserStack provides prettified session logs, screenshots on every failed selenium command, and a video of the entire test. Additionally, you can enable the following features:
Update browserstack.yml file with selected capabilities
Copy the following code snippet and replace contents of browserstack.yml file in the root folder of your test suite.
Use our Capability Generator to select from a comprehensive set of options you can use to customize your tests.
Run your test suite
You can continue running your tests as you have been previously.
Install BrowserStack Plugin
On the Eclipse toolbar, click Help > Eclipse Marketplace.
In the Eclipse Marketplace, search for BrowserStack > click Install > Finish.
Install BrowserStack SDK using the build.gradle file
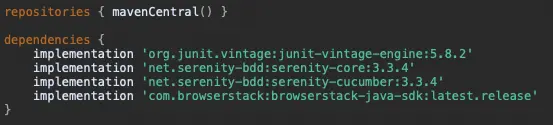
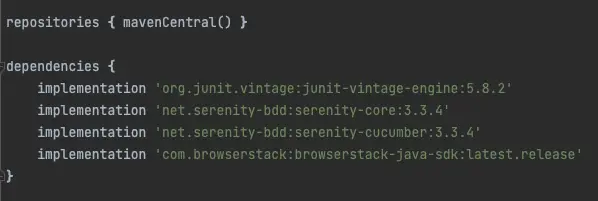
Add browserstack-java-sdk to the dependencies
Navigate to the build.gradle file and add the given code snippet as shown in the image
Fetch browserstackSDK path
Fetch the browserstackSDKPath on your local machine by adding the given variable to the build.gradle file

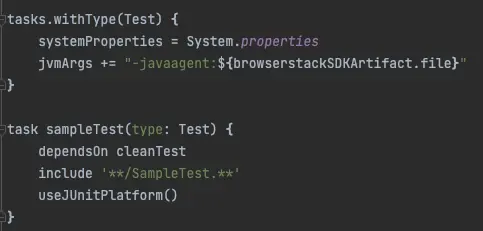
Add browserstackSDK as a javaagent
In the same build.gradle file, modify the gradle tasks to add jvmArgs which include browserstackSDK as a javaagent

Set up serenity.conf file
Since project uses the Serenity BrowserStack plugin, set the remote URL and add your BrowserStack credentials in the serenity.conf file of your project.
Update your BrowserStack config file
Update your browserstack.yml config file at the root level of your project. This file holds all the required capabilities to run tests on BrowserStack.
Set platforms to test on
Set the browsers/devices you want to test under the platforms object. Our config follows W3C-formatted capabilities.
Do you want to dynamically configure platforms?
To dynamically configure platforms across different tests, you can comment out the platforms capability while still passing platform-specific capabilities.
Configure AI Agents
You can enable the following AI agents by adding the respective configurations in your browserstack.yml file:
Enable BrowserStack Local
Test localhost/internal servers in your network
BrowserStack’s Local Testing feature connects with test suites pointing to your localhost URL
BrowserStack Local supports all advanced use cases and restricted networks. Contact our support team for assistance in configuring BrowserStack Local for your enterprise.
BrowserStack Reporting
You can leverage BrowserStack’s extensive reporting features using the following capabilities:
Set a name to your build (usually the same as the build ID that’s on your CI/CD platform).
Accepted characters: A-Z, a-z, 0-9, ., :, -, [], /, @, &, ', _. All other characters are ignored.
Character limit: 255
| buildIdentifier | Description | Generated build name on dashboard |
|---|---|---|
| ${BUILD_NUMBER} (Default) | If build is triggered locally, an incremental counter is appended. If build is triggered with CI tools, CI generated build number is appended. |
bstack-demo 1 bstack-demo CI 1395 |
| ${DATE_TIME} | The timestamp of run time is appended to the build. | bstack-demo 29-Nov-20:44 |
Advanced use cases for Build name
Custom formatting of build name
Prefix buildIdentifier with desired characters, for example, # or :
buildName: bstack-demo
buildIdentifier: '#${BUILD_NUMBER}'
Re-run tests in a build
You can re-run selected tests from a build using any of the following options:
Option 1: Set the existing build name in the BROWSERSTACK_BUILD_NAME variable and prepend it to your test run command to re-run tests in the same build:
MacOS/Linux:
BROWSERSTACK_BUILD_NAME=“bstack-demo 123” mvn test -P sample-test
Windows Powershell:
$env:BROWSERSTACK_BUILD_NAME=“bstack-demo 123”; mvn test -P sample-test
Windows cmd:
set BROWSERSTACK_BUILD_NAME=“bstack-demo 123” && mvn test -P sample-test
Option 2: Set the build name as a combination of buildName and buildIdentifier, as seen on the dashboard, and set buildIdenitifier as null:
buildName: bstack-demo 123
buildIdentifier: null
Option 3: Set the buildIdentifier as the build number or time of the required build as seen on the dashboard:
buildName: bstack-demo
buildIdentifier: 123
Set a project name for your project.
Do you want to enable/disable auto-marking of test status and session?
The sessionName and sessionStatus are the names of your test sessions and status of your test sessions respectively. They are automatically picked from your test class/spec names and statuses. They do not need to be set manually when using the BrowserStack SDK. To override the sessionName and sessionStatus capabilities, use the following in your browserstack.yml file:
You can configure local testing to start without initializing the BrowserStack binary, or even with an existing binary using a local identifier
testContextOptions:
    skipSessionName: true
    skipSessionStatus: true
Use additional debugging features
By default, BrowserStack provides prettified session logs, screenshots on every failed selenium command, and a video of the entire test. Additionally, you can enable the following features:
Update browserstack.yml file
Copy the given code snippet and replace contents of browserstack.yml file in the root folder of your test suite.
Use our Capability Generator to select from a comprehensive set of options you can use to customize your tests.
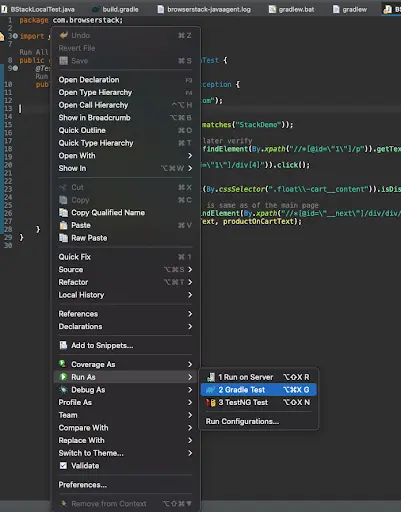
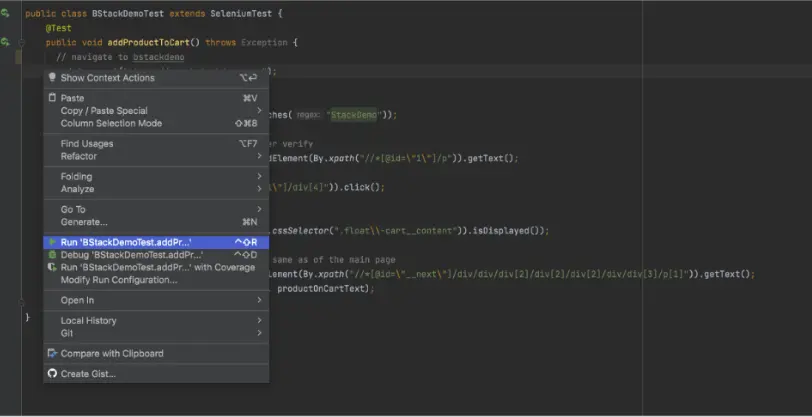
Run your test suite
Right Click on the test you want to run and click Run As -> Gradle Test
Install BrowserStack Plugin
Click IntelliJ IDEA > Preferences > Plugins.
Search for BrowserStack and click Install.
Install BrowserStack SDK using the build.gradle file
Add browserstack-java-sdk to the dependencies
Navigate to the build.gradle file and add the given code snippet as shown in the image
Fetch browserstackSDK path
Fetch the browserstackSDKPath on your local machine by adding the given variable to the build.gradle file

Add browserstackSDK as a javaagent
In the same build.gradle file, modify the gradle tasks to add jvmArgs which include browserstackSDK as a javaagent
Set up serenity.conf file
Since project uses the Serenity BrowserStack plugin, set the remote URL and add your BrowserStack credentials in the serenity.conf file of your project.
Update your BrowserStack config file
Update your browserstack.yml config file at the root level of your project. This file holds all the required capabilities to run tests on BrowserStack.
Set platforms to test on
Set the browsers/devices you want to test under the platforms object. Our config follows W3C-formatted capabilities.
Do you want to dynamically configure platforms?
To dynamically configure platforms across different tests, you can comment out the platforms capability while still passing platform-specific capabilities.
Configure AI Agents
You can enable the following AI agents by adding the respective configurations in your browserstack.yml file:
Enable BrowserStack Local
Test localhost / internal servers in your network
BrowserStack’s Local Testing feature connects with test suites pointing to your localhost URL
BrowserStack Local supports all advanced use cases and restricted networks. Contact our support team for assistance in configuring BrowserStack Local for your enterprise.
BrowserStack Reporting
You can leverage BrowserStack’s extensive reporting features using the following capabilities:
Set a name to your build (usually the same as the build ID that’s on your CI/CD platform).
Accepted characters: A-Z, a-z, 0-9, ., :, -, [], /, @, &, ', _. All other characters are ignored.
Character limit: 255
| buildIdentifier | Description | Generated build name on dashboard |
|---|---|---|
| ${BUILD_NUMBER} (Default) | If build is triggered locally, an incremental counter is appended. If build is triggered with CI tools, CI generated build number is appended. |
bstack-demo 1 bstack-demo CI 1395 |
| ${DATE_TIME} | The timestamp of run time is appended to the build. | bstack-demo 29-Nov-20:44 |
Advanced use cases for Build name
Custom formatting of build name
Prefix buildIdentifier with desired characters, for example, # or :
buildName: bstack-demo
buildIdentifier: '#${BUILD_NUMBER}'
Re-run tests in a build
You can re-run selected tests from a build using any of the following options:
Option 1: Set the existing build name in the BROWSERSTACK_BUILD_NAME variable and prepend it to your test run command to re-run tests in the same build:
MacOS/Linux:
BROWSERSTACK_BUILD_NAME=“bstack-demo 123” mvn test -P sample-test
Windows Powershell:
$env:BROWSERSTACK_BUILD_NAME=“bstack-demo 123”; mvn test -P sample-test
Windows cmd:
set BROWSERSTACK_BUILD_NAME=“bstack-demo 123” && mvn test -P sample-test
Option 2: Set the build name as a combination of buildName and buildIdentifier, as seen on the dashboard, and set buildIdenitifier as null:
buildName: bstack-demo 123
buildIdentifier: null
Option 3: Set the buildIdentifier as the build number or time of the required build as seen on the dashboard:
buildName: bstack-demo
buildIdentifier: 123
Set a project name for your project.
Do you want to enable/disable auto-marking of test status and session?
The sessionName and sessionStatus are the names of your test sessions and status of your test sessions respectively. They are automatically picked from your test class/spec names and statuses. They do not need to be set manually when using the BrowserStack SDK. To override the sessionName and sessionStatus capabilities, use the following in your browserstack.yml file:
You can configure local testing to start without initializing the BrowserStack binary, or even with an existing binary using a local identifier
testContextOptions:
    skipSessionName: true
    skipSessionStatus: true
Use additional debugging features
By default, BrowserStack provides prettified session logs, screenshots on every failed selenium command, and a video of the entire test. Additionally, you can enable the following features:
Update browserstack.yml file
Copy the given code snippet and replace contents of browserstack.yml file in the root folder of your test suite.
Use our Capability Generator to select from a comprehensive set of options you can use to customize your tests.
Run your test suite
Click Run Test to run your tests on BrowserStack
Install BrowserStack SDK using the build.gradle file
Add browserstack-java-sdk to the dependencies
Navigate to the build.gradle file and add the given code snippet as shown in the image
Fetch browserstackSDK path
Fetch the browserstackSDKPath on your local machine by adding the given variable to the build.gradle file
Add browserstackSDK as a javaagent
In the same build.gradle file, modify the gradle tasks to add jvmArgs which include browserstackSDK as a javaagent
Add serenity-browserstack dependency in pom.xml
Add serenity-browserstack as Maven dependency in your pom.xml file and save the file.
This dependency adds the Serenity BrowserStack plugin to your project.
Set up serenity.conf file
Since project uses the Serenity BrowserStack plugin, set the remote URL and add your BrowserStack credentials in the serenity.conf file of your project.
Update your BrowserStack config file
Once you have installed the SDK, a browserstack.yml config file will be created at the root level of your project. This file contains all the required capabilities to run tests on BrowserStack.
Set platforms to test on
Set the browsers/devices you want to test under the platforms object. Our config follows W3C-formatted capabilities.
Do you want to dynamically configure platforms?
To dynamically configure platforms across different tests, you can comment out the platforms capability while still passing platform-specific capabilities.
Configure AI Agents
You can enable the following AI agents by adding the respective configurations in your browserstack.yml file:
Enable BrowserStack Local
Test localhost/internal servers in your network
BrowserStack’s Local Testing feature connects with test suites pointing to your localhost URL
BrowserStack Local supports all advanced use cases and restricted networks. Contact our support team for assistance in configuring BrowserStack Local for your enterprise.
Use additional debugging features
By default, BrowserStack provides prettified session logs, screenshots on every failed selenium command, and a video of the entire test. Additionally, you can enable the following features:
Update browserstack.yml file with selected capabilities
Copy the following code snippet and replace contents of browserstack.yml file in the root folder of your test suite.
Use our Capability Generator to select from a comprehensive set of options you can use to customize your tests.
Run your test suite
You can continue running your tests as you have been previously
To find out the location of the BrowserStack SDK log files, refer to BrowserStack SDK Log Files. If you are looking for more information, see FAQ documentation.
After you run your test, visit the Automate dashboard to view your test results.
Facing issues with your project? Try running a sample build here.
Advanced features and use cases
Here’s a list of features and capabilities you may find useful.
Accept insecure certificates
The acceptInsecureCerts capability suppresses browser popups warning about self-signed certificates usually found in staging environments.
| Capability | Expected values |
|---|---|
acceptInsecureCerts |
A boolean. Default is False.True if you want to accept all SSL certificates. |
Change desktop resolution
The resolution capability changes the default desktop screen resolution for your tests on BrowserStack.
| Capability | Description | Expected values |
|---|---|---|
resolution |
Set the resolution of your VM before beginning your test | A string. Default resolution is 1024x768 Supported resolutions: Windows (XP, 7): 800x600, 1024x768, 1280x800, 1280x1024, 1366x768, 1440x900, 1680x1050, 1600x1200, 1920x1200, 1920x1080, and 2048x1536 Windows (8, 8.1, 10): 1024x768, 1280x800, 1280x1024, 1366x768, 1440x900, 1680x1050, 1600x1200, 1920x1200, 1920x1080, and 2048x1536 OS X (Golden Gate, Tahoe, Sequoia, Sonoma, Ventura, Monterey, Big Sur, Catalina, Mojave, and High Sierra): 1024x768, 1280x960, 1280x1024, 1600x1200, 1920x1080, 2560x1440, 2560x1600, and 3840x2160 OS X (All other versions): 1024x768, 1280x960, 1280x1024, 1600x1200, and 1920x1080
|
Simulate IP geolocation
The geoLocation capability lets you test your websites across different countries.
Note that this capability is supported on the Enterprise plan only. You can contact sales to get an Enterprise plan for your account.
| Capability | Description | Expected values |
|---|---|---|
geoLocation |
Set the country code you want your test to detect | A string. An ISO 2 country code FR for France, CN for China Check out the complete list of 45+ countries we support. |
Simulate network conditions
The networkProfile capability lets you test your websites under different network conditions.
| Capability | Description | Expected values |
|---|---|---|
networkProfile |
Set the network profile to start the test with | A string. 2g-gprs-good, 4g-lte-advanced-lossy Check out the complete list of all pre-defined network profiles. |
Others
Following are a few additional links to documentation pages that might help with your test scenarios:
Next steps
Once you have successfully integrated your test suite with BrowserStack, you might want to check the following:
- Generate a list of capabilities that you want to use in tests
- Find information about your Projects, Builds and Sessions using our REST APIs
- Set up your CI/CD: Jenkins, Bamboo, TeamCity, Azure, CircleCI, BitBucket, TravisCI, GitHub Actions
We're sorry to hear that. Please share your feedback so we can do better
Contact our Support team for immediate help while we work on improving our docs.
We're continuously improving our docs. We'd love to know what you liked
We're sorry to hear that. Please share your feedback so we can do better
Contact our Support team for immediate help while we work on improving our docs.
We're continuously improving our docs. We'd love to know what you liked
Thank you for your valuable feedback!